


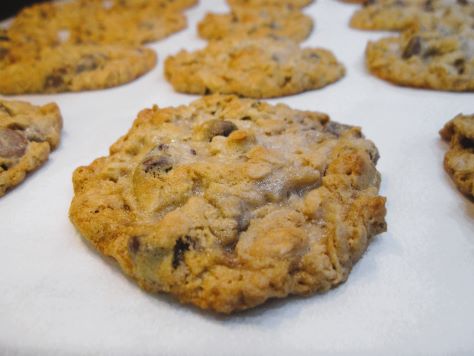
Bready or Not: Crunchy Biscuits
These are Crunchy Biscuits in the British sense–that is, they are crunchy cookies with a satisfying snap.
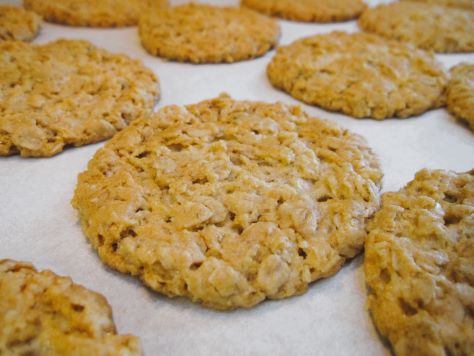
I found the recipe in Bigger Bolder Baking by Gemma Stafford [affiliate link], a book gifted to me by my mother-in-law. Gemma is Irish-born and now lives in America, and her fantastic cookbook has ingredients and cooking temperatures in both British and American measurements.
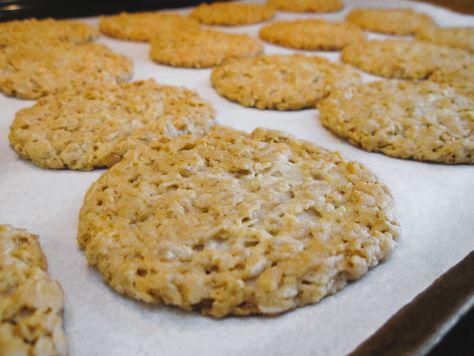
This small-batch recipe includes a quintessentially British ingredient, golden syrup, that has no real American parallel. I’ve seen some recommendations to substitute with half measures of light corn syrup and honey, and while that works as a liquid replacement, the flavor isn’t quite the same.

That said, golden syrup isn’t hard to find in America, it just tends to be expensive. Even in the wastelands of Phoenix, I could find Lyle’s Golden Syrup in the small British goods section of my local Fry’s (Kroger) chain.
Bready or Not: Crunchy Biscuits
Equipment
- parchment paper
- baking sheet
- tablespoon scoop
- cooling rack
Ingredients
- 1 cup unsalted butter (2 sticks) softened
- 3/4 cup white sugar
- 3 Tablespoons golden syrup
- 1 cup self-rising flour
- 2 2/3 cup rolled oats also called old fashioned oats
- 1 teaspoon baking soda
- 1/4 teaspoon salt
Instructions
- Preheat oven to 350-degrees. Line a baking sheet with parchment paper.
- In a large bowl, cream together butter and sugar until it is soft and light in color. Add golden syrup. Follow up with the flour, oats, baking soda, and salt, mixing until just combined.
- Use a tablespoon scoop to shape dough, rolling each lump briefly with hands to compress and flatten, then place spaced out two-inches apart on baking sheet. They will spread as they bake.
- Bake 12 to 14 minutes, until golden brown and set. Let them idle on the cookie sheet about 5 to 10 minutes, then transfer them to a cooling rack. Store them in an airtight container at room temperature.
OM NOM NOM!
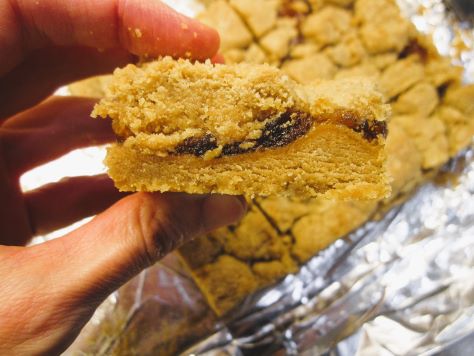
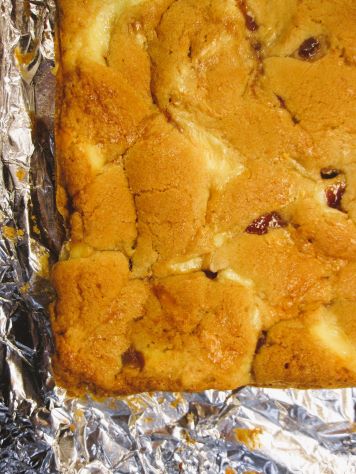
Bready or Not Original: Cookie Butter and Jelly Bars (Big Pan)
This big casserole dish of Cookie Butter and Jelly Bars is chewy and sweet, perfect to feed a crowd! Customize it by using your favorite jelly.
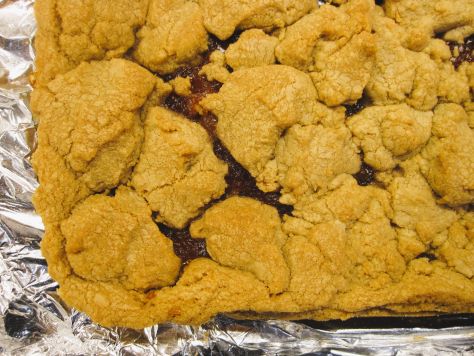
I love cookie butter. You can find it in jars near the nut butters in a lot of grocery stores. There’s nothing healthy about it–it’s spice cookies pulverized with oil to make a smearable paste that you can use however you use peanut butter, such as on sandwiches or in baked goods like this.
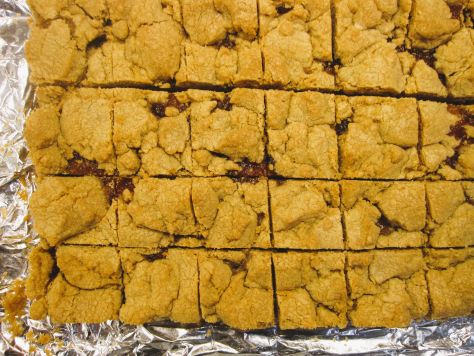
Cookie butter makes everything taste inherently more cookie-like. It’s fantastic with jelly! I recommend using about 10-12 ounces of jelly here; less than that and the layer is thin, more than that, it can gush at the sides of the pan and stick to the foil.
These bars are best eaten within two days. After that, they will dry out a bit but they are still tasty.
Bready or Not Original: Cookie Butter and Jelly Bars (Big Pan)
Equipment
- 13×9 pan
- aluminum foil
- nonstick spray
- offset spatula
Ingredients
- 1 cup unsalted butter (2 sticks) room temperature
- 1 1/2 cups white sugar
- 1 teaspoon vanilla extract
- 2 large eggs room temperature
- 2 cups creamy cookie butter such as Biscoff and Trader Joe's Speculoos
- 3 cups all-purpose flour
- 1 teaspoon baking powder
- 10-12 ounces jelly or jam or preserves
Instructions
- Preheat oven at 350-degrees. Line a 13×9 pan with foil and apply nonstick spray.
- In a large mixing bowl, beat together butter and sugar until light and fluffy. Add the eggs, vanilla, and cookie butter. Follow up with the flour and baking powder.
- Spread about 2/3 of the dough in the prepared pan. Using an offset spatula, spread the jam in an even layer up to about 1/2 inch of the edge. Dollop the remaining dough all over the top. Use a knife to gently form into swirls with the jelly.
- Bake for 25 to 30 minutes until the edges start to brown and the middle is set and passes the toothpick test. Let cool completely on wire rack. Use foil to lift contents onto a cutting board to slice into bars. Store in a sealed container at room temperature.
OM NOM NOM!
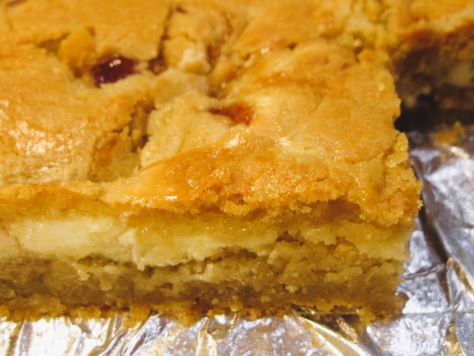
Bready or Not Original: Fruity-Cheesy Swirled Blondies
These Fruity-Cheesy Swirled Blondies are easy to customize based on your budget and ingredient availability. Go expensive and fancy and use a goat cheese log, or more budget-conscious and still-delicious with standard cream cheese.
I’ve done it both ways. Both are fantastic. For the goat cheese, I recommending hitting someplace like Costco or Sam’s Club. For cream cheese, my go-to has become Aldi.
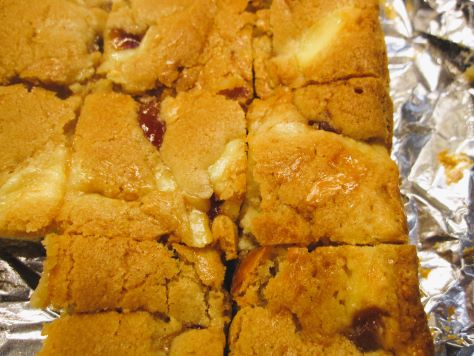
Use any variety of jams or preserves, but the one necessity is that it is THICK. A watery one will sink to the bottom (says the voice of experience). I found the good basic Smucker’s Strawberry Jam was fine in this recipe.
Bready or Not Original: Fruity-Cheesy Swirled Blondies
Equipment
- 9×9 pan
- aluminum foil
- nonstick spray
- uneven spatula
Ingredients
Blondies
- 12 Tablespoons unsalted butter (1 1/2 sticks) room temperature
- 1/2 cup white sugar
- 3/4 cup light brown sugar packed
- 2 large eggs room temperature
- 1/2 teaspoon vanilla extract
- 1 3/4 cups all-purpose flour
- 1 1/4 teaspoons baking powder
- 1/2 teaspoon salt
Cheesecake Swirl
- 8 ounces soft goat cheese or cream cheese, softened
- 2 Tablespoons white sugar
- 1 Tablespoon plain or vanilla Greek yogurt or sour cream
- 1 large egg room temperature
- 1/2 teaspoon vanilla extract
- 3/4 cup jam or preserves
Instructions
- Preheat oven at 325-degrees. Line a 9-inch square pan with foil and apply nonstick spray.
- In a large bowl, cream together the butter and sugars until fluffy. Add the eggs and vanilla. Stir in the flour, baking powder, and salt until just combined.
- In a separate bowl, beat together the cheese, sugar, yogurt, egg, and vanilla to make smooth.
- Pour about half the blondie batter into the prepared pan. Smooth it out with an uneven spatula.
- Dollop on all of the cheese mixture. Then add spoonfuls of the jam to fill any gaps. Follow up by adding dollops of the remaining blondie batter. Use a butter knife to swirl the layers together for a marbled effect.
- Bake for 45 to 50 minutes, until the middle is not jiggly and passes the toothpick test. Cool for at least an hour at room temperature, then chill in fridge. Once the pan is cool, use the foil to lift the blondies onto a cutting board to slice into bars.
- Enjoy promptly or store in a sealed container in the fridge to eat over the coming days.
OM NOM NOM!
Bready or Not Original: Oatmeal Coconut Cookies
These Oatmeal Coconut Cookies are super-chewy thanks to that combo. Plus, they aren’t super-sweet, which lets the chocolate shine through.
I love how old-fashioned these cookies look, like something I’d eat when I was a kid, with my grandma on a visit to friend’s house. There’s a certain level of heartiness and coziness to these cookies.
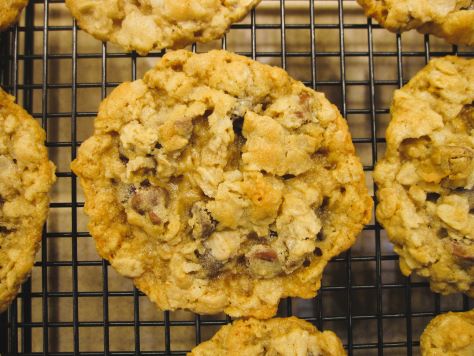
These cookies are quick to assemble, too. After posting some intricate recipes this month (I’m looking at you, Apple Cream Cheese Brioche Tart) it’s nice to share things are simple and good.

Bready or Not Original: Oatmeal Coconut Cookies
Equipment
- parchment
- tablespoon or tablespoon scoop
- baking sheet
Ingredients
- 1/2 cup unsalted butter (1 stick) room temperature
- 1/4 cup brown sugar packed
- 1/4 cup white sugar
- 1 large egg room temperature
- 1 Tablespoon milk or half & half
- 1 teaspoon vanilla extract
- 3/4 cup all-purpose flour
- 1/2 teaspoon baking soda
- 1/4 teaspoon salt
- 1 1/2 cups rolled oats also called old-fashioned oats
- 1 cup chocolate chips semisweet, milk, dark, or a mix
- 1 cup shredded coconut
Instructions
- Preheat oven at 350-degrees. Line a baking sheet with parchment paper.
- In a large bowl, cream together the butter and both sugars to create a creamy mix. Add the egg, milk, and vanilla. In a separate bowl, stir together the flour, baking soda, and salt; mix this into the butter bowl. Fold in the oats, chocolate chips. and coconut until everything is distributed.
- Use a tablespoon to place scoops of dough spaced-out on the baking sheet; the cookies will spread.
- Bake until the cookies are golden and set, about 11 to 13 minutes. Let them sit on pan for about 5 minutes before moving to a rack to fully cool. Store in a sealed container at room temperature.
OM NOM NOM!
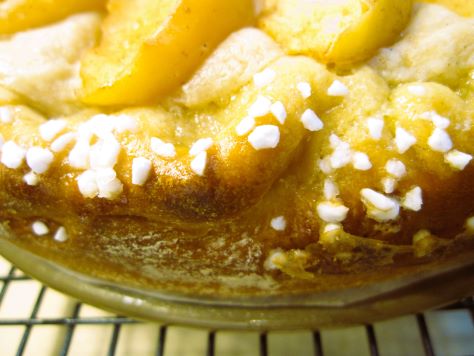
Bready or Not: Apple Cream Cheese Brioche Tart
This Apple Cream Cheese Brioche Tart isn’t a beginner’s recipe, I’ll say that straight up. There are gobs of steps, multiple rise times, lots of dirty dishes. But the result? Wow.

This is really a show-stopper kind of bread for a dessert, breakfast, or brunch. You have an enriched bread with a creamy, rich filling topped with spiced apples.
We had to test the best ways to eat the leftovers, too. The tart is fantastic fresh. Because of the creamed cheese, it needs to be stored in the fridge–but it’s thick and cloggy if eaten cold.
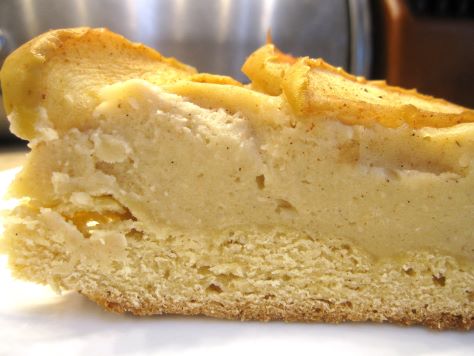
However, heating it in the toaster oven doesn’t work–the cream cheese will melt off! Like Goldilocks, we eventually found the “just right.” It was a quick zap in the microwave, maybe 15-20 seconds depending on your machine. Enough to take the chill off without making it hot.
The things we bakers must do for science and the good of the people…
Bready or Not: Apple Cream Cheese Brioche Tart
Equipment
- rimmed baking sheet
- 9-inch springform pan
- parchment paper
- stand mixer with paddle and dough hook
- nonstick spray with flour
- pastry brush
- uneven spatula
- instant read thermometer
Ingredients
Apples
- 2 cups apples peeled then sliced to 1/4-inch, about 1 1/2 medium apples (Honeycrisp recommended)
- 1 Tablespoon white sugar
- 1/2 teaspoon lemon juice
- 1/4 teaspoon apple pie spice
Dough
- 2 cups all-purpose flour divided
- 1 1/2 Tablespoons white sugar
- 1 1/2 Tablespoons light brown sugar packed
- 1 0.25oz package Platinum Yeast
- 1 1/2 teaspoons kosher salt
- 1/4 cup milk or half & half, warmed to 120-F to 130-F
- 2 large eggs room temperature
- 3/4 teaspoon pure vanilla extract
- 1/4 cup unsalted butter softened
Filling
- 2 Tablespoons unsalted butter softened
- 3 Tablespoons white sugar
- 2 Tablespoons light brown sugar firmly packed
- 1 teaspoon pure vanilla extract
- 1/4 teaspoon kosher salt
- 1/4 teaspoon apple pie spice
- 8 ounces cream cheese room temperature
- 1 large egg room temperature
- 3 Tablespoons all-purpose flour
Topping
- 1 large egg for egg wash
- 1 Tablespoon water for egg wash
- Swedish pearl sugar for sprinkling
Instructions
- Preheat oven to 400-degrees. Line a rimmed baking sheet with parchment paper.
- Prepare the sliced apples by using a large bowl to stir them with sugar, lemon juice, and pie spice. Let the mixture stand for 15 minutes, stirring occasionally. Spread apple mixture in an even layer on prepared pan.
- Bake the apples until they are fork-tender and have released significant moisture, 12 to 16 minutes. Rotate the pan and stir halfway through. The apples should reduce in size slightly but retain their shape. Let the apples cool while continuing with other stages. Also, turn off the oven, as it won’t be needed for a while.
- Begin the dough. In the bowl of a stand mixer fitted with the paddle attachment, beat 1/2 cup flour, white sugar, brown sugar, yeast, and salt at medium-low speed. Add the warm milk, eggs, and vanilla, beating everything on medium about 2 minutes until it’s combined. Scrape the bottom and sides of bowl a few times. Gradually add the remaining 1 1/2 cups flour.
- Switch to the dough hook attachment. Beat at low speed until dough is smooth and elastic. It should start to pull away from sides of bowl. This will be around 6 to 9 minutes.
- Add the softened butter, 1 tablespoon at a time, beating well after each addition. This will take 6 to 8 minutes total. Scrape the sides of bowl and dough hook as needed. If the dough looks slightly broken during this stage, that's okay–keeping beating it and it'll come back together.
- Increase mixer speed to medium-low and beat until a smooth, elastic dough forms, about 6 minutes.
- Turn out dough onto a clean surface and knead 4 to 5 times. Shape into a smooth round. Place dough in a large ungreased bowl. (At this stage, the dough could be covered and placed in the fridge for a few hours or overnight.) Cover it and place it in a warm spot until it doubles in size, about 45 minutes to 1 hour.
- Cut a piece of parchment to fit in the base of a springform pan. Apply nonstick spray with flour in pan. Add cut paper. Spray again to coat paper and sides.
- Punch down dough, then cover it and let it rest for about 10 minutes. On a lightly floured surface, roll dough into an 11-inch circle. Use the bottom of the springform pan to poke a 9-inch circle in the middle of the dough. Fold and press outside edges inward to create a crimped edge. Lift the dough to place it in the prepared pan. Press dough to make sure it fills the bottom. Crimp and secure the edges again if needed. Cover and let rise again in a warm place for 25 minutes. Dough should be puffed and hold an indentation when it’s poked.
- Preheat oven to 325-degrees.
- Now make the filling. In the clean bowl of the stand mixer, using the paddle attachment, beat the butter, white sugar, brown sugar, vanilla, salt, and pie spice at medium speed. Gradually add the cream cheese, beating until smooth. Add egg, beating until combined, then add the flour. Scrape the bowl to make sure everything is mixed.
- Use your fingertips to dimple center of dough back down, leaving outside crust higher and puffed. Crimp and secure edges if necessary, and press out any air bubbles if you see them.
- Spoon and spread cream cheese mixture in an even layer in center of dough. Arrange the sliced apples slightly overlapping in two concentric circles. (You may have leftover slices. Eat’em on their own!)
- In a small bowl, whisk together egg and water. Brush outer edge of dough with egg wash. Sprinkle pearl sugar along the crust.
- Bake for 20 minutes. Rotate pan. If the crust is browning, cover it with foil. Bake for another 25 to 28 minutes. When the tart is done, the crust will be golden brown. The filling should be set around outside edges and slightly jiggly in center. An instant-read thermometer inserted in center should register at least 175-degrees.
- Let cool in pan for 10 minutes. Using a small offset spatula, loosen edges of bread. Remove sides of springform pan. Let cool completely on pan base on a wire rack.
- The tart can be enjoyed fresh after it cools. Leftovers should be stored in the fridge, but will be cloggy if eaten chilled. It’s best warmed with a short zap in the microwave, about 15-20 seconds; if it’s made too hot, the cream cheese melts! Leftovers can also be individually wrapped and frozen for later. Thaw in fridge.
OM NOM NOM!
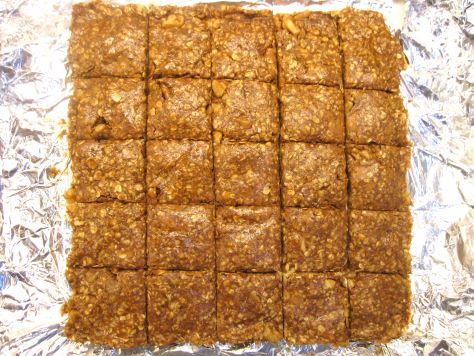
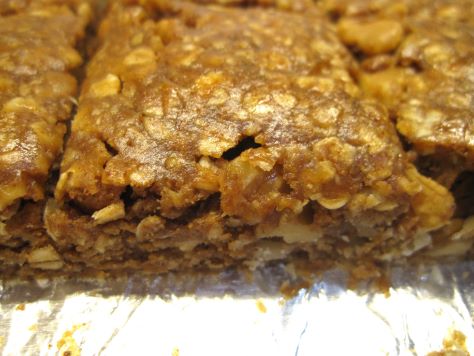
Bready or Not Original: No-Bake Almond Granola Bars
These No-Bake Almond Granola Bars are fast to make and contain wholesome, basic ingredients. Plus, they are delicious.
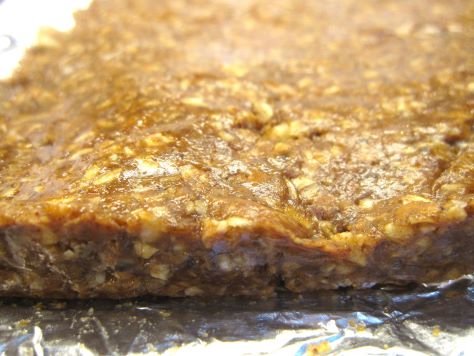
I made this recipe several times to find the right balance of ingredients. Too many almonds and oats, and nothing sticks together. You think it’s solid until you try to cut the chilled bars. (I speak from experience.)
I find it fun to make little swaps with the ingredients, too. Use cashew butter or another kind of nut butter! Try different varieties of honey. You could even use pumpkin spice mix or other spices to give it a different vibe.
The end result will keep for a week or two in the fridge, and even longer in the freezer!
Bready or Not Original: No-Bake Almond Granola Bars
Equipment
- 9×9 pan
- aluminum foil
- nonstick spray
- food processor
- waxed paper
- heavy glass
Ingredients
- 1 cups almonds or buy pre-chopped almonds
- 2 cups quick-cooking oats
- 2 teaspoons ground cinnamon
- 1/2 teaspoon fine sea salt reduce if using regular table salt or salted nut butter
- 1 1/2 cups creamy almond butter
- 1/2 cup maple syrup or honey
- 2 teaspoons vanilla extract
Instructions
- Line a 9×9 square pan with foil and apply nonstick spray.
- If the almonds are whole, give them a rough chop in food processor, just a few pulses.
- In a large mixing bowl, combine the oats, cinnamon, and salt, and stir to blend. If the almond butter is stiff, measure it into a separate microwave-safe bowl and heat it for 20-30 seconds to soften it. Add almond butter, maple syrup or honey, and vanilla extract to the big bowl with the dry ingredients. Stir together until it forms a cohesive mass. If it seems too liquid, add more oats; if it’s too dry, add more almond butter. Stir in the chopped almonds to distribute them throughout.
- Dump the mixture into the prepared pan. Even out some, then use a pan-size piece of wax paper and a heavy glass to compress the dough evenly.
- Stash the pan in the fridge for at least an hour, or until the next day. Slice into bars of desired size. Store between stacked waxed paper layers in the fridge, or freeze for later enjoyment.
OM NOM NOM!
Follow me


