


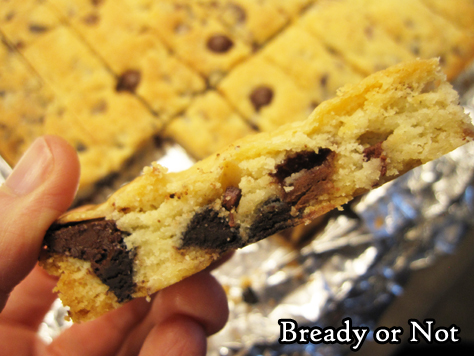
Bready or Not Original: Chocolate Chip Shortbread with Cocoa Nibs
A classic shortbread gets deeper coffee flavors in this new take featuring cocoa nibs.
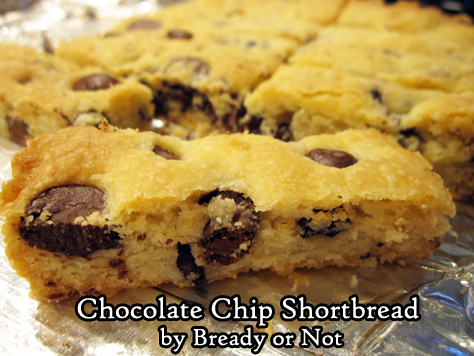
Cocoa nibs are strong stuff. You don’t need a lot to add some oomph. Here, two tablespoons is enough to do the trick.
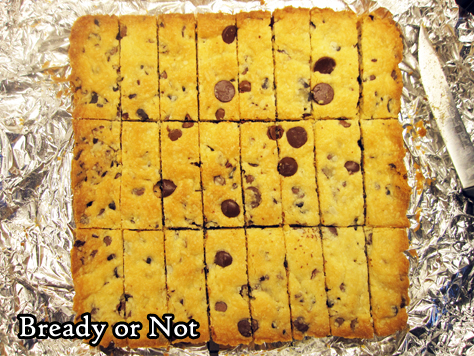
Use whatever chocolate chips you have around for this recipe. Going dark will be a closer match for the nibs. Therefore, I prefer semisweet or milk chocolate, or a combination thereof.
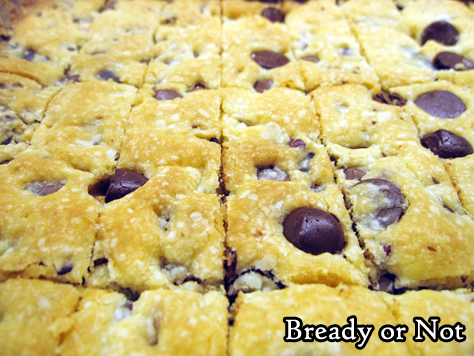
The resulting shortbread is firm enough to hold up when it is cut into finger-sized pieces, but it is wonderfully soft and chewy to eat.
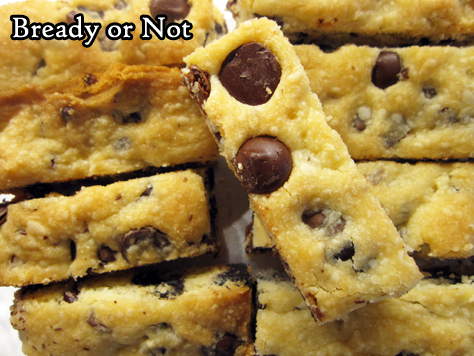
Eat this for a snack or dessert, or do the proper UK thing and serve it with some hot tea!
Bready or Not Original: Chocolate Chip Shortbread with Cocoa Nibs
Equipment
- 9×9 pan
Ingredients
- 1 cup unsalted butter 2 sticks, room temperature
- 1 teaspoon vanilla extract
- 1/4 teaspoon salt
- 3/4 cup confectioners’ sugar
- 2 cups all-purpose flour
- 3/4 cup chocolate chips
- 2 Tablespoons cocoa nibs
Instructions
- Preheat oven at 350-degrees. Line a 9×9 pan with foil and apply nonstick spray.
- In a big bowl, beat butter, vanilla, and salt until it is smooth and creamy. Slowly beat in the confectioners’ sugar followed by the flour. Fold in the chocolate chips and cocoa nibs.
- Dump dough into the prepared pan. Lightly flour hands and pat dough flat and smooth. Score through the dough with a floured knife to make rectangular wedges, then prick surface all over with a floured fork.
- Bake for 30 to 33 minutes, until shortbread is set and the edges are browned. Let set in pan for 20 minutes, then use the foil to lift contents onto a rack to completely cool. Move them to a cutting board and slice into pieces along original score marks.
- Store in a sealed container at room temperature.
OM NOM NOM!
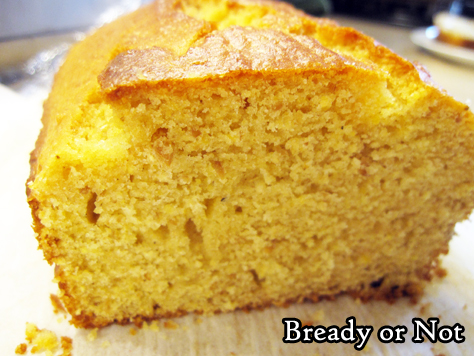
Bready or Not Original: Honey Cornbread Loaf
Cornbread is good ol’ basic American comfort food, perfect to warm up bellies at this time of year.
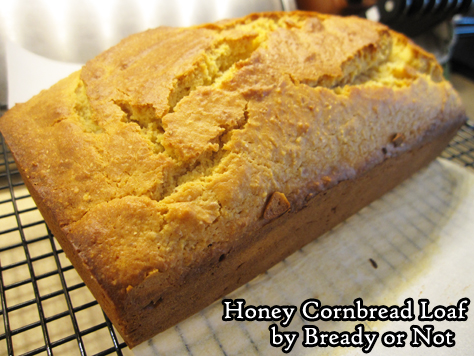
Sometimes, though, you don’t want a huge batch of cornbread. Just enough for a meal or two, maybe. That’s where this recipe comes in.
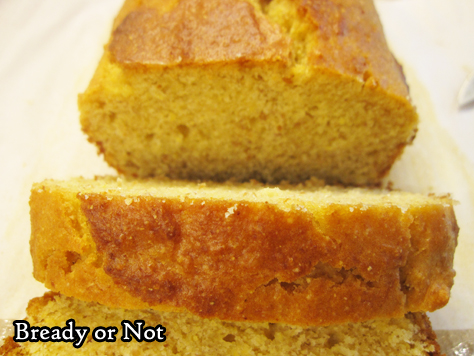
It makes a 9×5 loaf pan of delicious cornbread. Leftovers keep well wrapped up at room temperature, and the bread can also be frozen to eat later.
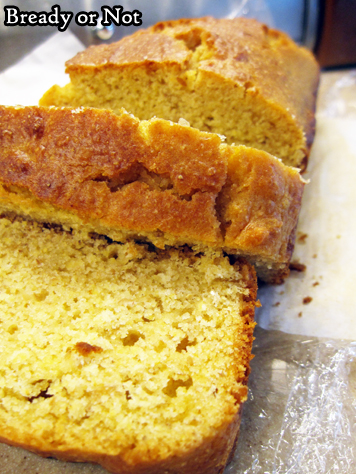
This cornbread is soft with a strong cornbread flavor highlighted with a touch of sweetness. Heat it up, add some butter, and you’re set.
Eat it by itself for a warming snack. Make it to go along with chili or soup or a roast. However you eat it, it’ll be yummy.
Bready or Not Original: Honey Cornbread Loaf
Equipment
- 9x5x3 loaf pan
Ingredients
- 1 1/2 cups cornmeal
- 1/4 cup all-purpose flour
- 1/4 cup golden flax meal
- 1 1/2 teaspoons baking powder
- 1/2 teaspoon salt
- 1/2 cup vegetable oil
- 1/2 cup sour cream or substitute plain yogurt or crème fraiche
- 1/4 cup honey
- 2 large eggs room temperature
Instructions
- Preheat oven at 350-degrees. Line a 9×5-3 loaf pan with a parchment paper sling along the long side, with enough paper sticking up on each side to grip it.
- In a medium bowl, stir together cornmeal, flour, flaxseed meal, baking powder, and salt.
- In a big bowl, beat together oil, sour cream, honey, and eggs. Add in the dry ingredients until just mixed. Pour batter into the pan.
- Bake for 30 to 35 minutes, until the middle passes the toothpick test. Let cool at least 10 minutes before using paper sling to set cornbread on cutting board.
- Cornbread keeps well for days well-wrapped at room temperature. It can also be frozen for later enjoyment.
OM NOM NOM!
Bready or Not Original: Cocoa Nib Brownies
Cocoa nibs add chocolate flavor and a crunch to baked goods, and they are fantastic atop these Cocoa Nib Brownies!

Cocoa nibs are strongly flavored like dark chocolate. You don’t need a lot of them to add a boost to these brownies.
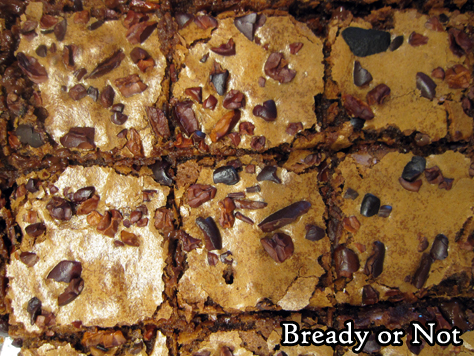
The original version of this recipe involved melting the chocolate and butter on the stovetop. Ain’t nobody got time for that. I ended up reworking the entire recipe.
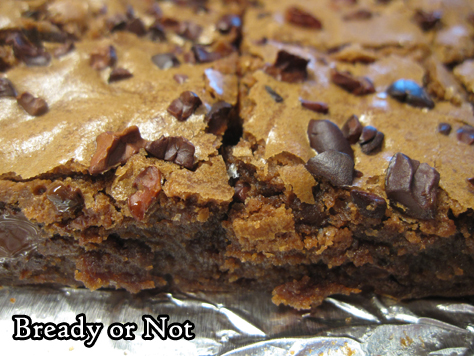
I’m all about using the microwave whenever I can. Fast to heat up, convenient to stick the bowl in the dishwasher afterward!

Of course, you can go back to the stove top method if you want. Either way, you get a delicious, chewy brownie packed with chocolate flavor plus a crunch.
Bready or Not Original: Cocoa Nib Brownies
Equipment
- 9×13 dish
- big microwave-safe bowl
- uneven spatula
Ingredients
- 1 cup unsalted butter 2 sticks
- 10 ounces bittersweet chocolate chips
- 1 3/4 cups white sugar
- 4 large eggs room temperature
- 1 1/2 teaspoons vanilla extract
- 1 1/4 cups all-purpose flour
- 1/4 teaspoon kosher salt
- 1/4 cup cocoa nibs plus 1 Tb
Instructions
- Preheat oven at 350-degrees. Line a 9×13 pan with foil and apply nonstick spray or butter.
- In a big microwave-safe bowl, in short bursts melt together the butter and 1 1/4 cups of the bittersweet chocolate chips, stirring well between each pass, until everything is melted together and smooth.
- Whisk sugar into the chocolate. It’s okay if it still looks somewhat grainy. Beat in the eggs and vanilla, following up with the flour and salt. Once no streaks of white remain, fold in the last 3/4 cups of chocolate chips.
- Pour batter into the pan and use an uneven spatula to spread it to corners. Sprinkle the cocoa nibs evenly all over the stop.
- Bake for 25 to 28 minutes, until a toothpick stuck in the center comes out clean. Set out to cool completely. Use the foil to lift the contents onto a cutting board, and slice into pieces. Store in a sealed container at room temperature for up to 3 days.
OM NOM NOM!
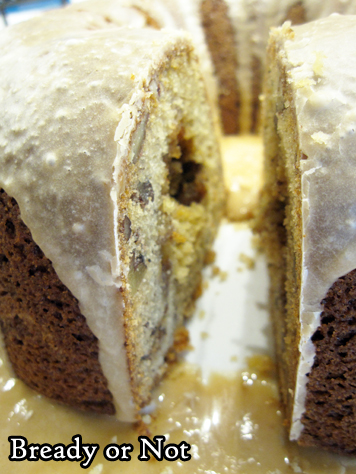
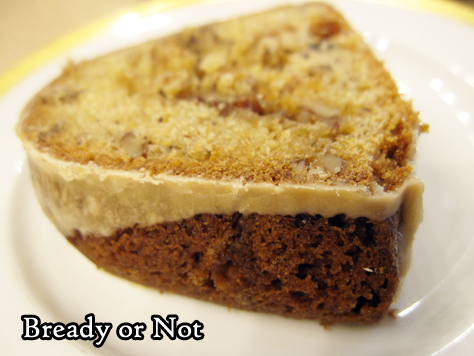
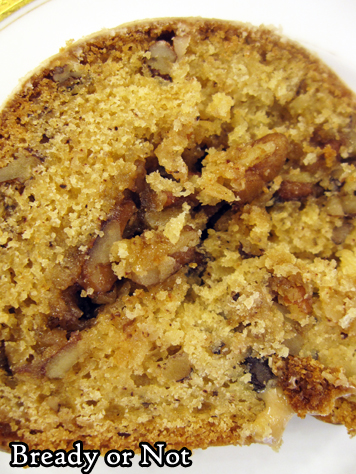
Bready or Not Original: Browned Butter Coffee Bundt Cake
This Browed Butter Coffee Bundt Cake is moist, delicious, and packed with a flavors that will get your day off to a good start.
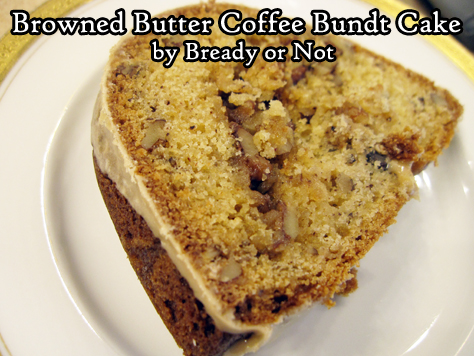
And by a good start, of course, that includes CAFFEINE. Espresso powder is included in the icing!
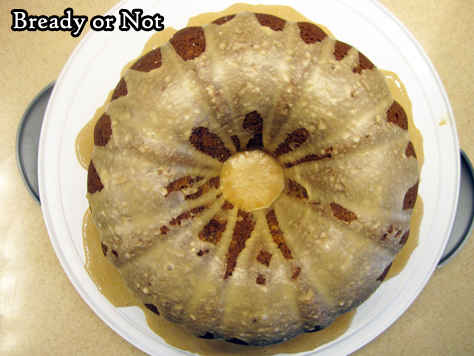
What I love about this cake is that it has all the luscious flavors of a coffee cake without the crumbly mess of the topping. In this cake, that crunchy, extra-sugary layer is in the center!
This is a great cake for a breakfast or brunch, and it’s a fantastic one to cut into individual slices, wrap up, and freeze for later.
If 2021 is anything like 2020, it’s a very good idea to have a stash of quick-thaw cake in the freezer.
Modified from Fall Baking Magazine 2013.
Bready or Not Original: Browned Butter Coffee Bundt Cake
Equipment
- large bundt cake pan
Ingredients
Bundt cake
- 3/4 cup unsalted butter 1 1/2 sticks
- nonstick spray with flour
- 2 cups pecan pieces finely chopped, divided
- 2 cups brown sugar packed, divided
- 2 teaspoons all-purpose flour
- 3 cups all-purpose flour
- 1 1/2 teaspoons baking powder
- 1 1/2 teaspoons baking soda
- 3/4 teaspoon salt
- 3 large eggs room temperature
- 1 teaspoon vanilla extract
- 1 1/2 cups vanilla yogurt or plain yogurt, crème fraiche, or sour cream
Coffee icing
- 4 teaspoons milk or half & half, or more as needed
- 1/2 teaspoon espresso powder
- 2 cups confectioners’ sugar or more as needed
Instructions
- First of all, brown the butter. (Note that this can be done a day ahead of time with the butter stashed in the fridge; set at room temperature to soften again or briefly and carefully, zap in microwave before mixing into recipe.) In a medium saucepan, melt the butter on medium-low heat for 5 to 6 minutes, until it becomes brown and embodied by a nutty fragrance. Remove from heat and cool for a while, then transfer to a small bowl. Cover and chill in the fridge for 2 hours, at minimum, to make firm.
- Preheat oven at 325-degrees. Apply nonstick spray with flour to coat inside of a large bundt pan. Soften the browned butter a bit.
- Prepare the filling. In a small bowl, mix together 3/4 cups of chopped pecans, 1/2 cup brown sugar, and 2 teaspoons of flour. Add 3 Tablespoons of the browned butter and work it in with a fork until it makes a crumbly mix.
- In another bowl, mix together the 3 cups flour, baking powder, baking soda, and salt. Set aside.
- In a big mixing bowl, beat together the remaining browned butter with the rest of the brown sugar. Add the eggs, one at a time, followed by the vanilla. Take turns mixing in the dry ingredients and the yogurt until just combined. Fold in the remaining 1 1/4 cups pecans.
- Pour about half the batter into the prepared pan and even it out. Sprinkle filling over it all the way around. Pour in the rest of the batter and spread it even again.
- Bake for 50 to 60 minutes, until it passes the toothpick test in the middle. Let cool for about 20 minutes, then invert it onto a rack to completely cool.
- Make the coffee icing. Stir together the milk, espresso powder, and confectioners’ sugar, adding more milk or sugar as needed to make an icing of a good consistency. Drizzle over cake.
- Store at room temperature. Can be sliced and frozen for later enjoyment.
OM NOM NOM!
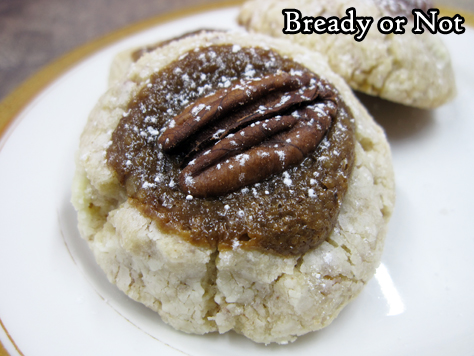
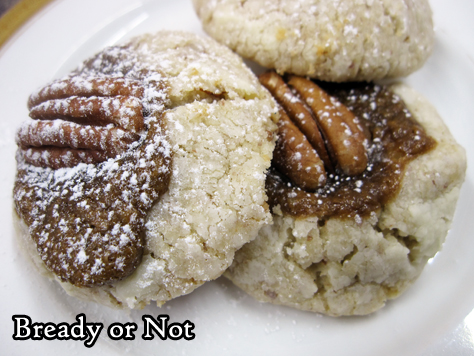
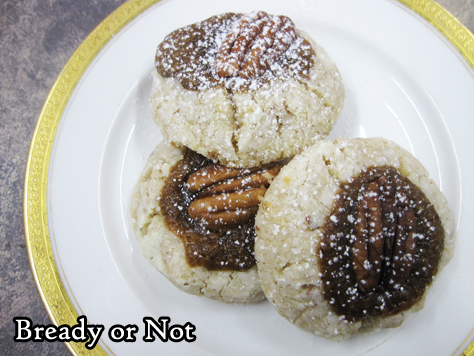
Bready or Not: Double Pecan Thumbprint Cookies
These Double Pecan Thumbprint Cookies take some extra work, but that is evident in their final appearance and flavor.
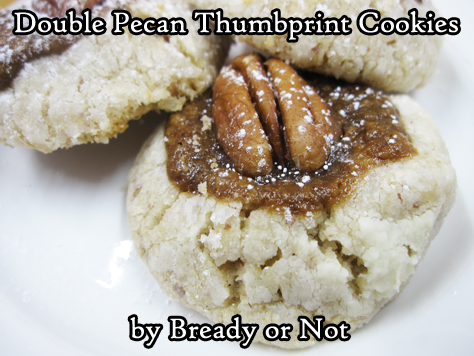
Seriously, these cookies are amazing. The shortbread-like base is filled with frangipane and crowned with a pecan. You get layers of flavor and texture in a single bite.
“What is frangipane?” you may ask. It’s an almond custard found in various fine European baked goods. You’ll find it in past Bready or Not recipes like last week’s Galettes Des Rois.
I wouldn’t rate this recipe as difficult, just outright laborious.

Plan to make these cookies over a day or a few days, and then try to space out the eating of the cookies like that, too. They are sooo dangerously good.
Modified from the original found in Bon Appetit December 2018/January 2019.
Bready or Not: Double Pecan Thumbprint Cookies
Equipment
- food processor
- stand mixer
Ingredients
Frangipane
- 2 cups pecan halves
- 1/3 cup white sugar
- 1 large egg white
- 2 Tablespoons unsalted butter room temperature
- 1 teaspoon espresso powder
- 1/2 teaspoon kosher salt
- 1/4 teaspoon almond extract
Dough and Assembly
- 1 1/4 cups all-purpose flour
- 1 teaspoon kosher salt
- 1/2 teaspoon baking powder
- 3/4 cup unsalted butter (1 1/2 sticks) room temperature
- 1/4 cup white sugar
- 3/4 cup confectioners' sugar divided; plus more for serving, if desired
- 1 large egg yolk
- 1 teaspoon vanilla extract or vanilla paste
Instructions
Make the Frangipane
- (This stage can be done as much as 3 days ahead of time. Cover the finished frangipane and store it in the fridge. There will be leftovers, but it’s great toasted on bread or mixed into other cookie dough recipes.)
- Preheat oven at 350-degrees. Line a small rimmed baking sheet with foil. Spread out the pecans on it to mostly be in a single layer. Lightly toast them for a total of 6 to 8 minutes, with a pause in the middle to stir them. Let the pecans cool. Set aside 1 1/4 cups to go into the cookie dough.
- Pulse the 3/4 cup of pecans and white sugar in a food processor until nuts are very finely ground, which will take less than a minute (don’t let them become paste!). Divide the egg, adding the egg white to the processor; place the yolk in a small bowl, add a sprinkle of sugar to help preserve it, then stash it in the fridge to go into the dough later.
- Into the food processor, add the butter, espresso powder, salt, and almond extract. Pulse until everything is smooth and combined. Scrape the frangipane into a small bowl and chill for anywhere from 30 minutes (minimum) to 3 days.
Cookie Dough
- In the clean food processor, pulse the flour, salt, baking powder, and 1 cup of the reserved pecans until nuts are very finely ground, about 1 minute. (Note that there is still 1/4 cup of pecans reserved for topping the cookies.)
- In the bowl of a stand mixer, beat the butter, white sugar, and 1/4 cup confectioners’ sugar until light and fluffy, about 4 minutes. Add in egg yolk and vanilla. Gradually mix in the dry ingredients until just incorporated, about 1 minute.
- Cover bowl with plastic wrap and chill dough until it is firm enough to be scooped and hold its shape, 30 to 45 minutes.
Make the Cookies
- Set oven racks in upper and lower thirds, and preheat at 350-degrees. Line two large baking sheets with parchment paper.
- Place 1/2 cup confectioners’ sugar in a bowl. Scoop out dough by the tablespoon and roll into balls, then roll in confectioners’ sugar, knocking off any excess. Set balls on baking sheets, spaced a few inches apart.
- Bake cookies for 6 to 8 minutes, until puffed but edges are still soft. Remove sheets from oven. Make an indentation in the center of each cookie with the handle end of a wooden spoon or a similar heatproof object. Spoon a heaping 1/2-teaspoon of frangipane into each well and top with a pecan half from the reserved 1/4 cup.
- Return cookies to oven and continue to bake until edges are set and very lightly browned, 6 to 8 minutes more. Let cool on baking sheets.
- If desired, serve with a dusting of extra confectioners’ sugar on top. Cookies keep well in a sealed, room temperature container for up to 5 days.
OM NOM NOM!
Bready or Not: Galette Des Rois
Eat like royalty without a lot of fuss with this shortcut recipe for Galette Des Rois!
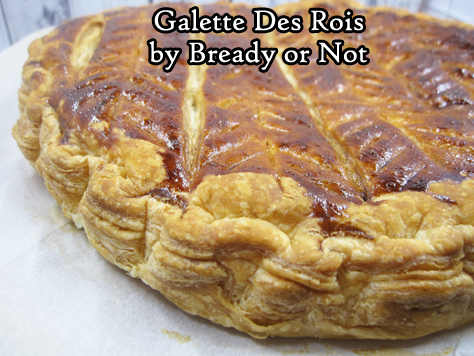
Galette des Rois (King Cake) celebrates Epiphany and is available throughout January in France.
I am so not in France. Nor did I get to go there in June, as planned. Sigh. So, I have to make-do.
However, making-do can still be delicious. Frozen puff pastry is great stuff. You make a frangipane from scratch, but it’s pretty straightforward.
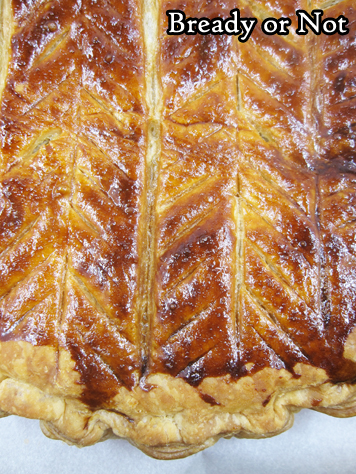
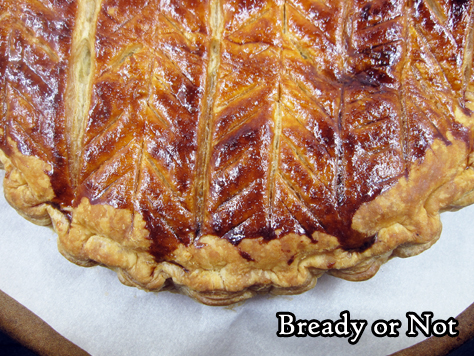
Honestly, the trickiest part for me was figuring out what pattern to etch into the top of the galette–and then hope that I didn’t dig the knife in too deeply.
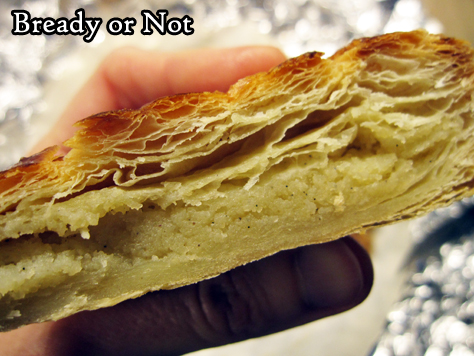
If you do a Google search for Galette des Rois, you’ll see all sorts of different patterns you can do. I’m happy with my choice. And that I didn’t cut too deeply.
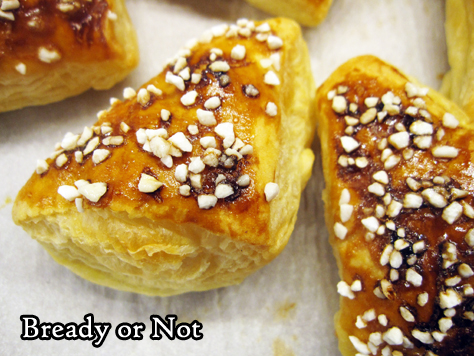
Because I am OCD and can’t bear to waste food, I include a bonus recipe on a great way to bake-up the scraps of puff pastry, too.
The galette and scraps are tastiest the day they are baked, but they are still good for the next few days, too.
Adapted from Dorie Greenspan.
Bready or Not: Galette Des Rois
Equipment
- baking sheet
- parchment paper
- pastry brush
Ingredients
Frangipane filling
- 6 Tablespoons unsalted butter room temperature
- 3/4 cup confectioners’ sugar
- 3/4 cup almond flour sifted
- 1/4 teaspoon salt
- 2 large eggs room temperature
- 1 Tablespoon rum optional but awesome
- 1 teaspoon vanilla extract or vanilla bean paste
Cake
- 1 puff pastry dough box 14-17 ounce package, cold
- 1 whole almond for the traditional charm
Instructions
Prepare the frangipane
- This can be made up to a day ahead, but needs at least an hour to chill before assembling the galette.
- Beat together the butter and sugar until they are creamy and light. Add the almond flour and salt. Add one whole egg. Divide the other egg, adding only the white–reserve the yolk for later. Mix in the rum, if using, and the vanilla extract.
- Transfer to a small bowl. Cover with plastic wrap, pressing it against the top of the mix, then place in fridge to chill.
- Mix the reserved yolk with 1 teaspoon of cold water, and cover it and set it in the fridge as well.
Assembling the galette
- Set out a complete sheet of puff pastry. Cut a 9-1/2 diameter circle out of the middle; if a 9-inch tart pan insert is available, use that as a handy guide. Set aside scraps from edges. Place the cut round on a parchment-lined baking sheet.
- Repeat the process with the second sheet of puff pastry. Place all of the cut-off bits aside in the fridge for now.
- Return to the pastry round on the baking sheet. Spread the frangipane evenly over the dough, but leave a 1-inch border bare. Place the almond somewhere on the filling. Moisten the border with some cold water. Set the second round of pastry on top and press it down around the edges to seal them together.
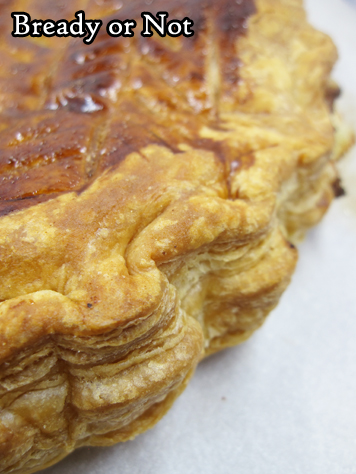
- Use the back of a butter knife to scallop the edges by creating an indentation about a quarter-inch deep, spaced out about a half-inch apart. Refrigerate for about 30 minutes.
- Preheat the oven at 425-degrees.
- Pull out the chilled galette. Brush a thin layer of yolk over the top, but be very careful that it doesn’t drip down over the edge, or the galette won’t rise. Use a paring knife to etch a design on the very top of the galette while taking care not to cut too deeply. Add 6 small slits spaced out to act as steam vents.
- Drop the oven temperature to 400-degrees. Bake the galette for 30 to 40 minutes, until it is puffed and golden brown. Keep an eye on it. If filling starts to ooze out, scrape it away so that it doesn’t drip off the pan. If the galette is browning too fast, cover it with aluminum foil.
- Transfer it to a rack to cool for at least 15 minutes. Expect it to deflate some, as that is the way of puff pastry. Best eaten when fresh, served warm or at room temperature, but can be chilled and eaten over the coming days.
- Bonus: As soon as the galette is out of the oven, put the puff pastry scraps on the parchment. Brush the remaining yolk atop. Then add a topping like pearl sugar, turbinado sugar, or maple sugar. Bake scraps for 15 to 20 minutes, until pieces are puffed and golden. Like the galette, they are best eaten the same day, but are still quite edible after that.
