


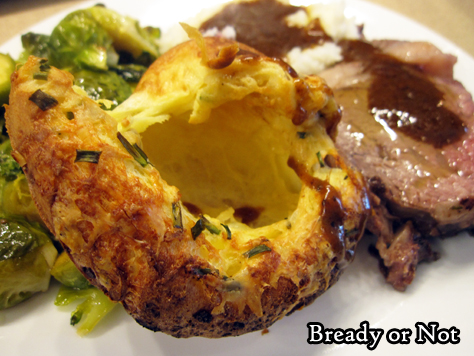
Bready or Not: Cheese and Chives Yorkshire Puddings (Small Batch)
Yorkshire puddings are what many Americans also know of as popovers–light, airy, crisp sponges perfect to eat with a roast and gravy!
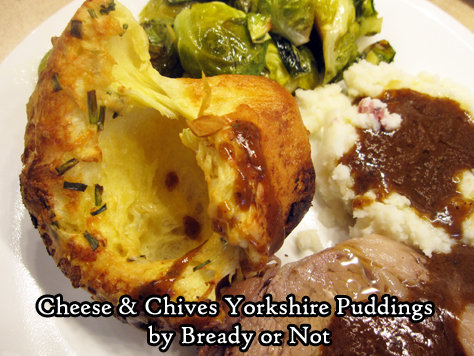
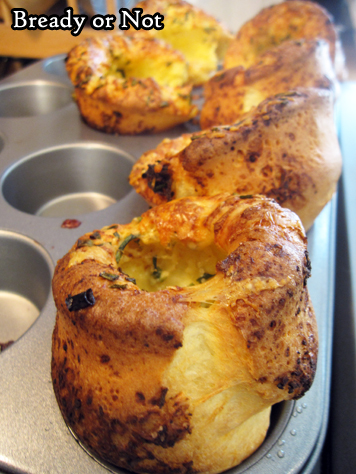
This recipe is for a small batch of puds. Since they are so airy (if they rise right), the six puddings of this recipe are perfect for two or three people.

Cheese makes everything better, of course. I used Dubliner Irish Cheddar, as it is available at my nearest Costcos for a good price.
Use a good quality cheddar here to really take these puddings to the next level.
Modified from Bake from Scratch Magazine.
Bready or Not: Cheese and Chives Yorkshire Puddings (Small Batch)
Equipment
- metal muffin pan
- blender
Ingredients
- 3/4 cup milk or half & half
- 2 large eggs room temperature
- 3 Tablespoons unsalted butter melted, divided
- 3/4 cup all-purpose flour
- 1/2 teaspoon kosher salt
- 1/4 cup quality cheddar cheese (25 grams), freshly grated
- 1 1/2 Tablespoons fresh chives chopped, plus more for garnish
Instructions
- Preheat oven at 425-degrees.
- In the container of a blender, place milk, eggs, 1 tablespoon melted butter, flour, and salt; process just until smooth. Let rest for 10 minutes.
- In a small bowl, toss together grated cheese and chives.
- Place a 12-cup muffin pan in oven for 5 minutes to preheat.
- Remove muffin pan from oven, and quickly spoon the remaining 2 tablespoons melted butter into the 6 muffin cups that are being used. Return pan to oven for 2 minutes.
- Remove pan from oven. Working fast, spoon or pour batter into buttered muffin cups, dividing as evenly as possible. Top each with a spoonful of cheese mixture.
- Bake until puffed and golden brown, 15 to 18 minutes. Garnish with more chives, if desired. Serve immediately. Yorkshires are best fresh as they deflate after baking.
OM NOM NOM!
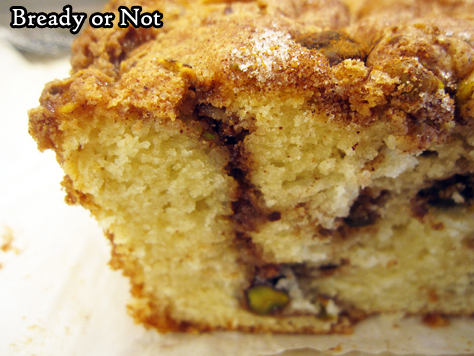
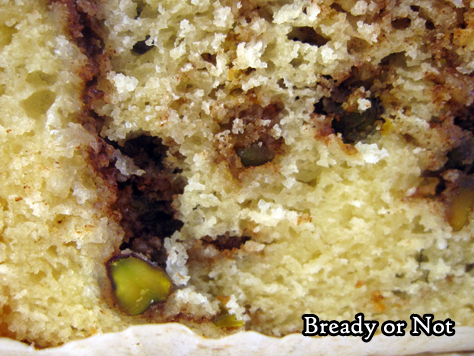
Bready or Not Original: Snickerdoodle Swirl Loaf
This Snickerdoodle Loaf Cake is proof, yet again, that snickerdoodles are awesome in any form.

I made this based on a recipe in Bake from Scratch and had to modify it significantly to make it more snickerdoodly (that is totally a word) and work overall.
The foremost issue on my first bake is that, despite the toothpick test, my loaf wasn’t fully baked. It ended up collapsing as it cooled. I had to gut the middle of the cake, but the majority of it was edible.
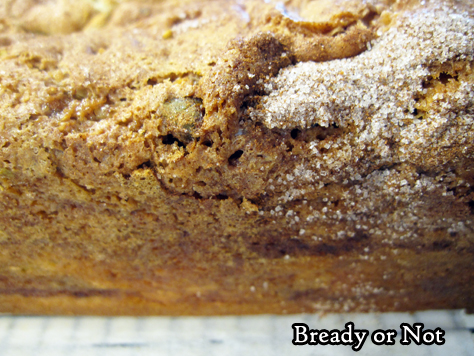
Not only was it edible, but my husband loved it. Therefore, he was happy when I baked it again, with more modifications–including a longer bake time.
This cake is a great keeper, too. It tasted great for a full five days. It might last even longer than that.
I guess I’d need to bake it again to test that theory. Oh darn.
Bready or Not Original: Snickerdoodle Swirl Loaf
Equipment
- 9x5 loaf pan
- parchment paper
Ingredients
- 2 cups all-purpose flour
- 3 teaspoons baking powder
- 1/2 teaspoon cream of tartar
- 1 1/2 cups white sugar divided
- 1 1/2 teaspoons kosher salt
- 1 cup whole milk or half & half
- 1 teaspoon vanilla extract
- 1/4 cup vegetable oil
- 1 large egg
- 1 Tablespoon ground cinnamon
- 1/2 cup pecans or pistachios, divided, optional
Instructions
- Preheat oven at 350-degrees. Cut parchment paper to fit long-ways in a loaf pan, sticking up on either side as a sling. Apply nonstick spray into pan, place paper, then spray again. Set aside.
- In a big bowl, stir together flour, baking powder, cream of tartar, 1 cup white sugar, and salt. Gradually mix in the milk, vanilla extract, oil, and egg, until just combined.
- In a small bowl, combine the remaining 1/2 cup sugar with the cinnamon.
- Spread about half the batter in the loaf pan. Sprinkle half the cinnamon-sugar on top, followed by about half the nuts (if using). Add rest of the batter. Use a knife to swirl batter, bringing the blade up and down a bit, to marble the layers together. Sprinkle rest of the cinnamon-sugar across the top followed by the nuts (if using). Swirl the batter again.
- Bake for 55 to 65 minutes, until a toothpick stuck deep in the middle comes out clean. About halfway through the bake, add foil over the top to prevent overbrowning.
- Let cool in pan for 10 minutes, then use parchment sling to lift loaf onto a rack to fully cool.
- Well-wrapped loaf keeps at room temperature as long as 5 days. Slices can also be frozen for later enjoyment.
OM NOM NOM!
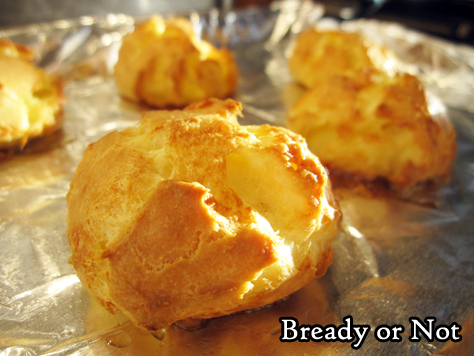
Bready or Not: Gougeres (French Cheese Puffs)
Eat your cheese in delicious, airy form in Gougeres, aka French cheese puffs!
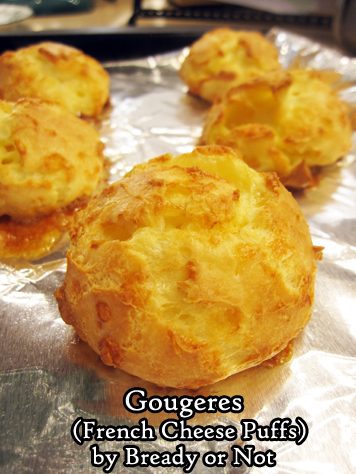
This is a savory version of pate a choux, the dough used for cream puffs and eclairs. In this case, though, you fold in a generous amount of grated cheese.
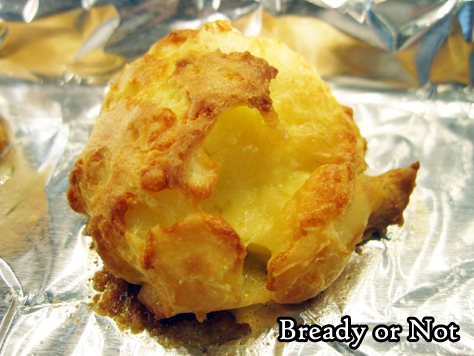
What kind of cheese? Go for ones that grate and melt. Traditional choices would include Gruyere or Comte, or be a rebel like me and use English cheddar. (Scandalous, I know.)
I modified this recipe from Dorie Greenspan’s version in her lovely tome Around My French Table. I felt like I learned something new every time I baked up a serving of these puffs, and I wanted to include all that info to prevent people from repeating my mistakes.
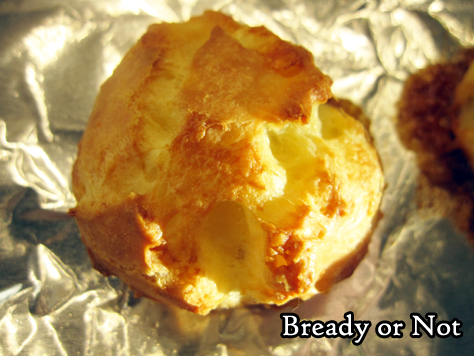
Such as, see the aluminum foil in these pictures? Don’t use that. Do parchment instead. I didn’t take pictures of how I mangled these gougeres, which were hopelessly stuck to the foil despite a spray of Pam.

The recipe results in about 30 puffs. These things keep well, unbaked and frozen, but only for about a month. After that, the puff declines and an eggy taste is more pronounced.
Bready or Not: Gougeres (French Cheese Puffs)
Equipment
- baking sheets
- parchment paper
- tablespoon scoop
- mixer
Ingredients
- 1/2 cup whole milk or half & half
- 1/2 cup water
- 8 Tablespoons unsalted butter (1 stick) cut into 4 pieces
- 1/2 teaspoon salt
- 1 cup all-purpose four
- 5 large eggs room temperature
- 1 1/2 cups coarsely-grated cheese (6 ounces) such as Gruyere, Comte, Emmenthal, or cheddar
Instructions
- If baking now, position racks in oven to be at the top and bottom. Preheat oven at 425-degrees. Line two large baking sheets with baking mats or parchment paper; do not use aluminum foil.
- If preparing the gougeres now, with plans to freeze and bake later, line a pan with waxed paper and clear some space in the freezer so the puffs can set.
- Place milk, water, butter, and salt in a medium saucepan. Bring to a fast boil. Add flour all at once, then lower heat. Promptly start stirring batter with a wooden spoon or sturdy whisk. The dough will come together, but keep stirring with vigor for another couple minutes until the dough is very smooth and looks dryer.
- Drop the dough into the big bowl of a stand-mixer or a bowl where a hand mixer can be used. (Or, if mixing by hand, be ready for an arm work-out.) Let the dough set for a couple minutes, then add the eggs one by one. Beat, beat, beat that batter, fully incorporating each egg before adding the next. If it separates, that's okay--keep beating it! It needs to reach a stage where it is thick and shiny. Beat in the grated cheese.
- The batter must be immediately doled out onto pans to either bake or freeze. Use a tablespoon or tablespoon-sized scoop to measure out the batter; if baking, space out about two inches apart.
- Slide baking sheets into oven. Immediately lower temperature to 375-degrees. Bake for 12 minutes, then rotate pans from front to back, top to bottom. Continue baking another 12 to 15 minutes, until gougeres are golden and firm. Note that they will not puff until the end of the bake. Serve promptly.
- If freezing some or all of the gougeres, freeze on waxed paper, then place in a freezer bag or lidded container. Bake straight from the freezer--do not thaw them! Place on parchment or a greased surface to cook, with gougeres in a central location in the oven. Eat frozen gougeres within a month, as they will otherwise taste increasingly eggy and have less rise.
OM NOM NOM!
Bready or Not Original: Apple Cinnamon Loaf Cake
This Apple Cinnamon Loaf Cake is tender and delicious, perfect for breakfast, snack, or dessert.
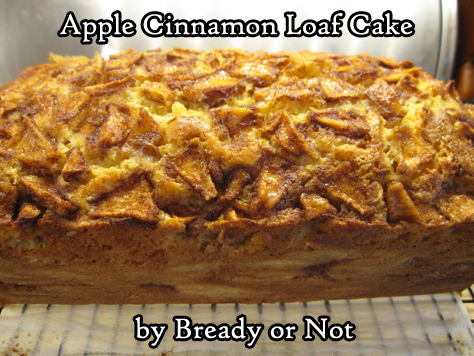
This loaf cake is a lot like my small casserole-sized Easy Apple Cinnamon Cake. If you like one, you’ll like the other!
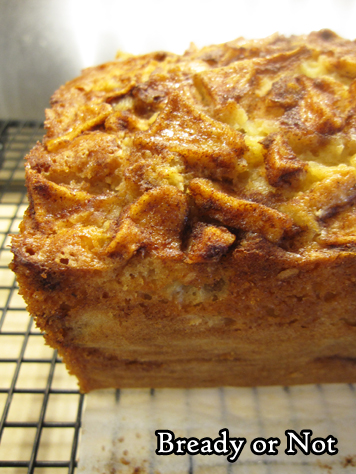
My husband, see, looooves apple pie and apple cake. Apples in baked goods, period. And yes, he loved this loaf cake.
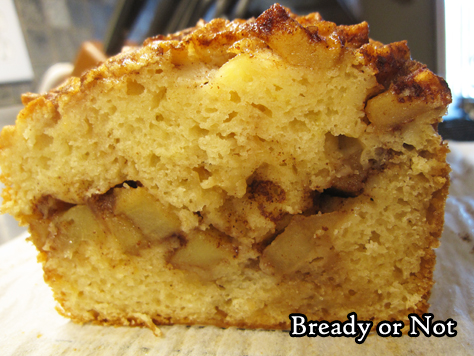
One of the great things about this recipe is that this loaf kept for about a week, all wrapped up and stored in a safe place at room temperature.
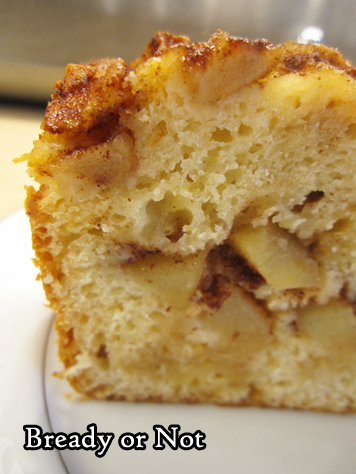
(In my house, that means tucked inside my stainless steel breadbox, as otherwise my cats would tear their way inside the plastic wrap. Because my cats are weird.)
Bready or Not Original: Apple Cinnamon Loaf Cake
Equipment
- 9x5 loaf pan
Ingredients
- 2 medium apples such as Gala, peeled, cored, and chopped
- 1/3 cup brown sugar packed
- 1 teaspoon ground cinnamon
- 2/3 cup white sugar
- 1/2 cup applesauce
- 2 large eggs room temperature
- 1 1/2 teaspoons vanilla extract
- 1 1/2 cups all-purpose flour
- 1 3/4 teaspoons baking powder
- 1/4 teaspoons salt
- 1/2 cup milk or half & half
Instructions
- Preheat oven at 350-degrees. Cut parchment paper to fit long-ways in a loaf pan, sticking up on either side as a sling. Apply nonstick spray into pan, place paper, then spray again. Set aside.
- Prepare apples. Add brown sugar and cinnamon to bowl and toss with chopped apples to coat.
- In a big bowl, mix white sugar and applesauce until smooth and creamy. Add eggs one at a time, then the vanilla extract.
- In another small bowl, stir together the flour, baking powder, and salt. Gradually stir this into the egg mixture, followed by the milk.
- Spoon about half of the batter into the prepared pan. Layer about half of the apples on top. Scoop the remaining batter over it, and add the rest of the apples. Pat them into the top.
- Bake for 50 to 55 minutes, until a toothpick stuck into the middle emerges clean.
- Use parchment sling to immediately lift loaf onto a rack to completely cool. Once the loaf is at room temperature, shroud in plastic wrap and store at room temperature--or freeze all or part of loaf for later.
OM NOM NOM!
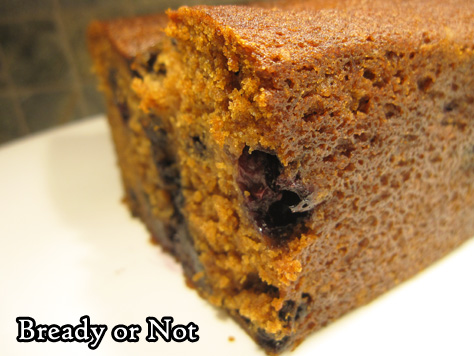
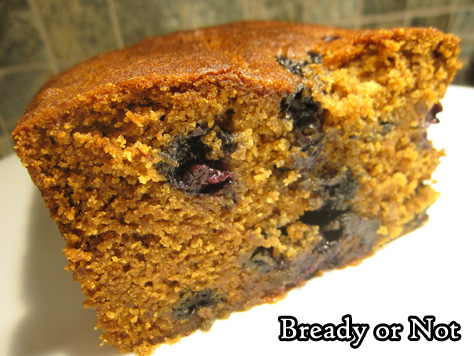
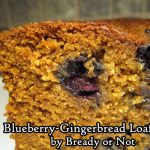
Bready or Not Original: Blueberry-Gingerbread Loaf
Fresh blueberries and gingerbread! This combo never occurred to me before, and wow was I missing out. Find out how good it is when you bake this Blueberry-Gingerbread Loaf.
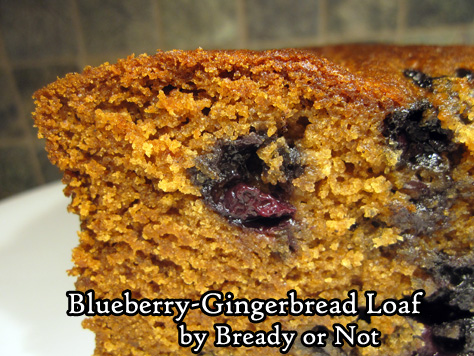
I’m growing increasingly convinced that blueberries can make almost everything better. Case in point: Wensleydale Cheese with Blueberries. DIVINE. This recipe ranks up there, too.
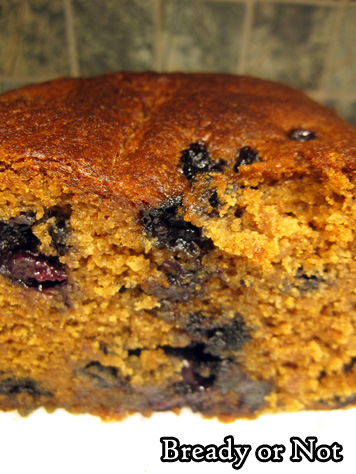
As any gingerbread should be, this loaf is packed with spices that sing of autumn and winter. Blueberries add an incredibly fresh note, a literal burst of flavor that stands apart from the usual tart cranberry.
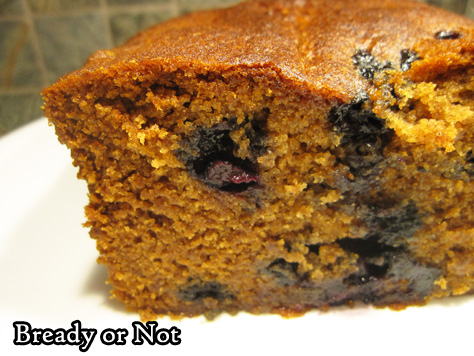
This bread is very moist and tender. It is perfect to slice for breakfasts or snacks, and it doesn’t even need an additional pat of butter.
I’m sharing this recipe in December because of the gingerbread/Christmas association, but let me fervently remind you that delicious foods should not be confined to any season. Print this out and save it for when summer blueberries are bountiful and cheap. Heck, even bake the bread and freeze it for later.
This bread smells so good, though, I bet you’ll find it hard to resist a slice or two.
Bready or Not Original: Blueberry-Gingerbread Loaf
Equipment
- 9x5 loaf pan
Ingredients
- 1/2 cup fresh blueberries 6 ounce pack
- 1 1/2 cups all-purpose flour or mix in whole-wheat, plus extra flour
- 2 teaspoons ground cinnamon
- 2 teaspoons ground ginger
- 1 teaspoon salt
- 1/4 teaspoon ground cloves
- 1/2 cup unsalted butter 1 stick, softened
- 1/2 cup white sugar
- 1/2 cup brown sugar packed
- 1 cup applesauce
- 1/2 teaspoon vanilla extract
- 1 teaspoon baking soda
Instructions
- Preheat oven at 350-degrees. Cut a piece of parchment to fit inside a 9x5 loaf pan, with paper extending up the two long sides to form a sling. Apply nonstick spray or butter to pan, place parchment inside to adhere, then grease paper as well.
- Wash and pick through blueberries to remove any stems, smashed berries, or moldy ones. Dry blueberries and gently toss with a couple spoons of flour to coat. Set aside.
- In a medium-sized bowl, combine the 1 1/2 cups flour, cinnamon, ginger, salt, and cloves.
- In a big bowl, beat butter until creamy. Add both sugars, beating until combined and fluffy. Add applesauce, vanilla, and baking soda. Follow up with flour mixture, mixing until combined. Gently fold in the blueberries. Pour batter into prepared loaf pan.
- Bake for 1 hour to 1 hour and 10 minutes, removing loaf only after middle has passed the toothpick test. Cool in pan no more than 20 minutes. THIS IS IMPORTANT, as otherwise the loaf can steam up and collapse! Let loaf continue to cool on a rack.
- Keep stored in a plastic bag or plastic wrap for at least two days. Loaf can also be frozen for later enjoyment.
OM NOM NOM!
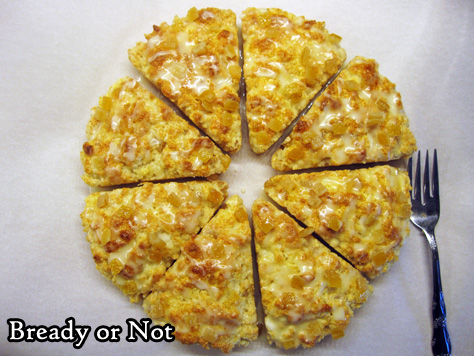
Bready or Not Original: Citrus Scones
These citrus scones offer a bright way to start the day in portable and delicious form!

I managed to score a container of candied citrus peel–the stuff usually used in fruitcakes–on an after-Christmas clearance. “Oh, what to do with us?” I wondered.
Finally, it hit me: scones! An original scone recipe that my husband could enjoy before work.

Of course, I had to add a glaze. Orange juice and confectioners’ sugar made that easy.

Plus, I found that the scones freeze like a charm, even while glazed! They thaw quickly at room temperature, too.
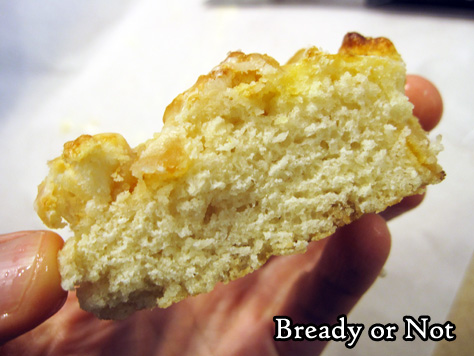
Unlike other scone recipes I’ve made, this one produces soft, fluffy results. Not dry or crumbly at all. I credit the sour cream for that. It sure works wonders in cakes and bars, too.

Bready or Not Original: Citrus Scones
Ingredients
Scones:
- 1 3/4 cups all-purpose flour
- 1/4 cup white sugar
- 4 teaspoons baking powder
- 1/8 teaspoon salt
- 5 Tablespoons unsalted butter
- 1/2 cup plus 1 Tablespoon milk or half & half
- 1/4 cup sour cream
- 1/3 cup candied orange peel
- 1 egg lightly beaten
Glaze:
- 1/2 cup confectioners' sugar
- 3 teaspoons orange juice [or water]
- sprinkle of additional orange peel optional
Instructions
- Preheat oven at 400-degrees.
- In a large bowl, whisk together flour, sugar, baking powder, and salt. Cut in the butter until it resembles coarse crumbs.
- In a different bowl, stir together 1/2 cup milk and sour cream. Stir into dry ingredients until it just holds together, adding more milk if needed. Fold in the candied citrus peel.
- If using a scone pan, pack the dough into the triangular holes. If shaping by hand, transfer the cohesive dough to a large piece of parchment paper on a large cookie sheet. Shape into a large, even circle. Slice into eight wedges and separate them slightly.
- Whisk egg and remaining tablespoon of milk and brush them atop each scone.
- Bake until scones are golden brown, 15 to 17 minutes. Leave on pan to cool for 20 minutes.
- To glaze, mix together confectioners' sugar and orange juice to create a thick, dribbly consistency. Spoon atop scones. Immediately sprinkle on more candied orange peel and gently press into tops of scones.
- Scones are best eaten within the day, but they can be frozen even while glazed. Freeze on waxed paper then transfer to a freezer bag or plastic container. They thaw quickly at room temperature.
- OM NOM NOM!
Follow me


