


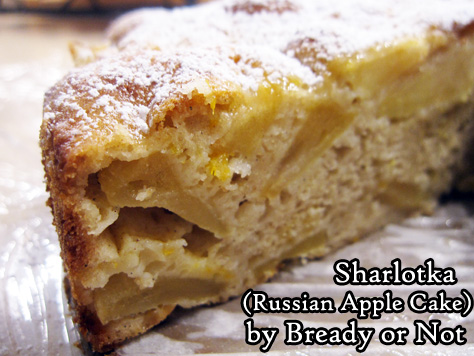
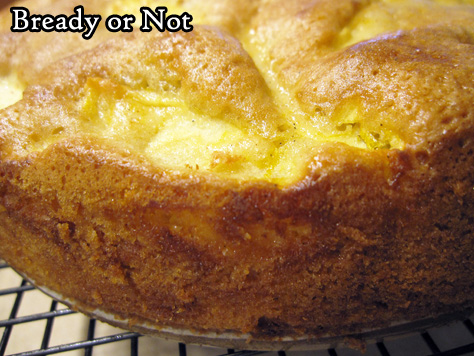
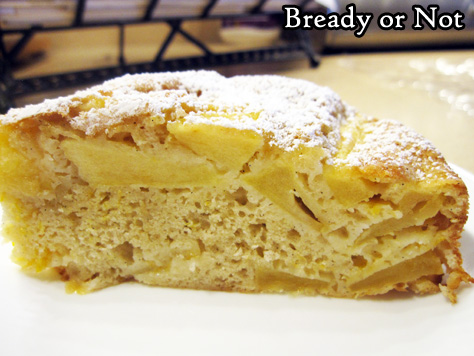
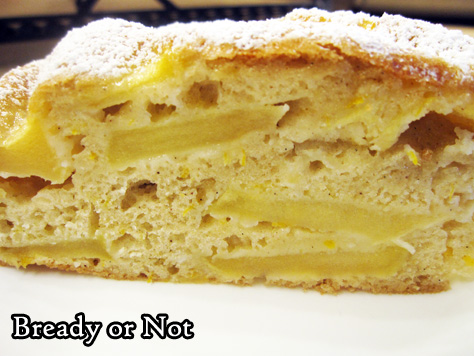
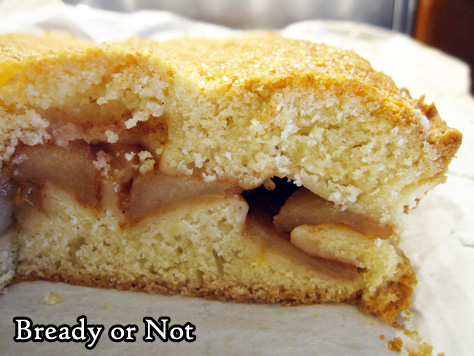
Bready or Not: Sharlotka (Apple Cake)
As you might have noticed, I’ve been experimenting with many different kinds of apple cakes over the past while. This Sharlotka has a Russian name but British origins, because that’s the way of the world.
I modified this from a recipe in Bake from Scratch’s October 2020 issue. There, they say the first Sharlotka was a very different kind of cake that was served for Czar Alexander during a London visit–and made by a French chef. Because of course.
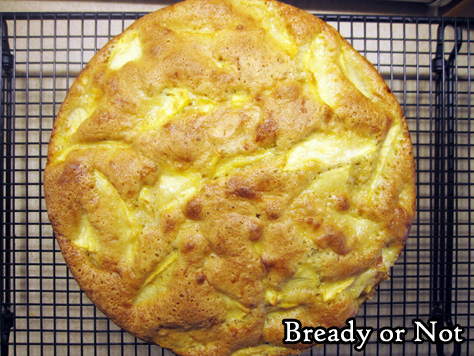
The cake that evolved after that became more of a basic apple cake. The batter is minimal, and beaten for a prolonged time to increase volume. It’s pretty much there to act like adhesive for the mélange of apples.
The resulting cake is light and airy. The flavor of the apples really shines through.
This cake is great for a breakfast, snack, or dessert. Eat it on its own, or with some ice cream.
Bready or Not: Sharlotka (Apple Cake)
Equipment
- 9-inch springform pan
- parchment paper
- fine mesh sieve
- offset spatula
Ingredients
- 4 medium apples such as Granny Smith, Ambrosia, Fuji, or Golden Delicious; go for a mix!
- 1 cup plus 1 Tablespoon white sugar divided
- 1 large orange or 1 large lemon zested and juiced
- 4 large eggs room temperature
- 1 1/2 teaspoons vanilla extract or vanilla bean paste
- 3/4 teaspoon kosher salt
- 1 1/4 cups all-purpose flour
- 1 1/2 teaspoons baking powder
- 1/2 teaspoon ground cinnamon
- 1/4 teaspoon ground cardamom
- confectioners’ sugar for dusting
Instructions
- Preheat oven at 350-degrees. Cut parchment to fit the bottom of the springform pan. Grease the pan, then place in parchment round, then spray that as well.
- Peel and thinly slice the apples. In a big bowl, coat the apples with 1 Tablespoon white sugar, the citrus zest, and 2 teaspoons of fresh juice. Set aside.
- In the bowl of a stand mixer with a whisk attachment, beat eggs, vanilla, salt, and remaining 1 cup of sugar at medium high speed for about 7 minutes. It should turn thick and pale, the batter forming ribbons when the whisk is lifted up. Remove bowl from mixer.
- In a medium bowl, combine flour, baking powder, cinnamon, and cardamom. Use a fine-mesh sieve to sift the dry ingredients into the egg mix. Gently fold the flour in until it’s just combined and there are no white streaks.
- Place half the apples in the prepared pan. Pour half the batter over them. Use an offset spatula to work the batter into nooks and crannies. Scatter the rest of the apples on top, followed by the rest of the batter. Again, use the spatula to spread the small amount of batter. For a couple minutes, thump the pan on the counter and tap the sides every now and then to cause bubbles to rise, smoothing batter again after.
- Bake cake. Check it at 30 minutes to see if it is getting too brown; if so, cover it with foil. Continue baking 10 more minutes (40 total) then test the middle with a toothpick. If it comes out clean, the cake is done. Let it cool on a rack for 15 minutes before carefully releasing the sides of the pan.
- Serve the cake warm, at room temperature, or cold from the fridge. Add a dusting of confectioners’ sugar on top for serving; if keeping cake for later, add fresh sugar each time, as it will gradually be absorbed. Store covered in the fridge or at room temperature.
OM NOM NOM!
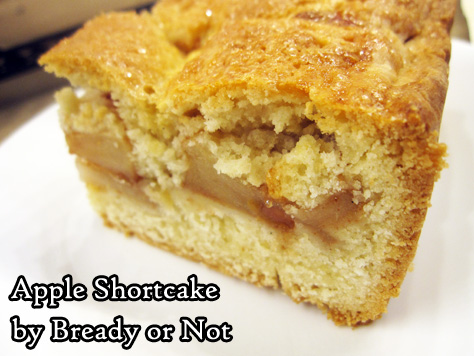
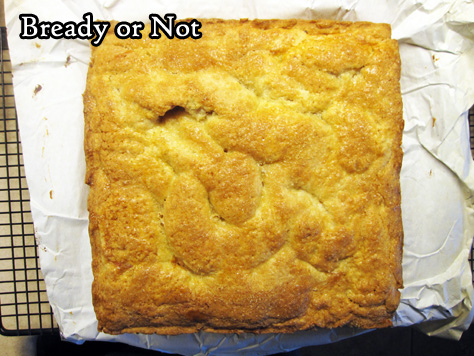
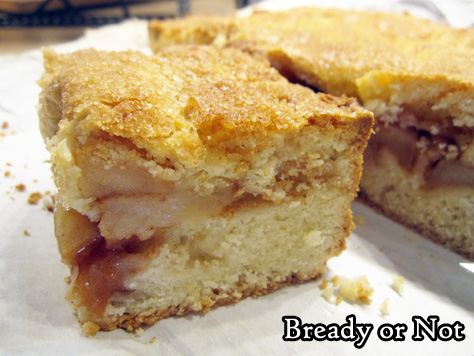
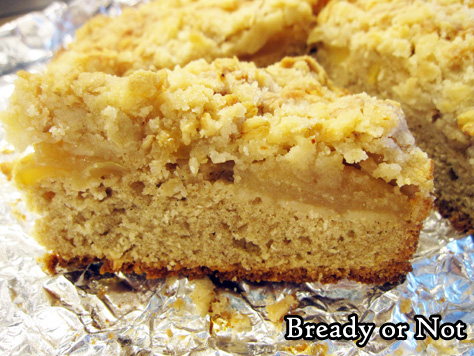
Bready or Not: Apple Shortcake
This Apple Shortcake is fussy to make, but the results are absolutely delicious!
I modified this from a recipe in Bake from Scratch, the September/October 2020 issue. There, they describe this style of shortcake as a New Zealand favorite.
Here in American, I grew up with strawberry shortcake (and loved the cartoon and toys for Strawberry Shortcake in my earliest years), and thought of fruit shortcakes as being simply made in individual portions. I was intrigued by this idea of it being like a cake and pie hybrid.
The most annoying thing about the recipe is that I found the dough to be quite sensitive–but this also might be an Arizona problem, as my kitchen year-round is hotter than many get. The good thing is that the recipe makes a lot of dough, so it’s easy to patch any tears or holes with a bit of the leftovers.
The baked shortcake is dense and delicious, with perfectly-spiced apples in a kind of shortbread sandwich.
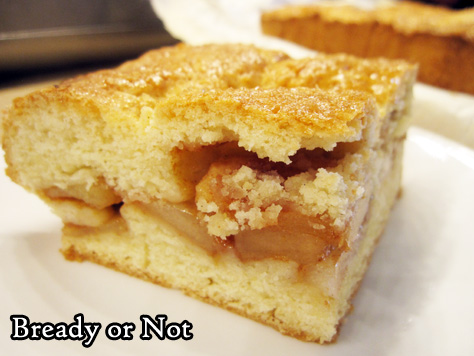
The shortbread keeps okay at room temperature up to 2 days. If you’re feeding a small crowd, no prob–cut it into individual pieces, encase in plastic wrap, and freeze. It keeps fantastically that way.
Modified a lot from Bake from Scratch, September/October 2020 issue.
Bready or Not: Apple Shortcake
Equipment
- food processor
- food scale
- 9×9 pan
- Rolling Pin
- pastry brush
Ingredients
- 4 cups all-purpose flour plus more for rolling
- 1 cup plus 3 Tablespoons white sugar divided
- 1 3/4 teaspoons baking powder
- 1 1/4 teaspoons plus 1/8 teaspoons kosher salt divided
- 1 cup cold unsalted butter
- 3 large eggs divided
- 3/4 teaspoons almond extract
- 1/2 teaspoon vanilla extract
- 3 large apples such as Granny Smith and Pink Lady
- 1 lemon zested and juiced
- 2 teaspoons corn starch
- 1 teaspoon ground cinnamon
- turbinado sugar optional to sprinkle on top
Instructions
Make the crust
- In the bowl of a food processor, pour in the flour, 1 cup sugar, baking powder, and 1 1/4 teaspoons salt, then pulse until combined. Cut the butter into cubes and add to the bowl, pulsing until the mixture resembles coarse crumbs. Add 2 eggs and the extracts. Pulse to bring the dough together so that it's moist but not sticky; if it doesn't come together, add a small amount of water and pulse more.
- Turn out the dough to press it together. Use a food scale to weigh the dough and divide it in two. Wrap each piece with plastic wrap. Chill in fridge for at least 30 minutes, or up to a few days.
Assemble the shortcake
- Preheat oven at 350-degrees. Let the dough stand at room temperature for about 10 minutes. Sprinkle flour on a flat surface and roll out one portion of dough to make a 13-inch square. Set the pan on top as a guide to cut an even 9×9 square.
- Line pan with foil and apply nonstick spray. Place cut square inside. It’s okay if it tears as its being moved–patch it with fingertips. Pat the leftover dough up the sides of the pan to completely cover, sealing the edges together along the bottom and at the corners. Chill pan during the next step.
- Peel the apples and cut into quarter-inch slices, placing them in a large bowl. Add the lemon zest and 2 teaspoons of juice. Stir to coat apples. Add the cornstarch, cinnamon, remaining 3 Tablespoons sugar, and last bit of salt. Toss everything together, coating the apples. Spread the apples evenly across the bottom of the pan.
- Roll out remaining dough to make a 10-inch square to completely cover the top of the apples. Press overlapping edges to seal together, trimming dough if needed. Lightly beat the remaining egg then brush it over the top crust. Use a fork to poke the crust all over to create vents. If desired, sprinkle turbinado sugar across the crust.
- Bake until crust is golden brown, about 50 minutes to 1 hour. The apples should be tender if poked with a toothpick. Let cool in pan for at least an hour. Use foil to lift shortcake onto a cutting board for easy slicing.
- Store cake in sealed container at room temperature for up to 2 days. It can also be cut into individual slices and frozen for later enjoyment.
OM NOM NOM!
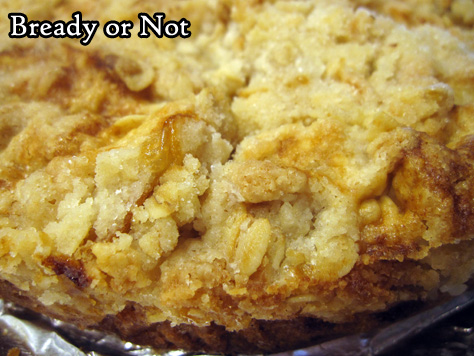
Bready or Not: Irish Apple Cake
I’ve posted many different recipes for apple cake. This Irish Apple Cake uses a 9-inch round cake pan with layers of cake, apple, and streusel.
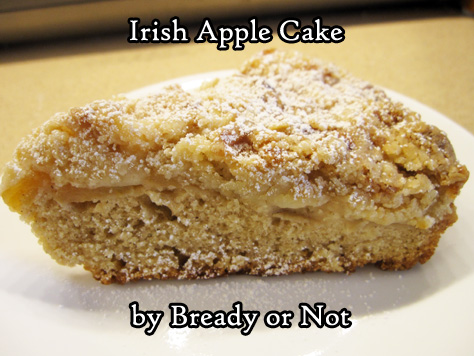
This isn’t a light, airy cake. It’s dense and moist. It’s a cake that is ideally paired with tea, coffee, or hot cider.
It’s not heavily sweet, either, but the sweetness that is there arises from the apple and that wonderful crumble topping.
The big thing that sets this cake apart from other recipes is that you do experience the textural variations between the layers. It really reminds me of my family favorite Caramel Apple Pie in that regard.
This cake is best eaten fresh, but fear not! If you freeze it when it’s fresh, it will be wonderfully preserved for later on. Just eat it right after it’s thawed.
Modified from a Gemma Stafford recipe in Food Network Magazine, March 2021.
Bready or Not: Irish Apple Cake
Equipment
- 9-inch cake pan
Ingredients
Streusel
- 6 Tablespoons cold butter
- 3/4 cups all-purpose flour
- 1/4 cup rolled oats
- 1/2 cup white sugar
- pinch salt
Cake
- 1/2 cup salted butter 1 stick
- 1/2 cup white sugar
- 2 teaspoons pure vanilla extract
- 2 large eggs
- 1 1/4 cups all-purpose flour
- 1 teaspoon baking powder
- 1 teaspoon ground cinnamon
- pinch salt
- 3 Tablespoons milk
- 3 medium baking apples such as Fuji or Granny Smith, peeled and thinly sliced
- confectioners' sugar for serving
Instructions
- Preheat oven at 350-degrees. Line a 9-inch cake pan with foil and apply nonstick spray or butter.
- Make the streusel first. Dice up the butter in a medium bowl. Add the flour, oats, sugar, and salt. Using fingers, compress and break apart the butter into small crumbs distributed throughout the dry mix. Set the bowl in fridge to chill while assembling the cake.
- Cream the butter and white sugar until light and fluffy. Add the vanilla and eggs.
- In a separate bowl, sift together the flour, baking powder, cinnamon, and salt. Gradually fold the dry ingredients into the wet along with the milk. Once everything is just mixed, pour it into the prepared pan. Place the apple slices one at a time to form an even layer. Sprinkle the streusel on top and even it out.
- Bake the cake until the top is golden, about 60 to 70 minutes. The middle should pass the toothpick test. Let cool at room temperature, eventually placing in fridge to speed the process, if desired.
- Cut into 1/8ths. Top pieces with sprinkled confectioners’ sugar to make it even more pretty. The cake is best eaten fresh, but pieces can also be individually frozen the day of baking for a delicious treat later.
OM NOM NOM!
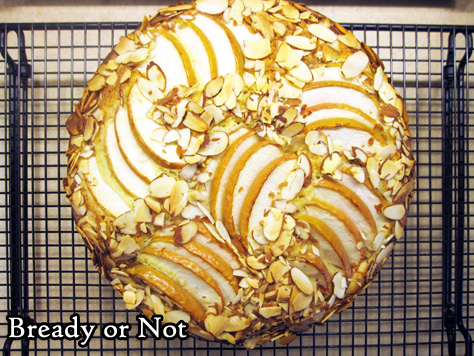
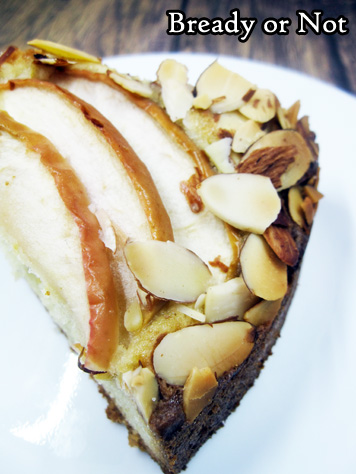
Bready or Not Original: Apple-Almond Olive Oil Cake
This Apple-Almond Cake is an absolute showstopper of a cake, and it’s not difficult to make!
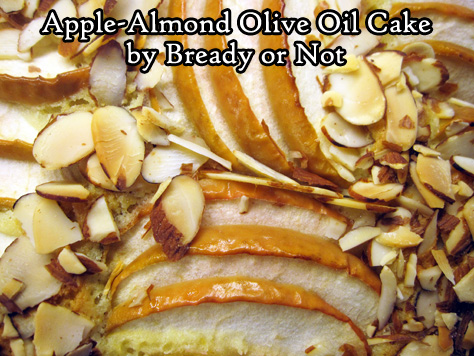
Really, I found cutting the apple into thin, mostly-equal pieces and placing them on the cake to be the most piddly part of the whole process. However, it was all well worth the effort!
The taste of the cake isn’t super-sweet. The cake really tastes of lemon and almond, a fabulous pairing, with the apple providing a touch of flavor and sweetness.
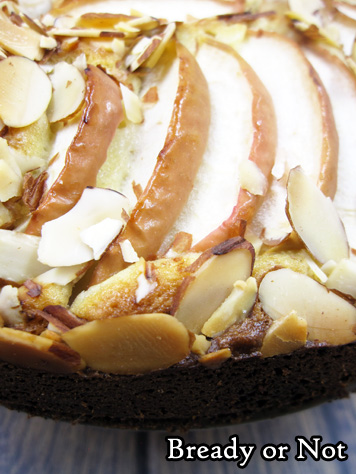
It’s not a thick or heavy cake, either. This would be fantastic to serve for a breakfast, brunch, or dessert–it can really do all the things!

I modified this recipe greatly from one that was in Bake from Scratch’s September-October 2020 issue, which used a pear instead of an apple. It’s a fantastic issue–you’ll see my takes on several other recipes in the future!
Bready or Not Original: Apple-Almond Olive Oil Cake
Equipment
- 9-inch springform pan
- parchment paper
Ingredients
- 2 large eggs room temperature
- 1 cup white sugar
- 1/2 cup extra-virgin olive oil
- 2/3 cup almond flour sifted to remove clumps
- 1/3 cup half & half or milk
- 1 lemon zested and juiced
- 1 teaspoon vanilla extract
- 1/4 teaspoon almond extract
- 1 1/3 cup all-purpose flour
- 1 1/2 teaspoons baking powder
- 3/4 teaspoon kosher salt
- 1 large Pink Lady apple or other firm baking apple
- 1/2 cup sliced almonds
Instructions
- Preheat oven at 350-degrees. Cut parchment paper to fit the bottom of a 9-inch springform pan. Apply nonstick spray to pan; place parchment round inside, then spray to coat that as well.
- In a stand mixer with a whisk attachment. whip the eggs at high speed until they are foamy, about a minute. Reduce the speed to medium to add the white sugar. Continue to beat until it becomes thick and pale, about 2 minutes.
- With the mixer going, pour in olive oil. Pause to scrape sides of bowl. Add the almond flour, half & half, all of the lemon zest, and both extracts, mixing until combined.
- In another bowl, stir together flour, baking powder, and salt. Fold the dry ingredients into the moist mix. Pour batter into the prepared pan.
- Prep the apple. Core it, leaving the peel intact. Cut into thin slices of equal size. Pour reserved lemon juice over the apples, tossing them to coat.
- Place apple slices on top of batter in fanned-out groups of about five, having them face different angles all around the top. NOTE: as the batter is very sticky, the apples will be nigh impossible to move after they are placed, so make careful decisions. Sprinkle the sliced almonds around the edges and in the gaps between the apples.
- Bake for about 50 minutes, until the middle passes the toothpick test. Set on rack for 15 minutes before removing the ring from the pan. Serve warm, or cool completely, keeping the cake on the round base. When slicing the cake, be aware that the peel is pretty but may resist the blade–it’s easier to snip through with a pair of kitchen shears.
- Cake can be sliced and frozen for later, but it will taste best at room temperature or warmed.
OM NOM NOM!
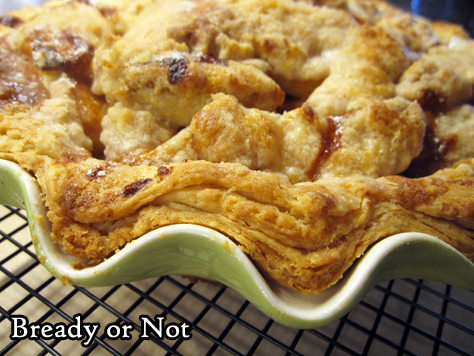
Bready or Not Original: Caramel Apple Pie
Bready or Not has featured many kinds of apple pie and cake over the years, but this is the recipe that I have made most often across my twenty years of marriage: Caramel Apple Pie.
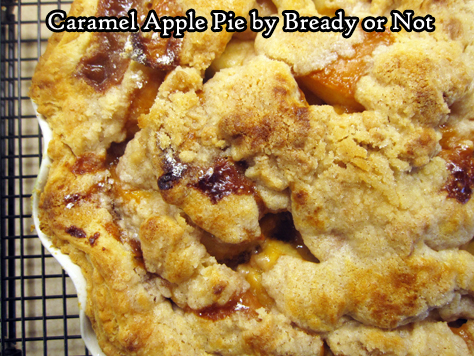
I was shocked to realize I hadn’t featured it on Bready or Not since I started it on my domain site in 2014. I posted an earlier version on my LiveJournal, back in the day.
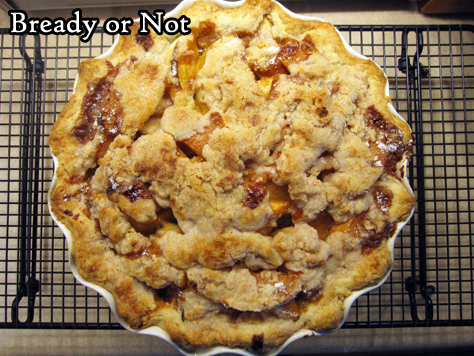
The base recipe came from Mr. Food. Who else remembers the Mr. Food spots on TV? He used to be on Channel 30’s midday news in Fresno. I was newly engaged when I saw him demonstrate this on his five-minute TV spot, and I mailed to the TV station with a SASE to get a print copy of the recipe.
The air date on the sheet is October 8th, 1999. I would have been watching the news from my dorm room at Fresno Pacific University!
I’m pretty sure I made this recipe for my fiancé when he came to visit me that Christmas (and we hoped that the Y2K Disaster would happen so he didn’t have to fly back to the Navy on January 1st).
It seems only right to feature this recipe at holiday time all these years later. I wouldn’t be surprised if I’m asked to make this again in just a few weeks!
Greatly modified from Caramel Crunch Apple Pie from Mr. Food (rest in peace, good chef).
Bready or Not Original: Caramel Apple Pie
Ingredients
Pie filling:
- 1 deep-dish pie shell homemade dough or store-bought
- 5 medium apples mix of varieties best, including Granny Smith, Honeycrisp, Pink Lady, etc
- 2 Tablespoons all-purpose flour
Topping:
- 2/3 cup all-purpose flour
- 1/2 cup white sugar
- 1/2 teaspoon ground cinnamon
- 1/2 cup unsalted butter 1 stick, cold
- 1 jar caramel drizzle as much as desired; most of the jar will be unused
Instructions
- Preheat oven at 375-degrees; set a baking sheet in the oven to heat up as well (this will reduce the likelihood of a pie with a soggy bottom). Press the pie dough into a deep dish pie pan, if not already formed. Stash it in the fridge while the filling is being prepared.
- Peel and core apples and slice into thin wedges. Toss them with the 2 Tablespoons flour to coat. Set aside.
- In a mixing bowl, sift together the flour, sugar, and cinnamon. Dice up the butter and toss it in the mix. Use a pastry cutter or a fork to mash up the butter to make pea-sized and smaller pieces of various shapes. Set bowl in fridge briefly, and bring out the pie shell.
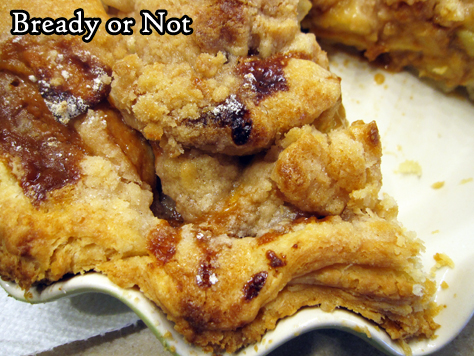
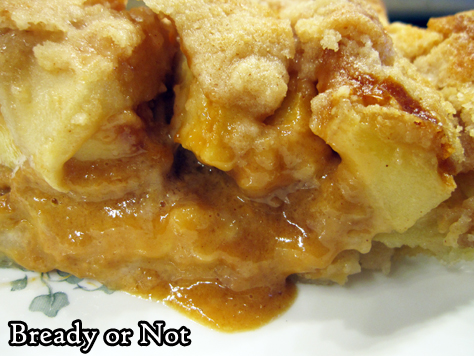
- Pour the apple slices into the pie shell and distribute them to make a nice mound. Drizzle jarred caramel over the top, to personal preference. Use a spoon to distribute crumb topping to cover apples, using butter lumps and powder to fill the nooks and crannies.
- Set pie on hot baking sheet. Bake for 40 to 45 minutes, until apples are tender when pierced by fork. Cool for at least 30 minutes before cutting in.
- Store pie covered by foil in fridge. Will keep for as long as a week. Great eaten cold or warmed up!
OM NOM NOM!
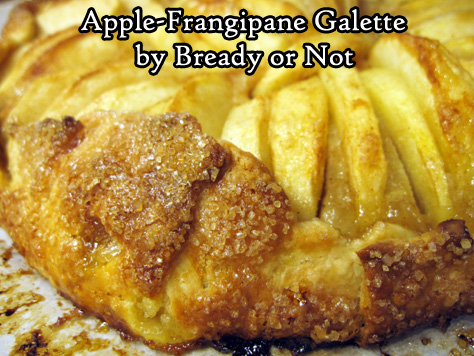
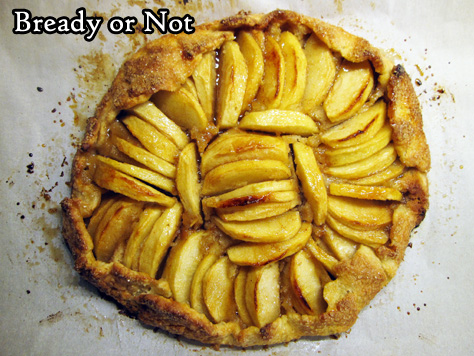
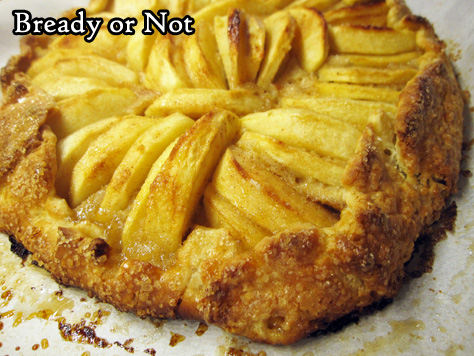
Bready or Not Original: Apple-Frangipane Galette
This Apple-Frangipane Galette is like a leaner apple pie. It’s the way to enjoy a sweet treat without going full overkill.
This recipe has a lot of ingredients and steps, but they can be spread out over a few days, if you want. The actual recipe is pretty straightforward!
I’ve been doing a number of recipes that use frangipane, and I get asked almost every time: “what is frangipane?”
To quote Wikipedia, it’s: “a sweet almond-flavored custard used in a variety of ways including cakes and… pastries. …Today it is normally made of butter, sugar, eggs, and ground almonds.”
In other words, it’s a spreadable, sweet, nutty layer of goodness. It acts as the perfect complement to apples in this recipe.
Do note that this is best enjoyed the day it is made. It’s fine, though, to freeze slices of it right away. When you thaw them later, enjoy the pieces that same day!
Bready or Not Original: Apple-Frangipane Galette
Equipment
- parchment paper
- food processor
- pastry brush
Ingredients
Crust:
- 1 cup all-purpose flour plus more for dusting
- 4 teaspoons white sugar
- 1/2 teaspoon salt
- 6 Tablespoons cold unsalted butter cut into small pieces
- 1 large egg
Frangipane:
- 2/3 cup almond flour sifted to remove lumps
- 1/4 cup white sugar
- 1 Tablespoon all-purpose flour
- 1 Tablespoon unsalted butter room temperature
- 1 large egg
- 1 Tablespoon apple brandy such as Calvados (optional)
- 1 teaspoon pure vanilla extract
- 1/2 teaspoon apple pie spice
- pinch salt
Apple filling:
- 2 medium apples such as Honeycrisp or Golden Delicious
- 1 Tablespoon brown sugar packed
- 1 Tablespoon white sugar
- 1 teaspoon lemon juice
- 1/4 teaspoon apple pie spice
- 1 large egg beaten
- turbinado or other coarse sugar
Glaze:
- 2 Tablespoons honey
- 2 teaspoons apple brandy such as Calvados
Instructions
Make the crust:
- In a food processor, pulse together the flour, sugar, and salt. Add the butter and chop until it’s pea-sized. Add the egg and pulse until it comes together; if it doesn’t, add tiny drizzles of water until it does–just make sure the dough ends up cohesive, not wet. Turn out the dough onto a big piece of plastic wrap and compress the dough to form a disc. Wrap it up and chill it in fridge for a few hours, minimum, or a few days.
Make the frangipane:
- Use a rubber spatula to combine the almond flour, sugar, flour, butter, egg, apple brandy, vanilla, pie spice and salt, making it smooth. Stash it in the fridge until ready to use.
Assembling the galette:
- Preheat oven at 400-degrees. Prepare a big cookie sheet with a piece of parchment. Bring out the dough to warm for a few minutes, then lightly flour a surface and roll it out to about a 12-inch round. Move it to the parchment paper.
- Spread the frangipane over the dough, leaving a blank 1 1/2-inch border. Set the baking sheet in the fridge while preparing the apples.
Prepare the apples:
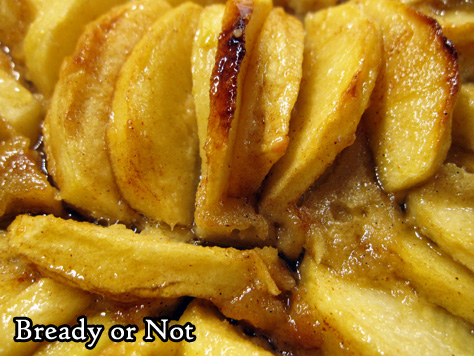
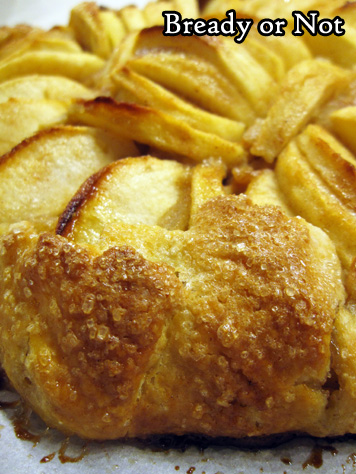
- Peel the apples and slice to 1/4-inch thickness. In another bowl, stir together the brown sugar, sugar, lemon juice, and pie spice. Add this to the apples, and toss them to coat. Bring out the galette dough. Arrange the apples on the frangipane starting from the middle, spiraling them outward while slightly overlapping them. Fold the blank edge over the apples to form a thin, pleated crust. Brush the beaten egg over the crust, then sprinkle it with coarse sugar.
- Bake galette for 35 to 40 minutes. Apples in middle should be fork-tender when done. Cool for about 30 minutes.
Make the glaze:
- In a small saucepan on the stovetop or in a microwave-safe bowl in the microwave, warm the honey and brandy until it is loose and spreadable. Using a clean pastry brush, brush glaze over the apples.
- Let galette cool another 30 minutes, minimum, before cutting it–a pizza slicer is great for this. The galette is best eaten the day it is made, or promptly frozen in slices to be eaten soon after it thaws.
OM NOM NOM!
Follow me


