


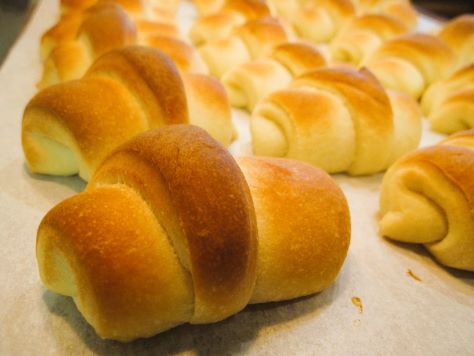
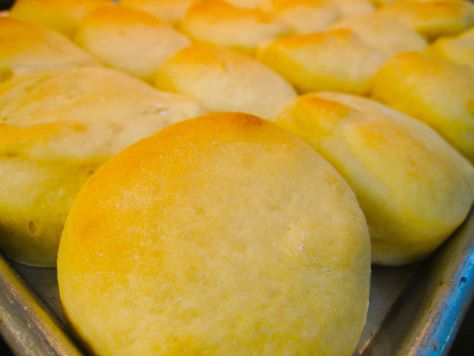
Bready or Not: Sweet Crescent Rolls in the Bread Machine
The blog is titled Bready or Not. Today, it is decidedly bready, as the recipe is one for Sweet Crescent Rolls made using a bread machine.

The recipe requires little hands-on effort. The dough mixes in the bread machine. You divide it and form the crescent rolls, which is actually rather fun. They rise. You then bake. The recipe makes 24 rolls, meaning you can feed a crowd or you can freeze a bunch.

These keep well in the freezer for months. This is the kind of thing you can make at Thanksgiving and then pull out as needed through the rest of the holiday season.
Modified from Allrecipes.com Magazine Oct/Nov 2014.
Bready or Not: Sweet Crescent Rolls in the Bread Machine
Equipment
- food thermometer
- bread machine
- parchment paper
- food scale
- cookie sheet
- knife or pizza cutter
Ingredients
- 1/2 cup warm water (110 degrees)
- 1/2 warm milk or half & half (110 degrees)
- 1 large egg room temperature
- 1/3 cup unsalted butter softened
- 3 3/4 cup all-purpose flour
- 1/2 cup white sugar
- 1 teaspoon salt
- 2 1/4 teaspoon active dry yeast or 1 packet active dry yeast
- 1/4 cup unsalted butter softened, for filling
Instructions
- Place ingredients in recommended order for bread machine, usually liquid first: water, milk, egg, butter, flour, sugar, salt, and yeast. Start dough cycle, and let it mix and complete the first rise.
- Prepare a baking sheet or sheets with parchment paper.
- Once that is done, remove dough and divide in half using food scale. Roll each half into a 12-inch round. Divide the 1/4 cup butter in half and spread over each round. Use a knife or pizza cutter to slice each round into 12 wedges. Starting at the wide end, roll up each triangle gently but tightly to form a crescent roll. Place each roll, narrow side down, on the baking sheet.
- Cover pan with plastic wrap or a clean towel and let rise in a warm spot for an hour. Meanwhile, start preheating oven at 400 degrees.
- Once rolls are risen after the hour, bake for 10 to 15 minutes, switching pan position in oven, if necessary, to prevent overbrowning. Let cool for 15 minutes before serving.
- Cool rolls can also be frozen for later enjoyment; thaw them at room temperature then heat wrapped in aluminum foil at 350 degrees for about 10-12 minutes.
OM NOM NOM!
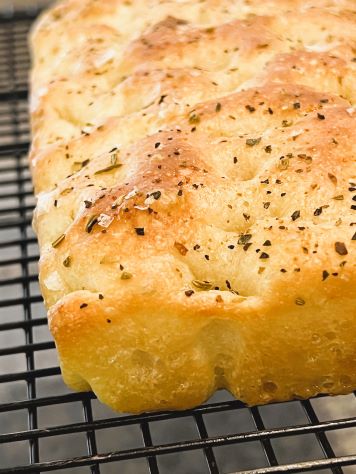
Bready or Not: Mini Focaccia for Two
This Mini Focaccia recipe creates the perfect serving amount for two people to use as a side with a nice meal!

One blessing/curse of most bread recipes is that they can make a lot of bread. This can be problematic if a person has limited freezer space or simply doesn’t want leftovers.
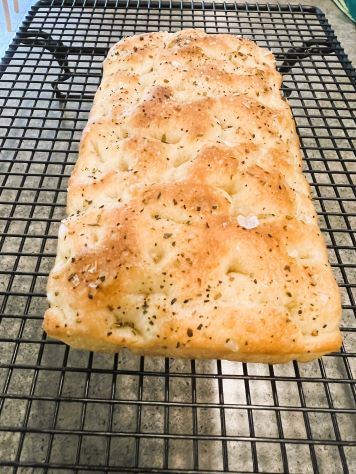
Let this recipe come to the rescue. It uses only about a cup of flour to create a small, thin loaf, the perfect size for, say, a yeast bread side for a date night or for one person to even use as a treat for a meal or two.
I completely rewrote this recipe from a poorly written, confusing one that I found online.
Bready or Not: Mini Focaccia for Two
Equipment
- food scale
- bench knife or spatula
- towel or plastic wrap
- loaf pan
Ingredients
- 120 grams all-purpose flour or bread flour
- 3 grams kosher salt
- 5 grams white sugar
- 90 grams warm water 90-110 degrees
- 3 grams active yeast
- 10 grams extra virgin olive oil plus about 2 Tablespoons for pan
- Italian seasoning or pizza seasoning
- flaked sea salt
Instructions
- In a medium bowl, stir together flour, salt, and sugar. Pour the warm water into the middle. Sprinkle yeast on top and wait a minute for it to begin to bloom. Add oil, then mix dough together.
- Use a bench knife or spatula to begin folding the dough over, turning the bowl to knead from different angles. Dough will be very sticky. Work it until it can form a small ball.
Cover dough with a towel or plastic wrap and let rise for 15 minutes.
- Using a damp hand or the bench knife, knead the bread, folding it over repeatedly until it begins to tighten.
Cover again to rest for 15 minutes.
- Knead again using the same method. It may still be somewhat sticky, but the dough's texture should be smooth.
- Add about 1 Tablespoon of olive oil to the loaf pan. Use fingertips to rub it across bottom and sides. Transfer the dough to the pan. Use already-oiled fingers to stretch it out toward the sides of the pan, but don’t expect it to make contact.
Cover pan and let dough rise.
- After about 30 minutes, oil fingers again and push and stretch dough with fingertips to reach the sides and corners of the pan. It's okay if fingertips touch the bottom or tear the dough; it'll rise again. Cover pan again to rise for another 30 minutes. Preheat oven to 400 degrees.
- Right before putting the focaccia in the oven, drizzle more oil over the top. If desired, add a sprinkling of herb seasoning and a sprinkle of flaked salt.
- Bake for about 20 minutes, until the top is a nice golden brown. Pull pan from oven. Carefully tip the bread out onto a cutting board and let cool for at least 15 minutes before slicing.
- Enjoy right away. Leftovers, if there are any, can be stored in a sealed bag and reheated later.
OM NOM NOM!
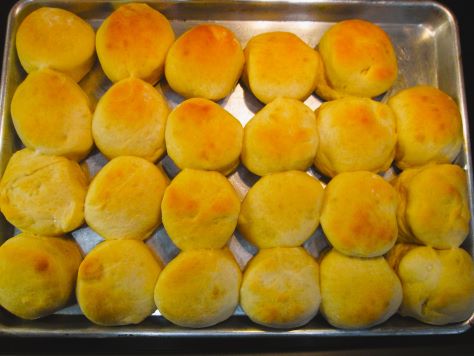
Bready or Not Original: Portuguese Sweet Bread Rolls in the Bread Machine
These Portuguese Sweet Rolls come together fast thanks to a bread machine. The resulting bread is sweet, flaky, and perfect to go with any meal–though as a born Central Californian, I have to recommend serving alongside tri-tip!
I grew up surrounded by a vibrant Portuguese community. That meant a lot of awesome food, like linguica on Me-N-Eds pizza, and rounds of sweet bread on the counter at Boston Pizza. We didn’t have a lot of money, so when we could grab that bread loaf, it was a real treat!
As with most any bread, these rolls are great to freeze and eat later. The fresher they are when you freeze them, the fresher they’ll still taste when you warm them up later!

Bready or Not Original: Portuguese Sweet Bread Rolls in the Bread Machine
Equipment
- bread machine
- 2 1/2-inch cutter
- rimmed baking sheet
- plastic wrap
Ingredients
- 1 cup half & half
- 1/2 cup water
- 1/3 cup melted butter 80 ml
- 1/2 cup white sugar
- 2 large eggs
- 1 1/2 teaspoons sea salt
- 4 cups white bread flour plus more
- 2 teaspoons instant dry yeast or bread machine yeast
Instructions
- Place the half & half and water in a liquid measuring cup and gently warm in a microwave-safe cup in microwave to reach 100-110 degrees.
- Follow bread machine directions for loading ingredients into the bucket; for most, that means liquids first. Stir together the half & half, water, butter, and sugar. That should lower the temperature enough to make it safe to add the eggs (you don’t want them scrambled!); stir those in to break the yolks. Add the salt, flour, and yeast. Start the machine on the DOUGH cycle.
- Check on it once it starts mixing. If the mixture looks runny, add spoonfuls of flour until it comes together; if it’s too thick, add a touch of warm water. Let the cycle finish.
- Grease a rimmed baking sheet with nonstick spray or butter.
- Lightly flour a flat surface. Pat out the dough to be about 1/2-inch thick. Use cutter to slice dough into rounds; place rounds spaced out just a touch on the greased pan. Press dough scraps together as much as possible, and bring together into more rounds. Loosely cover baking sheet with plastic wrap and set in a warm place to rise for about 45 minutes.
- Near the end of the second rise, as the rolls begin to look puffy, preheat oven at 350-degrees. Discard plastic wrap.
- Bake rolls for 17 to 20 minutes, until they are golden across the top. Let cool a few minutes before pulling apart to enjoy.
- Rolls may be eaten fresh, or will keep in a sealed bag at room temperature for a day or two. They can also be frozen right after initially cooling, and thawed later for later enjoyment. They can be eaten at room temperature but are even better warmed up.
OM NOM NOM!
Bready or Not Original: Paprika Cheddar Crackers
These Paprika Cheddar Crackers are a perfect snack or appetizer, and they even keep well for travel!
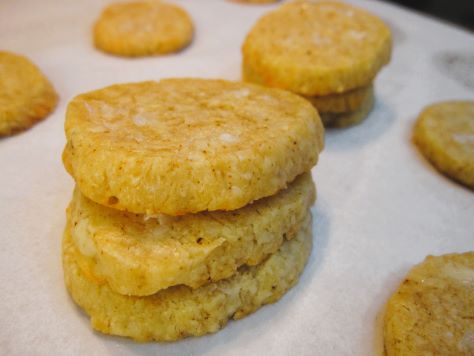
Use a good aged cheese here–or one labeled extra sharp. The cheese should be the main thing here, with the paprika and salt serving to heighten that flavor. Of course, you can mix in some other spices as well–or even use chipotle pepper for a zing.
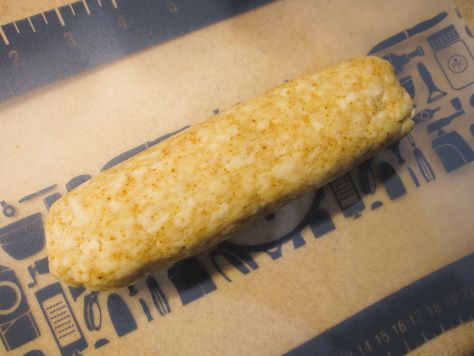
I split up this batch and baked them months apart. One of the nice things about these tubes of dough is that they don’t take up much room in the freezer–or in the fridge when it’s time to thaw them.
I got 16 crackers out of each batch (so 32 total), and mind you, these are pretty thick, hearty crackers. These aren’t the kind you grab a handful of, maybe just a few at a time. They would be great at a fancier function, served with wine or champagne, but are good with pretty much any drink. Cheese is versatile like that.
Bready or Not Original: Paprika Cheddar Crackers
Equipment
- food scale
- plastic wrap
- parchment paper
- baking sheet
- knife
Ingredients
- 1/2 cup unsalted butter (1 stick) room temperature
- 8 ounces aged cheddar shredded
- 1 cup plus 2 Tablespoons all-purpose flour
- 1/2 teaspoon paprika
- 1 1/2 Tablespoons water
- 1 teaspoon kosher salt
- flaked sea salt
Instructions
- Mix together the butter, cheddar, flour, paprika, and salt. Add the water. Continue to mix together until it forms a cohesive dough; add a touch more flour if it’s too wet, or a dribble of water if it’s dry.
- Use a food scale to weigh the dough and divide it in half. Roll out the plastic wrap to about 10 inches. Place half the dough on the plastic and shape into a thick tube, then wrap it in plastic to compress it and make it into an even log about an inch in diameter. Completely seal in plastic wrap. Repeat with other half of dough.
- The dough can be kept in the fridge for up to 4 days, or frozen for several months.
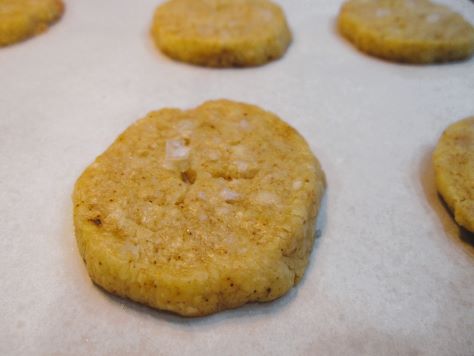
- When ready to bake, preheat the oven at 350-degrees. Place parchment paper on baking sheet. Place a chilled (thawed) dough tube on a cutting board and slice about 1/4-inch thick. Place with minimal spacing on the parchment. Add a pinch of flaked sea salt onto each cracker and gently press it into the surface.
- Bake for 17 to 20 minutes, until edges are just starting to turn golden. Let set to cool on cookie sheet. Store in a sealed container. They are best eaten within 3 days.
OM NOM NOM!
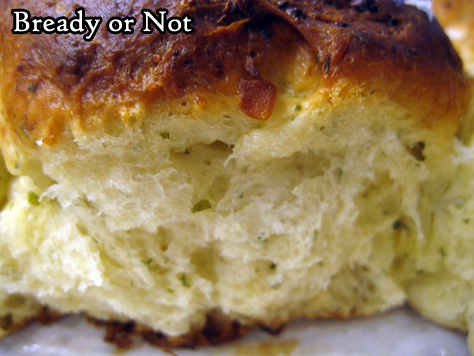
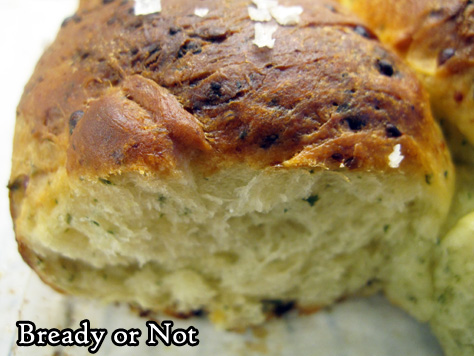
Bready or Not: Cheesy Fantail Rolls
If you know anything about me, you know I’m all about cheese. These Cheesy Fantail Rolls deliver all that good stuff with cheese in the dough and oozing from between the layers of dough.

I based this on a Bake from Scratch recipe for Parmesan-Gouda Fantails. I’m more flexible about the cheese. Just go with a good melter, or a combination of melters. I did a whole block of Roth Dill Havarti. Another firm cheese with herbs would be great. If you like spice? Go with a spicy blend. Have fun with it.
My other big recommendation is that you don’t use pre-shredded cheese, as it’s coated with preservatives and won’t melt as well. But if that’s all you have, well, it won’t end the world.
Do reserve a block of time for this recipe. Shaping the rolls isn’t hard, but it is fiddly, and it will make a mess on your counter or table. However, that effort is well worth it, because these rolls are gorgeous and delicious.
Bready or Not: Cheesy Fantail Rolls
Equipment
- stand mixer
- microwave
- 12-cup muffin pan
- pastry brush
Ingredients
- 1 cup light beer room temperature
- 1 Tablespoon white sugar
- 2 1/4 teaspoons active dry yeast
- 8 Tablespoons unsalted butter melted and divided
- 3 cups all-purpose flour
- 2 cloves garlic minced
- 1 1/2 teaspoons dried parsley divided
- 1 teaspoon kosher salt
- 8 ounces cheese such as cheddar, havarti, or other good melter; shredded
Instructions
- In a microwave-safe bowl, microwave 1/4 cup beer until it is 105-110-degrees Fahrenheit. (If it overheats, cool it for a few minutes.) Add sugar and yeast, stirring to combine. Let it sit about 5 minutes; it should become foamy. Stir in 6 Tablespoons of melted butter and the remaining 3/4 cup beer.
- In a stand mixer with a paddle attachment, mix 2 cups flour, a healthy pinch of shredded cheese, 1 minced garlic clove, 1 teaspoon of dried parsley, and the kosher salt. Add yeast mixture and stir for a minute. Gradually add the remaining 1 cup flour, beating until the dough begins to pull away from the sides of the bowl. That will be after 3 to 4 minutes. Cover the bowl with plastic wrap or a towel, and let it stand in a warm place for about 45 minutes.
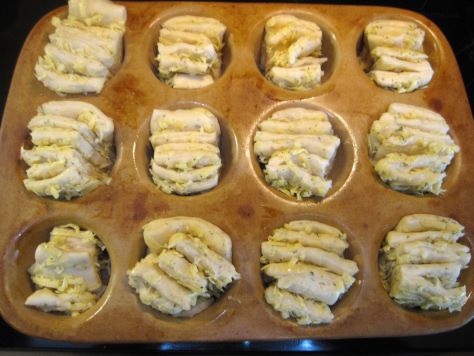
- Apply nonstick spray to the wells in a 12-cup muffin pan.
- Punch down dough and divide it in half. On a lightly floured surface, roll a half into a 12-inch square. Sprinkle half of the grated cheese over the dough. Use a bench knife or pizza cutter to slice dough into 6 equal strips. Stack strips, cheese side up, and cut crosswise into 6 equal pieces. Place each segment of 6 stacked mini strips into a muffin cup. Repeat with remaining dough.
- Slightly separate and stretch each piece of dough in the cups. Cover with plastic wrap or a towel to rise in a warm spot for 30 to 45 minutes.
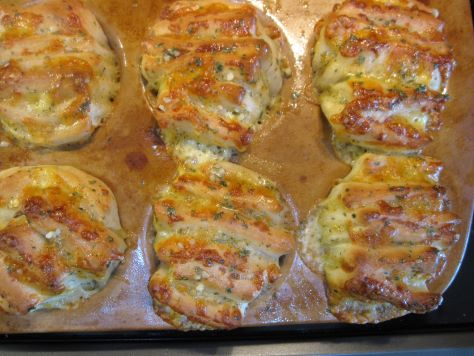
- Preheat oven at 375-degrees, then bake fantails for 20 to 24 minutes, until browned with visible melted cheese.
- In a microwave-safe bowl, melt the remaining 2 Tablespoons butter. Add 1 minced garlic clove and 1/2 teaspoon dried parsley, stirring to distribute. Use a pastry brush to coat each fantail with buttery goodness. Let cool for at least 10 minutes before serving.
- Leftovers should be refrigerated and will reheat beautifully in the coming days. Use an oven or toasted oven, and wrap up the rolls in foil. Add a touch of butter, if desired, to keep them from becoming extra crisp. Heat until warmed.
OM NOM NOM!
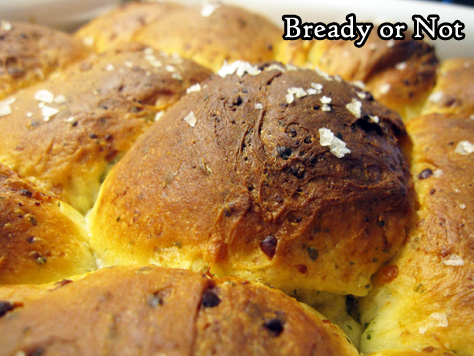
Bready or Not Original: Comte Pull-Apart Rolls
Bread is awesome. Cheese is awesome. Combine them to achieve a special kind of awesome, especially in the case of these Comte Pull-Apart Rolls.
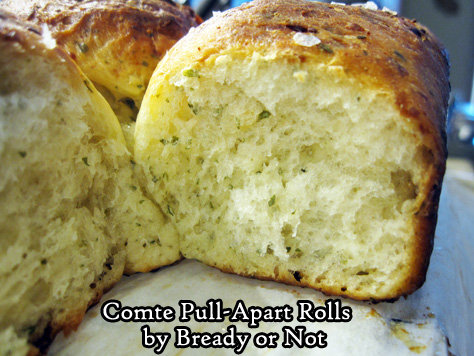
These rolls are tender, soft, and inherently savory. They are perfect to go along with roasts.
First of all, the cheese. If you live in a cheese-deprived area as I do, Comte may not be available (or is only available at Christmas, sigh) or is prohibitively expensive. Really, you can use any cheese you like here, but I advise using one with a savory note. Another alpine cheese or a bandage-wrapped cheddar would do the trick.

My recipe is based on one featured in the Nov/Dec 2018 issue of Bake from Scratch. I made significant modifications, the foremost being that I halved the recipe so that it would only produce 12 rolls.
This recipe isn’t as fussy as some homemade rolls, but it still takes some time and effort. I was very worried because my first rise was so low, but my rolls rose beautifully once they were formed. That’s the rise that really matters!
If you want to give your second rise a boost, use this trick: preheat your oven at 200-degrees. Shape your rolls or bread. Stick the dough in the oven without any plastic wrap or cover. Immediately turn the oven OFF. Set a timer for 30 to 40 minutes or longer; this will depend on the oven, so experiment. Once the bread has nicely puffed from the heat, remove it from the oven, then preheat it again for the full bake.
These rolls can be eaten at room temperature or warm, but for me, they really are far better hot. I want them to melt butter!
Bready or Not Original: Comte Pull-Apart Rolls
Equipment
- 9×9 pan
- parchment paper
- kitchen scale
- pastry brush
Ingredients
- 1/2 cup warm milk (105-110 degrees F), can substitute half & half
- 1/2 cup warm water (105-110 degrees F)
- 1/2 Tablespoon active dry yeast
- 1 large egg room temperature
- 2 Tablespoons white sugar
- 1/4 cup unsalted butter melted and divided
- 1/2 Tablespoon kosher salt
- 2 3/4 cup bread flour
- 2 Tablespoons dried parsley or other dried herbs
- 4 ounces grated Comte cheese 100 grams
- flaked salt for garnish, optional
Instructions
- In a stand mixer, place the warm liquids and yeast. Let stand for about 10 minutes, until the yeast is nice and foamy. Add the eggs, sugar, 2 Tablespoons of melted butter, and salt. Gradually beat in the flour, cheese, and parsley, until everything is well combined.
- Cover the bowl to let the dough rise for about an hour.
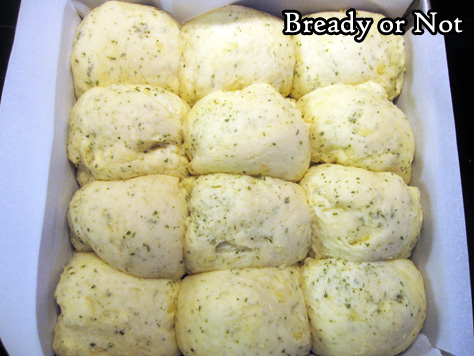
- Line a 9×9 pan with parchment paper cut to crisscross and extend up all four sides. Apply nonstick spray.
- Lightly flour a surface. Turn out the dough onto it. Use the kitchen scale to weigh the dough. Divide it into 12 equal portions, forming each into a tidy ball. Place in rows within the prepared pan, each roll touching. Cover the pan to let rolls rise for another 40 minutes to an hour.
- Preheat oven at 375-degrees. Brush rolls with remaining 2 Tablespoons butter and add a sprinkle of flaked salt, if desired.
- Bake rolls for 13 minutes. Check them. If they are getting quite brown, cover the pan with foil. Bake for another 13 to 15 minutes.
- Serve rolls at room temperature or warm.
OM NOM NOM!
Follow me


