


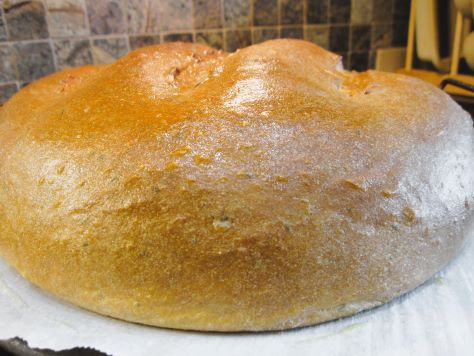
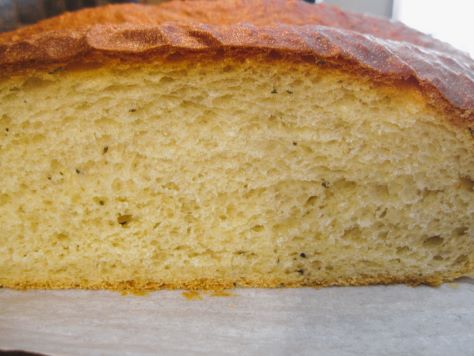
Bready or Not: Herb Butter Bread Mixed in the Bread Machine
I offer up another great bread recipe that starts with a bread machine. This Herb Butter Bread isn’t heavily herbaceous (though you can certainly modify that) but has a gentle flavor that lets the butter and bready goodness shine through.
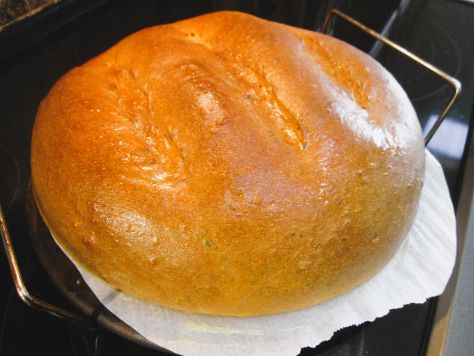
For me, this is a special occasion bread to serve alongside a roast or steaks. This produced a large boule, so unless you have a crowd, there will be lots of leftovers.
Those leftovers are no problem because bread is just about one of the best things to freeze to preserve for later. I like to individually slice it before freezing so I can pull out the exact amount I want to thaw.
Modified from Making Artisan Bread in the Bread Machine by Michelle Anderson. [Affiliate link.]
Bready or Not: Herb Butter Bread Mixed in the Bread Machine
Equipment
- food thermometer
- bread machine
- baking sheet
- parchment paper
- plastic wrap
- pastry brush
Ingredients
- 1 cup milk or half & half (lukewarm, 100-110-degrees F)
- 1 cup water (lukewarm, 100-110 degrees F)
- 1/4 cup unsalted butter melted divided
- 2 Tablespoons honey
- 1 1/2 teaspoons sea salt
- 4 cups bread flour plus more for work surface
- 1/2 Tablespoon mix of dry herbs such as parsley oregano, and thyme
- 1 1/2 teaspoons instant dry yeast or bread machine yeast
- canola oil or olive oil
Instructions
- In the bucket of a bread machine, add the milk, water, 3 Tablespoons of melted butter, honey, and salt. Follow up with the bread flour, herbs, and yeast. Start the Dough cycle.
- Prepare a baking sheet with parchment paper. Clean a section of counter or table and add a sprinkling of flour.
- When the Dough cycle is done, tip the dough onto the work surface and shape it into a ball by gathering the rougher dough beneath. Make the ball smooth and tight, creating surface tension. With the smooth portion on top, place the loaf in the center of the parchment. Lightly coat the dough with oil. Loosely cover with plastic wrap and let rise in a warm spot until doubled, about an hour. Near the end, start preheating the oven at 350-degrees.
- Score the top of the loaf three times in the direction. Bake the bread until it is golden brown and sounds hollow when tapped (don't burn yourself!), about 30 to 35 minutes. If desired, discreetly plunge a digital thermometer into the center of the loaf; it should be over 190-degrees. Melt the last tablespoon of butter and brush it over the top. The loaf may be huge, but will shrink some as it cools. Let it cool at least 30 minutes before slicing.
- This bread is good at room temperature but even better hot. It will keep for up to 2 days at room temperature, or slice and freeze it promptly to thaw for later enjoyment.
OM NOM NOM!
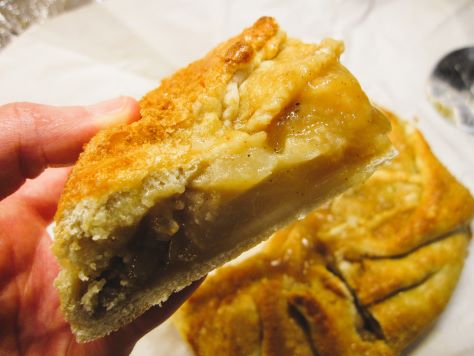
Bready or Not: Maple Pear Galette Redux
This Maple Pear Galette recipe is a must for any maple-lovers. I first featured it on Bready or Not in 2016, and it was high time to take new pictures and share the recipe anew!
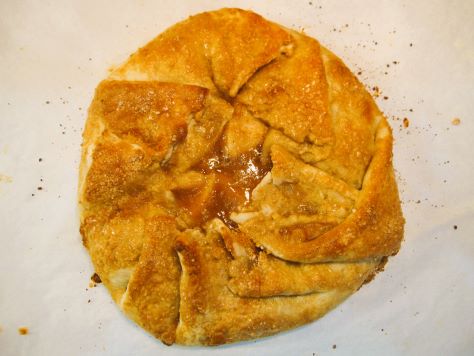
This recipe laces maple sugar into every layer: the galette dough, the thick maple paste for the pears, and as a golden accent and perfect crunch for the top of the galette.
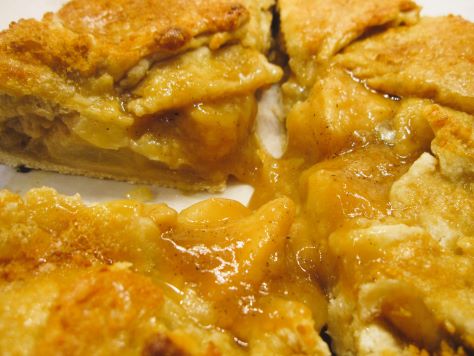
This is remarkably easy to make, too. The peeling and coring the pears is the biggest hassle. I like to make the dough a day ahead of time, which makes the assembly part go pretty fast.
I heavily modified this recipe from one found in this incredible cookbook called Maple by Katie Webster. [Affiliate link.] Seriously, if you love maple used in dishes for any meal of the day, get this cookbook! It looks like it’s now out of print, but used copies are available for decent prices.
Bready or Not: Maple Pear Galette
Equipment
- medium bowl
- large bowl
- Rolling Pin
- parchment paper
- baking sheet
- pastry brush
Ingredients
Galette
- 1 1/4 cups all-purpose flour
- 1 Tablespoon maple sugar
- 1/2 teaspoon salt
- 4 Tablespoons unsalted butter 1/2 stick
- 3 to 6 Tablespoons ice water
Interior
- 2 Tablespoons all-purpose flour
- 1/2 cup maple sugar
- 2 teaspoons vanilla extract
- 1 Tablespoon lemon juice
- 3 ripe pears peeled, cored, and cut into wedges
Topping
- 1 large egg lightly beaten
- 1 Tablespoon maple sugar
Instructions
Make the galette.
- In a medium bowl, whisk together flour, maple sugar, and salt. Add butter and work into dough so that the butter is down to pea-sized chunks. Add just enough water to incorporate as dough, smearing butter chunks in the process. Shape dough into a disk and shroud in plastic wrap; refrigerate for 30 minutes, or overnight.
- Preheat oven to 350-degrees. Place parchment paper on a large rimmed baking sheet.
Make the interior.
- In a large bowl, gently stir together the flour, maple sugar, vanilla, and lemon juice; it will form a thick paste. Gently stir in the pears to coat. Expect the mixture to become more liquid as it sits with the pears in it.
- Use some extra flour to lightly dust a large work surface. Roll out the dough to at least a foot diameter circle. Transfer it to the prepared parchment paper on baking sheet; the dough might hang over the edges for now, but that’s okay.
- Arrange the pears in a circular pattern in the center; leave a 2 1/2 to 3-inch border. Scrape the rest of the maple paste over the pears. Fold the dough inward, with the center still exposed. Brush the egg over the top and sprinkle on the remaining maple sugar.
- Bake for 40 to 50 minutes, until the crust is golden and the filling bubbles. Let cool before cutting.
OM NOM NOM!
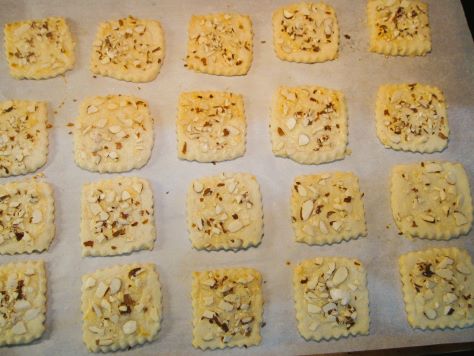
Bready or Not Original: Finnish Almond Cookies
These Finnish Almond Cookies are a lot like a classic sugar cookie, but include a topping of brushed egg, almonds, and decorator sugar to make them a little more fancy.
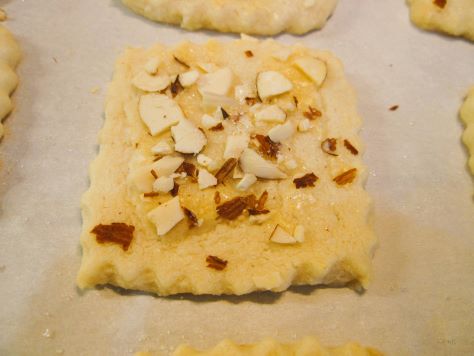
You can shape these using a regular old knife or cookie cutters, but I used this recipe as an opportunity to use a rolling pastry cutter set I’ve had for years and never tried before. I loaded the rolling cutter, rolled it, and lo and behold, it worked great!
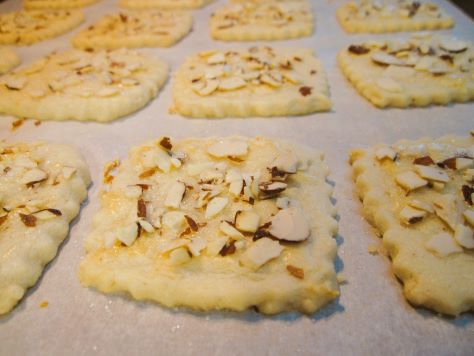
These cookies are soft and chewy. The butter and vanilla really come through. The almond pieces on top add a fantastic crunch in contrast. I imagine these would be great with chopped walnuts or pecans, too–I need to try that sometime!
Bready or Not Original: Finnish Almond Cookies
Equipment
- parchment paper
- Rolling Pin
- rolling pastry cutter or cookie cutter
- pastry brush
Ingredients
- 1 cup unsalted butter (2 sticks) room temperature
- 1/2 cup white sugar
- 2 cups all-purpose flour plus extra for surface
- 1/2 teaspoon vanilla extract or vanilla bean paste
- 1 large egg room temperature
- 1/2 cup finely chopped almonds or sliced almonds
- colored decorator sugar optional
Instructions
- In a large bowl, cream together the butter and sugar until they become light and fluffy. Beat in flour and vanilla, mixing well. Cover and refrigerate for at least an hour. If the dough chills overnight, let it sit at room temperature for a bit before rolling out, as it can get quite firm.
- Preheat oven at 350-degrees. Line a large baking sheet with parchment paper.
- On a well-floured surface, roll out the dough to 1/4-inch thick. Use a rolling pastry cutter or cookie cutters, shape cookies and move to parchment, granting each slight space to expand. Reform dough leftovers to shape more cookies.
- In a small bowl, beat the egg to break it up. Use a pastry brush to wash the top of each cookie with egg. Sprinkle almonds pieces atop each, followed by a dusting of decorator sugar, if using.
- Bake for 12 to 14 minutes, until the edges turn a touch brown. Let sit on sheet a few minutes before transferring to a cooling rack. Store in a sealed container at room temperature.
OM NOM NOM!
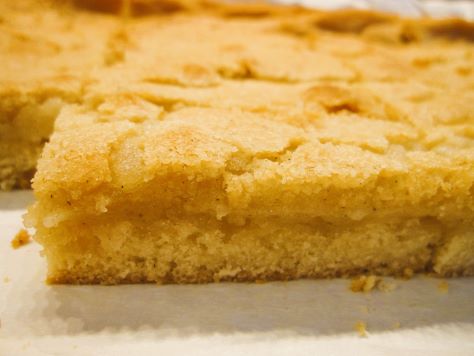
Bready or Not: St. Louis Gooey Butter Cake
A disclaimer straight up: there are many variations on this recipe, and mine is based on a version published in Bake from Scratch Magazine. I can’t say how it compares to others out there, but I can say with confidence that my recipe here is DELICIOUS.
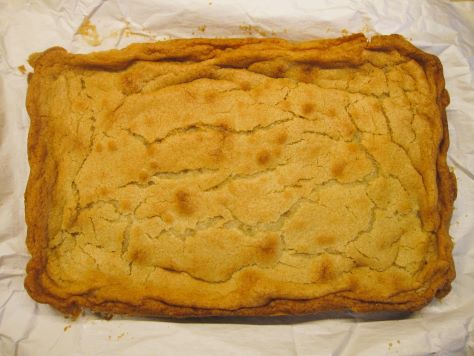
There are a lot of steps here but the progression is straightforward. In the old European style, this consists of a yeast cake base with a varied top. Both layers are sweet, soft, and chewy, but in distinct ways. You can see that in the pictures.
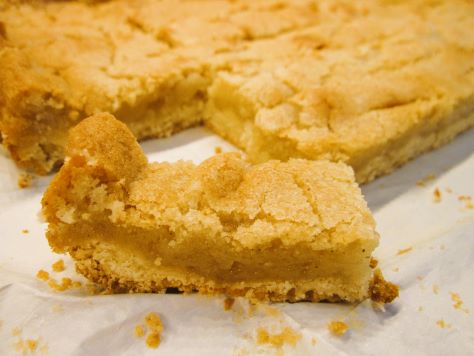
This cake is also rich. Not the kind of thing you need a big slice of. I recommend cutting it into finger-sized portions, as some shortbreads are also cut.
Bready or Not: St. Louis Gooey Butter Cake
Equipment
- stove pot
- 13×9 pan
- aluminum foil
- nonstick spray or butter
- stand mixer
- uneven spatula
Ingredients
Browned butter:
- 3/4 cup unsalted butter
Base dough:
- 5 Tablespoons whole milk or half & half, warmed to 105-110-degrees F
- 2 teaspoons active dry yeast
- 1/4 teaspoon white sugar yes this is a tiny amount to feed the yeast
- 3 Tablespoons white sugar
- 1 teaspoon kosher salt
- 6 Tablespoons unsalted butter room temperature
- 1 3/4 cups all-purpose flour
- 1 egg room temperature
- 1/2 teaspoon vanilla extract or vanilla bean paste
Topping:
- 1 1/2 cups white sugar
- 1/2 teaspoon kosher salt
- 1 egg room temperature
- 3 Tablespoons light corn syrup
- 2 Tablespoons water
- 3 teaspoons vanilla extract or vanilla bean paste
- 1 1/4 cups all-purpose flour
Instructions
Brown the butter:
- In a stove pot, heat the 3/4 cup butter on medium, stirring often. Cook until the butter is medium-brown with a nutty aroma, which takes about 7 to 10 minutes. Set aside to bring to room temperature.
Make the dough:
- Line a 13×9 pan with foil and apply nonstick spray or a coating of butter.
- In a small bowl, mix together warm milk, yeast, and 1/4 teaspoon sugar. Let stand about 5 minutes. It should become foamy.
- In a stand mixer with a paddle attachment, mix more base dough ingredients: white sugar, kosher salt, and remaining butter, beating for about 3 to 4 minutes until they become creamy. Stop and scrape the bowl as needed. To that, add the yeast mixture, flour, egg, and vanilla. Raise the speed to medium and beat until everything is combined and elastic, about 4 to 5 minutes, scraping the bowl on occasion. The dough should be tacky but shouldn’t stick to hands.
- Press the dough into the prepared pan in a thin layer. Cover loosely with plastic wrap and let it rise in a warm spot in the kitchen until it doubled in size, about 2 hours. In the meantime, clean the mixer bowl and paddle attachment.
Make the topping:
- Preheat oven at 350 degrees.
- To the mixer bowl, add the browned butter, white sugar, and salt, beating to combine, then raising the rhythm to medium to beat until fluffy, about 4 to 5 minutes. Beat in the egg.
- In a separate small bowl, whisk together the corn syrup, water, and vanilla. With the mixer on low, add the flour to the butter mixture alternatively with the corn syrup mix. Scrape the bowl as needed. Use an uneven spatula to spread the topping over the risen dough.
- Bake until the top is set and the edges are golden brown, anywhere from 25 to 35 minutes. The center can still be a touch soft and jiggly. Let cool completely in pan, chilling in fridge if desired. To cut, use the foil to lift the contents onto a cutting board. Slice into finger sized (1×4) portions.
OM NOM NOM!
Bready or Not: Cornish Fairings Cookies
Cornish Fairings Cookies (to use the American wording, as these would be Corning Fairings Biscuits at their point of origin in Cornwall) are light, delicious cookies that use golden syrup for flavor and sweetness.
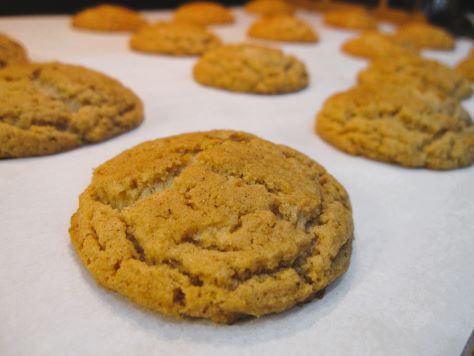
Golden Syrup is a delicious ingredient out of the UK. Some recipes call for using a half and half mix of light corn syrup and honey to replace it in American recipes, but I’ve found that’s not a good replacement for the flavor. If you’re in the US, look for Lyle’s Golden Syrup in the British section of a grocery store or at World Market.
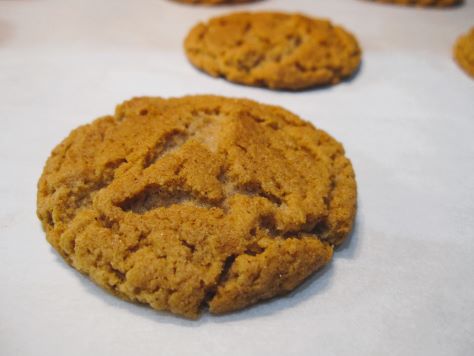
Ginger gives these cookies a pleasant warming element, but I should note that these aren’t heavy like most gingerbreads. This is something different, light and chewy.

Do note that I found these cookies got stiffer in texture after a day, but they were still delicious.
Adapted from Bigger Bolder Baking by Gemma Stafford.
Bready or Not: Cornish Fairings Cookies
Equipment
- parchment paper
- baking sheet
- food processor
- teaspoon scoop
Ingredients
- 1/2 cup unsalted butter 1 stick
- 1 1/2 cups all-purpose flour
- 1/2 cup light brown sugar packed
- 2 teaspoons ground ginger
- 2 teaspoons baking powder
- 1 teaspoon baking soda
- 1 teaspoon ground cinnamon
- 1/2 teaspoon salt
- 6 Tablespoons golden syrup
Instructions
- Preheat oven to 400-degrees. Line a baking sheet with parchment paper.
- Using a food processor, dice up butter. Add flour, brown sugar, ginger, baking powder, baking soda, cinnamon, and salt, and pulse to mix, scraping the blades clean as needed. Add golden syrup and pulse to incorporate.
- Use a teaspoon scoop to dole out dough, spaced out, on parchment paper. Bake for 7 to 9 minutes, until cookies are set and crackled across the top. Cool on sheet for a few minutes, then transfer to a rack to completely cool. Store in an airtight container at room temperature; they will get stiffer in texture after a day, but the flavor is still wonderful.
OM NOM NOM!
Follow me


