


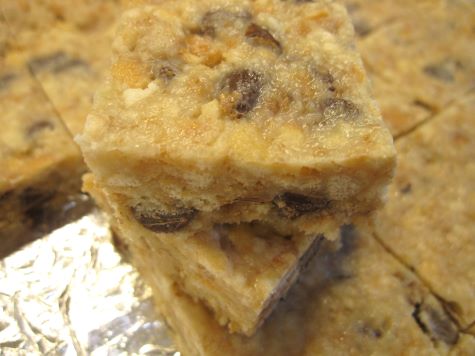
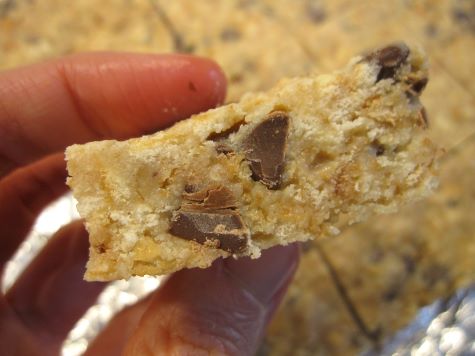
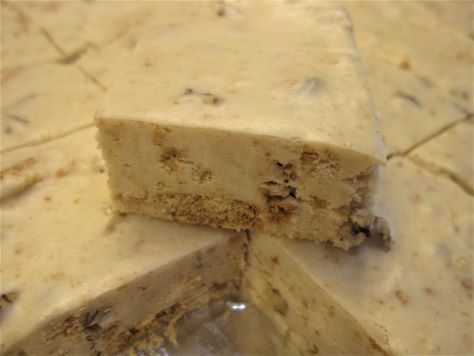
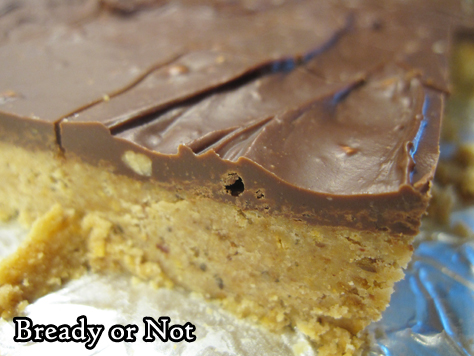
Bready or Not: No-Bake Triple-Decker Toffee Bars
These No-Bake Triple-Decker Toffee Bars are a sweet summertime treat. No oven is required, and there’s only a brief time standing at the stove. The result is, essentially, a homemade candy bar made from simple ingredients.
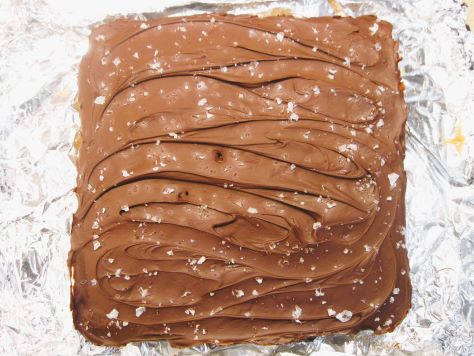
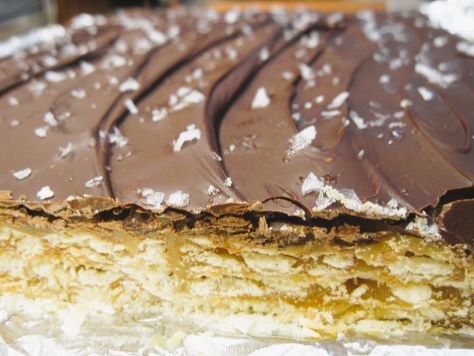
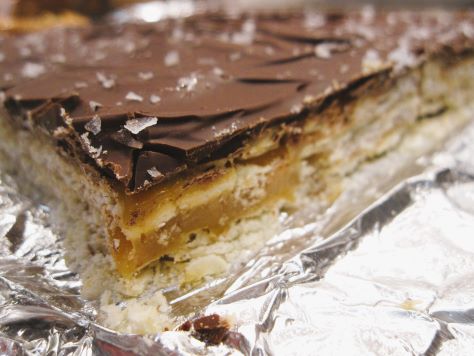
Saltine crackers form the basis for the three layers of these bars. They add intense crispiness that holds up to a deluge of toffee, but they also add salt. That salt really builds incredible flavor throughout the layers, and the flaky sea salt on top adds even more.
The homemade toffee in this recipe isn’t terrible to work with, but please, use caution. It can go from a simmer to a boil FAST, and you do not want that molten sugar on your skin. So, keep an eye on the temperature and bring it down as you need to, and keep stirring the toffee as the directions say. Once this gets going, don’t leave the pot unattended.
Modified from Southern Living December 2022 issue.
Bready or Not: No-Bake Triple-Decker Toffee Bars
Equipment
- 9×9 pan
- aluminum foil
- nonstick spray
- offset spatula
Ingredients
- 48 saltine crackers from a 16-ounce package, divided
- 3/4 cup light brown sugar packed
- 1/2 cup unsalted butter
- 14 ounces sweetened condensed milk one can
- 3 Tablespoons half & half
- 2 Tablespoons light corn syrup
- 1/4 teaspoon kosher salt
- 1/2 teaspoon vanilla extract
- 8 ounces chocolate chips or chocolate bark
- 1 teaspoon flaky sea salt
Instructions
- Line a 9×9 pan with foil, overlapping two long strips to cover all four side. Apply nonstick spray all over interior. Place 16 crackers in a single layer to form a base crust. On a plate, count out 32 more crackers to have ready to make the next layers quickly. Stage the uneven spatula nearby.
- In a saucepan on the stove, cook sugar and butter, stirring often, until the butter is melted and the sugar is dissolved. That will take about 5 minutes. Pour in the sweetened condensed milk, half & half, corn syrup, and salt. Increase the heat to medium to bring the contents to a simmer. Stir constantly. Continue stirring–bringing the heat down as needed to keep it at a simmer, not a full boil–for about 6 to 8 minutes, until it obtains a deep golden color. Remove the pan from heat and add the vanilla extract.
- Carefully pour about 1/3 of the toffee over the crackers. Set down pan and quickly use the spatula to spread the toffee into an even layer. Place 16 more crackers on top. Add another 1/3 of toffee. Place the last of the crackers, and then pour the rest of the toffee on top and even it out. Let cool for a few minutes. Clean the uneven spatula.
- Meanwhile, melt the chocolate using a microwave-safe bowl in the microwave or a pot on the stovetop. Slowly pour the chocolate over the top of the of the cracker-toffee stack and use the spatula to even it out. Let it cool about 5 minutes. Measure out the flaky sea salt and sprinkle it all over the top.
- Place the pan in the fridge to chill for at least 2 hours or overnight.
- Remove from fridge and let set at room temperature about 10 minutes, which will reduce the amount of crackling across the chocolate top. Use the foil to lift the contents onto a cutting board. Use a knife to cut off the very edges to form neat sides, and then cut the rest of it into small bars.
- Store bars in a sealed container in the fridge for up to a week.
OM NOM NOM!
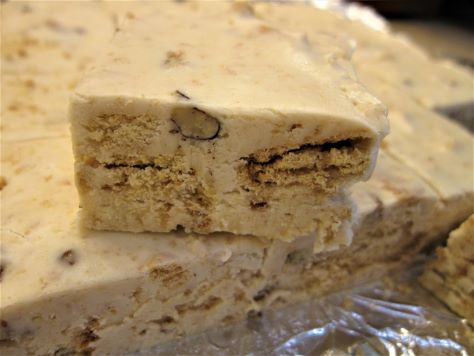
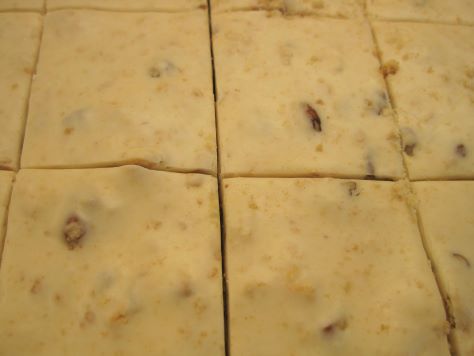
Bready or Not: No-Bake Cookie Bars
When you have no time to bake and you need sweets fast–or you don’t have an oven or can’t heat the house–no-bake treats are the way to go. These No-Bake Cookie Bars involve little fuss and are sweet and tasty.
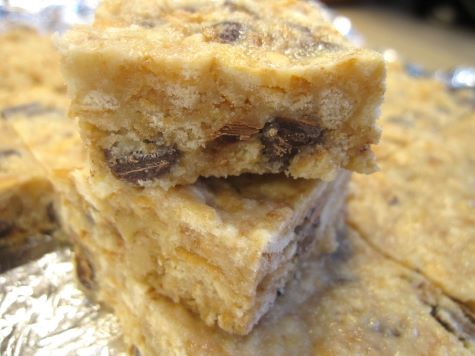
Also, these are pretty cheap to make. I used a generic kind of vanilla wafers that were a dollar-something.
Since I live in Arizona, I had to store these in the fridge, but in most places, you’d probably be fine keeping them at room temperature.
Bready or Not: No-Bake Cookie Bars
Equipment
- 9×9 pan
- nonstick spray
- aluminum foil
- waxed paper
- heavy glass
Ingredients
- 11 ounces vanilla wafer cookies generic is fine
- 14 ounces sweetened condensed milk
- 1 cup chocolate chips semisweet or milk
- 1/2 cup chopped walnuts or pecans
- 1 teaspoon pure vanilla extract
- 1/4 teaspoon salt
Instructions
- Line a 9×9 pan with foil and apply nonstick spray.
- Use a food processor or a gallon bag, rolling pin, and muscle to crush all of the vanilla wafers.
- In a big bowl, stir together the cookies crumbs, sweetened condensed milk, chocolate chips, nuts, vanilla, and salt. Completely mix and coat.
- Dump the mixture into the prepared pan. Level it out, then use waxed paper and a heavy object such as a glass to evenly compress the crumbs. Chill in fridge for at least 2 hours.
- Use the foil to lift the contents onto a cutting board. Slice up and store in a sealed container either at room temperature or in the fridge.
OM NOM NOM!
Bready or Not Original: Quick Maple Cookie Fudge Redux
Let’s finish off the year 2022 by reviving a recipe first on Bready or Not in 2016: Maple Cookie Fudge!
This is a shortcut fudge without any need of a candy thermometer or stress. I like to use the microwave, but you can use the stovetop if you want. You can keep the maple cookies chunky, if you desire, or grind everything to crumbs–your choice! I actually like some small chunks mixed in for texture.
The maple flavor is nice and consistent here, not cloying, while the marshmallow fluff grants the texture some extra oomph. The nuts add an extra flavor and crunch, but you can omit them if you want.
This maple cookie fudge is just about perfect if you ignore the pesky nutritional side of things.
Bready or Not Original: Quick Maple Cookie Fudge
Equipment
- 9×13 pan
- aluminum foil
- nonstick spray or butter
Ingredients
- 3 cups white chocolate chips
- 12.3 ounces maple crème cookies crushed/chopped/maimed, about 20 cookies
- 7 ounces marshmallow fluff
- 14 ounces sweetened condensed milk
- 1 teaspoon maple flavor
- 1 teaspoon vanilla extract
- 1/2 cup chopped nuts walnuts, pecans, macadamias, etc
Instructions
- Prepare a 9×13 pan by lining it with foil and applying nonstick spray.
- Either in microwave or on stovetop, carefully melt chocolate with sweetened condensed milk and marshmallow cream. If microwaving, do it in short bursts because it can burn fast! Stir often.
- When the mix is smooth, add the maple flavor and vanilla. Fold in the maple cookies and nuts. Pour fudge into the prepared pan. Use an uneven spatula to smooth out the top.
- Refrigerate at least 3 hours, until the fudge is firm. Cut into bite size pieces. Keep stored in fridge between layers of wax paper. Unlike some other quick fudges, this will keep well for hours at room temperature.
OM NOM NOM!
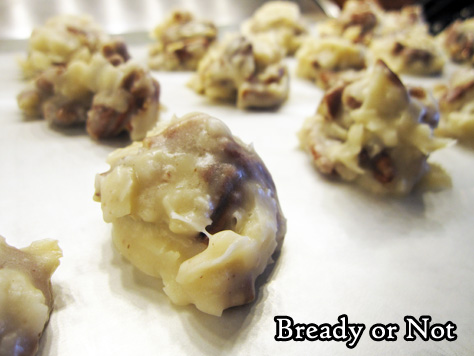
Bready or Not Original: No Bake Pecan Praline Cookies
Do you need cookies ready, FAST? These no-bake wonders are prepared in minutes and just need 15 minutes to set.
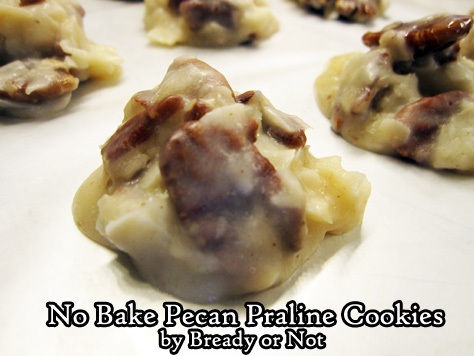
Traditional pecan pralines are crunchy and sweet. This no-bake cookie version definitely has all that going on, with added chewiness from coconut.
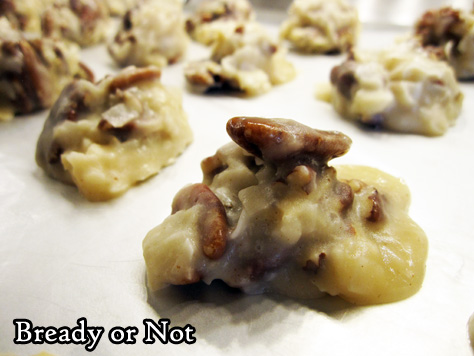
I highly recommend using unsweetened coconut flakes or shreds here, as these cookies are not lacking at all in the sugariness department!
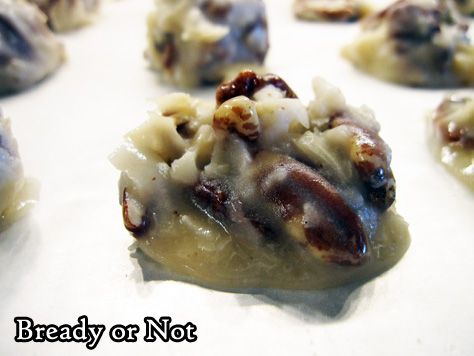
It’s amazing to me how something so goopy and hot can so quickly become set and easy to handle. This is the ultimate in fast-and-delicious cookies.
Bready or Not Original: No Bake Pecan Praline Cookies
Equipment
- large saucepan
- cookie sheet
- waxed paper
- tablespoon scoop
Ingredients
- 2 1/2 cups pecans chopped or whole
- 2 cups unsweetened coconut flakes or coconut shreds
- 2 1/2 cups white sugar
- 1/2 cup milk
- 1/2 cup light corn syrup
- 1 stick unsalted butter 1/2 cup
- 1 teaspoon vanilla extract
Instructions
- Prepare a large cookie sheet, or several sheets, with waxed paper. In a bowl, stir together the pecans and coconut.
- In a saucepan on medium-high heat, stir together the sugar, milk, corn syrup, and butter. Continue to stir while bringing the mixture to a rolling boil. Stabilize the heat so that it continues to boil for 3 minutes.
- Remove pot from heat. Pour in the vanilla. Follow up with the pecans and coconut, stirring well to coat everything in goopy hot sugar.
- Use a tablespoon scoop to dole out cookies on the waxed paper. If they fall apart a bit, carefully use a spoon or the scoop to shape them again. Let cookies set, at least 15 minutes. Carefully peel them away from the waxed paper; note that the first scoops may be more prone to stick.
- Store cookies in a sealed container.
OM NOM NOM!
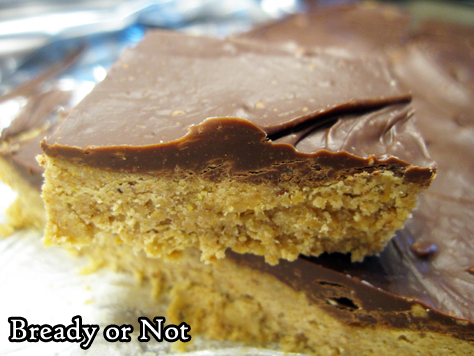
Bready or Not Original: No-Bake Peanut Butter Bars
When you need a dessert in a hurry, these delicious No-Bake Peanut Butter Bars are the way to go.
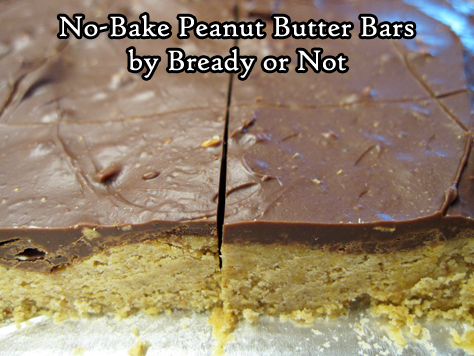
I especially enjoy this recipe because it doesn’t involve the oven, which is a wonderful thing during Arizona summers.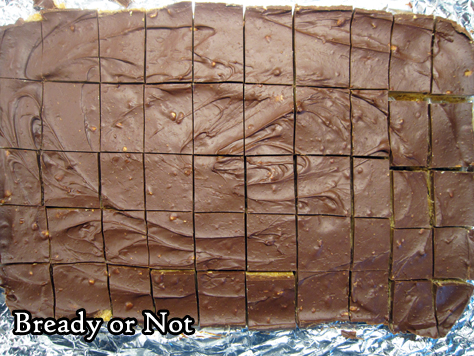
These bars come together in minutes thanks to a microwave, and they only need a few hours to set. You end up with an entire casserole dish of candy bars. Yum.
Use crunchy or creamy peanut butter. I used a jar from Trader Joe’s that had flaxseeds mixed in, and my son didn’t like it. This recipe gave me a way to use it up by sending the result with my husband to work!
This would be an easy recipe to dress up, too. Add sprinkles, nuts, or cacao nibs atop the chocolate. Have fun with it!
Bready or Not Original: No-Bake Peanut Butter Bars
Equipment
- 13x9 pan
- large microwave-safe bowl
- uneven spatula
Ingredients
Bars
- 2 cups peanut butter crunchy or smooth
- 1 cup unsalted butter 2 sticks
- 2 cups graham cracker crumbs
- 2 cups confectioners' sugar
Ganache
- 1 1/2 cups chocolate chips semisweet, dark, milk, or a mix
- 1/4 cup peanut butter crunchy or smooth
Instructions
- Line a 13x9 pan with foil and apply nonstick spray or butter.
- In a large microwave-safe bowl, melt together the peanut butter and butter by zapping in short increments and stirring well between each pass. Once they mix together, stir in the graham cracker crumbs and confectioners' sugar. Spread the mixture into the prepared pan. Use a hands or maybe a piece of waxed paper and a heavy glass to compress the layer as much as possible.
- Use the same microwave-safe bowl to bowl for the chocolate chips and peanut butter, again zapping in brief increments and stirring well between each burst. Once they can mix together smoothly, dump dollops atop the layer in the pan. Use an uneven spatula to even out the chocolate to the edges.
- Chill in the fridge for at least 2 hours.
- Use the foil to lift the contents onto a cutting board. Let sit for about 10 minutes, enough time to soften the chocolate so that it doesn't shatter when sliced. Use a long knife or sharp bench knife to cut bars. If desired, cut off edges first to produce neater pieces to share.
- Store bars in a sealed container in the fridge with waxed paper between the layers. Keeps for days.
OM NOM NOM!
Bready or Not Original: Hard Maple Candy
This Hard Maple Candy garnered the name “Canadian meth” at my husband’s work. By that nickname, I take it that they 1) liked it, and 2) kept eating it.
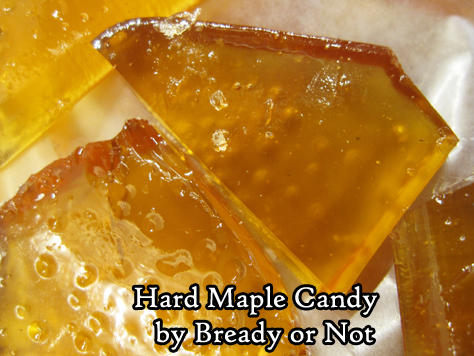
On a more personal note, this candy could also work as a shiv, because this stuff is like GLASS. Trust me when I say that if you decide to break this into pieces with your hands, you will get little cuts all over. Ow.
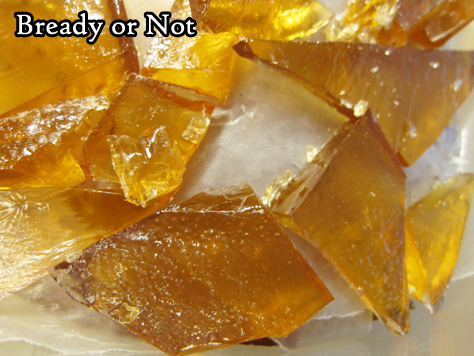
So maybe tap the candy gently with the butt of a butter knife or use a little mallet, whatever you have that will break the candy apart without harming your pan, counter, or you.
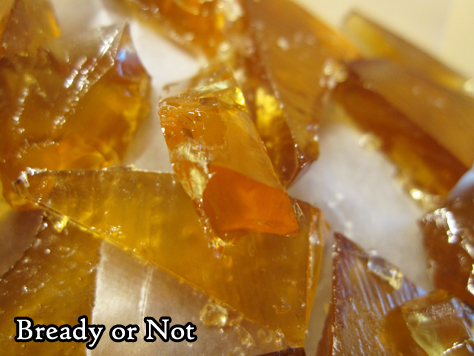
Once you survive that stage, though, wow will you have a lot of candy to enjoy. Definitely make this to share with a crowd, or you just might go into diabetic shock.

It’d be a delicious way to go, but seriously, I don’t recommend going at all. We’ve made it this far in 2020. Hold on a while longer.
Bready or Not Original: Hard Maple Candy
Equipment
- 15x10x1-inch pan (jelly roll pan)
- candy thermometer
Ingredients
- nonstick spray
- 3 1/2 cup white sugar
- 1 cup light corn syrup
- 1 cup water
- 3 Tablespoons maple flavor
Instructions
- Heavily apply nonstick spray to the jelly roll pan.
- In a large saucepan, stir together the sugar, corn syrup, and water. Start heating up. Set up candy thermometer and stir frequently as the heat rises to 300-degrees, which is hard-crack stage.
- Remove pan from heat. Stir in maple flavoring. Immediately pour candy into the prepared pan. Cool completely, which won’t take long.
- Carefully break into pieces. Note that this stuff is like candy glass, and if breaking with hands, it can and will cut the skin.
- Pack into individual bags or tins for gift-giving, or stack it in a large sealed container with waxed paper between layers. Can keep for weeks.
OM NOM NOM!
Follow me


