


Bready or Not: White Chocolate Peppermint Bundt Cake
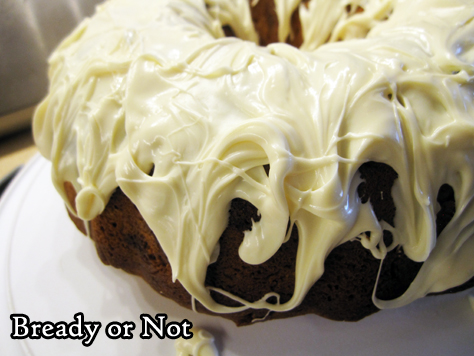
This White Chocolate Peppermint Bundt Cake features a light, refreshing peppermint flavor and a lot of white chocolate. Seriously, it’s a snow-capped mountain of a cake.

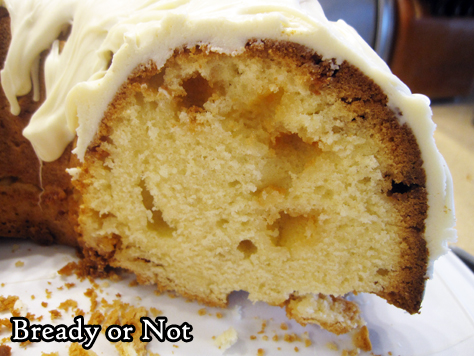
Don’t look for health food here. This thing is sweet. Lush. The middle is moist and dense, with a base (the former top) wonderfully crunchy in contrast.
White chocolate is melted into the batter, with chips also mixed in. See the golden dapples throughout the crumb? Those are the chips. They are like sweet explosions in the mouth.
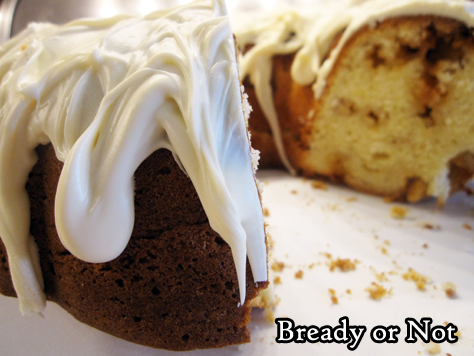
And yes, there’s that snow cap: a thick blanket of melted-down chocolate wafers. It ends up firm, but ready to melt again once it meets the warmth of a mouth. It’s perfect along with that tender cake.
This will be great for any December gathering, but it’s so delicious, you’ll want to make it year-long!
Bready or Not: White Chocolate Peppermint Bundt Cake
Equipment
- 10-cup bundt cake
- nonstick spray with flour
- microwave-safe bowls
Ingredients
Cake:
- 3/4 cup unsalted butter 1 and a half sticks, softened
- 1 1/2 cups white sugar
- 3 large eggs room temperature
- 2 teaspoons vanilla extract
- 1/2 teaspoon peppermint extract
- 3 cups all-purpose flour
- 1 1/2 teaspoons baking powder
- 1/2 teaspoon kosher salt
- 1/2 cup half & half or milk
- 8 ounces white chocolate chips divided
- 1/2 cup sour cream
Topping:
- 8- ounces white chocolate melting wafers melted
- 5 peppermint candies crushed, optional
Instructions
- Preheat oven at 325-degrees. Apply nonstick spray with flour to coat the interior of the bundt pan.
- In a big bowl, beat the butter and sugar until fluffy. Add eggs one at a time, followed by the extracts.
- In a separate bowl, stir together flour, baking powder, and salt. Gradually mix the dry ingredients into the big bowl alternatively with the half & half, beating until they are just combined.
- In a microwave-safe bowl, heat 2 ounces of white chocolate chips in 30 second bursts, stirring well between each zap, until it’s melted and smooth; keep an eye on the white chocolate, as it can burn fast! Add the melted chocolate into the cake batter. Follow that with the sour cream and the remaining white chocolate chips. Pour batter into the prepared pan.
- Bake for about 1 hour 15 minutes; the middle should pass the toothpick test. If it’s getting overly brown near the end, cover the top with foil.
- Let cake cool in pan for 20 minutes, then upend onto a cooling rack. Cool completely, speeding process in fridge if desired.
- Melt chocolate wafers in microwave or on stovetop. Drizzle atop cake to form a thick snowcap. If desired, top with peppermints.
OM NOM NOM!
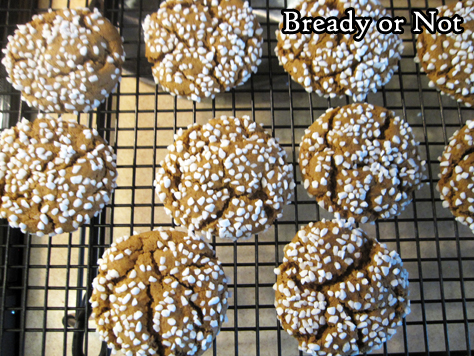
Bready or Not: Pearl Sugar Ginger Cookies
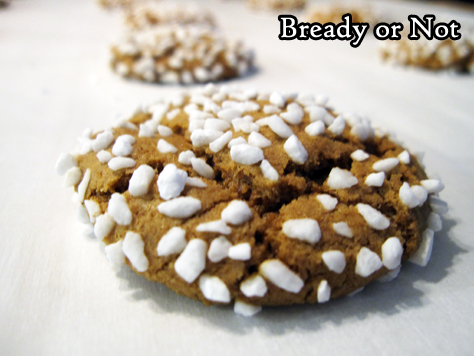
Pearl Sugar Ginger Cookies! These beauties are holiday-perfect with their crackled gingerbread looks and a crusting of pearl sugar.
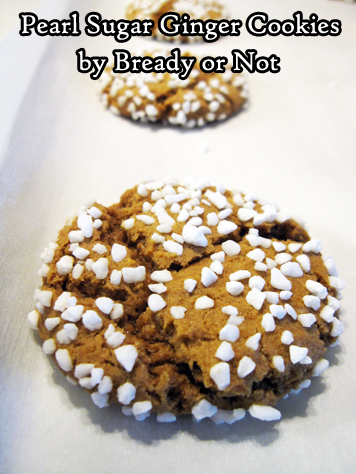
What is pearl sugar, you ask? Something awesome! It’s the kind of thing you see in Scandinavian bakeries, and through the miracle of the internet, you can now use it in home baking as well.
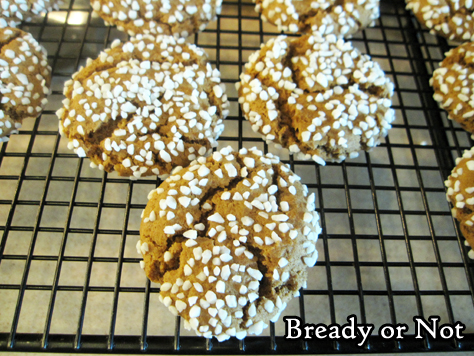
I highly recommend the stuff. Not only is it pretty, but it adds an texturally-pleasant crunch. That is especially nice with these cookies, as the actual cookie is quite chewy. The sugar granules make it into something extraordinary.
If you can’t find pearl sugar in nearby stores (I can’t), it is available on Amazon. I like the Lars’ brand. [affiliate link]
These cookies will keep for upwards of a week in a sealed container, making them perfect for holiday cookie trays and gift-giving.
Recipe modified from my favorite baking magazine, Bake from Scratch.
Bready or Not: Pearl Sugar Ginger Cookies
Equipment
- parchment paper
- teaspoon scoop
Ingredients
- 1/2 cup unsalted butter (1 stick) room temperature
- 3/4 cup white sugar
- 1/4 cup light brown sugar packed
- 1 medium lemon zested
- 1/3 cup molasses not blackstrap
- 1 large egg room temperature
- 2 1/4 cups all-purpose flour
- 2 teaspoons ground ginger
- 1 teaspoon baking soda
- 1 teaspoon kosher salt
- 3/4 teaspoon ground cinnamon
- 1/2 teaspoon ground cardamom
- 1/2 teaspoon ground cloves
- 1 cup Swedish pearl sugar
Instructions
- Preheat oven to 350-degrees. Line a baking sheet with parchment paper.
- Beat together the butter, white sugar, brown sugar, and lemon zest until fluffy. In a stand mixer , this will be 2 to 3 minutes. Add the molasses and egg, scraping the bowl to make sure everything is mixed.
- In a separate bowl, stir together the flour, ginger, baking soda, salt, cinnamon, cardamom, and cloves.
- Gradually add the dry ingredients to the butter mixture. Stage the pearl sugar in a small bowl.
- Use a teaspoon scoop to form balls of dough. Roll them in the pearl sugar. If the granules aren’t sticking well, lightly dampen the dough and try again. Place the balls spaced out on the pan.
- Bake until the cookies look crackled on top with the edges just set, at 10 to 12 minutes. Let set on pan a few minutes before transferring cookies to a rack to completely cool. Store cookies in an airtight container at room temperature.
OM NOM NOM!
New Poetry Publications
I have a number of stories set to come out in the next few months, but somehow, October ended up being a month for poetry releases!
- “Follow the Meandering Path” in Abyss & Apex Issue 80: 4th Quarter 2021
- “The Eye of the Kraken” in Eye to the Telescope Issue 42: The Sea
- “Demons,” Star*Line 44.4 Winter 2021
#SFWAPro
Read MoreBready or Not Original: Bread Machine Cheesy Soft Dinner Rolls
I upgraded my original Soft Dinner Roll recipe in the most Beth Cato way possible: I added loads of cheese!

I don’t simply mix cheese into the dough like with a standard cheesy roll or biscuit recipe. Nah, that’s too mundane. I tried a take on lamination–the French technique wherein butter is layered to create flaky layers in pastry. But with cheese.
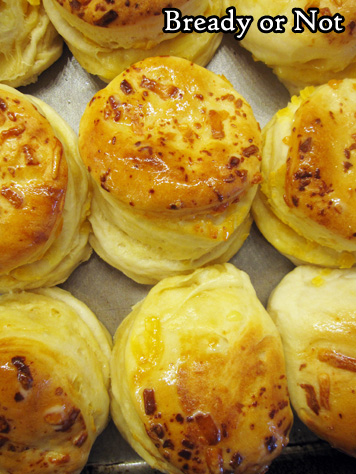
It worked out, in a beautiful way. In these pictures, you see a fine Vermont Cheddar. I highly recommend using an orange cheese (Cheddar, or if you are blessed, something like Red Leicester) because the finished rolls look amazing. White Cheddar would be great for flavor, too, though it would blend in more.
I wrote this recipe for bread machines, but it would be easy to modify to make by hand. Just let the dough have an initial rise for about an hour, mix the first portion of cheese in, then let it rise again before the lamination stage.

Bready or Not Original: Bread Machine Cheesy Soft Dinner Rolls
Equipment
- bread machine
- jelly roll pan or baking sheet
Ingredients
- 1 cup warm water about 110 degrees
- 1/4 cup vegetable oil
- 2 Tablespoons white sugar
- 3 cups bread flour
- 1 teaspoon kosher salt
- 2 1/4 teaspoons instant yeast or 1 packet instant yeast
- 6 ounces cheddar cheese shredded
Instructions
- Add ingredients EXCEPT cheese into the bread machine. That often means the liquids first. Set the machine on dough cycle and start; this should run for about 2 hours. Once the dough starts mixing, sprinkle in about half the cheese. If necessary–and if safely possible, dependent on the machine–use a spatula to press cheese into the dough. Let dough cycle continue until done.
- Prepare a cookie sheet or jelly roll pan by greasing with butter or nonstick spray.
- Pat out dough on an even lightly-greased surface. It’s time to add the rest of the cheese using a process roughly like French butter lamination.
- Sprinkle a handful of cheese over the lower portion of dough. Fold top part over it, then fold dough the other way, creating a fat dough ball. Pat out dough again. Repeat process again one or two more times, until only a handful of cheese is left.
- Pat out dough again. Use a small round cutter to slice out portions of dough. Place them in the prepared pan, spaced so they don’t quite touch. Sprinkle the remaining cheese on top. Cover pan with plastic wrap or a light towel and let rise again in a warm spot for 30 minutes to 1 hour, until rolls become puffy and double in size.
- Preheat oven at 350-degrees.
- Bake rolls for 15 to 22 minutes. If they begin to brown too much, cover with foil halfway through. Let rolls cool a few minutes before serving.
- Completely cooled rolls can be frozen in gallon freezer bags for several months. Sealed rolls will keep well at room temperature for at least 6 days. They are good eaten at room temperature, but are best briefly warmed in the oven.
*OM NOM NOM!*
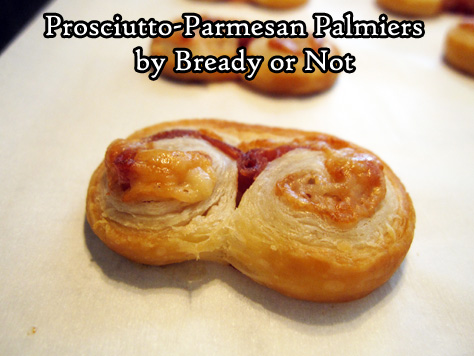
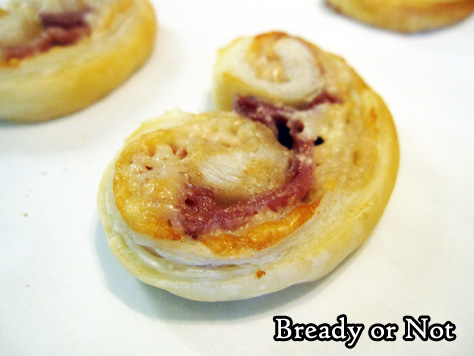
Bready or Not Original: Prosciutto-Parmesan Palmiers
The holiday season is nigh, and these Prosciutto-Parmesan Palmiers are the perfect appetizer for a couple or an entire gang!
These really have three ingredients, plus some flour for dusting a counter. They take minutes to assemble. Stash them in the freezer for hours or days. They bake up fast. They make bellies happy.
Plus, I daresay, they are downright pretty. I love the layers in puff pastry! Here, those crisp buttery layers are fantastic along with shredded cheese and thin slices of prosciutto.
Honestly, these are dangerous. It’s hard to eat just one.
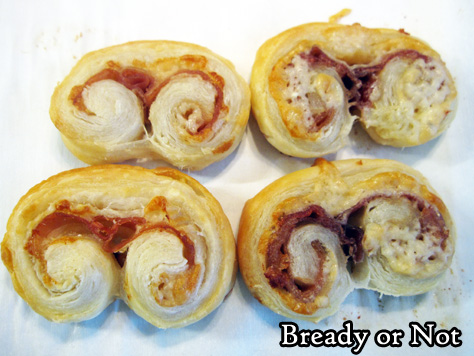
However, if you can exercise restraint, the leftovers are delicious. They can be eaten cold (the prosciutto is the prominent flavor then), but are better with a brief warm-up in the oven.
Make these your go-to game day, holiday event, or date night treat!
Bready or Not Original: Prosciutto-Parmesan Palmiers
Equipment
- parchment paper
- knife
Ingredients
- flour to dust surface
- 1 sheet puff pastry (half a box) thawed in fridge
- 1/2 cup shredded Parmesan packed
- 2 to 3 ounces sliced prosciutto
Instructions
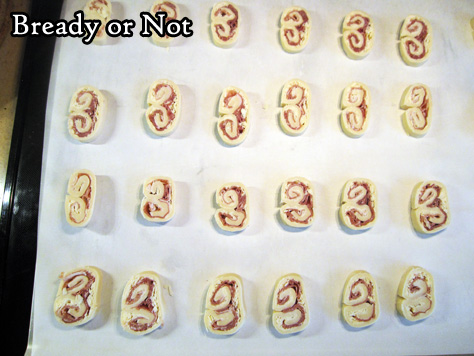
- Hours or days before baking day: Sprinkle flour on a flat, clean surface. Roll out the puff pastry to make a 12-inch square. Cut in half. Sprinkle cheese over both halves. Place prosciutto slices to completely cover cheese; if there is extra meat, layer on the additional pieces. Roll the short sides of each piece of pastry together to meet in the middle–from the end, it will look rather like a number 3. Repeat this with the other half.
- Encase both logs in plastic wrap and freeze until firm, at least an hour, but as long as several days.
- Preheat oven at 400-degrees. Prepare a large baking sheet with parchment paper.
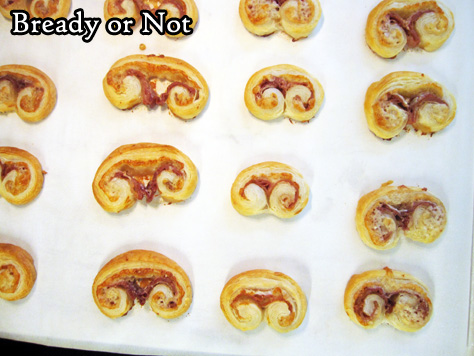
- Pull out frozen logs to thaw for just a few minutes. While it is still mostly frozen, slice into 1/4-inch pieces and place spaced out on parchment. (Note that the end pieces may be sparse on filling and not presentable for company, but still worth baking up for private enjoyment.)
- Bake for 12 to 15 minutes until palmiers are golden brown and puffed. They are best eaten fresh, but leftovers can be refrigerated. They are okay cold, but better toasted briefly again in the oven.
