


Bready or Not: Fudgy Chocolate Chunk Brownies
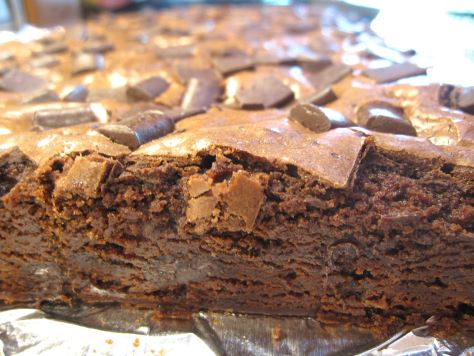
These Fudgy Chocolate Chunk Brownies are thick and rich. Plus, they even look amazing thanks to the chocolate chunks on top!

My favorite go-to for chocolate chunks are the German chunks sold at Aldi. They are way cheaper than those sold at other stores, but the quality is high. (I’m a major Aldi fan. They have one of the best cheese selections around, too!)
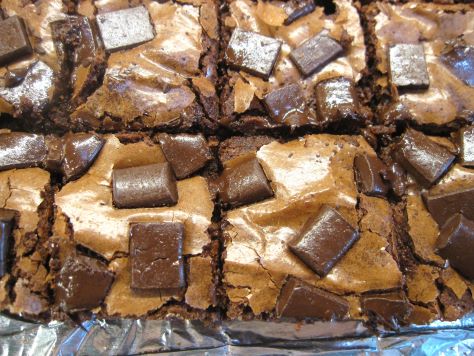
If you want to make these have a neat presentation, slice off the edges. Then eat those edges, because they can’t go to waste.
Modified from Food Network Magazine October 2013.
Bready or Not: Fudgy Chocolate Chunk Brownies
Equipment
- 9×13 dish
- aluminum foil
- uneven spatula
Ingredients
- 1 1/2 sticks unsalted butter
- 1 1/2 cups all-purpose flour
- 1/2 cup cocoa powder sifted
- 1/2 teaspoon salt
- 8 ounces dark chocolate
- 2 cups white sugar
- 6 large eggs room temperature
- 1 1/2 cups semisweet chocolate chunks
Instructions
- In a large microwave-safe bowl or in a pot on the stovetop, melt together the butter and dark chocolate until smooth. Set aside to cool slightly.
- Preheat oven at 325-degrees. Line a 9×13 pan with foil and apply nonstick spray or butter.
- In a small bowl, combine the flour, cocoa powder, and salt.
- Return to the large container with the melted butter and chocolate. Stir in the sugar until no white streaks remain. Beat in the eggs one at a time. Gradually fold in the dry ingredients. Fold in 1 cup of chocolate chunks.
- Pour batter into the prepared dish. Use an uneven spatula to spread it into an even layer. Sprinkle the remaining 1/2 cup chocolate chunks over the top.
- Bake for 40 to 45 minutes, until the middle passes the toothpick test. Set on a rack to cool for at least an hour, speeding process in fridge if desired. Use foil to lift contents onto a cutting board to slice up. Store in a sealed container at room temperature.
OM NOM NOM!
Bready or Not: Cheesy Fantail Rolls
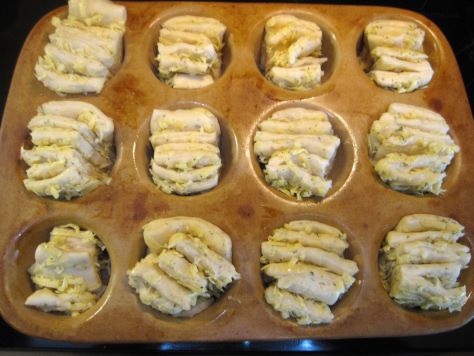
If you know anything about me, you know I’m all about cheese. These Cheesy Fantail Rolls deliver all that good stuff with cheese in the dough and oozing from between the layers of dough.
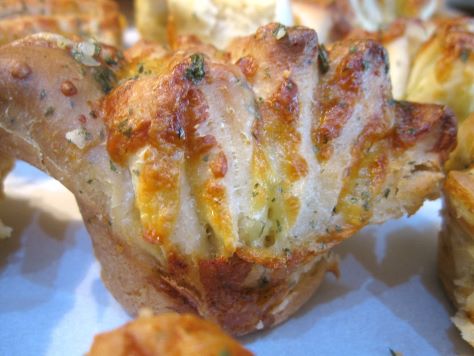
I based this on a Bake from Scratch recipe for Parmesan-Gouda Fantails. I’m more flexible about the cheese. Just go with a good melter, or a combination of melters. I did a whole block of Roth Dill Havarti. Another firm cheese with herbs would be great. If you like spice? Go with a spicy blend. Have fun with it.
My other big recommendation is that you don’t use pre-shredded cheese, as it’s coated with preservatives and won’t melt as well. But if that’s all you have, well, it won’t end the world.
Do reserve a block of time for this recipe. Shaping the rolls isn’t hard, but it is fiddly, and it will make a mess on your counter or table. However, that effort is well worth it, because these rolls are gorgeous and delicious.
Bready or Not: Cheesy Fantail Rolls
Equipment
- stand mixer
- microwave
- 12-cup muffin pan
- pastry brush
Ingredients
- 1 cup light beer room temperature
- 1 Tablespoon white sugar
- 2 1/4 teaspoons active dry yeast
- 8 Tablespoons unsalted butter melted and divided
- 3 cups all-purpose flour
- 2 cloves garlic minced
- 1 1/2 teaspoons dried parsley divided
- 1 teaspoon kosher salt
- 8 ounces cheese such as cheddar, havarti, or other good melter; shredded
Instructions
- In a microwave-safe bowl, microwave 1/4 cup beer until it is 105-110-degrees Fahrenheit. (If it overheats, cool it for a few minutes.) Add sugar and yeast, stirring to combine. Let it sit about 5 minutes; it should become foamy. Stir in 6 Tablespoons of melted butter and the remaining 3/4 cup beer.
- In a stand mixer with a paddle attachment, mix 2 cups flour, a healthy pinch of shredded cheese, 1 minced garlic clove, 1 teaspoon of dried parsley, and the kosher salt. Add yeast mixture and stir for a minute. Gradually add the remaining 1 cup flour, beating until the dough begins to pull away from the sides of the bowl. That will be after 3 to 4 minutes. Cover the bowl with plastic wrap or a towel, and let it stand in a warm place for about 45 minutes.
- Apply nonstick spray to the wells in a 12-cup muffin pan.
- Punch down dough and divide it in half. On a lightly floured surface, roll a half into a 12-inch square. Sprinkle half of the grated cheese over the dough. Use a bench knife or pizza cutter to slice dough into 6 equal strips. Stack strips, cheese side up, and cut crosswise into 6 equal pieces. Place each segment of 6 stacked mini strips into a muffin cup. Repeat with remaining dough.
- Slightly separate and stretch each piece of dough in the cups. Cover with plastic wrap or a towel to rise in a warm spot for 30 to 45 minutes.
- Preheat oven at 375-degrees, then bake fantails for 20 to 24 minutes, until browned with visible melted cheese.
- In a microwave-safe bowl, melt the remaining 2 Tablespoons butter. Add 1 minced garlic clove and 1/2 teaspoon dried parsley, stirring to distribute. Use a pastry brush to coat each fantail with buttery goodness. Let cool for at least 10 minutes before serving.
- Leftovers should be refrigerated and will reheat beautifully in the coming days. Use an oven or toasted oven, and wrap up the rolls in foil. Add a touch of butter, if desired, to keep them from becoming extra crisp. Heat until warmed.
OM NOM NOM!
Bready or Not: Classic Vanilla Bundt Cake
This Classic Vanilla Bundt Cake is nothing fancy, but it’s all good.
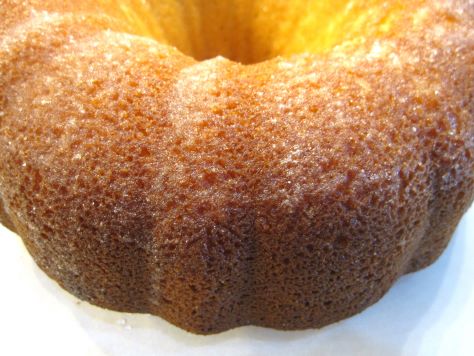
This cake isn’t about hardcore sweetness. It’s about vanilla. With a tablespoon of extract in the batter, you get the fragrance and flavor coming through strongly in the final bake.
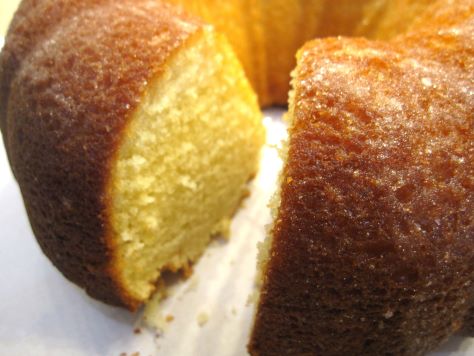
One thing I love about bundt cakes is the variety of textures. The crusty bottom is so good. If you want the cake to rest flat for a prettier presentation, then by all means, level off the base–but don’t squander those trimmings!
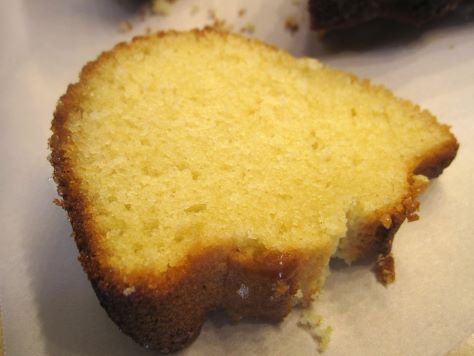
This is a great cake to serve with fruit and ice cream, as it’s similar to a pound cake, but much lighter. Me, I thought the glaze alone made things just right.
Modified from King Arthur Flour.
Bready or Not: Classic Vanilla Bundt Cake
Equipment
- large bundt pan
- nonstick spray
- pastry brush
Ingredients
Cake
- 1 1/2 cups unsalted butter (3 sticks) room temperature
- 1 1/2 cups white sugar
- 2 1/4 teaspoons baking powder
- 1 1/2 teaspoons salt
- 6 large eggs room temperature
- 3 cups all-purpose flour
- 1 Tablespoon vanilla extract
- 1/4 teaspoon almond extract
- 3/4 cup milk or half & half
Glaze
- 1/3 cup white sugar
- 5 teaspoons water
- sprinkle salt
- 2 teaspoons vanilla extract
Instructions
- Preheat oven at 350-degrees. Generously grease the interior of a large bundt pan.
- In a mixer, beat butter and sugar until light and fluffy. Mix in baking powder and salt, followed by 3 of the eggs.
- Measure out the flour. Add a few tablespoons of it into the mix. Add another egg. Add a bit more flour followed by another egg. Repeat to incorporate the last egg. Add the two extracts and the milk, followed by the last of the flour. Scrape the bottom and sides of the bowl well, then beat until the batter is smooth and fluffy.
- Pour batter into the pan and smooth out the top. Bake for 50 to 60 minutes, until the cake passes the toothpick test. Let cool for about 15 minutes, then invert it onto a rack to cool completely.
- Make the glaze. The amount will look like a lot, but there’s a lot of exterior to this cake. For easier clean-up, place parchment paper beneath the rack. Use a pastry brush to apply the glaze to the cake. Let glaze set an hour or so before slicing.
- Store in a sealed container or with slices individually wrapped.
OM NOM NOM!
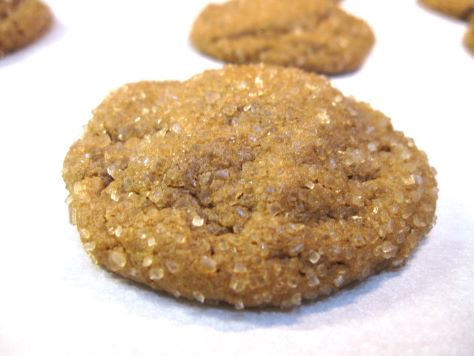
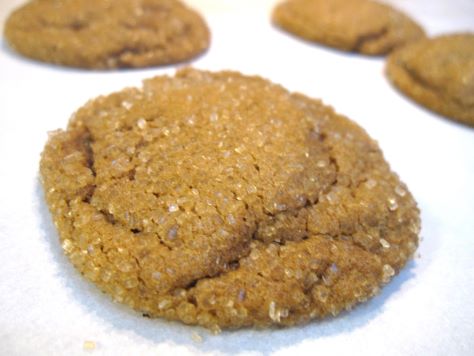
Bready or Not: Big Soft Ginger Cookies
These Big Soft Ginger Cookies are delicious any time of year!
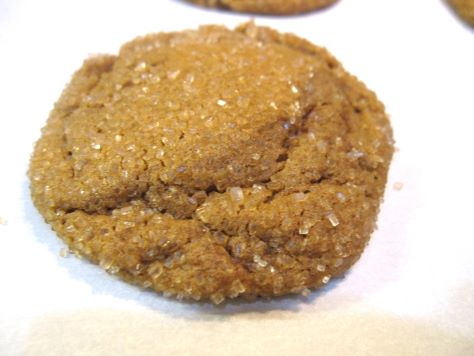
These things taste like gingerbread. They are soft, chewy, and fragrant, with a delicate crunch from the coarse sugar topping. They are good on their own, or with a hot drink!
These take some planning, as the dough is soft and could use some chill time. Make it a little bit ahead of when you plan to bake. A few hours will do; overnight is great, too. Then bake away!
Modified from Allrecipes Magazine Dec/Jan 2014 issue.
Bready or Not: Big Soft Ginger Cookies
Equipment
- baking sheet
- parchment paper
- tablespoon scoop
- plastic wrap or sealed bag
Ingredients
- 2 1/4 cups all-purpose flour
- 2 teaspoons ground ginger
- 1 teaspoon baking soda
- 3/4 teaspoon ground cinnamon
- 1/2 teaspoon ground cloves
- 1/4 teaspoon salt
- 3/4 cup unsalted butter (1 1/2 sticks) room temperature
- 1 cup white sugar
- 1 large egg room temperature
- 1 Tablespoon water
- 1/4 cup molasses
- 3/4 cup coarse sugar such as turbinado
Instructions
- In a medium bowl, combine flour, ginger, baking soda, cinnamon, cloves, and salt. Set aside.
- In a big bowl, cream together butter and sugar until light and fluffy. Beat in the egg followed by the water and molasses. Slowly mix in the dry ingredients, scraping the bottom of the bowl a few times.
- Once everything is mixed, encase the dough in plastic wrap and chill in fridge for a few hours or a day or two.
- When ready to bake, preheat oven at 350-degrees. Line a large baking sheet with parchment. Measure coarse sugar into a bowl.
- Using a tablespoon scoop or tablespoon, shape dough into small balls. Roll dough in coarse sugar. Set spaced-out on prepared baking sheet.
- Bake for 10 to 12 minutes, until cookies are set and starting to crinkle across the top. Let rest on sheet for another 10 minutes, then transfer to a rack to fully cool. Store in a sealed container at room temperature.
OM NOM NOM!
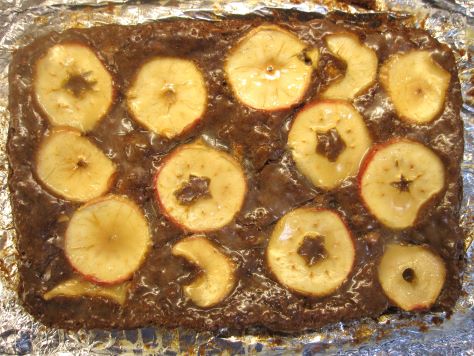
Bready or Not: Apple Sheet Cake
I’ve done a lot of different apple cakes. This Apple Sheet Cake is unique in that it’s 1) in a casserole dish, so can feed a lot of people, and 2) uses apple butter, diced fresh apple, diced dried apple, and cross-wise sliced fresh apples on top!
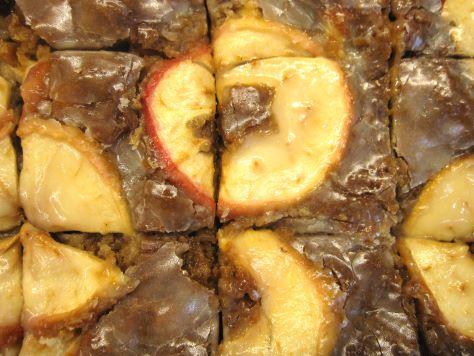
It probably goes without saying that this cake is loaded with apple flavor. There’s just enough batter to complement the fruit. Really, this is all about the apples.
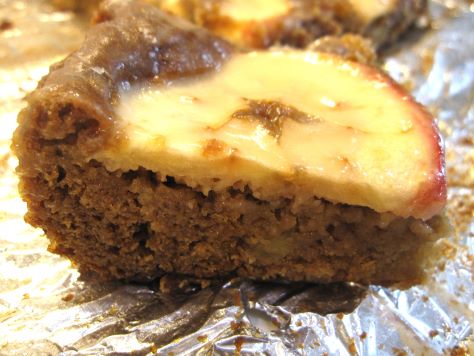
I think the apple butter in particular carries a lot of weight here. It adds a touch more spice, but most of all it adds moist texture to the crumb.
Modified from a clipping for Applicious Sheet Cake.
Bready or Not: Apple Sheet Cake
Equipment
- 13×9 pan
- aluminum foil
- uneven spatula
Ingredients
Cake
- 2 medium baking apples
- 1/3 cup unsalted butter melted
- 1 2/3 cup brown sugar packed
- 1 cup apple butter
- 2 large eggs room temperature
- 2 teaspoons vanilla extract or vanilla bean paste
- 1 2/3 cups all-purpose flour
- 1 teaspoon baking powder
- 1 teaspoon baking soda
- 1/4 teaspoon salt
- 1 cup dried apples finely chopped
Icing
- 1 Tablespoon unsalted butter melted
- 1 Tablespoon maple syrup
- 1/2 cup confectioners’ sugar
- 1/4 teaspoon vanilla extract
- 1 Tablespoon milk or half & half
Instructions
- Preheat oven at 350-degrees. Line a 13×9 pan with foil and apply nonstick spray or butter. Set aside.
- Peel, core, and shred or finely dice-up one apple. Thinly slice the other apple cross-wise, removing the seeds.
- In a large bowl, mix together butter, brown sugar, apple butter, eggs, and vanilla. Add flour, baking powder, baking soda, and salt, scraping bottom of bowl to make sure everything is mixed. Fold in the shredded/diced fresh apple and the chopped dried apple. Spread batter in pan, using uneven spatula to level out. Arrange apple cross-sections over cake.
- Bake for about 40 minutes. The middle should pass the toothpick test. Move to a wire rack.
- Immediately mix glaze to go over hot cake. Drizzle it all over the top, using the back of a spoon or a pastry brush to distribute across surface. Cool completely to set the glaze, speeding process in fridge if desired.
- Use foil to lift cake onto a cutting board to slice. Pieces can be individually wrapped and frozen for later, or will keep several days covered in the fridge. Eat cold or warmed slightly in microwave.
