


Bready or Not: Gingerbread Cookie Bars
I suppose I could try to justify the timing of these Gingerbread Cookie Bars with a line like “It’s five months until Christmas!” but nah. Good food is good food, and should be enjoyed at any time of year.
I don’t care that it’s the middle of summer. Gingerbread Bars are awesome. If your house gets hot, bake these up early in the day or late at night, then enjoy a cool-weather-vibe treat in the days ahead.
This is a very straightforward recipe that makes a lot of bars that keeps for many days. A perfect recipe for a large gathering or a cookie exchange, this is a great version of a classic treat.
Bready or Not: Gingerbread Cookie Bars
Equipment
- 15×10 pan (jelly roll pan)
- aluminum foil
- nonstick spray
Ingredients
- 4 1/2 cups all-purpose flour
- 4 teaspoons ground ginger
- 2 teaspoons baking soda
- 1 1/2 teaspoons ground cinnamon
- 1/4 teaspoon salt
- 1 1/2 cups shortening
- 2 cups white sugar
- 2 eggs
- 1/2 cup molasses
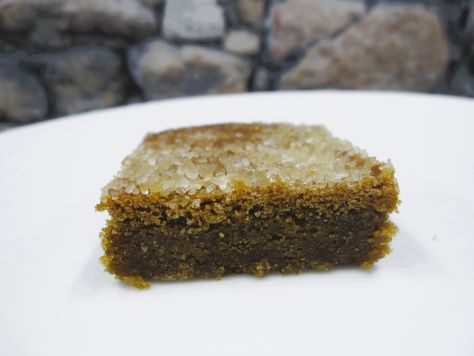
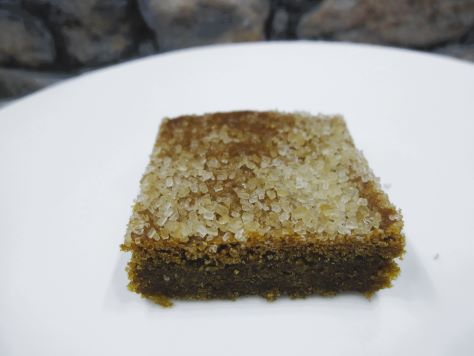
- 1/2 cup coarse sugar such as turbinado sugar
Instructions
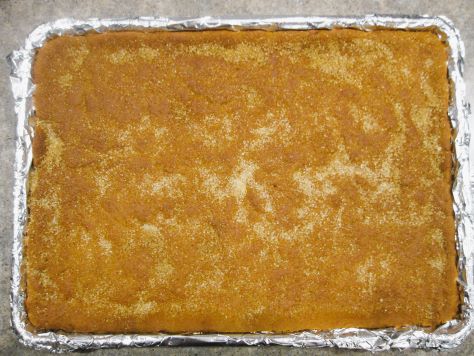
- Preheat oven at 350 degrees. Line the jelly roll pan with wide foil and apply nonstick spray.
- In a mixing bowl, combine flour, ginger, baking soda, cinnamon, and salt.
- In a large bowl, beat together the shortening and sugar until they are fluffy. Scrape the bowl as needed. Beat in the eggs and molasses. Slowly add the dry ingredients; if using a stand mixer, it may be necessary to stop doing so at the end to finish mixing by hand. Pat the dough into the prepared pan. Sprinkle the coarse sugar across the top and lightly press it in.
- Bake for 18 to 20 minutes. The edges should be turning golden. Cool in pan on wire rack. Use the foil to lift it onto a cutting board for easy slicing. In a sealed container, keeps up over five days at room temperature.
OM NOM NOM!
Bready or Not Original: Glazed Maple Shortbread Cookies
Maple is a regular theme here on Bready or Not, and these Glazed Maple Shortbread Cookies are as delicious as they look.
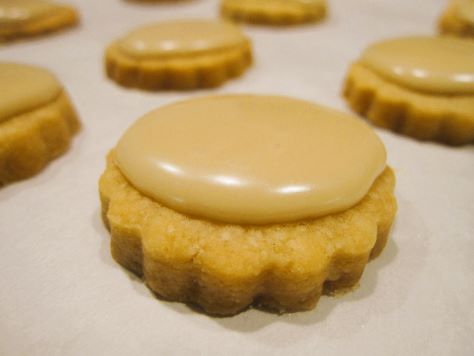
They are simple to make, too. Easy dough. Chill it for a bit. Shape and bake. Make the glaze. If you use a complicated cookie cutter, that might make the glazing more tedious, but that’s a choice to make. This scalloped version was easy to do with the back of a spoon.
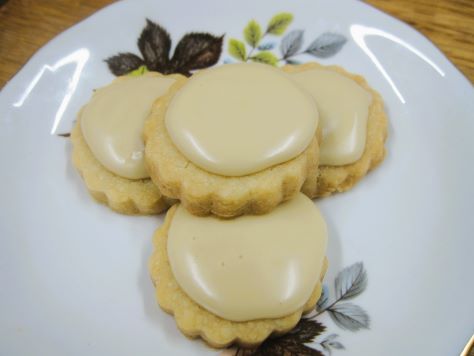
These cookies are great year-round! Good flavors should be confined to no particular season.
Bready or Not Original: Glazed Maple Shortbread Cookies
Equipment
- plastic wrap
- baking sheet
- cookie cutter
- Rolling Pin
Ingredients
Dough
- 1 cup unsalted butter (2 sticks) softened
- 1/2 cup white sugar
- 3 Tablespoons cornstarch
- 2 teaspoons maple flavor
- 1 3/4 cups all-purpose flour
Glaze
- 1 cup confectioners’ sugar
- 1/3 cup maple syrup
Instructions
- In a large bowl, beat together the butter, sugar, cornstarch, and maple flavor. Gradually add the flour. Shape the dough into a disc and encase in plastic wrap. Chill it for at least 45 minutes in the fridge until it’s firm enough to roll out, but it can be kept there for up to 2 days–but note that it will get quite hard with longer storage. If it’s there over a day, let it sit at room temp for 30 minutes to an hour to soften enough to roll out (but don’t let it get too soft, either).
- Preheat oven at 325 degrees. Line a baking sheet with parchment paper.
- Lightly flour a surface and roll out dough to 1/4 inch thickness. Cut out cookies. Place spaced out on parchment.
- Bake for 18 to 20 minutes. Remove from pan to cooling rack. Once they are cool, mix the glaze. Use the back of a spoon to spread glaze onto cookies, Set them back on cookie sheet or rack to set for an hour or two. Pack in sealed containers for up to a few days.
OM NOM NOM!
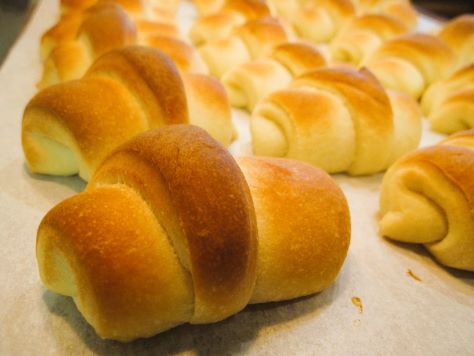
Bready or Not: Sweet Crescent Rolls in the Bread Machine
The blog is titled Bready or Not. Today, it is decidedly bready, as the recipe is one for Sweet Crescent Rolls made using a bread machine.

The recipe requires little hands-on effort. The dough mixes in the bread machine. You divide it and form the crescent rolls, which is actually rather fun. They rise. You then bake. The recipe makes 24 rolls, meaning you can feed a crowd or you can freeze a bunch.

These keep well in the freezer for months. This is the kind of thing you can make at Thanksgiving and then pull out as needed through the rest of the holiday season.
Modified from Allrecipes.com Magazine Oct/Nov 2014.
Bready or Not: Sweet Crescent Rolls in the Bread Machine
Equipment
- food thermometer
- bread machine
- parchment paper
- food scale
- cookie sheet
- knife or pizza cutter
Ingredients
- 1/2 cup warm water (110 degrees)
- 1/2 warm milk or half & half (110 degrees)
- 1 large egg room temperature
- 1/3 cup unsalted butter softened
- 3 3/4 cup all-purpose flour
- 1/2 cup white sugar
- 1 teaspoon salt
- 2 1/4 teaspoon active dry yeast or 1 packet active dry yeast
- 1/4 cup unsalted butter softened, for filling
Instructions
- Place ingredients in recommended order for bread machine, usually liquid first: water, milk, egg, butter, flour, sugar, salt, and yeast. Start dough cycle, and let it mix and complete the first rise.
- Prepare a baking sheet or sheets with parchment paper.
- Once that is done, remove dough and divide in half using food scale. Roll each half into a 12-inch round. Divide the 1/4 cup butter in half and spread over each round. Use a knife or pizza cutter to slice each round into 12 wedges. Starting at the wide end, roll up each triangle gently but tightly to form a crescent roll. Place each roll, narrow side down, on the baking sheet.
- Cover pan with plastic wrap or a clean towel and let rise in a warm spot for an hour. Meanwhile, start preheating oven at 400 degrees.
- Once rolls are risen after the hour, bake for 10 to 15 minutes, switching pan position in oven, if necessary, to prevent overbrowning. Let cool for 15 minutes before serving.
- Cool rolls can also be frozen for later enjoyment; thaw them at room temperature then heat wrapped in aluminum foil at 350 degrees for about 10-12 minutes.
OM NOM NOM!
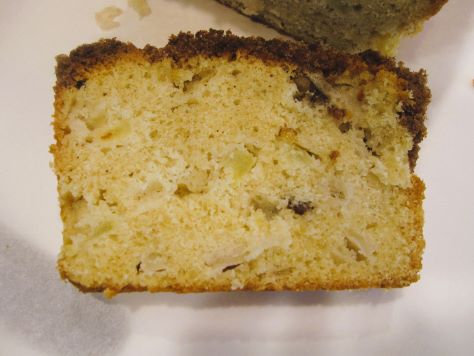
Bready or Not: Dutch Apple Loaf Cake
Need a smaller portion apple cake? Use your loaf pan! This Dutch Apple Loaf Cake has a crumble topping that is a bit messy, sure, but it’s also delicious.

I used three small apples in this cake, which came to about 2 cups diced up. That would probably equal two mediums or one really huge apple. You have more wiggle room in this recipe’s fruit content than you would in, say, an apple pie where the volume is more obvious.
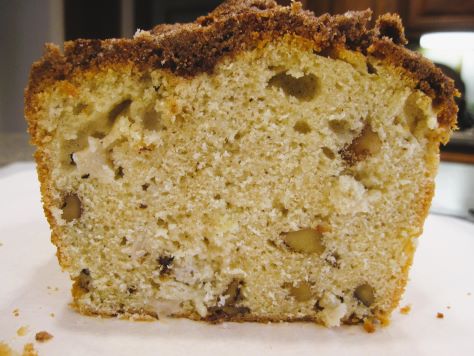
This is an especially nice recipe to cut into slices and freeze for later. They thaw fast, too, making them great to pack for the road to enjoy on a trip or for a snack or lunch–though remember, they might be a little crumbly, so maybe eat where the birds can enjoy those crumbs.
Bready or Not: Dutch Apple Loaf Cake
Equipment
- 9×5 loaf pan
- parchment paper
- nonstick spray
Ingredients
Topping:
- 1/4 cup white sugar
- 1/4 cup all-purpose flour
- 2 teaspoons ground cinnamon
- 1/4 cup unsalted butter cold, cut up
Cake:
- 1/2 cup unsalted butter softened
- 1 cup white sugar
- 2 large eggs room temperature
- 1/4 cup buttermilk or soured milk (see note)
- 1 teaspoon vanilla extract
- 2 cups all-purpose flour
- 1 1/2 teaspoons baking powder
- 1/2 teaspoon salt
- 1/4 teaspoon baking soda
- 2 cups apple pieces peeled and diced (about 3 small apples)
- 1/2 cup walnuts chopped
Instructions
Mix topping
- Combine sugar, flour, and cinnamon. Cut in the butter until the mixture becomes crumbly. Tuck into fridge while the loaf is made.
Create loaf cake
- Preheat oven at 350 degrees. Cut parchment paper to fit into loaf pan like a sling, the paper extending up both long sides. apply nonstick spray into middle.
- In a large bowl, cream the butter and sugar until fluffy. Add eggs one at a time. Add the buttermilk and vanilla.
- In a small bowl, sift together the flour, baking powder, salt, and baking soda. Gradually add the dry ingredients to the wet. Fold in the apple pieces and the walnuts. Pour batter into the pan and even out. Sprinkle topping mix to cover.
- Bake for 55 to 60 minutes, until a toothpick inserted into the middle comes out clean. Cool for 20 minutes in pan before using the parchment to lift the cake onto a rack. Keep stored at room temperature, wrapped in plastic wrap or otherwise covered. Pieces can also be individually wrapped and frozen.
OM NOM NOM!
Notes
Bready or Not: Easy Pear Bundt Cake
Some bundt cakes are super complicated with long lists of ingredients. This Pear Bundt Cake is not. It takes about 10 minutes to throw together, and only has four ingredients plus optional confectioners’ sugar to sprinkle on top.
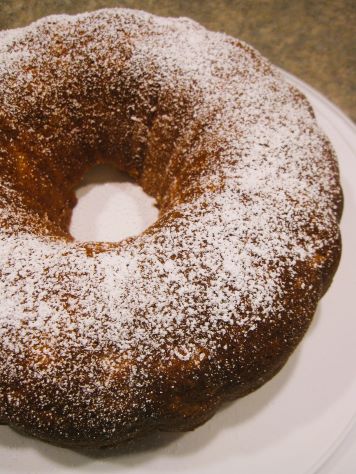
This is a cheap cake to make, too. I bought Aldi’s classic white cake mix and found pears for under a buck (originating in South Africa, which was a first for me) with the discount foods at Menards. Then the eggs–well, those prices seem to fluctuate all over these days. But hey, maybe save the egg yolks from this recipe to make a Big Batch of Chocolate Chip Shortbread?

I must note something important about this recipe, too–the cake is lovely and soft. So soft that you should use a sharp knife to cut it, and also, the cake should be eaten within the day. The pear juice, I think, just keeps breaking down the interior crumb as the cake sits around. So, serve this for a crowd. I didn’t test freezing this cake, as I do many cakes, but because it is so moist, I don’t think it would be a good candidate for that.

Modified from Centennial Kitchen Fall Baking 2021.
Bready or Not: Easy Pear Bundt Cake
Equipment
- bundt pan
- nonstick spray with flour
Ingredients
- 15 ounces canned pear halves in light syrup
- 15.25 ounce white cake mix box
- 1 whole egg
- 2 egg whites
- confectioners' sugar to sprinkle on top, optional
Instructions
- Preheat oven at 350 degrees. Use nonstick spray with flour on the interior of a bundt pan.
- Drain the pears, reserving the syrup. Mash the pears with a fork to break into small chunks.
- In a large bowl, reunite the mashed pears with the syrup. Add the cake mix, egg, and two egg whites. Beat for several minutes to fully incorporate and create a light batter.
- Pour batter into prepared pan. Bake for 50 to 55 minutes; the middle of the cake should pass the toothpick test. Cool for 20 minutes, then invert cake onto cooling rack to completely cool.
- If desired, sprinkle on confectioners’ sugar just before serving. Cut into slices with a sharp knife (seriously, the cake is very soft) and enjoy! Cake is best if eaten within a day.
OM NOM NOM!
Follow me


