


Bready or Not: Lemonade-Like Cookies
It’s February (how did that happen?), but these brightly-flavored Lemon-Lake Cookies will add some sunshine to your day, no matter when you make them.
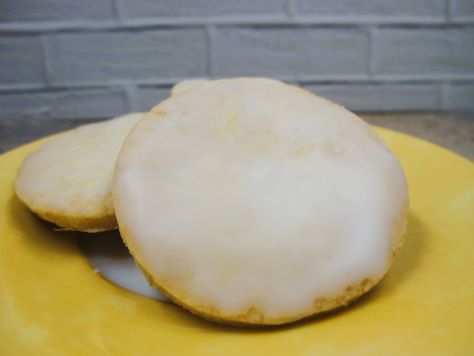
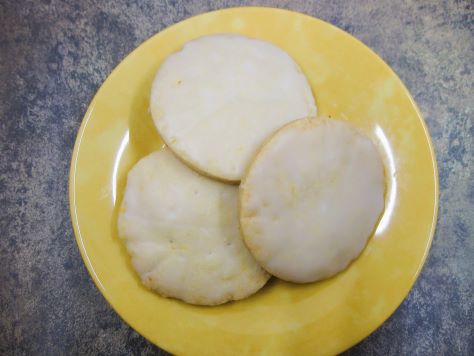
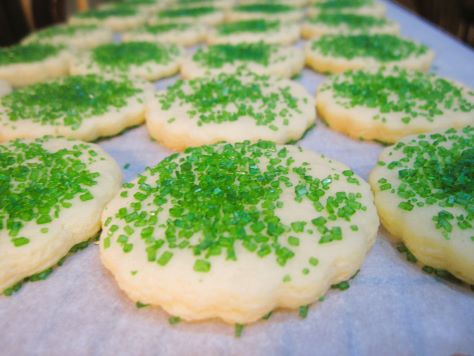
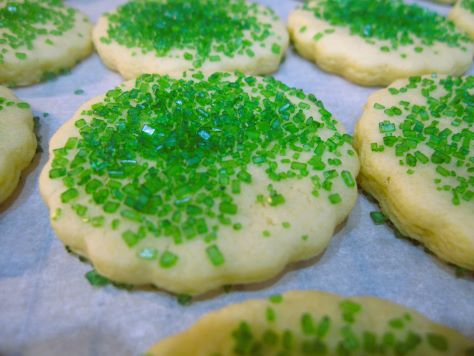
These are not fancy cookies. They are fairly straightforward to make. The only real “extra” bit is etching the lemon effect onto the cookies. I found it annoying that the example picture in Allrecipes Magazine, where I found the original recipe, showed the cookies when they were unglazed, hence the lemon effect is quite bold.
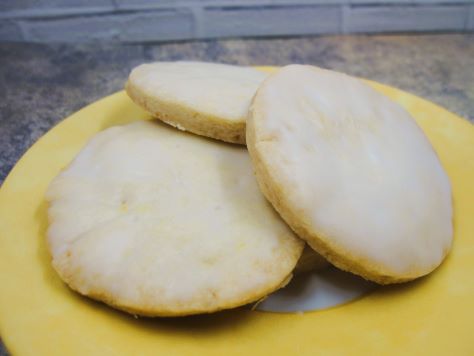
The reality is that the glaze fills in many of the lines and holes, making the etching much more subtle. It is still visible, though (if you impress the lines and dots enough).
Bready or Not: Lemonade-Like Cookies
Equipment
- zester
- juicer
- parchment paper
- Rolling Pin
- plastic wrap
- 2-inch cookie cutter
- skewer or chopstick
- pastry brush
Ingredients
Dough
- 1 cup unsalted butter (2 sticks) cut into thin slices
- 1/2 cup white sugar
- 1 lemon
- 1 teaspoon kosher salt
- 1/2 teaspoon vanilla extract
- 1/2 teaspoon lemon extract
- 2 1/4 cups all-purpose flour plus more for surface
Glaze
- 1 cup confectioners’ sugar
- 2 to 3 Tablespoons lemon juice
Instructions
- Zest the lemon. Cut lemon in half and squeeze out juice. Set aside zest and juice.
- Preheat oven at 300-degrees. Line a cookie sheet with parchment paper.
- Place butter, white sugar, lemon zest, salt, and vanilla in a bowl, stirring together until the butter starts to soften and the ingredients come together. Add flour, mixing until buttery crumbs form. Use hands to press dough together into a ball.
- Lightly flour a flat work surface. Set the dough there and press it into a 1/2-inch thick disk. Place a long stretch of plastic wrap on top and roll the dough to about 1/4-inch thickness. Cut dough with cookie cutter, placing rounds slightly spaced out on prepared sheet. Reroll dough scraps cut out more rounds until it’s all basically shaped.
- If desired, etch a lemon-like effect. Use a sharp knife to form decorative lines atop cookies, pressing in the blade to form 8 triangular wedges on each; make sure to only press into the top of the dough, not all the way through. Use a skewer or chopstick to add decorative holes near the tip of each wedge, creating an effect like a lemon seed.
- Bake cookies until they are light brown around the wedges, 22 to 25 minutes. Transfer to a rack to cool completely, but reserve the parchment and pan for the glazing.
- Return cookies to cooled pan. Mix together the confectioners’ sugar and 2 tablespoons lemon juice, adding more if needed to form a thick but spreadable glaze. Use a pastry brush to apply a layer of glaze to each cookie, adding an extra layer, if desired, with any leftover glaze after the initial coat. Let cookies stand for 30 minutes to an hour, until glaze is set. Pack cookies into a sealed container. Store at room temperature.
OM NOM NOM!
Bready or Not Original: Lemon Butter Cookies
Let’s say you need a lot of cookies. They don’t need to be fancy. You just need something sweet and good that kids and adults will both like. Well, these Lemon Butter Cookies might be just about perfect.
Another thing to know about this recipe: it makes a lot. The entire batch produces over 100 cookies. The nice thing is, though, it’s also a great recipe to divvy up. It’s no problem to keep half the batch wrapped in the fridge to make a day or two later, while the other half is frozen.
Or make them all at once and pretend you can swim through piles of cookies like Scrooge McDuck through his money bin.
The lemon flavor may make some people think of spring and summer, but I’m of the opinion that good food is good all year long. Plus, you can use different colored sugars to customize it for sports teams or holidays.
Bready or Not Original: Lemon Butter Cookies
Equipment
- parchment paper
- cookie cutter
- cooling rack
Ingredients
- 1 cup unsalted butter (2 sticks) room temperature
- 2 cups white sugar
- 2 large eggs room temperature
- 1/4 cup milk or half & half
- 3 teaspoons lemon extract
- 1 teaspoon vanilla extract
- 4 1/2 cups all-purpose flour
- 2 teaspoons baking powder
- 1/2 teaspoon salt
- 1/4 teaspoon baking soda
- colored sugar for topping, optional
Instructions
- In a large bowl, cream together the butter and sugar until they are light and fluffy. Mix in the eggs one at a time followed by the milk and both extracts. Scrape the bottom of the bowl.
- In another bowl, stir together the flour, baking powder, salt, and baking soda. Gradually add to the wet mix to create a cohesive dough (and it makes a LOT of dough!).
- At this point, the dough can be divided to rest in the fridge or placed in the freezer for weeks. If the cookies will be made today, chill the dough, covered, for about 30 minutes. (Note that if the dough is chilled for a longer time, it will need to sit at room temperature for a bit to become soft enough to roll out.)
- Preheat oven at 350-degrees. Prepare a cookie sheet with parchment paper.
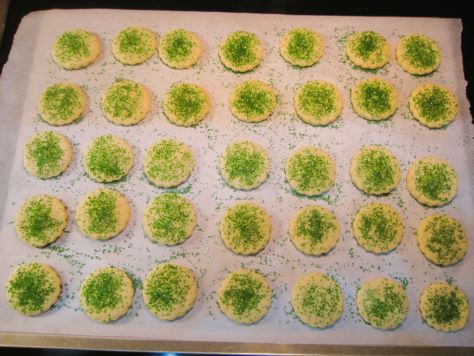
- Lightly flour a clean, flat surface. Roll out the dough to 1/8-inch thickness. Parcel out using a 2-inch inch cookie cutter. Place spaced out a bit on cookie sheet. If using colored sugar, sprinkle atop each cookie to coat. Bake for 8 to 9 minutes, until set. Let the cookies idle on the sheet for a few minutes, then transfer to a cooling rack. Repeat process to make more cookies. Store in a sealed container at room temperature.
- The full batch of cookies will make 100-120, dependent on the thickness.
OM NOM NOM!
Bready or Not: Soft Lemon-Ginger Cookies Redux
Today we’re returning to a Soft Lemon-Ginger Cookies recipe I last featured in July 2017! Why let something delicious wallow in the archives, right?
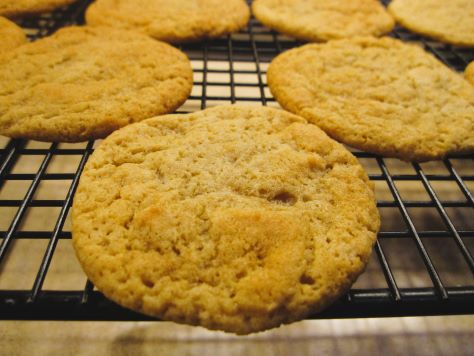
This is a great dough to make hours or days ahead; just stash it in the fridge until baking time. Coolness also makes the sticky dough easier to work with.
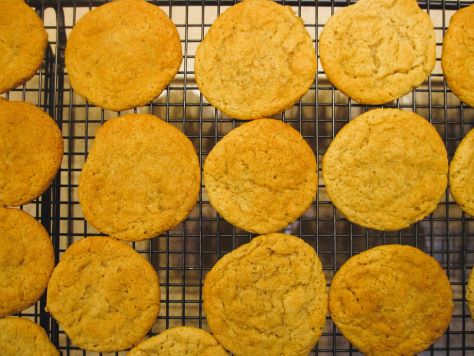
The lemon brings in a fresh element, while the ginger delivers the right amount of heat. These are sweet and refreshing cookies overall.
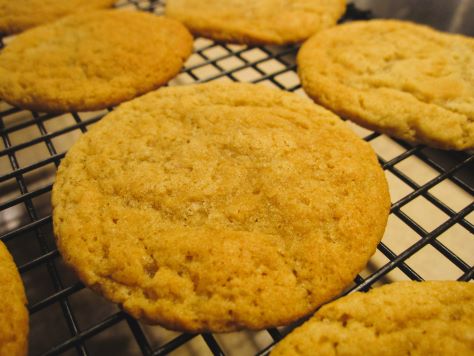
The one modification I made in this redux is that you can use sour cream or Greek yogurt. Both products contribute moisture, fat, and acid.
Bready or Not: Soft Lemon-Ginger Cookies Redux
Equipment
- teaspoon scoop or teaspoon
Ingredients
- 1/2 cup unsalted butter (1 stick) softened
- 1 cup brown sugar packed
- 1 egg
- 3 Tablespoons sour cream or vanilla or plain Greek yogurt
- 1 1/2 teaspoons lemon extract
- 1 teaspoon vanilla extract
- 1 3/4 cups all-purpose flour
- 1 teaspoon baking soda
- 1 teaspoon cream of tartar
- 2 teaspoons ground ginger
- 1/4 teaspoon salt
Instructions
- If baking right away, preheat oven at 350-degrees.
- In a large mixing bowl, mix together the butter and brown sugar until they gain a fluffy texture. Beat in the egg, sour cream or yogurt, and extracts.
- In another bowl, sift together the flour, baking soda, cream of tartar, ginger, and salt; make sure to press any lumps out of the cream of tartar and ginger. Slowly mix the dry ingredients into the other bowl. At this point, the dough can be wrapped and chilled for a few hours or days; this will also reduce the dough's stickiness somewhat.
- When it is baking time, be sure to preheat the oven. Drop by rounded teaspoons onto a baking sheet. Bake for 10 to 12 minutes, until the cookies are lightly browned and no longer jiggly. Watch out–they can overbake quickly. Let them rest on the cookie sheet for just a few minutes, then transfer to a rack to cool.
OM NOM NOM!
Bready or Not: Baked Lemon Curd Hand Pies
Pie is good. Portable pie is something special indeed. These Baked Lemon Curd Hand Pies are a real treat.
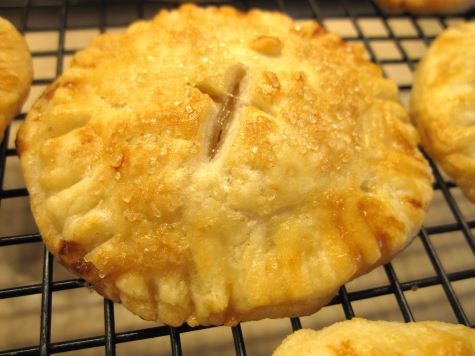
This is a pairing of recipes that dirties numerous dishes and spaces, but the result is a good batch of hand pies. The recipe makes roughly 18 to 20, so make these for a group!
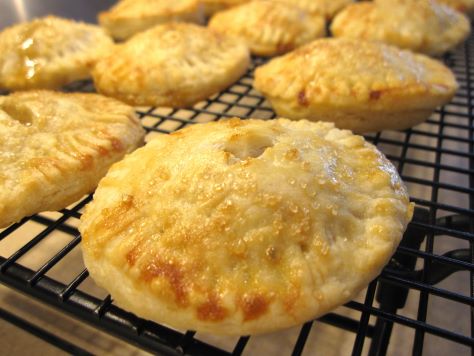
I usually experiment with freezing my baked goods to see how they keep, but I didn’t do so with these. My husband took them to work, where they were pretty much inhaled!
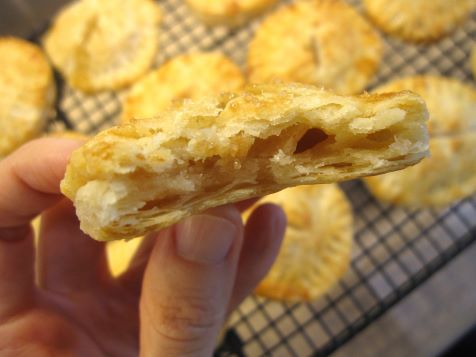
Use homemade lemon curd, if you have a reliable recipe, or use a trustworthy brand. I recommend going with one that is pretty thick, as a watery one might interfere with the seal of the pies.
Bready or Not: Hand Pie Dough
Equipment
- food processor
- food scale
- plastic wrap
Ingredients
- 2 3/4 cups all-purpose flour
- 1 teaspoon kosher salt
- 1 cup plus 1 Tb unsalted butter
- 1/2 cup ice water
- 2 teaspoons apple cider vinegar
Instructions
- Place the flour and salt in the bowl of the food processor. Pulse to combine. Cut the butter into cubes and add, pulsing until the pieces are pea-sized.
- In a liquid measured cup, combine the ice water and vinegar. With the processor running, pour in the liquid until the dough comes together. It will look crumbly but should come together if squeezed between fingers.
- Turn out the dough and divide it in half. Wrap tightly in plastic and chill for at least 2 hours. Store in fridge for a few days or freeze for later.
Bready or Not: Baked Lemon Curd Hand Pies
Equipment
- flour for dusting
- 2 1/2-inch cutter
- basting brush
- parchment paper
- baking sheet
Ingredients
- hand pie dough
- 1 cup lemon curd
- 1 large egg room temperature
- 1 Tablespoon water
- coarse sugar optional
Instructions
- On a lightly floured surface, roll out half of the prepared pie dough to be about 1/8-inch thick. Using a 2 1/2-inch cutter, cut dough, reforming scraps to roll out again.
- Dollop about a teaspoon of lemon curd into the center of half of the dough rounds.
- In a small bowl, beat together the egg and water. Brush the egg mix around the edges that surround the curd; do not discard egg wash. Top each with a remaining dough circle, stretching them slightly to cover. Press edges firmly to seal, then apply the tines of a fork to bind the halves. Chill hand pies in fridge for 1 hour.
- Preheat oven at 425-degrees. Line baking sheet with parchment paper. Place hand pies on parchment. Brush tops with remaining egg wash, then use the tip of a knife to cut a small x in each to vent steam during baking. If desired, sprinkle coarse sugar over the tops.
- Bake for 13 to 16 minutes, until pies are golden. Move to a rack or different sheet to completely cool. Store in a covered container. Best eaten within a day or two.
OM NOM NOM!
Bready or Not: Kerrygold Almond Breakfast Cake
This Kerrygold Almond Breakfast Cake is moist, light, and delicious thanks to Irish butter, ricotta cheese, and a vivid spark of lemon.
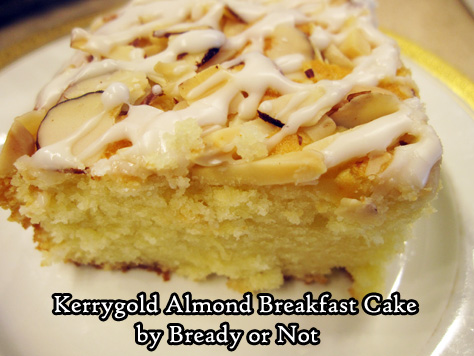
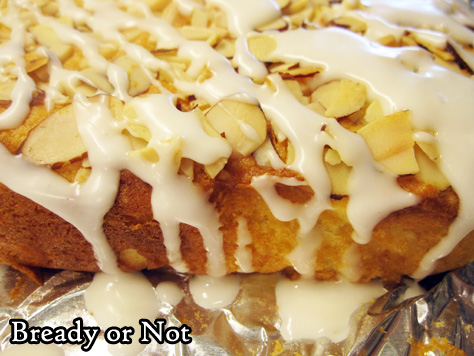
I found the original version of this recipe on the Kerrygold website and modified it quite a bit to make it work for a square 9-inch pan. I also added a glaze because, well, I thought it needed one–and it does. Not only does it boost the sweetness, but it helps that layer of sliced almonds adhere more.
Using ricotta cheese in a cake like this doesn’t make it taste cheesy. The ricotta adds moisture, creating a soft, tender crumb, and it plays beautifully with the potent Kerrygold butter.
Now, about that Kerrygold. For baking purposes, I like to buy it at Costco when it goes on sale a few times a year. Stash it in the freezer and it keeps for a long, long time. It’s sure more cost-effective than buying it at the grocery store.
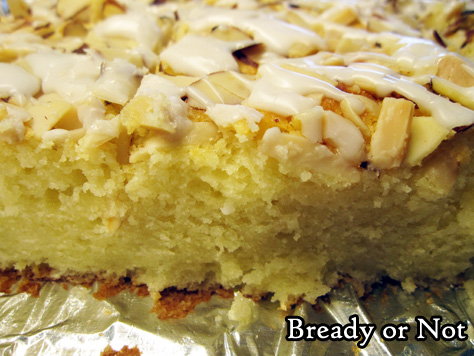
This cake is lemony-bright in flavor with a crisp-top crust thanks to the almonds. It keeps at room temperature for a few days or can be frozen for later.
Bready or Not: Kerrygold Almond Breakfast Cake
Equipment
- 9-inch square pan
- aluminum foil
- uneven spatula
Ingredients
Cake
- 1 1/2 cups all-purpose flour
- 2 teaspoons baking powder
- 3/4 teaspoon kosher salt
- 8 Tablespoons Kerrygold unsalted butter (1 stick) 1/2 cup, room temperature
- 1 cup white sugar
- 1 lemon zested and juiced
- 2 large eggs room temperature
- 1 teaspoon pure almond extract
- 1 1/2 cups whole milk ricotta cheese
- 3/4 cup sliced almonds
Glaze
- 3/4 cup confectioners’ sugar
- 3 teaspoons fresh lemon juice
Instructions
- Preheat oven at 350-degrees. Line 9-inch pan with foil extended up all four sides. Apply nonstick spray.
- Whisk together flour, baking powder, and salt. Set aside.
- In a large mixing bowl, beat together butter, sugar, and lemon zest until light and fluffy, about 4 minutes. Add eggs and almond extract.
- To the mixing bowl, alternatively add the flour mixture and the ricotta. Batter will be thick.
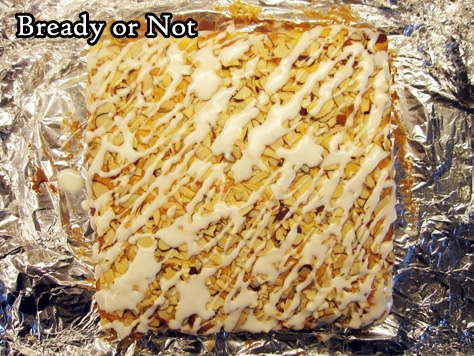
- Pour it into the prepared pan. Level off with an uneven spatula. Sprinkle sliced almonds to cover the top.
- Bake for 33 to 38 minutes, until the middle passes the toothpick test.
- Cool in pan for at least 45 minutes, then use foil to lift it onto a rack to completely cool at room temperature.
- Make glaze and drizzle across the top. Let set for 30 minutes before cutting. Cake will keep at least two days at room temperature, or pieces can be individually wrapped and frozen for later.
OM NOM NOM!
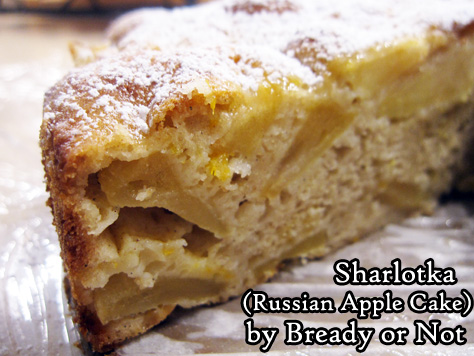
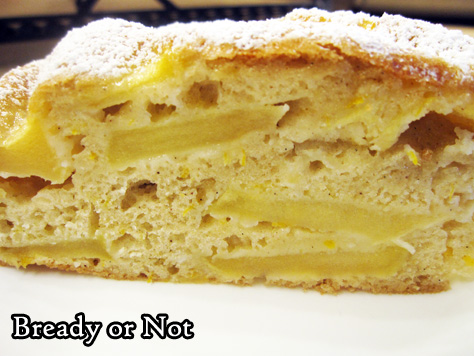
Bready or Not: Sharlotka (Apple Cake)
As you might have noticed, I’ve been experimenting with many different kinds of apple cakes over the past while. This Sharlotka has a Russian name but British origins, because that’s the way of the world.
I modified this from a recipe in Bake from Scratch’s October 2020 issue. There, they say the first Sharlotka was a very different kind of cake that was served for Czar Alexander during a London visit–and made by a French chef. Because of course.
The cake that evolved after that became more of a basic apple cake. The batter is minimal, and beaten for a prolonged time to increase volume. It’s pretty much there to act like adhesive for the mélange of apples.
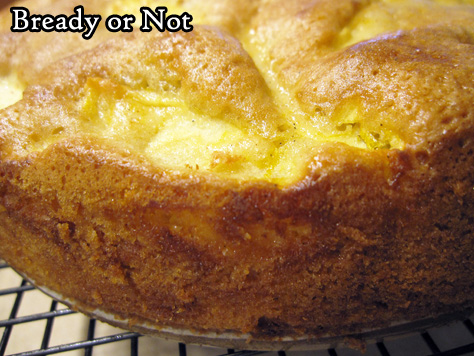
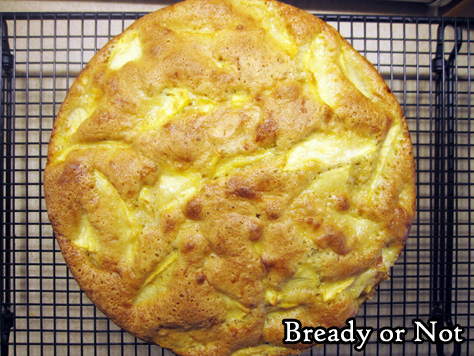
The resulting cake is light and airy. The flavor of the apples really shines through.
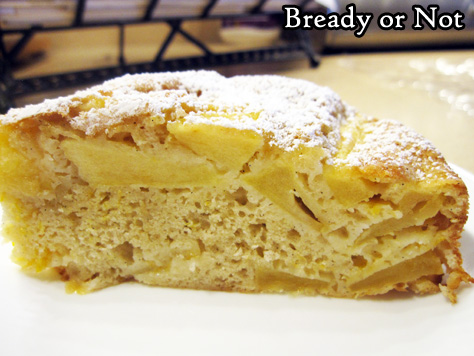
This cake is great for a breakfast, snack, or dessert. Eat it on its own, or with some ice cream.
Bready or Not: Sharlotka (Apple Cake)
Equipment
- 9-inch springform pan
- parchment paper
- fine mesh sieve
- offset spatula
Ingredients
- 4 medium apples such as Granny Smith, Ambrosia, Fuji, or Golden Delicious; go for a mix!
- 1 cup plus 1 Tablespoon white sugar divided
- 1 large orange or 1 large lemon zested and juiced
- 4 large eggs room temperature
- 1 1/2 teaspoons vanilla extract or vanilla bean paste
- 3/4 teaspoon kosher salt
- 1 1/4 cups all-purpose flour
- 1 1/2 teaspoons baking powder
- 1/2 teaspoon ground cinnamon
- 1/4 teaspoon ground cardamom
- confectioners’ sugar for dusting
Instructions
- Preheat oven at 350-degrees. Cut parchment to fit the bottom of the springform pan. Grease the pan, then place in parchment round, then spray that as well.
- Peel and thinly slice the apples. In a big bowl, coat the apples with 1 Tablespoon white sugar, the citrus zest, and 2 teaspoons of fresh juice. Set aside.
- In the bowl of a stand mixer with a whisk attachment, beat eggs, vanilla, salt, and remaining 1 cup of sugar at medium high speed for about 7 minutes. It should turn thick and pale, the batter forming ribbons when the whisk is lifted up. Remove bowl from mixer.
- In a medium bowl, combine flour, baking powder, cinnamon, and cardamom. Use a fine-mesh sieve to sift the dry ingredients into the egg mix. Gently fold the flour in until it’s just combined and there are no white streaks.
- Place half the apples in the prepared pan. Pour half the batter over them. Use an offset spatula to work the batter into nooks and crannies. Scatter the rest of the apples on top, followed by the rest of the batter. Again, use the spatula to spread the small amount of batter. For a couple minutes, thump the pan on the counter and tap the sides every now and then to cause bubbles to rise, smoothing batter again after.
- Bake cake. Check it at 30 minutes to see if it is getting too brown; if so, cover it with foil. Continue baking 10 more minutes (40 total) then test the middle with a toothpick. If it comes out clean, the cake is done. Let it cool on a rack for 15 minutes before carefully releasing the sides of the pan.
- Serve the cake warm, at room temperature, or cold from the fridge. Add a dusting of confectioners’ sugar on top for serving; if keeping cake for later, add fresh sugar each time, as it will gradually be absorbed. Store covered in the fridge or at room temperature.
OM NOM NOM!
Follow me


