


Bready or Not Original: Prosciutto-Parmesan Palmiers
The holiday season is nigh, and these Prosciutto-Parmesan Palmiers are the perfect appetizer for a couple or an entire gang!

These really have three ingredients, plus some flour for dusting a counter. They take minutes to assemble. Stash them in the freezer for hours or days. They bake up fast. They make bellies happy.
Plus, I daresay, they are downright pretty. I love the layers in puff pastry! Here, those crisp buttery layers are fantastic along with shredded cheese and thin slices of prosciutto.

Honestly, these are dangerous. It’s hard to eat just one.

However, if you can exercise restraint, the leftovers are delicious. They can be eaten cold (the prosciutto is the prominent flavor then), but are better with a brief warm-up in the oven.

Make these your go-to game day, holiday event, or date night treat!
Bready or Not Original: Prosciutto-Parmesan Palmiers
Equipment
- parchment paper
- knife
Ingredients
- flour to dust surface
- 1 sheet puff pastry (half a box) thawed in fridge
- 1/2 cup shredded Parmesan packed
- 2 to 3 ounces sliced prosciutto
Instructions
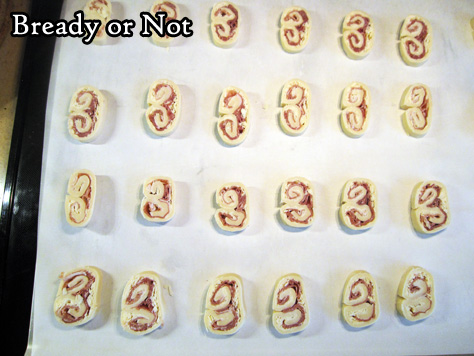
- Hours or days before baking day: Sprinkle flour on a flat, clean surface. Roll out the puff pastry to make a 12-inch square. Cut in half. Sprinkle cheese over both halves. Place prosciutto slices to completely cover cheese; if there is extra meat, layer on the additional pieces. Roll the short sides of each piece of pastry together to meet in the middle–from the end, it will look rather like a number 3. Repeat this with the other half.
- Encase both logs in plastic wrap and freeze until firm, at least an hour, but as long as several days.
- Preheat oven at 400-degrees. Prepare a large baking sheet with parchment paper.
- Pull out frozen logs to thaw for just a few minutes. While it is still mostly frozen, slice into 1/4-inch pieces and place spaced out on parchment. (Note that the end pieces may be sparse on filling and not presentable for company, but still worth baking up for private enjoyment.)
- Bake for 12 to 15 minutes until palmiers are golden brown and puffed. They are best eaten fresh, but leftovers can be refrigerated. They are okay cold, but better toasted briefly again in the oven.
OM NOM NOM!
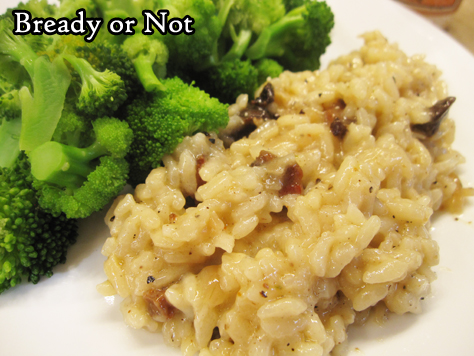
Bready or Not Original: Pancetta Risotto
This Pancetta Risotto is a fantastic meal for two people, or a delicious side for a group. It’s time-consuming but very straightforward to make.

I confess, I spent years being intimidated by the very idea of a risotto. I would see it done on cooking shows. So much stirring! When I finally got up the gumption to give it a try, I found risotto wasn’t hard at all. It really is about lots of stirring.
This recipe here is my fancy occasion recipe, especially when I have some good pancetta on hand, such as the kind carried by Smoking Goose Meatery out of Indianapolis.

As for the wine, I’ve tried this with fancier Sauvignon Blanc from Total Wine (Cloudy Bay from New Zealand) as well as a $6 Trader Joe’s Coastal Sauvignon Blanc. Both versions turned out great! You don’t need to go all-out, but get something that is (hopefully) drinkable with the finished meal.
Bready or Not Original: Pancetta Risotto
Equipment
- large stock pot
- medium saucepan
Ingredients
- 8 oz pancetta diced
- 1 Tablespoon dried shallots or fresh shallot, finely minced
- 3 cloves garlic minced
- 1 1/4 cups Arborio rice
- 1 cup dry white wine Sauvignon Blanc works well
- 4 cups chicken broth or chicken stock, equal to a 32 oz box or 2 cans
- 1/2 cup shredded Parmesan or Pecorino Romano or Grana Padano, plus more to top rice
- salt and pepper to taste
Instructions
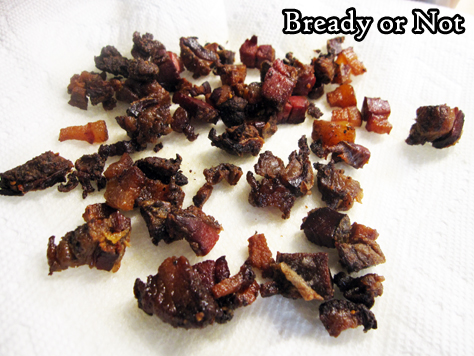
- In a large stock pot, cook the pancetta for 10 to 12 minutes, until it starts to turn brown and crispy. At the same time, on another stove burner, use a medium sauce pan to bring the chicken broth to a very low simmer.
- Use a slotted spoon to transfer pancetta to a paper towel-lined plate; set aside. Add dry shallots and garlic to the fat in the big pot. Sauté for two minutes. Add the Arborio rice and a pinch of salt. Sauté another 2 minutes, until the rice looks glossy with translucent edges.
- Add the white wine and stir until it is absorbed. Add chicken broth in 1/2 cup increments, stirring well after each addition until it is absorbed. After about 12 to 15 minutes, when most of the broth has been added, begin to taste the rice. The goal is a chewy, al dente consistency. Add more broth as needed, and remember to turn off the burner for the broth pot when it is empty.
- When the rice is creamy and al dente, stir in the pancetta and cheese. Taste the risotto again, adding more salt and pepper as needed. Serve with the remaining white wine.
OM NOM NOM!
Bready or Not: 5 Minute Artisan Pizza Dough and Cast Iron Pan Pizzas
Today’s Bready or Not is a 2-for-1 deal: a recipe for fast and easy pizza dough, followed by the process I use for divvying up that dough to make small but thick cast iron pan pizzas.

The basic dough recipe is modified from the great book Artisan Bread in 5 Minutes a Day. [Affiliate link] Yes, this dough really comes together in 5 minutes. It also keeps for up to 2 weeks AND can be frozen.

The method for making mini pizzas in a skillet is one I practiced a few times several years ago, then made a LOT during 2020 as my husband was working from home more often. I perfected it to the point where I had to write it down–and share here.

The pan pizza recipe is pretty much an outline to show the timing on the shaping, rise, and crust-cooking, but the ingredients are all up to you!

Bready or Not: 5 Minute Artisan Pizza Dough
Ingredients
- 1 1/3 cups warm water
- 2 Tablespoons olive oil
- 1/2 Tablespoon white sugar
- 3 1/4 cups all-purpose flour
- 3/4 Tablespoon kosher salt
- 2 teaspoons pizza seasoning or Italian seasoning, optional
- 2 1/4 teaspoons active yeast or one packet store-bought active yeast
Instructions
- Place the water, olive oil, and sugar in a big mixing bowl, stand mixer, or food processor. Add the flour, salt, and seasoning, if using. Start mixing together, then sprinkle in the yeast. Mix until just combined.
- Keep in same bowl, if desired, or transfer to another bowl that is greased. Loosely cover top with plastic wrap or towel and let dough rise at room temperature until it flattens out on top, about two hours.
- Dough can be used now but is much easier to handle when cold. Refrigerate in a non-airtight container and use within two weeks. Dough can also be frozen in freezer bags, for up to a month, and defrosted later in the fridge.
OM NOM NOM!
Bready or Not Original: Cast Iron Pan Pizzas
Equipment
- 10-inch cast iron skillet
Ingredients
- handful pizza dough
- olive oil
- desired toppings and seasonings
Instructions
- Preheat oven at 450-degrees. Add about a tablespoon of olive oil to a cast iron skillet and place the pan in the oven to heat up.
- Grab a good handful of pizza dough, or as much as desired to bake today. Oil a small space of counter or table as well as hands, and gently stretch and press out the dough to a rough circle. If it tears, patch with other pieces of dough as best possible. Let dough rest for about 20 minutes.
- By this time, the oven should have preheated. Use a potholder to pull out the skillet. Carefully swirl the hot oil in the pan to coat the bottom and set pan down on a safe surface. Carefully, again, place the dough in the pan.
- Bake crust for 6 to 10 minutes, until it is set. Pull out of oven and add desired toppings.
- Put pizza in oven for another 6 to 10 minutes, until crust is golden and toppings are cooked to desired level. Let pizza cool for about 10 minutes, then slide onto a plate or other surface to slice and eat.
- OM NOM NOM!
Bready or Not: Bacon-Toffee Cookies
Bacon, chocolate, and toffee complement each other in these incredible Bacon-Toffee Cookies.

Fact: My Bacon Fat Chocolate Chip Cookies (originally shared at the Holy Taco Church lo those many years ago) is among my most popular recipes.

This recipe is different. The previous take makes a crisper cookie, while these are chewier with some extra sweetness and crunch from the Heath toffee pieces.

This recipe makes a lot, too: about 70 cookies if you use a teaspoon scoop!

That sounds like a lot, but my husband’s co-workers inhaled them, so I don’t know how well they keep beyond a day. One of those good/bad problems to have.

Modified from Fall Baking 2016 by Better Homes & Gardens.


Bready or Not: Bacon-Toffee Cookies
Ingredients
- 1/2 cup unsalted butter softened
- 1/2 cup shortening
- 1 1/2 cups brown sugar packed
- 1/2 teaspoon baking soda
- 1/2 teaspoon salt
- 2 eggs room temperature
- 1 teaspoon vanilla extract
- 2 3/4 cup all-purpose flour
- 1/2 cup Heath bits
- 3/4 cup semi-sweet chocolate chips
- 6 thick-cut bacon slices chopped up
Instructions
- Preheat oven at 375-degrees. Ina large bowl, beat butter and shortening together until turning fluffy. Add brown sugar, baking soda, and salt, followed by the eggs and vanilla. Gradually beat in the flour.
- Stir in the Heath bits, chocolate chips, and bacon. Use a teaspoon scoop or spoon to dollop dough onto baking sheet, spaced out to allow for minor spreading. Bake for 8 to 10 minutes, until edges are just turning golden. Cool for five minutes, then transfer to a rack to finish cooling.
- Store cookies in a sealed container.
- OM NOM NOM!
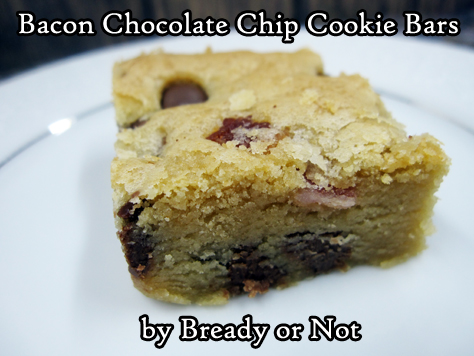
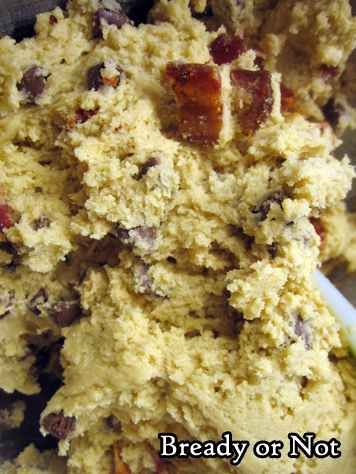
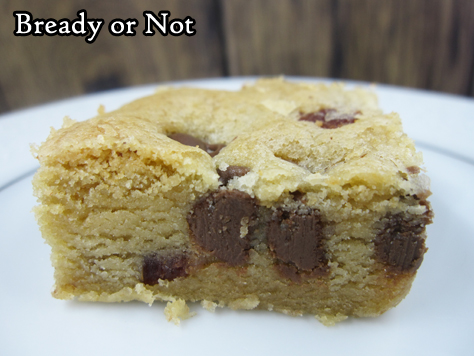
Bready or Not Original: Bacon Chocolate Chip Cookie Bars
These soft, chewy blondies are savory, sweet, and amazing–and my original creation.
The year 2018 was awful in a lot of ways, but it offered one bonus: frequent sales on bacon at my regular grocery stores around Phoenix. I developed quite a strategic stockpile.
I then realized, hey, I should try baking bacon into more sweets. After all, my bacon fat chocolate chip cookies are among my most popular recipes.

I didn’t have a lot of free time, though. I wanted something to bake up fast, without a lot of fuss. Therefore, cookies were out. I wanted bars.

To my surprise, I couldn’t find an existing recipe that appealed to me. I decided that if I wanted soft, chewy bacon and chocolate chip bars, I needed to develop my own recipe.
That’s exactly what I did.
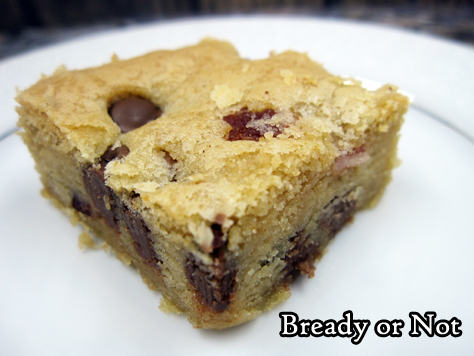
This is a recipe that utilizes sweet and savory together, and it’s a must-bake for any bacon lovers.

Bready or Not Original: Bacon Chocolate Chip Cookie Bars
Ingredients
- 14 Tablespoons unsalted butter softened
- 2 Tablespoons bacon fat
- 1 cup light brown sugar packed
- 3/4 cup white sugar
- 2 teaspoons vanilla extract
- 2 eggs room temperature
- 3 cups all-purpose flour
- 3/4 teaspoon salt
- 3/4 teaspoon baking soda
- 1 1/4 cup milk chocolate chips divided
- 4 slices thick-cut cooked bacon chopped
Instructions
- Preheat oven at 350-degrees. Line a 13x9 pan with foil and grease with butter or nonstick spray.
- Cream together the butter and bacon fat. Mix in the sugars until pale and fluffy, then add the vanilla and eggs.
- In a separate bowl, sift together the flour, salt, and baking soda. Gradually mix the dry ingredients into the wet, until just combined. Fold in 1 cup of the chocolate chips along with the chopped bacon.
- Press dough into prepared pan. Sprinkle the remaining chocolate chips over the top.
- Bake for 22 to 25 minutes, until the middle passes the toothpick test. Cool until room temperature. Use foil to lift contents onto cutting board for easy slicing. Keep stored in sealed containers at room temperature or in the fridge.
- OM NOM NOM!
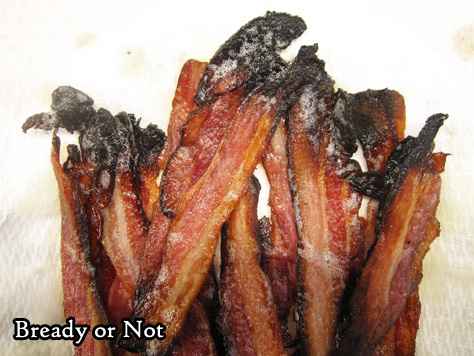
Bready or Not: Cato Home-Cured Bacon
We’re kicking off a breakfast theme for a month with a recipe that will step-by-step teach you how to cure your own bacon.
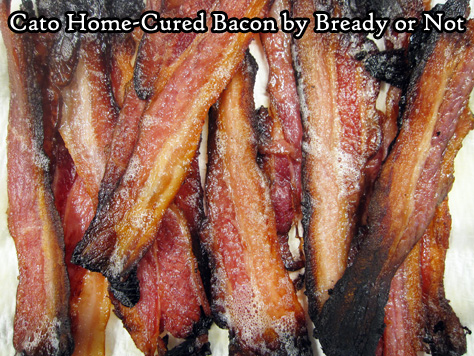
I guarantee this will be among the best, if not THE best, bacon you will have in your life. Fresh really makes the difference.
This recipe is not difficult. In all honesty, the greatest challenge is that the curing bacon takes up a lot of fridge space for about 10 days.
I completely modified this from a Michael Symon recipe featured in Food Network Magazine, March 2014. The only way that I can buy pork belly locally is from Costco (for about $2.69 a lb!), so this is a Costco-sized recipe.
If you can buy a smaller pork belly slab, then just halve the ingredients. Otherwise, buy the big belly and follow all of the steps I provide… which means you’ll have another slab of frozen bacon already seasoned and prepped to cure in a few weeks or months.
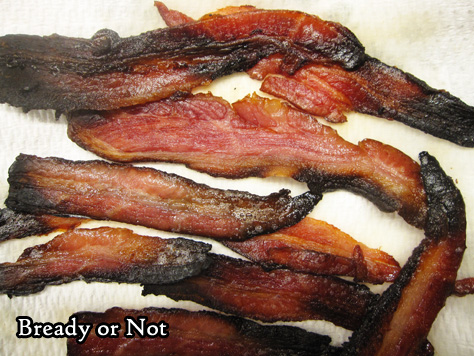
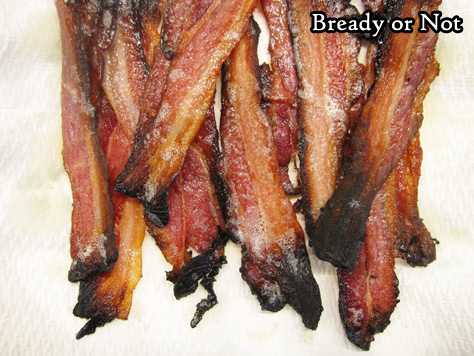
After the meat is smoked, slice it up and use it however you want. I find that home-cured bacon cooks much faster than the store stuff, though it can be much thicker, and the bits that look burned aren’t usually burned.

The smoked meat also freezes and keeps for weeks or months. Just thaw it in the fridge when you’re ready, and use it however you wish.
You’ll wish to eat every last morsel. Trust me.
This recipe does require some supplies that you likely don’t have in the cupboard, and might be hard to find locally. Amazon, of course, has everything. I recommend them for buying 2-gallon zipper bags as well as pink curing salt (plus, you get enough salt to last through the apocalypse). Note that pink curing salt is essential here because it has salt and sodium nitrate, which keeps the meat pink and kills bacteria. Normal salts don’t pack that wallop.

Bready or Not: Cato Home-Cured Bacon
Ingredients
- 9 to 10 lb pork belly
- 1/2 cup kosher salt
- 4 teaspoons pink curing salt
- 2 teaspoons cumin
- 1/2 cup brown sugar packed
- 1/2 cup honey
- 1/4 cup red pepper flakes
- 1/4 cup paprika sweet or smoky
Instructions
- Cut the pork belly slab in half and rinse and pat dry both pieces. Place them in separate re-sealable 2-gallon plastic bags.
- Mix together the spice rub. It'll form a thick paste. Roughly divide it into quarters, and use a quarter on each side of a pork piece. The rub will be very lumpy. Don't worry about a perfect, even coating; the pork will release juices and the flavors will seep in during the curing process.
- Close both bags, pressing out as much air as possible. Freeze one bag for later; as a precaution against holes getting torn in the bag, wrap it well in plastic wrap, too. When ready to start the curing process for this half, add another day or two to the curing time in the fridge to account for thawing time.
- As for the ready piece of pork belly, set that bag in the fridge for the next 7 to 10 days, until it feels firm. Flip the meat once a day.
- Remove the pork belly from the bag. Rinse it well and pat it dry. Set it on a rack on a small cookie sheet in the fridge and let it dry for another two days. No need to flip it at this point.
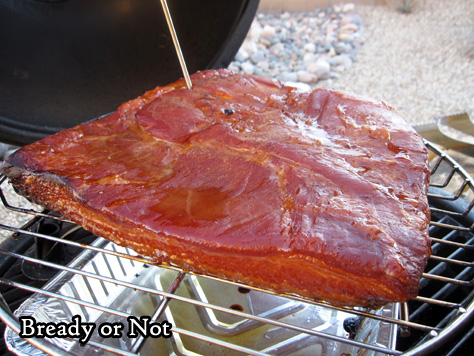
- Set up your smoker at 200-degrees. Applewood chips are a great choice, but maple and hickory are fantastic as well. Smoke the pork belly for about 3 hours, until the bacon reaches an internal temperature of about 150-degrees.
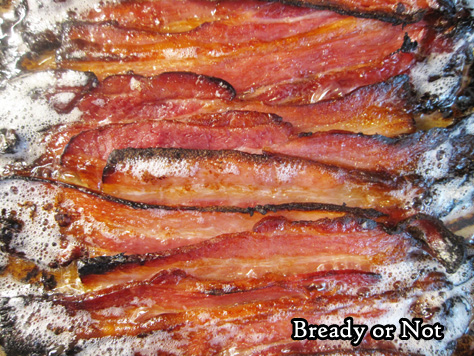
- From this point, slice and cook the meat as you would regular bacon, but note that this fresher, homemade variety will cook much faster. Use plastic wrap or plastic bags to store the sliced meat in the fridge for upwards of a week, or freeze for up to 2 months.
- OM NOM NOM!
Follow me


