


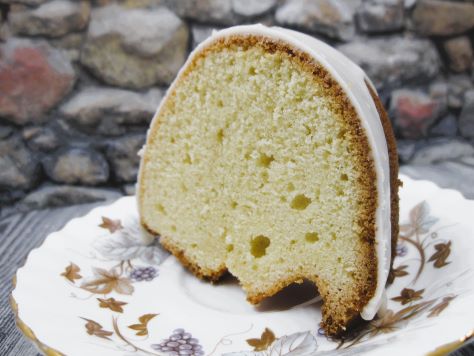
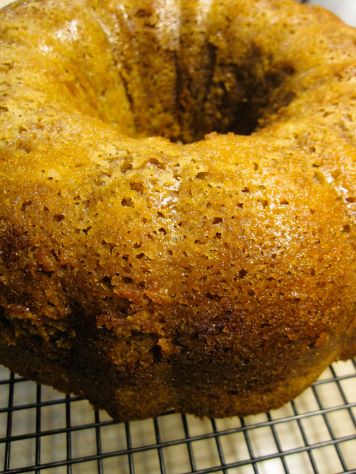
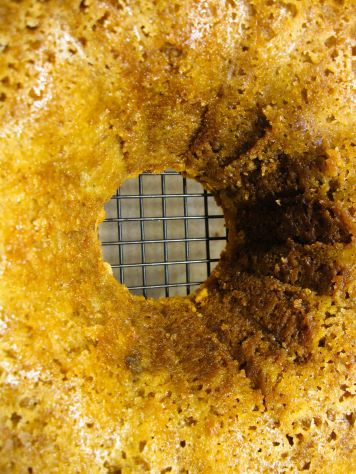
Bready or Not: Maple Bundt Cake with Maple Icing
Yes, it’s time for yet another maple cake on Bready or Not! This time, a straightforward Maple Bundt Cake with Maple Icing. Delicious cake, plain and simple.
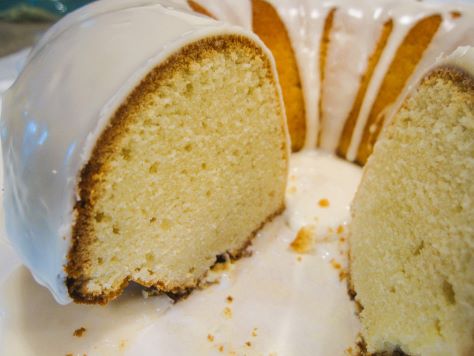
This recipe uses both maple syrup and maple flavor. I feel that both are really necessary here. Really, if you love maple, maple flavor is great to have around. It stays good forever. If you need recipes that use it, well, I think I have dozens of them here on my site.
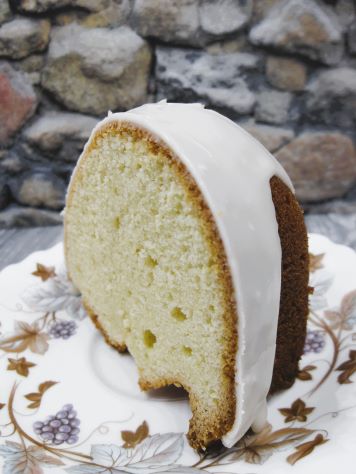
This is the kind of cake that works well for a breakfast, brunch, or dessert. It’s deliciously versatile like that.
Bready or Not: Maple Bundt Cake with Maple Icing
Equipment
- large bundt pan (12 cups/10 inches)
- nonstick spray
- baking sheet
Ingredients
Cake
- 1 cup unsalted butter (2 sticks) room temperature
- 1 cup white sugar
- 1/2 cup pure maple syrup
- 4 large eggs room temperature
- 2 1/2 cups all-purpose flour
- 1 teaspoon baking powder
- 1/2 teaspoon sea salt
- 1/2 cup half & half or milk
- 1/2 teaspoon maple flavor
Icing
- 1 1/2 cups confectioners’ sugar
- 2 Tablespoons pure maple syrup
- 2 Tablespoons half & half or milk
Instructions
- Preheat oven at 350 degrees. Place a baking sheet inside to warm up. Apply nonstick spray to coat the interior of a large bundt pan.
- In a large mixing bowl, cream the butter until smooth. Add the sugar, scraping down the bowl a few times to make sure everything is mixed. Continue to beat until it becomes light and fluffy. Add the maple syrup followed by the eggs, one at a time.
- In another bowl, combine flour, baking powder, and salt. Gradually add the dry ingredients to the main bowl, interspersing it with the addition of the half & half. Add the maple flavor. Once everything is added, scrape the bottom of the bowl.
- Scoop the batter into the prepared bundt pan. Smooth the top with the back of a spoon.
- Place the bundt pan atop the hot baking sheet. Bake for 1 hour to 1 hour and 10 minutes, until a toothpick plunged into the middle of the cake comes out clean.
- Let cake rest in pan for 20 minutes, then invert it onto a rack to cool completely.
- Make the glaze by combining the three ingredients to form a thick texture. Drizzle over the top of the cooled cake.
- Store cake under a cake dome or other cover. Individual slices can be wrapped in plastic for transport or frozen for later.
OM NOM NOM!
Bready or Not Original: Maple Syrup Pie
Do you feel a change in the seasons coming? Or simply want to manifest one? I had to create a psychological autumn and winter when I lived in Arizona, and maple flavor was a big part of that. If you’re in need of some cool weather vibes about now, too, maybe this Maple Syrup Pie will help!

The recipe is pretty straightforward. The most involved process is parbaking the crust, that is, baking the raw dough to form a golden shell that won’t become a soggy mess once it has a wet filling.
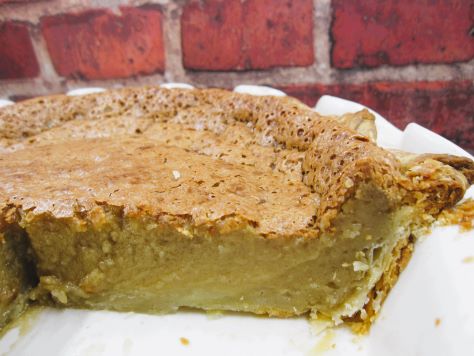
The filling itself comes together quickly in a blender. Mine puffed a LOT in the oven and then dropped down again once the pie cooled.

This is a great pie to make for a treat any time of year, but it would be especially nice for Thanksgiving or at a holiday celebration.
Bready or Not Original: Maple Syrup Pie
Equipment
- baking pan
- aluminum foil or parchment paper
- pie weights
- blender
Ingredients
- 1/4 cup all-purpose flour plus more for work surface
- raw pie dough for one crust or store-bought pie crust
- 1 1/4 cups dark maple syrup
- 1/2 cup unsalted butter (1 stick) melted
- 1/2 cup heavy cream room temperature
- 1/2 cup brown sugar packed
- 3 large eggs room temperature
- 1 1/2 teaspoons pure vanilla extract
- 1/2 teaspoon kosher salt
- canned whipped topping or Cool Whip for top
Instructions
- Place oven racks at the middle and bottom positions. Preheat oven at 375 degrees.
- If working with unshaped pie dough, use some flour on a clean surface to roll out dough to 12 inches. Place it in a 9-inch pie plate and shape to fit, crimping the crust at the rim. Prick the bottom of the crust all over with a fork. Freeze crust for 20 minutes.
- Set out a baking sheet. Line with aluminum foil.
- Line the crust with foil or parchment paper. Fill interior with pie weights, pressing in to make sure there are no gaps along the sides.
- Set pie crust on baking sheet. Bake it on bottom rack for 20 minutes. Carefully use foil or parchment to lift out pie weights onto another baking sheet or a large bowl. Bake crust again until the edges are golden brown and the bottom is dry, 5 to 10 minutes.
- Set the crust to cool on a rack while continuing to make the filling.
- Reduce oven temperature to 350.
- In a blender, place the flour, maple syrup, butter, heavy cream, brown sugar, eggs, vanilla, and salt. Blend on high until the contents are smooth. Pour into pie crust.
- Bake on middle rack in oven for 40 to 50 minutes; the filling should be puffed with only a slight jiggle in the middle. Cool on a rack.
- Store at room temperature, covered with foil. Serve with a dollop of whipped cream or Cool Whip on top. Keeps for at least 4 days.
OM NOM NOM!
Bready or Not Original: Glazed Maple Shortbread Cookies
Maple is a regular theme here on Bready or Not, and these Glazed Maple Shortbread Cookies are as delicious as they look.
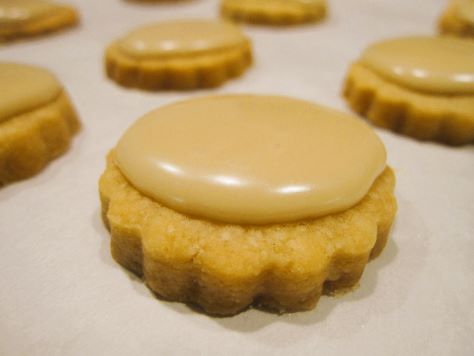
They are simple to make, too. Easy dough. Chill it for a bit. Shape and bake. Make the glaze. If you use a complicated cookie cutter, that might make the glazing more tedious, but that’s a choice to make. This scalloped version was easy to do with the back of a spoon.
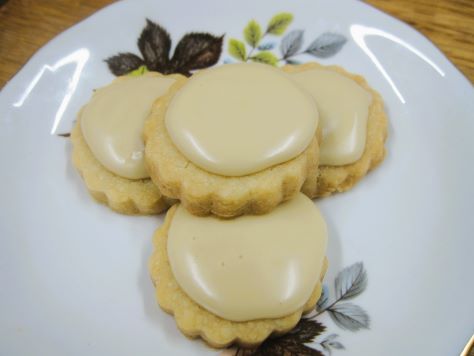
These cookies are great year-round! Good flavors should be confined to no particular season.
Bready or Not Original: Glazed Maple Shortbread Cookies
Equipment
- plastic wrap
- baking sheet
- cookie cutter
- Rolling Pin
Ingredients
Dough
- 1 cup unsalted butter (2 sticks) softened
- 1/2 cup white sugar
- 3 Tablespoons cornstarch
- 2 teaspoons maple flavor
- 1 3/4 cups all-purpose flour
Glaze
- 1 cup confectioners’ sugar
- 1/3 cup maple syrup
Instructions
- In a large bowl, beat together the butter, sugar, cornstarch, and maple flavor. Gradually add the flour. Shape the dough into a disc and encase in plastic wrap. Chill it for at least 45 minutes in the fridge until it’s firm enough to roll out, but it can be kept there for up to 2 days–but note that it will get quite hard with longer storage. If it’s there over a day, let it sit at room temp for 30 minutes to an hour to soften enough to roll out (but don’t let it get too soft, either).
- Preheat oven at 325 degrees. Line a baking sheet with parchment paper.
- Lightly flour a surface and roll out dough to 1/4 inch thickness. Cut out cookies. Place spaced out on parchment.
- Bake for 18 to 20 minutes. Remove from pan to cooling rack. Once they are cool, mix the glaze. Use the back of a spoon to spread glaze onto cookies, Set them back on cookie sheet or rack to set for an hour or two. Pack in sealed containers for up to a few days.
OM NOM NOM!
Bready or Not Original: Air Fryer Maple Roasted Nuts
Pardon me, have you heard that air fryers are awesome? Yeah, yeah, I won’t go for the hard sell, but I do love my air fryer, and it sure makes these Maple Roasted Nuts quick and convenient.
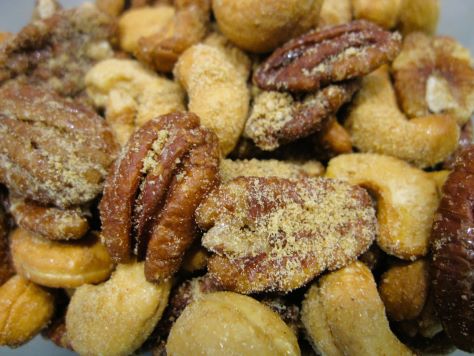
This is a good recipe if you want to prepare nuts for a sports game or any kind of gathering–or if, like me, you enjoy having some lightly-sweet nuts along with cheese.
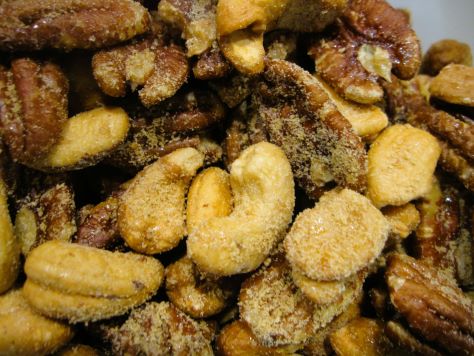
If you’d like, substitute honey for the maple syrup. I imagine something like agave syrup might work, too, but I haven’t tried that. I know maple sugar can be expensive or hard to find offline, but fortunately brown sugar makes for a good substitute for that, too.
Bready or Not Original: Air Fryer Maple Roasted Nuts
Equipment
- air fryer
- parchment paper
Ingredients
- 1 cup whole pecans
- 1 cup whole cashews
- 1 Tablespoon butter melted
- 1 Tablespoon maple syrup
- 1/2 teaspoon salt
- 1 Tablespoon maple sugar or brown sugar
Instructions
- Line the air fryer tray with parchment paper cut to fit, then place tray on top.
- Place the nuts in a large bowl. Pour the butter over the top, followed by the maple syrup and salt. Stir the nuts to coat. Place them spread out on the mesh tray.
- Air fry at 325-degrees for about 5 to 6 minutes or until they begin to smell toasted, stirring one halfway through. They should look browned at the end.
- While they are cooking, pull out another small cookie sheet or plate, putting more parchment on it if desired; this will be a surface on which the nuts will cool.
- When the nuts are done, pull them from the air fryer and carefully transfer them to the fresh cookie sheet. Let them cool for about 10 minutes, then sprinkle maple sugar on top, stirring to coat. Enjoy immediately, or place in a sealed container at room temperature to eat over the next month.
OM NOM NOM!
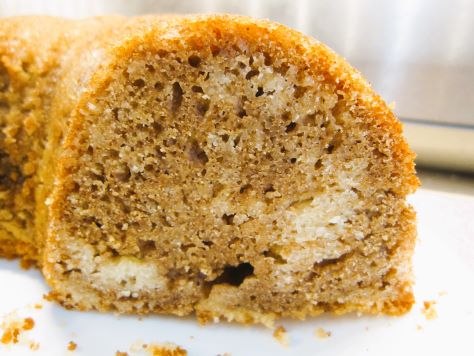
Bready or Not Original: Marble Swirl Bundt Cake
This Marble Swirl Bundt Cake is not only delicious but pretty, as it contains a light and dark swirl inside!
Spices are the prevalent flavor through the darker portions of the cake, with the pale portions plain and sweet in balance.
There are a lot of ingredients in this cake, though the assembly is straightforward. Save yourself some effort at baking time by combining the spice ingredients a day ahead!
Bready or Not Original: Marble Swirl Bundt Cake
Equipment
- large bundt cake pan
- nonstick spray with flour or regular nonstick spray
Ingredients
- 2 2/3 cup all-purpose flour
- 4 teaspoons baking powder
- 1/2 teaspoon salt
- 4 large eggs room temperature
- 2 cups white sugar
- 1 1/3 cup almond milk or regular milk
- 1/2 cup unsalted butter melted
- 1/3 cup canola oil
- 1/4 cup maple syrup
- 2 teaspoons instant espresso powder or unsweetened cocoa powder (sifted)
- 2 teaspoons ground cinnamon
- 1 teaspoon ground allspice
- 1 teaspoons ground cloves
- 1 teaspoon ground nutmeg
Instructions
- Move rack to lower 1/3 of oven; set to preheat at 350-degrees. Generously coat the interior of a large bundt pan with nonstick spray, preferably a baking spray with flour.
- In a medium bowl, combine flour, baking powder, and salt. Set aside. In a big mixing bowl, place eggs, sugar, milk, butter, and oil, beating until creamy yellow. Gradually mix in the dry ingredients, but reserve the empty bowl to one side. Scrape the bowl of batter as needed, mixing until it is smooth.
- Measure out 3 cups of the batter into the reserved bowl. Add the maple syrup, espresso powder or cocoa, cinnamon, allspice, cloves, and nutmeg, whisking until smooth.
- Pour half the plain batter into the greased pan. Top with half the spiced batter, spreading to the sides. Draw a butter knife through the layers, swirling up and down and around. Pour the remaining batters into the pan, repeating the swirl process with the butter knife.
- Bake bundt cake for 45 to 50 minutes. The top should feel dry and the middle should pass the toothpick test. Let cool in pan for 1 hour, then carefully invert onto a cooling rack; if any chunks stick to the pan, try to nestle them back into place on the cake.
- Finish cooling. Slice into wedges. Store under a cake dome or otherwise wrapped; individual slices can also be wrapped in plastic.
OM NOM NOM!
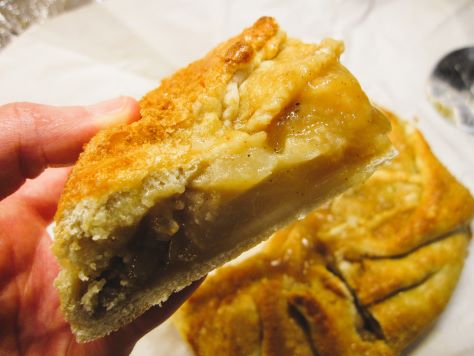
Bready or Not: Maple Pear Galette Redux
This Maple Pear Galette recipe is a must for any maple-lovers. I first featured it on Bready or Not in 2016, and it was high time to take new pictures and share the recipe anew!
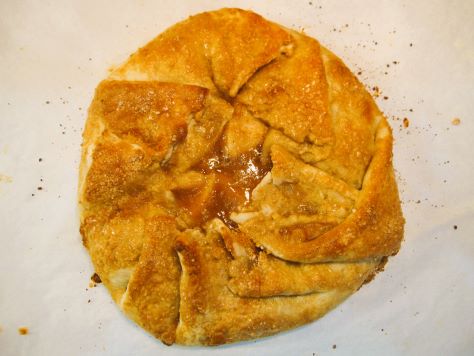
This recipe laces maple sugar into every layer: the galette dough, the thick maple paste for the pears, and as a golden accent and perfect crunch for the top of the galette.
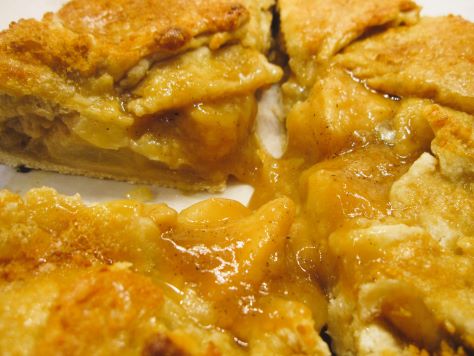
This is remarkably easy to make, too. The peeling and coring the pears is the biggest hassle. I like to make the dough a day ahead of time, which makes the assembly part go pretty fast.
I heavily modified this recipe from one found in this incredible cookbook called Maple by Katie Webster. [Affiliate link.] Seriously, if you love maple used in dishes for any meal of the day, get this cookbook! It looks like it’s now out of print, but used copies are available for decent prices.
Bready or Not: Maple Pear Galette
Equipment
- medium bowl
- large bowl
- Rolling Pin
- parchment paper
- baking sheet
- pastry brush
Ingredients
Galette
- 1 1/4 cups all-purpose flour
- 1 Tablespoon maple sugar
- 1/2 teaspoon salt
- 4 Tablespoons unsalted butter 1/2 stick
- 3 to 6 Tablespoons ice water
Interior
- 2 Tablespoons all-purpose flour
- 1/2 cup maple sugar
- 2 teaspoons vanilla extract
- 1 Tablespoon lemon juice
- 3 ripe pears peeled, cored, and cut into wedges
Topping
- 1 large egg lightly beaten
- 1 Tablespoon maple sugar
Instructions
Make the galette.
- In a medium bowl, whisk together flour, maple sugar, and salt. Add butter and work into dough so that the butter is down to pea-sized chunks. Add just enough water to incorporate as dough, smearing butter chunks in the process. Shape dough into a disk and shroud in plastic wrap; refrigerate for 30 minutes, or overnight.
- Preheat oven to 350-degrees. Place parchment paper on a large rimmed baking sheet.
Make the interior.
- In a large bowl, gently stir together the flour, maple sugar, vanilla, and lemon juice; it will form a thick paste. Gently stir in the pears to coat. Expect the mixture to become more liquid as it sits with the pears in it.
- Use some extra flour to lightly dust a large work surface. Roll out the dough to at least a foot diameter circle. Transfer it to the prepared parchment paper on baking sheet; the dough might hang over the edges for now, but that’s okay.
- Arrange the pears in a circular pattern in the center; leave a 2 1/2 to 3-inch border. Scrape the rest of the maple paste over the pears. Fold the dough inward, with the center still exposed. Brush the egg over the top and sprinkle on the remaining maple sugar.
- Bake for 40 to 50 minutes, until the crust is golden and the filling bubbles. Let cool before cutting.
OM NOM NOM!
Follow me


