


Bready or Not: Gingerbread Cookie Bars
I suppose I could try to justify the timing of these Gingerbread Cookie Bars with a line like “It’s five months until Christmas!” but nah. Good food is good food, and should be enjoyed at any time of year.
I don’t care that it’s the middle of summer. Gingerbread Bars are awesome. If your house gets hot, bake these up early in the day or late at night, then enjoy a cool-weather-vibe treat in the days ahead.
This is a very straightforward recipe that makes a lot of bars that keeps for many days. A perfect recipe for a large gathering or a cookie exchange, this is a great version of a classic treat.
Bready or Not: Gingerbread Cookie Bars
Equipment
- 15×10 pan (jelly roll pan)
- aluminum foil
- nonstick spray
Ingredients
- 4 1/2 cups all-purpose flour
- 4 teaspoons ground ginger
- 2 teaspoons baking soda
- 1 1/2 teaspoons ground cinnamon
- 1/4 teaspoon salt
- 1 1/2 cups shortening
- 2 cups white sugar
- 2 eggs
- 1/2 cup molasses
- 1/2 cup coarse sugar such as turbinado sugar
Instructions
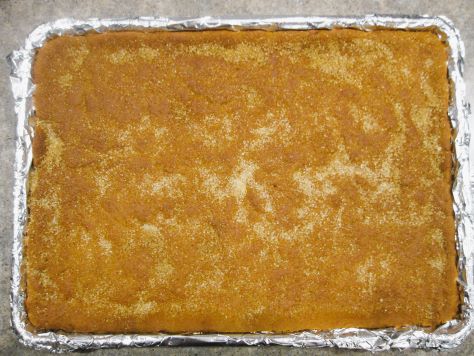
- Preheat oven at 350 degrees. Line the jelly roll pan with wide foil and apply nonstick spray.
- In a mixing bowl, combine flour, ginger, baking soda, cinnamon, and salt.
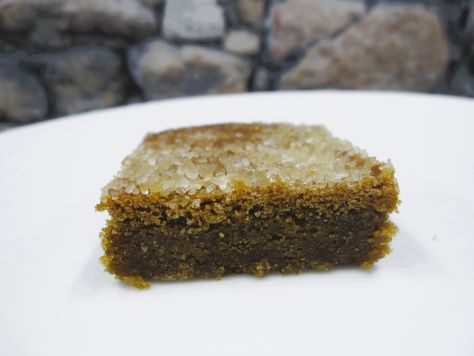
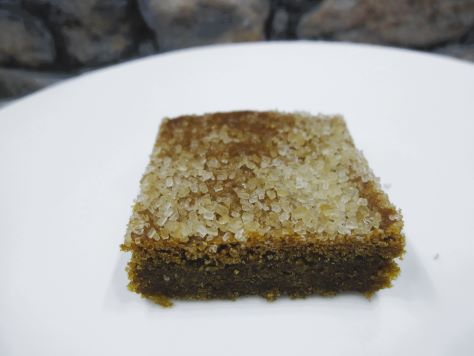
- In a large bowl, beat together the shortening and sugar until they are fluffy. Scrape the bowl as needed. Beat in the eggs and molasses. Slowly add the dry ingredients; if using a stand mixer, it may be necessary to stop doing so at the end to finish mixing by hand. Pat the dough into the prepared pan. Sprinkle the coarse sugar across the top and lightly press it in.
- Bake for 18 to 20 minutes. The edges should be turning golden. Cool in pan on wire rack. Use the foil to lift it onto a cutting board for easy slicing. In a sealed container, keeps up over five days at room temperature.
OM NOM NOM!
Bready or Not Original: Glazed Maple Shortbread Cookies
Maple is a regular theme here on Bready or Not, and these Glazed Maple Shortbread Cookies are as delicious as they look.
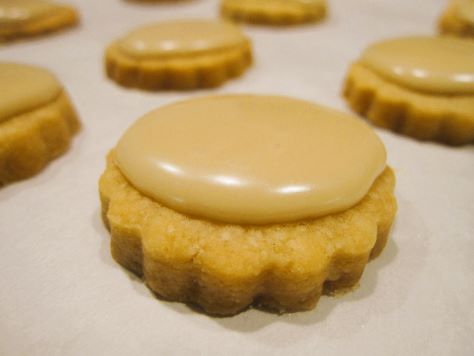
They are simple to make, too. Easy dough. Chill it for a bit. Shape and bake. Make the glaze. If you use a complicated cookie cutter, that might make the glazing more tedious, but that’s a choice to make. This scalloped version was easy to do with the back of a spoon.
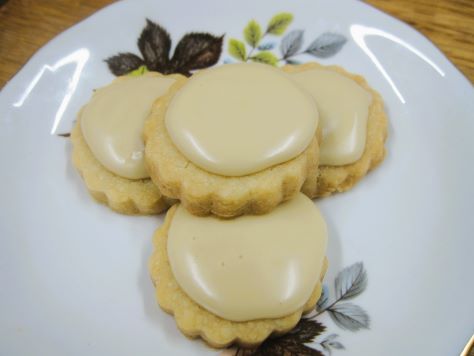
These cookies are great year-round! Good flavors should be confined to no particular season.
Bready or Not Original: Glazed Maple Shortbread Cookies
Equipment
- plastic wrap
- baking sheet
- cookie cutter
- Rolling Pin
Ingredients
Dough
- 1 cup unsalted butter (2 sticks) softened
- 1/2 cup white sugar
- 3 Tablespoons cornstarch
- 2 teaspoons maple flavor
- 1 3/4 cups all-purpose flour
Glaze
- 1 cup confectioners’ sugar
- 1/3 cup maple syrup
Instructions
- In a large bowl, beat together the butter, sugar, cornstarch, and maple flavor. Gradually add the flour. Shape the dough into a disc and encase in plastic wrap. Chill it for at least 45 minutes in the fridge until it’s firm enough to roll out, but it can be kept there for up to 2 days–but note that it will get quite hard with longer storage. If it’s there over a day, let it sit at room temp for 30 minutes to an hour to soften enough to roll out (but don’t let it get too soft, either).
- Preheat oven at 325 degrees. Line a baking sheet with parchment paper.
- Lightly flour a surface and roll out dough to 1/4 inch thickness. Cut out cookies. Place spaced out on parchment.
- Bake for 18 to 20 minutes. Remove from pan to cooling rack. Once they are cool, mix the glaze. Use the back of a spoon to spread glaze onto cookies, Set them back on cookie sheet or rack to set for an hour or two. Pack in sealed containers for up to a few days.
OM NOM NOM!
Bready or Not Original: Big Batch Chocolate Chip Shortbread
Do you need a whole lot of cookies? This Big Batch Chocolate Chip Shortbread recipe has got you covered.

This recipe doubles my Pride O’ Scotland Shortbread Recipe (one of the first cookie recipes I ever called ‘mine’ back in my teens) and adds chocolate chips. I’ve reworked my basic shortbread recipe many ways over the years; check out versions with Cookie Butter, Lemon, and Chocolate Chip Espresso.

A few important things to mention here. Before the shortbread is baked, be sure to use a fork to poke holes over the top and then cut into the dough to form the shapes of the future cookies. Then, as soon as the pan is out of the oven, cut again along those lines. A lot of classic shortbread recipes produce cookies that are firm and soft, and if they are cut after being cooled, they may just fall apart.

Bready or Not Original: Big Batch Chocolate Chip Shortbread
Equipment
- jelly roll pan (15x10x1)
Ingredients
- 2 cups unsalted butter (4 sticks) softened
- 2 egg yolks
- 2 teaspoons vanilla extract or vanilla bean paste
- 4 cups all-purpose flour
- 1 1/2 cups white sugar
- 1/2 teaspoon salt
- 1 cup chocolate chips
Instructions
- Preheat oven at 375-degrees. Line jelly roll pan with foil and apply nonstick spray.
- In a large bowl, beat together the butter, egg yolks, and vanilla. In another bowl, stir together the flour, sugar, and salt. Gradually add the dry ingredients to the wet. If using something like a KitchenAid, by the end, the thick dough will likely require setting the beater aside and using both hands. Distribute the chocolate chips throughout.
- Press dough into prepared pan. Flatten evenly with palms. Prick surface all over with floured fork. Use a knife or bench knife to score the dough into finger-sized wedges.
- Bake for at least 20 minutes; the tops should just be turning golden, with the middle set and dry. Remove from oven. Immediately cut again following slash marks.
- Let shortbread cool. Cut again along slash marks. Use the foil to carefully lift the shortbread onto a cutting board to pull apart the pieces. Shortbread will keep in a sealed container for several days.
OM NOM NOM!
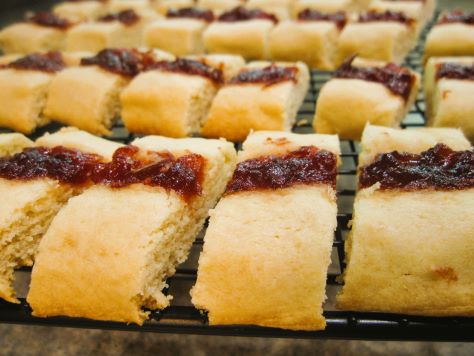
Bready or Not Original: Jammy Shortbread
This Jammy Shortbread is a fun recipe that’s easy to customize with your favorite jam! Go for raspberry, cranberry, blueberry… something sweet and delicious.
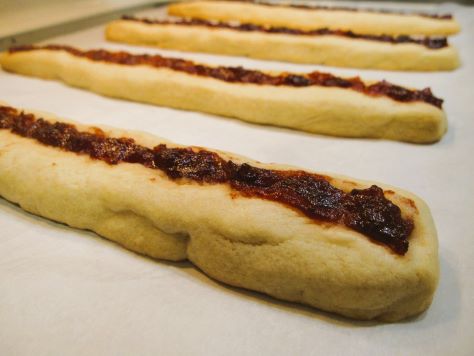
I had to make this recipe a few times to get it right. Specifically, shaping the dough was the issue. That’s why I give instructions to form the divided dough into a 12-inch stick that is 1 inch across. That makes the dough thick enough to form a trench that will hold the jam.
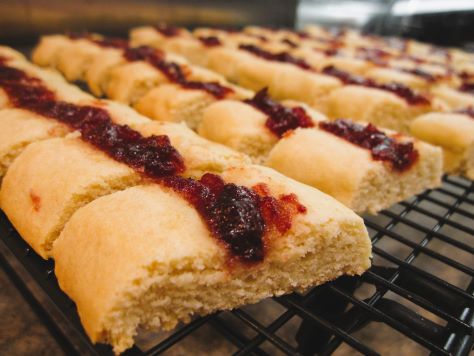
What initially foiled me was that the dough was too wide, and then it spread with baking. I had these wide cookies with just a little bit of jam in the middle. Oops.
Leave it to me to make the screw-ups so that your cookies can turn out great from the first batch!
Bready or Not Original: Jammy Shortbread
Equipment
- food scale
- plastic wrap or bags
- parchment paper
Ingredients
- 3/4 cup unsalted butter (1 1/2 sticks) softened
- 2/3 cup white sugar
- 1 large egg room temperature
- 1 teaspoon vanilla extract
- 2 cups all-purpose flour
- 1/2 teaspoon baking powder
- 1/2 teaspoon salt
- 1/3 cup thick fruit jam
Instructions
- In a large bowl, cream together butter and sugar until light and fluffy. Beat in egg and vanilla. In another bowl, sift together the flour, baking powder, and salt. Gradually add the dry ingredients to the wet to form a cohesive dough.
- Use a food scale to divide the dough into four portions. Wrap them each in plastic wrap or in a sealable bag, and chill for at least an hour.
- Preheat oven at 350 degrees. Prepare a large baking sheet with parchment paper.
- Pull out a portion of chilled dough. On a far side of the baking sheet, form it into a 12-inch-long stick, 1 inch across. Use fingertips to form a trench down the middle. Spoon jam to fill the trench. Repeat the process with the other three portions of dough, creating long lines on the pan.
- Bake for 18 to 22 minutes, until dough looks set and is light golden brown. Let cool for 2 minutes. Slice each stick 3/4-inch apart to form individual cookies. Move them to a rack to completely cool. Store in a sealed container at room temperature.
OM NOM NOM!
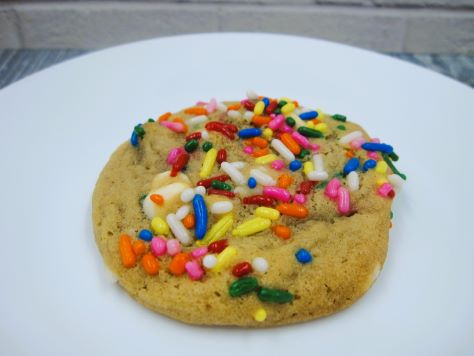
Bready or Not: Cookie Butter-Chocolate Chip Cookies
I like to say that cookie butter makes everything better. I would also add that rainbow sprinkles make everything better. These cookies feature both cookie butter AND rainbow sprinkles, and will absolutely blow your mind.
The recap, as there is always someone discovering cookie butter for the first time: it’s an addictive substance found near the peanut butter in most every grocery store in America; even my local Walmart has it in the main Biscoff brand or as a Walmart generic, and Trader Joe’s calls it Speculoos. It’s essentially pulverized cookies and oil. It has the exact same texture as peanut butter and can substitute for it in most any recipe. There is nothing healthy about it and it is incredibly delicious.
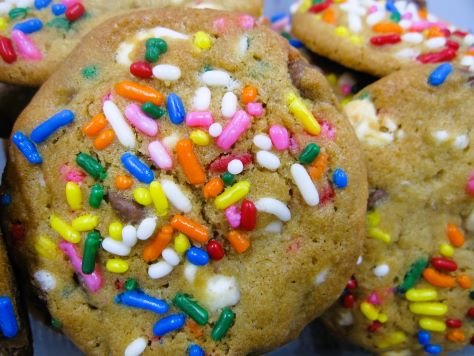
Cookie butter makes things taste like cookie dough. That’s outright magical when paired with chocolate. These cookies are especially pretty as they include white and brown chips along with the sprinkles.
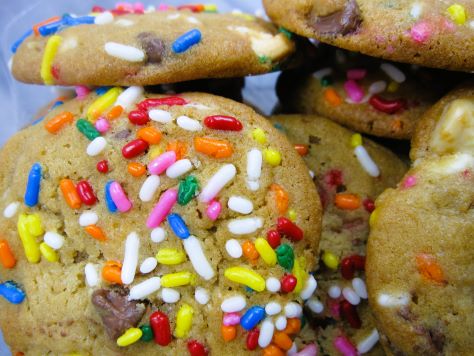
Customize the sprinkles based on the season or reason. Red and green for Christmas, pink and/or red and/or white for Valentine’s, favorite sports team colors, whatever. Of course, basic rainbow sprinkles are always a great choice!
Modified from Food Network Magazine December 2022.
Bready or Not: Cookie Butter-Chocolate Chip Cookies
Equipment
- large cookie scoop
- baking sheet
- parchment paper
Ingredients
- 1 3/4 cups all-purpose flour
- 1/2 teaspoon baking soda
- 1/2 teaspoon salt
- 10 Tablespoons unsalted butter room temperature
- 1/2 cup smooth cookie butter such as Biscoff or Speculoos
- 1/2 cup brown sugar packed
- 1/4 cup white sugar
- 2 large eggs room temperature
- 1 teaspoon vanilla extract
- 3/4 cup white chocolate chips
- 3/4 cup milk chocolate chips
- 3 Tablespoons sprinkles plus more for topping
Instructions
- In a small bowl, combine flour, baking soda, and salt. Set aside.
- In a large bowl, beat together the butter, cookie butter, and both sugars until they are light and fluffy. Add the eggs one at a time. Add the vanilla.
- Gradually stir in the dry ingredients to form a cohesive dough. Fold in both kinds of chips along with the sprinkles. Cover the dough and chill in the fridge at least 2 hours, or up to a few days.
- Preheat oven at 350 degrees. Line a baking sheet with parchment paper. Pour some sprinkles into a bowl.
- Use a scoop or spoon to shape the dough. Dip the top into the sprinkles and compress to coat. Place spaced out a few inches on sheet–they will spread!
- Bake 11 to 12 minutes, until set and golden. Let them cool for about 5 minutes on the sheet, then transfer them to a cooling rack. Store them in a sealed container at room temperature.
OM NOM NOM!
Bready or Not: Brown Sugar Pie Bars
If you have a major sweet tooth (like me), these indulgent Brown Sugar Pie Bars may blow your mind with their deliciousness. Seriously, these things are unique and they are amazing.
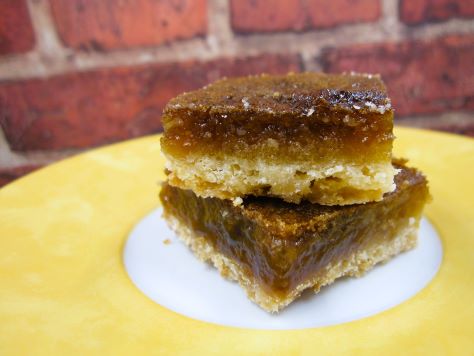
The base is similar to shortbread, nice and simple. The topping is like the filling for Pecan Pie without the pecans–or corn syrup, which is usually the sweetness and glue for such pies.
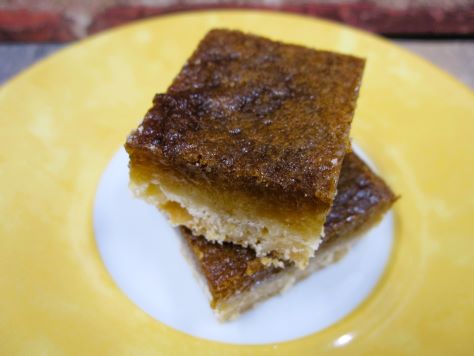
There’s no need to boil the filling or doing anything fussy. During the baking process, the top will essentially boil and caramelize. That creates a kind of crust that adds to the textural delight of every layer of these bars.
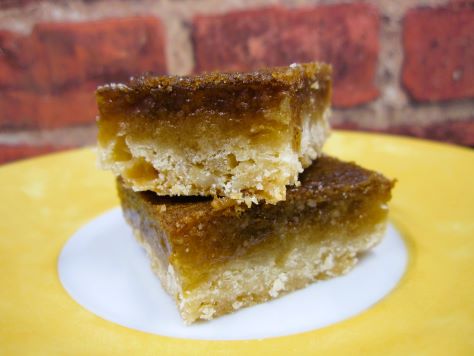
Modified from Better Homes & Gardens Christmas Cookies 2021.
Bready or Not: Brown Sugar Pie Bars
Equipment
- 13×9 pan
- aluminum foil
- nonstick cooking spray
- food processor
Ingredients
Crust
- 1/2 cup unsalted butter 1 stick
- 1 1/2 cups all-purpose flour
- 3 tablespoons white sugar
- 1/2 teaspoon fine sea salt
Filling
- 3 large eggs room temperature
- 3 1/3 cups light brown sugar packed
- 1/2 teaspoon ground cinnamon
- 1/2 teaspoon fine sea salt
- 1/2 cup unsalted butter melted (1 stick)
- 2 teaspoons vanilla extract
- 1/2 teaspoon almond extract
Instructions
- Preheat oven at 350 degrees. Line a 13×9 pan with aluminum foil. Apply a coating of nonstick cooking spray. Dice up the butter into chunks.
- In a food processor, pulse together the flour, sugar, and salt. Drop in the butter and pulse until the mix looks crumbly. It will not be cohesive. Pour everything into the prepared pan. Use the heel of a hand to press it into an even layer across the bottom.
- Bake the crust for 15 to 18 minutes, until it is lightly brown. While that is cooking, make the filling.
- In a large bowl, lightly beat the eggs. Mix in the brown sugar, cinnamon, salt, melted butter, and both extracts. Scrape the bottom of the bowl to ensure everything is combined. Pour the filling over the hot crust.
- Bake for 35 to 38 minutes, until the middle has only a slight jiggle. The filling may form large bubbles near the end of baking but they do not need to be popped. Let the pan cool to room temperature.
- Use the foil to lift the contents onto a cutting board. To make neat bars, use a knife to slice off the very edges, reserving these especially-candied portions for later enjoyment. Slice the rest into small squares. The bars can be stored in a sealed container at room temperature.
OM NOM NOM!
Follow me


