


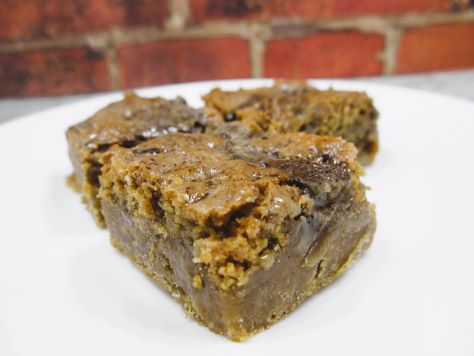
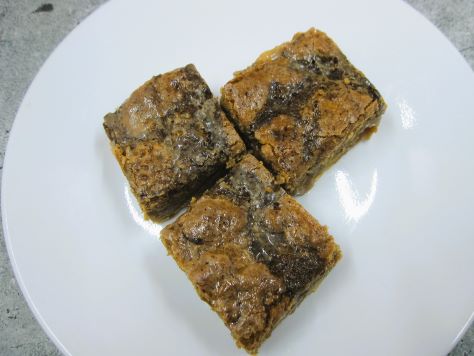
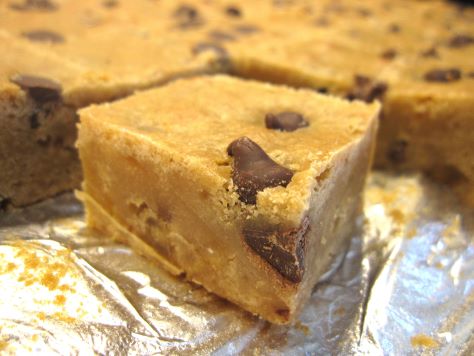
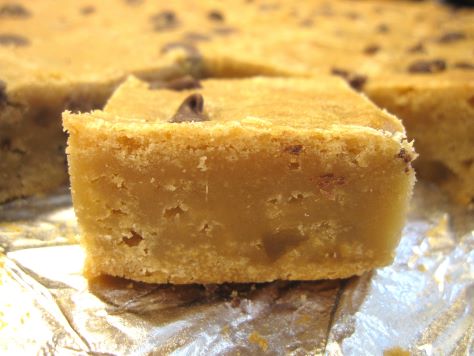
Bready or Not: Gingerbread Cookie Bars
I suppose I could try to justify the timing of these Gingerbread Cookie Bars with a line like “It’s five months until Christmas!” but nah. Good food is good food, and should be enjoyed at any time of year.
I don’t care that it’s the middle of summer. Gingerbread Bars are awesome. If your house gets hot, bake these up early in the day or late at night, then enjoy a cool-weather-vibe treat in the days ahead.
This is a very straightforward recipe that makes a lot of bars that keeps for many days. A perfect recipe for a large gathering or a cookie exchange, this is a great version of a classic treat.
Bready or Not: Gingerbread Cookie Bars
Equipment
- 15×10 pan (jelly roll pan)
- aluminum foil
- nonstick spray
Ingredients
- 4 1/2 cups all-purpose flour
- 4 teaspoons ground ginger
- 2 teaspoons baking soda
- 1 1/2 teaspoons ground cinnamon
- 1/4 teaspoon salt
- 1 1/2 cups shortening
- 2 cups white sugar
- 2 eggs
- 1/2 cup molasses
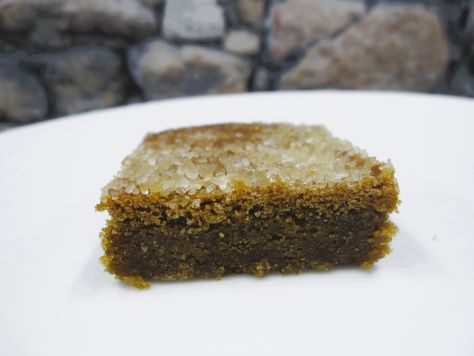
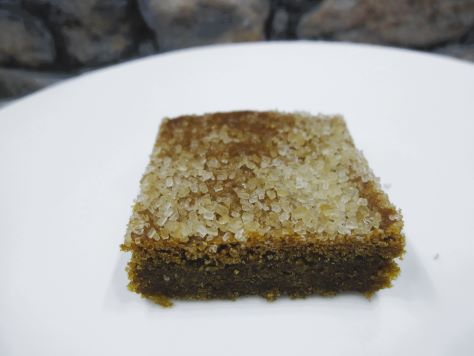
- 1/2 cup coarse sugar such as turbinado sugar
Instructions
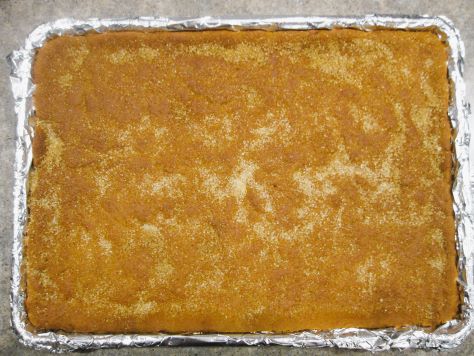
- Preheat oven at 350 degrees. Line the jelly roll pan with wide foil and apply nonstick spray.
- In a mixing bowl, combine flour, ginger, baking soda, cinnamon, and salt.
- In a large bowl, beat together the shortening and sugar until they are fluffy. Scrape the bowl as needed. Beat in the eggs and molasses. Slowly add the dry ingredients; if using a stand mixer, it may be necessary to stop doing so at the end to finish mixing by hand. Pat the dough into the prepared pan. Sprinkle the coarse sugar across the top and lightly press it in.
- Bake for 18 to 20 minutes. The edges should be turning golden. Cool in pan on wire rack. Use the foil to lift it onto a cutting board for easy slicing. In a sealed container, keeps up over five days at room temperature.
OM NOM NOM!
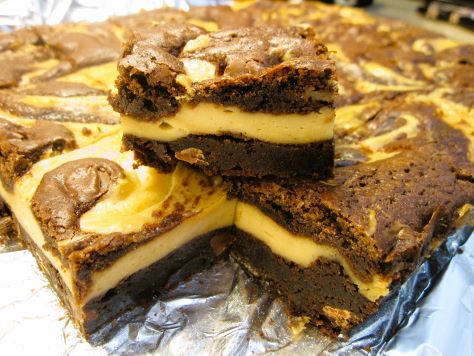
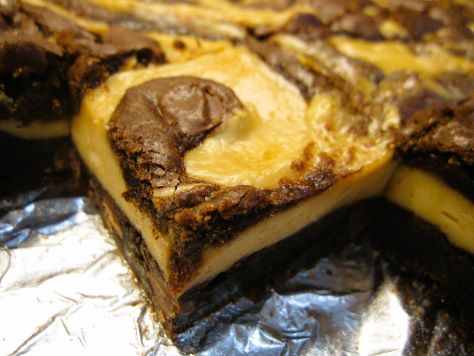
Bready or Not: Gooey Butter Bars [Cake Mix Variation]
A few months ago, I shared a time-consuming yeast-based recipe for making St. Louis Butter Cake. I continue to explore different takes on this Missouri classic, and this time around, the Gooey Butter Bars use convenient cake mix! (If you’re more interested in cookies than cake, I can also point you towards a Bready or Not guest post from Dan Koboldt back in 2018 where he shared Gooey Butter Cake Cookies that also use cake mix.)
![Bready or Not: Gooey Butter Bars [Cake Mix Variation]](https://www.bethcato.com/blog/wp-content/uploads/2024/01/Gooey-Cake-with-cake-mix2_sm.jpg)
To maximize the cheapness and convenience of this recipe, I used entirely Aldi ingredients. Their cake mix is as good as the name brands.
![Bready or Not: Gooey Butter Bars [Cake Mix Variation]](https://www.bethcato.com/blog/wp-content/uploads/2024/01/Gooey-Cake-with-cake-mix5_sm.jpg)
When it comes down to taste, I far prefer the yeast version. It is sweet and delicate with nuance–but it also takes a long time to make. This version is easy, but the sweetness could come across as cloyingly strong. So, keep that in mind in regards to your audience’s tastes.
![Bready or Not: Gooey Butter Bars [Cake Mix Variation]](https://www.bethcato.com/blog/wp-content/uploads/2024/01/Gooey-Cake-with-cake-mix4_sm.jpg)
Modified from Centennial Kitchen Fall Baking 2021 Magazine.
Bready or Not: Gooey Butter Bars [Cake Mix Variation]
Equipment
- 15x10x1 pan
- aluminum foil
- nonstick spray
Ingredients
Cake base
- 15.25- ounce yellow cake mix or white cake mix
- 1/2 cup unsalted butter softened
- 1 large egg
Top layer
- 8 ounces cream cheese softened
- 2 large eggs
- 4 cups confectioners’ sugar
Instructions
- Preheat oven at 350-degrees. Line a 15x10x1 inch pan (also called a jelly roll pan) with foil; apply nonstick spray.
- In a large bowl, stir together cake mix, butter, and egg, until they are crumbly. Pat the entire dough into the bottom of the prepared pan. It will be very thin and fiddly to work with.
- In the same bowl, beat together the cream cheese and eggs until they are fairly smooth; a few clumps are okay. Gradually mix in the confectioners’ sugar to make a cohesive mix. Spread on top of the crust.
- Bake for 25 to 30 minutes, until the middle is set and golden brown. Cool at room temperature, and chill in fridge to completely set.
- A reminder that this is called ‘Gooey Butter Cake.’ Cut pieces finger-sized. Some in the middle may be particularly gooey. If not serving immediately, move pieces to a lidded container and use waxed paper between the stacked layers. They will stay firmer and less-gooey if they are kept chilled.
OM NOM NOM!
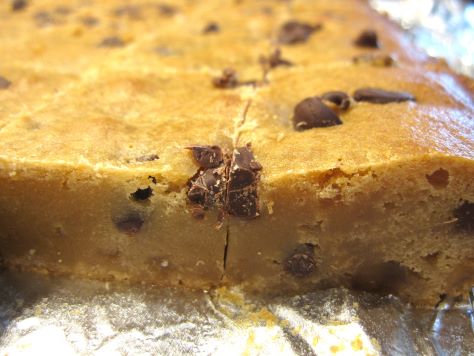
Bready or Not: Coffee Cookie Bars
These Coffee Cookie Bars are infused with coffee flavor inside and out, the perfect complement to the chewy sweetness of the bars.
If the caffeine doesn’t give you a boost, the sugar will. These bars are not only sweet, but tend to caramelize along the edges and bottom. That means you need to be careful that the foil doesn’t adhere!
These bars are great for a breakfast, snack, or dessert.
Modified from Better Homes & Gardens Christmas Cookies 2021.
Bready or Not: Coffee Cookie Bars
Equipment
- 9×13 pan
- aluminum foil
- nonstick spray
- pastry brush
Ingredients
- 14 ounces sweetened condensed milk
- 1 Tablespoon espresso powder plus 2 teaspoons
- 1 Tablespoon milk or almond milk
- 1 cup unsalted butter (2 sticks) melted
- 2 large eggs room temperature
- 1 1/4 cups brown sugar packed
- 1/2 cup white sugar
- 1 Tablespoon vanilla extract
- 3 cups all-purpose flour
- 1 teaspoon baking soda
- 1 teaspoon salt
Instructions
- Preheat oven at 350-degrees. Line a 9×13 pan with foil and apply nonstick spray or butter.
- In a small bowl, mix together the sweetened condensed milk and 1 Tablespoon espresso powder. Set aside 1/4 cup of this mixture.
- In a big bowl, mix together the milk and the remaining 2 teaspoons espresso powder. Add the melted butter, eggs, both sugars, and vanilla, mixing well. Follow up with the flour, baking soda, and salt, scraping the bottom of the bowl to make sure everything is combined. Set aside 1 cup of the dough.
- Place the bulk of the dough in the bottom of the prepared pan and even out with hands. Pour the larger amount of the sweetened condensed milk mixture over the top and spread out evenly. Crumble the reserved 1 cup of dough over the top.
- Bake for 25 to 30 minutes, until set. Immediately brush the reserved 1/4 cup of sweetened condensed milk/espresso powder over the top. Cool completely.
- Lift onto cutting board to slice into bars. Be wary that caramelization may make the base quite sticky, so make sure no foil adheres to the bars. Store in a sealed container at room temperature.
OM NOM NOM!
Bready or Not: Irish Coffee Blondies
This Irish Coffee Blondies recipe is a long-overdue revamp of a recipe I first shared over a decade ago on the first iteration of Bready or Not on LiveJournal. I made it a few times after that, only for the paper to be buried amid many other recipes.
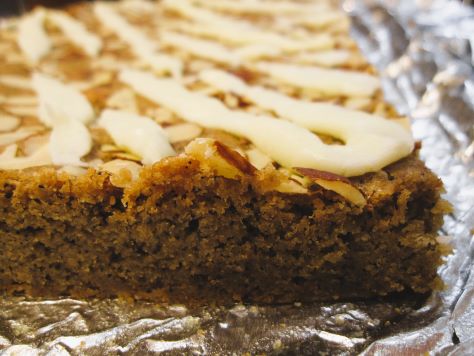
As I culled my recipe collection prior to moving, I rediscovered the print-out and knew I had to make it again soon because it’d help me use up some ingredients. Namely, sliced almonds and vanilla extract.
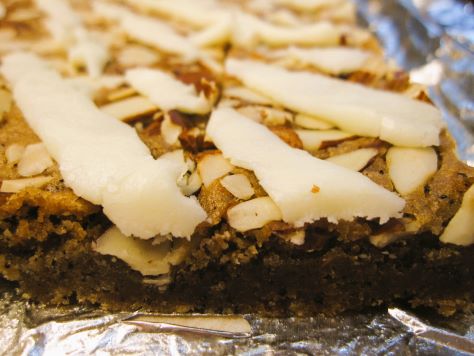
My husband now mostly uses k-cups for his coffee, a brewing method we didn’t have available back when I first baked this. I found that the 3 Tablespoons of ground coffee called for in this recipe were the exact contents of a Starbucks k-cup. I love when things work out like this!
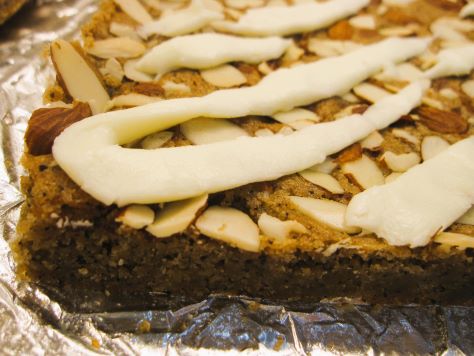
This recipe would make a great dessert, but really, with the flavors, it’s even better for a breakfast or brunch. It’ll go great with coffee or tea!
Bready or Not: Irish Coffee Blondies
Equipment
- 9×13 pan
- aluminum foil
- nonstick spray
- uneven spatula
Ingredients
Blondies:
- 2 cups all-purpose flour
- 1 teaspoon baking powder
- 1/4 teaspoon baking soda
- 1 cup unsalted butter (2 sticks) melted
- 2 cups brown sugar packed
- 3 Tablespoons ground coffee equals 1 K-cup
- 1 teaspoon salt
- 2 large eggs room temperature
- 2 teaspoon pure vanilla extract
- 1/2 cup sliced almonds
Glaze:
- 1 Tablespoon unsalted butter melted
- 1 teaspoon almond extract or vanilla extract
- 1 teaspoon water plus more if needed
- 3/4 cup confectioners' sugar
Instructions
Make the blondies
- Preheat oven to 350 degrees. Line a 9-by-13-inch baking pan with foil and apply nonstick spray.
- In a big bowl, whisk together flour, baking powder, and baking soda. Set aside.
- Place the melted butter into a mixing bowl. Add the brown sugar, ground coffee, and salt. Stir to combine.
- Add eggs one at a time followed by the vanilla extract. Stir in flour mixture until just combined. Pour batter into pan and level out; an uneven spatula makes that easy. Sprinkle with almonds.
- Bake 27 to 30 minutes, until the middle passes the toothpick test. Let cool completely.
To complete with glaze
- Mix together the melted tablespoon butter and extract. Gradually whisk in confectioners’ sugar. Add teaspoons of water, as needed, until the glaze is thick but can be drizzled. Place it in either a pastry bag fitted with a plain round tip or a sandwich bag of which a corner will be snipped off. Drizzle glaze over blondies in a rough crosshatch pattern. Let glaze set for 1 hour before cutting blondies into squares. Store in a sealed container at room temperature. If making these in a warm place, put waxed paper between the stacked layers of blondies.
OM NOM NOM!
Bready or Not Original: Swirled Cookie Butter Brownie Bars
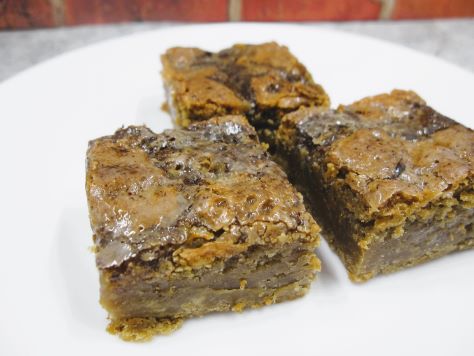
These Swirled Cookie Butter Brownie Bars are thick and luscious with just the right balance of chocolate and cookie dough flavors.

If you’re one of those people who had just to discover the joys of cookie butter–you’re in for a treat! Think cookies blended with oil to create a spreadable mass just like peanut butter. There is nothing healthy about it, but it tastes like cookie dough. You can find it at Trader Joe’s as Speculoos and at other stores as Biscoff or as a generic.
Cookie butter can pretty much replace peanut butter in any recipe, or even on something as simple as a sandwich. Here, it’s great swirled in with brownie batter. Chocolate and cookie dough, ever the perfect combination.
Since the swirl-in includes cream cheese, be sure to refrigerate these after they’ve baked and cooled. They are divine straight from the fridge!
Bready or Not Original: Swirled Cookie Butter Brownie Bars
Equipment
- 13×9 pan
- aluminum foil
- nonstick spray
- uneven spatula
- cutting board
Ingredients
Brownie base
- 3 large eggs room temperature
- 1 cup unsalted butter (2 sticks) melted
- 2 teaspoons vanilla extract
- 2 cups white sugar
- 1 1/4 cups all-purpose flour
- 3/4 cup baking cocoa sifted
- 1/2 teaspoon baking powder
- 1/4 teaspoon salt
- 1 cup milk chocolate chips
Cookie butter swirl-in
- 2 boxes cream cheese (8 ounces each) softened
- 1/2 cup creamy cookie butter
- 1/4 cup white sugar
- 1 large egg room temperature
- 2 Tablespoons milk
Instructions
- Preheat oven at 350-degrees. Line a 13×9 pan with foil and apply nonstick spray.
- In a big bowl, beat together eggs, butter, and vanilla. In another bowl, combine the brownie dry ingredients and gradually add them to the egg mix. Fold in the chocolate chips. Set aside 1 cup of the brownie batter for the topping. Scoop the rest into the prepared pan and use an uneven spatula to even it out.
- In another bowl, beat together the cream cheese blocks, cookie butter, and sugar. Once that is blended, add the egg and milk. Use an uneven spatula to spread the mixture in a thin layer across the top of the brownie batter in the pan. Dollop the reserved brownie batter on top. Use the tip of the uneven spatula or a butter knife to create swirls.
- Bake pan for 35 to 40 minutes, until the very middle passes the toothpick test. Cool on a wire rack for an hour, then place in fridge to completely chill. Use the foil to lift the contents onto a cutting board. Slice up and store in a sealed container in the fridge. Keeps for at least 3 days.
OM NOM NOM!
Bready or Not Original: Honey Ginger Blondies
These Honey Ginger Blondies are sweet and spicy-warm, the bars chewy and delightful.
Many years ago, back in January 2016, I posted a recipe for Honey Blondies. They were smooth and sweet. Quite excellent. Earlier this year, I resolved to rework the recipe because I needed to use up ingredients prior to moving.
It took me several bakes to get the balance right. I wanted the ginger present, warm and cozy. I wanted adequate chocolate to balance with the sweetness of the sugar and honey. The textures needed to be right, too–the interior smooth but for the chewy bits of candied ginger and softened chocolate.
The result is a delicious, unique recipe that is perfect year-round!
Bready or Not Original: Honey Ginger Blondies
Equipment
- large saucepan
- 9×13 pan
- aluminum foil
- nonstick spray
Ingredients
- 1 cup unsalted butter 2 sticks
- 2/3 cup honey
- 1 1/2 cups brown sugar packed
- 1 1/2 Tablespoons fresh ginger
- 2 1/2 cups flour
- 2 large eggs room temperature
- 1 1/2 Tablespoons vanilla extract
- 2 teaspoons coarse salt
- 1 1/4 cup candied ginger chopped
- 1 cup semisweet chocolate chips
Instructions
- Melt butter and honey in a large saucepan. Stir in the brown sugar and fresh ginger. Remove from heat and set aside to cool for about 20 minutes.
- Since the contents are still likely a bit warm, add some of the flour and stir to cool things off. Mix in the eggs and vanilla extract followed by the rest of the flour and the salt. Mix until just combined, and let it continue to cool about 30 minutes.
- Preheat the oven to 350-degrees. Prepare a 9×13 pan by lining with foil and greasing with nonstick spray or butter. Fold the candied ginger and chocolate chips into the batter, then spread into the pan.
- Bake for about 30 minutes; the edges will just be turning brown. Let the blondies cool completely on a wire rack, speeding the process in the fridge, if desired. Use the foil to lift them out to cut into squares. Store in an airtight container.
OM NOM NOM!
Follow me


