


Bready or Not Original: Red Velvet Brownies in Two Sizes
I really think the pictures do justice to how incredible these Red Velvet Brownies are. They are beautiful to the eyes and delicious to the tongue.

I’m offering up this recipe in two sizes, too: a version for a smaller pan (8×8 or 9×9) and another for a full 9×13 pan. Note that even the small pan makes a lot of brownies. These are rich enough that they feel indulgent if you have a square about the size of a fudge serving.

Another nice thing: these keep for at least a week in a sealed container. I suppose further testing is in order to see if they keep beyond that!

Bready or Not Original: Red Velvet Brownies (8×8 or 9×9 size)
Equipment
- 8×8 or 9×9 pan
- aluminum foil
- nonstick spray or extra butter
Ingredients
- 1 1/4 cup all-purpose flour
- 3 Tablespoons cocoa powder sifted
- 1 Tablespoon cornstarch
- 1/4 teaspoon salt
- 3/4 cup unsalted butter (1 1/2 sticks) melted and cooled slightly
- 1 1/4 cups white sugar
- 2 large eggs room temperature
- 1 teaspoon vanilla extract
- gel red food coloring
- 1 teaspoon white vinegar
- 1 cup white chocolate chips
Instructions
- Preheat oven to 350 degrees. Line the pan with foil going up the sides. Apply nonstick spray or butter.
- In a small bowl, stir together flour, cocoa, cornstarch, and salt.
- In a large mixing bowl, beat together the melted butter and sugar. Add the eggs. Drip in the red food coloring, mixing it in, adding enough to reach the desired color. Add vanilla extract and vinegar. Gradually work in the dry ingredients, scraping the bottom of the bowl a few times. Fold in the white chocolate chips.
- Dollop batter into the pan. Use an uneven spatula to level out the surface. Bake for 28 to 30 minutes, until the middle passes the toothpick test.
- Let cool completely, speeding process in the fridge if desired. Use the foil to lift it onto a cutting board to cut into small bars.
- Store in a sealed container at room temperature. They keep for at least a week.
OM NOM NOM!
Bready or Not Original: Red Velvet Brownies (9×13 size)
Equipment
- 9×13 pan
- aluminum foil
- nonstick spray or extra butter
Ingredients
- 2 1/2 cups all-purpose flour
- 6 Tablespoons cocoa powder sifted
- 2 Tablespoons cornstarch
- 1/2 teaspoon salt
- 1 1/2 cups unsalted butter (3 sticks) melted and cooled slightly
- 2 1/2 cups white sugar
- 4 large eggs room temperature
- 2 teaspoons vanilla extract
- gel red food coloring
- 2 teaspoons white vinegar
- 11 ounces white chocolate chips 1 bag
Instructions
- Preheat oven to 350 degrees. Line the pan with foil going up the sides. Apply nonstick spray or butter.
- In a small bowl, stir together flour, cocoa, cornstarch, and salt.
- In a large mixing bowl, beat together the melted butter and sugar. Add the eggs. Drip in the red food coloring, mixing it in, adding enough to reach the desired color. Add vanilla extract and vinegar. Gradually work in the dry ingredients, scraping the bottom of the bowl a few times. Fold in the white chocolate chips.
- Dollop batter into the pan. Use an uneven spatula to level out the surface. Bake for 30 to 33 minutes, until the middle passes the toothpick test.
- Let cool completely, speeding process in the fridge if desired. Use the foil to lift it onto a cutting board to cut into small bars.
- Store in a sealed container at room temperature. They keep for at least a week.
OM NOM NOM!
Bready or Not Original: Toffee Blondies
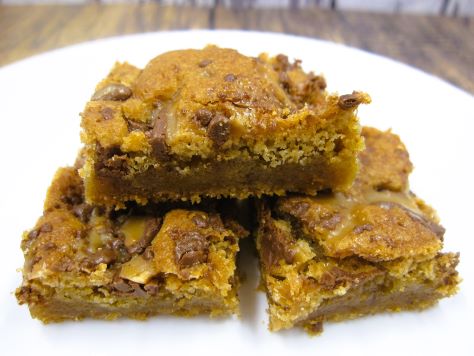
Why have a candy bar when you can have a chewy, luxurious treat that’s filled with candy bar pieces? These Toffee Blondies are a glorious combination of textures and sweetness.

If you can find it, use an 8 ounce bag of Heath Bits that include chocolate. All is not lost if that is unavailable, though. You can chop up normal Heath Bars, or use an all-toffee bag and add separate chocolate.

The result is a thick, chewy bar with crunchy little bits of toffee and pockets of chocolate. These things keep for days, too.
Bready or Not Original: Toffee Blondies
Equipment
- 9×13 pan
- aluminum foil
- nonstick spray
Ingredients
- 2 cups all-purpose flour
- 2 cups brown sugar packed
- 2 teaspoons baking powder
- 1/4 teaspoon salt
- 1/2 cup unsalted butter (1 stick) melted and cooled
- 2 large eggs room temperature
- 1 teaspoon vanilla extract
- 8 ounces Heath Bits with Chocolate
Instructions
- Preheat oven at 350 degrees. Line a 13×9 pan with foil and apply nonstick spray.
- In a bowl, mix together the flour, brown sugar, baking powder, and salt. Set aside.
- In a large bowl, beat the butter, eggs, and vanilla until smooth. Gradually mix in the dry ingredients. Fold in about 2/3 of the Heath Bits.
- Scoop the thick batter into the prepared pan and level out with an uneven spatula. Sprinkle the rest of the Heath pieces over the top.
- Bake for 24 to 27 minutes. Middle should be set and pass the toothpick test. Cool to room temperature, speeding the process in the fridge if desired.
- Use the foil to lift onto cutting board to slice into bars. Store in a sealed container at room temperature. They will keep for up to 3 days.
OM NOM NOM!
Bready or Not Original: Gingerdoodles
I’ve published many variations on Snickerdoodles (complete with pie and banana versions!), and here is a take called Gingerdoodles.
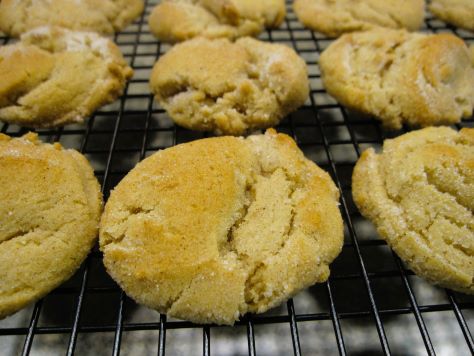
It should come as no surprise that these feature the warmth of ginger along with other complementary spices. To me, these were like a hybrid of snickerdoodles and sugar/spice cookies. The texture is soft and scrumptious.

This recipe is a must if you love soft cookies with some sweetness and spice.

Bready or Not Original: Gingerdoodles
Equipment
- parchment paper
- small scoop or teaspoon
Ingredients
Dough
- 3/4 cup unsalted butter (1 1/2 sticks) softened
- 1/2 cup white sugar
- 1/2 cup brown sugar packed
- 1 large egg room temperature
- 1/2 cup real maple syrup
- 3 1/4 cups all-purpose flour
- 1 teaspoon baking soda
- 1/2 teaspoon ground cinnamon
- 1/2 teaspoon ground ginger
- 1/4 teaspoon salt
- 1/4 teaspoon cream of tartar
- 1/4 teaspoon nutmeg
Topping
- 1/2 cup white sugar
- 1/4 teaspoon ground cinnamon
Instructions
- Preheat oven at 350 degrees. Line a baking pan with parchment paper.
- Beat together butter and both sugars until light and fluffy. Beat in egg and syrup.
- In another bowl, combine flour, baking soda, cinnamon, ginger, salt, cream of tartar, and nutmeg. Gradually mix the dry ingredients into the wet, forming a cohesive dough.
- In a small bowl, stir together the two topping ingredients.
- Use a small cookie scoop or spoon to shape dough into round balls. Roll them in the topping to coat. Place spaced out on baking pan.
- Bake for 9-10 minutes, until set and crackled. After 5-10 minutes, move them to a cooling rack.
- Store cookies in a sealed container at room temperature.
OM NOM NOM!
Bready or Not Original: Chai Crinkle Cookies
These Chai Crinkle Cookies are a fantastically fresh take on spice cookies. They are like pudgy soft pillows with gentle spice flavor.

This recipe is an easy one to break into sections to make for faster baking. There are a lot of ingredients–tiny amounts of flavorful spices–and those can be mixed with the flour hours or days in advance. The dough itself needs to chill for at least a few hours. I kept it in the fridge a full day.

These are great cookies to make year-round, but there’s something extra special about a warmly-spiced treat at this time of year!
Bready or Not Original: Chai Crinkle Cookies
Equipment
- plastic wrap
- parchment paper
- cookie scoop or spoon
Ingredients
- 1/2 cup unsalted butter (1 stick) softened
- 1/4 cup vegetable shortening
- 1 cup brown sugar firmly packed
- 1 large egg room temperature
- 1/4 cup molasses
- 1 Tablespoon vanilla extract
- 3 cups all-purpose flour
- 1 1/2 teaspoons ground cinnamon
- 1 1/4 teaspoons baking soda
- 1/2 teaspoon kosher salt
- 1/2 teaspoon ground ginger
- 1/2 teaspoon ground cardamom
- 1/8 teaspoon ground cloves
- 1/8 teaspoon ground black pepper
- 1/3 cup white sugar for topping
Instructions
- In a large bowl, beat together butter, shortening, and brown sugar, until fluffy, scraping the bottom of the bowl on occasion. Add egg, molasses, and vanilla.
- In another bowl, stir together flour, cinnamon, baking soda, salt, ginger, cardamom, cloves, and pepper. Gradually add the dry ingredients to the wet.
- Cover dough with plastic wrap and chill for at least two hours, or up to a day.
- Preheat oven at 350 degrees. Line a baking pan with parchment paper. Measure out topping sugar into a bowl.
- Use a scoop or spoon to form walnut-sized balls. Roll dough balls in sugar. Place them slightly spaced on pan and then compress each one; they will not spread much while baking.
- Bake for 10 to 12 minutes, until puffed and set. Let cool on pan a few minutes before transferring to a cooling rack.
- Store them in a sealed container at room temperature up to 3 days.
OM NOM NOM!
Bready or Not: Small Sourdough Boule
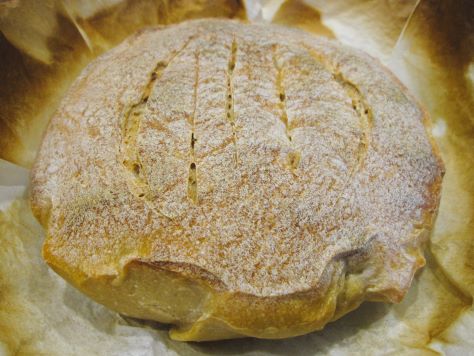
Begin the year as you intend to go, that’s what I have often heard. Therefore, we’re kicking off 2025 with a small bread round that entirely relies on sourdough starter as the rising agent. This Small Sourdough Boule begins a series of sourdough recipes that will continue into the fall, building up to the release of my new fantasy book from 47North, A House Between Sea and Sky.
One of my characters is a sentient sourdough starter by the name of Mother. Yes, I said “character.” Mother does not speak, but her feelings are still made known. I had early readers say that it was a testament to my writing that they came to deeply care for a sourdough starter.
Sourdough has a life cycle. It requires consistent maintenance to stay active. For this recipe, use a mature starter (at least a few days old) and feed it a half day before commending this recipe. Meaning, if the last feeding was in the evening, start making the dough the next morning. Because this bread relies entirely on the starter for leavening, the dough needs to be begun about a day and a half in advance of baking.

Bready or Not: Small Sourdough Boule
Equipment
- nonstick spray or oil
- parchment paper
- plastic wrap or towel
- small cast iron skillet or baking pan.
Ingredients
- 3 2/3 cups bread flour or all-purpose flour
- 1 3/4 teaspoons salt
- 1 1/2 cups water room temperature
- 1/3 cup mature sourdough starter (83 grams)
Instructions
- Mix flour and salt in a large mixing bowl. In another bowl, whisk together the starter and water. Pour wet ingredients into the dry, mixing until the dough looks smooth and is no longer tacky. In a stand mixer with bread hook, this will be about 10 minutes.
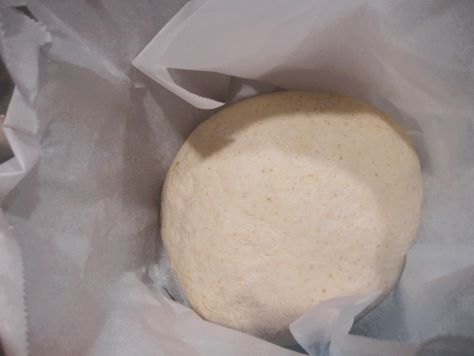
- Turn the dough onto the counter and form it into a ball by tucking dough underneath the tighten the top. Apply nonstick spray or oil to the bowl. Place dough back inside and turn it to coat the surface with oil.
- Line another large bowl with parchment paper. Place dough inside, seam side down. Cover with a towel or plastic wrap and allow dough to rise for about 12 hours at room temperature.
- Transfer bowl to fridge to continue its fermenting overnight. Keep there until baking time at some point the next day.
- Preheat oven at 500 degrees. Place the small cast iron skillet or baking pan inside to heat up as well. Once the oven and pan are at full heat, CAREFULLY remove pan from inside.
- Pull dough from fridge. Set aside the towel or plastic wrap. Use the parchment as a sling to transfer dough to the hot pan. Use a knife or French lame to score the top so that carbon dioxide can escape the bread as it bakes.
- Place pan in oven. After closing the door, change the heat to 475 degrees.
- Bake for 20 minutes. Lower the temperature to 350 and bake for another 20 minutes.
- When done, the loaf should sound hollow when thumped. A digital thermometer plunged into the center should read over 190 degrees.
- Let cool for at least 20 minutes before slicing in. Enjoy hot or at room temperature. Fresh bread can also be frozen for later enjoyment.
