


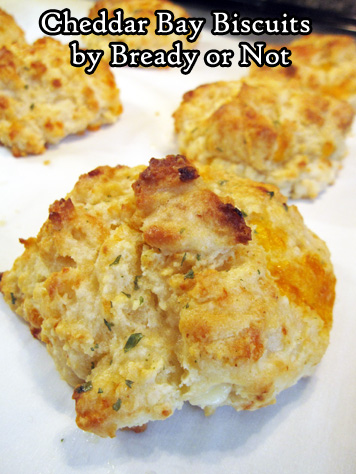
Bready or Not: Cheddar Bay Biscuits
Let’s state a truth up front: a visit to Red Lobster isn’t about the seafood. It’s about those Cheddar Bay Biscuits they bring out as an appetizer.
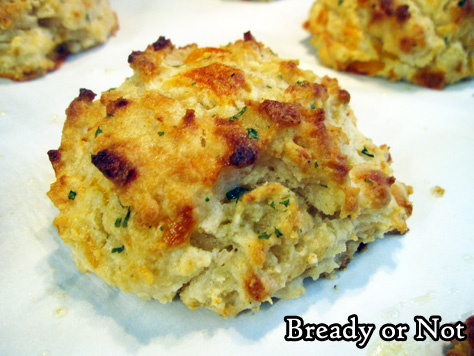
I’ve used this recipe for about 10 years now. I posted it on my LiveJournal in the earlier iteration of Bready or Not, but now it’s time to share again with new photos and an easy-to-print format.
These biscuits are incredible. Cheesy, crisp, tender. Buttery. I mean, you baste them in butter and seasonings for the final step. You know they will be good.

Plus, these keep well in the fridge for days! In a pinch, you can heat them in the microwave, but they are far better warmed in an oven or toaster oven. That way the outside stays crisp and the interior texture stays just right.
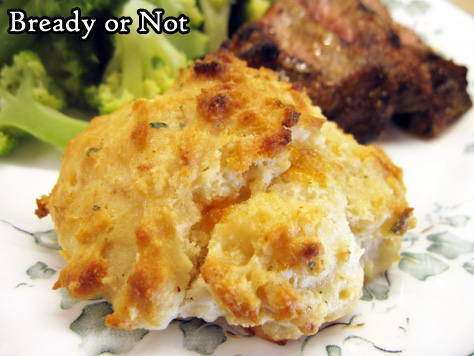
I bet if you give these a try, they’ll be a reliable side dish bread in your recipe repertoire, too!
Bready or Not: Cheddar Bay Biscuits
Equipment
- parchment paper
- pastry brush
Ingredients
Biscuits
- 2 cups all-purpose flour
- 2 teaspoons baking powder
- 1/2 teaspoon baking soda
- 1 teaspoon white sugar
- 1/2 teaspoon garlic powder
- 1/4 teaspoon cayenne pepper
- 6 ounces sharp cheddar cheese shredded
- 1 cup buttermilk or soured milk*
- 1/2 cup unsalted butter 1 stick, melted and cooled
Topping
- 3 Tablespoons unsalted butter melted
- 1/2 teaspoon garlic powder
- 1/4 teaspoon dried parsley
Instructions
- Preheat oven at 475-degrees. Line a big baking sheet with parchment.
- In a big bowl, combine the flour, baking powder, baking soda, sugar, salt, garlic powder, and cayenne. Fold in the cheddar cheese.
- Fold the buttermilk into the dry ingredients, followed by the melted butter, scraping the bottom of the bowl well to make sure everything is mixed in. Grease a 1/3 cup and use that to scoop up portions of dough to place spaced out on the baking sheet.
- As the biscuits bake for 11 to 13 minutes, until golden brown, prepare the topping. Melt the butter and stir in the garlic powder and parsley. As soon as the biscuits are out of the oven, brush on the topping to cover the nooks and crannies of every biscuit on the pan.
- Eat right away. Leftovers will keep in a sealed container in the fridge for days. They can be microwaved, but are best warmed in an oven or toaster oven.
OM NOM NOM!
Notes
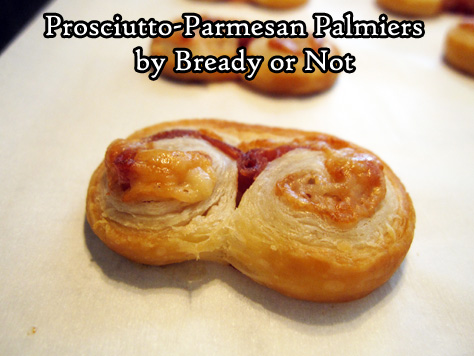
Bready or Not Original: Prosciutto-Parmesan Palmiers
The holiday season is nigh, and these Prosciutto-Parmesan Palmiers are the perfect appetizer for a couple or an entire gang!
These really have three ingredients, plus some flour for dusting a counter. They take minutes to assemble. Stash them in the freezer for hours or days. They bake up fast. They make bellies happy.
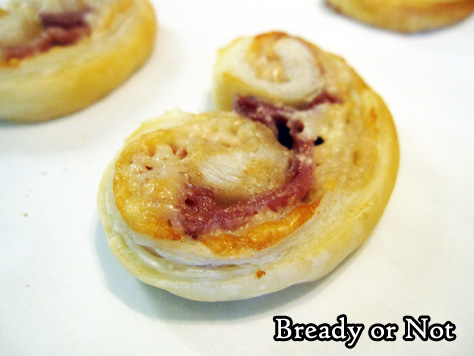
Plus, I daresay, they are downright pretty. I love the layers in puff pastry! Here, those crisp buttery layers are fantastic along with shredded cheese and thin slices of prosciutto.
Honestly, these are dangerous. It’s hard to eat just one.

However, if you can exercise restraint, the leftovers are delicious. They can be eaten cold (the prosciutto is the prominent flavor then), but are better with a brief warm-up in the oven.
Make these your go-to game day, holiday event, or date night treat!
Bready or Not Original: Prosciutto-Parmesan Palmiers
Equipment
- parchment paper
- knife
Ingredients
- flour to dust surface
- 1 sheet puff pastry (half a box) thawed in fridge
- 1/2 cup shredded Parmesan packed
- 2 to 3 ounces sliced prosciutto
Instructions
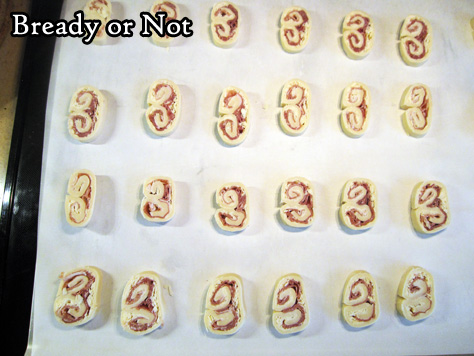
- Hours or days before baking day: Sprinkle flour on a flat, clean surface. Roll out the puff pastry to make a 12-inch square. Cut in half. Sprinkle cheese over both halves. Place prosciutto slices to completely cover cheese; if there is extra meat, layer on the additional pieces. Roll the short sides of each piece of pastry together to meet in the middle–from the end, it will look rather like a number 3. Repeat this with the other half.
- Encase both logs in plastic wrap and freeze until firm, at least an hour, but as long as several days.
- Preheat oven at 400-degrees. Prepare a large baking sheet with parchment paper.
- Pull out frozen logs to thaw for just a few minutes. While it is still mostly frozen, slice into 1/4-inch pieces and place spaced out on parchment. (Note that the end pieces may be sparse on filling and not presentable for company, but still worth baking up for private enjoyment.)
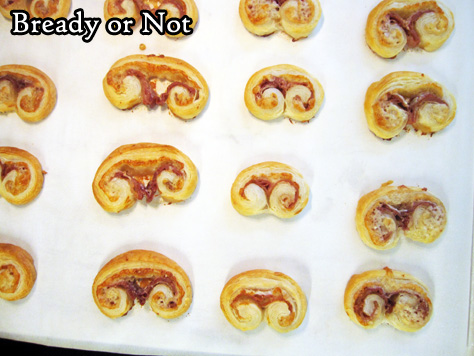
- Bake for 12 to 15 minutes until palmiers are golden brown and puffed. They are best eaten fresh, but leftovers can be refrigerated. They are okay cold, but better toasted briefly again in the oven.
OM NOM NOM!
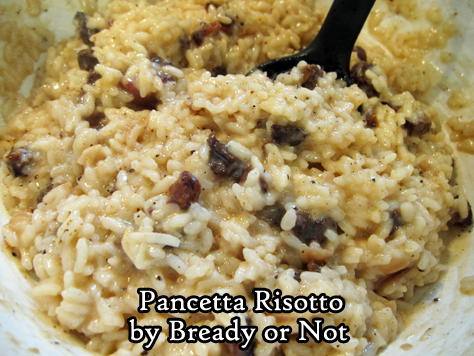
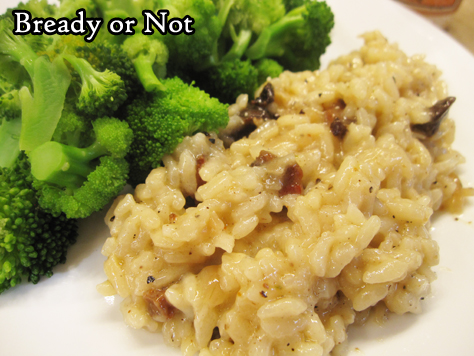
Bready or Not Original: Pancetta Risotto
This Pancetta Risotto is a fantastic meal for two people, or a delicious side for a group. It’s time-consuming but very straightforward to make.
I confess, I spent years being intimidated by the very idea of a risotto. I would see it done on cooking shows. So much stirring! When I finally got up the gumption to give it a try, I found risotto wasn’t hard at all. It really is about lots of stirring.
This recipe here is my fancy occasion recipe, especially when I have some good pancetta on hand, such as the kind carried by Smoking Goose Meatery out of Indianapolis.

As for the wine, I’ve tried this with fancier Sauvignon Blanc from Total Wine (Cloudy Bay from New Zealand) as well as a $6 Trader Joe’s Coastal Sauvignon Blanc. Both versions turned out great! You don’t need to go all-out, but get something that is (hopefully) drinkable with the finished meal.
Bready or Not Original: Pancetta Risotto
Equipment
- large stock pot
- medium saucepan
Ingredients
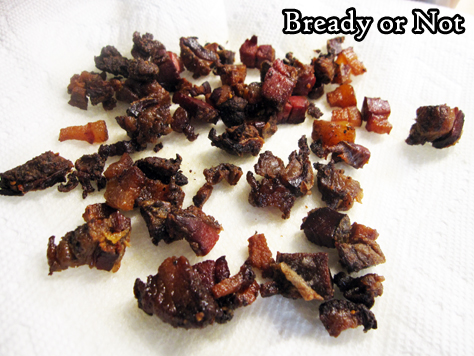
- 8 oz pancetta diced
- 1 Tablespoon dried shallots or fresh shallot, finely minced
- 3 cloves garlic minced
- 1 1/4 cups Arborio rice
- 1 cup dry white wine Sauvignon Blanc works well
- 4 cups chicken broth or chicken stock, equal to a 32 oz box or 2 cans
- 1/2 cup shredded Parmesan or Pecorino Romano or Grana Padano, plus more to top rice
- salt and pepper to taste
Instructions
- In a large stock pot, cook the pancetta for 10 to 12 minutes, until it starts to turn brown and crispy. At the same time, on another stove burner, use a medium sauce pan to bring the chicken broth to a very low simmer.
- Use a slotted spoon to transfer pancetta to a paper towel-lined plate; set aside. Add dry shallots and garlic to the fat in the big pot. Sauté for two minutes. Add the Arborio rice and a pinch of salt. Sauté another 2 minutes, until the rice looks glossy with translucent edges.
- Add the white wine and stir until it is absorbed. Add chicken broth in 1/2 cup increments, stirring well after each addition until it is absorbed. After about 12 to 15 minutes, when most of the broth has been added, begin to taste the rice. The goal is a chewy, al dente consistency. Add more broth as needed, and remember to turn off the burner for the broth pot when it is empty.
- When the rice is creamy and al dente, stir in the pancetta and cheese. Taste the risotto again, adding more salt and pepper as needed. Serve with the remaining white wine.
OM NOM NOM!
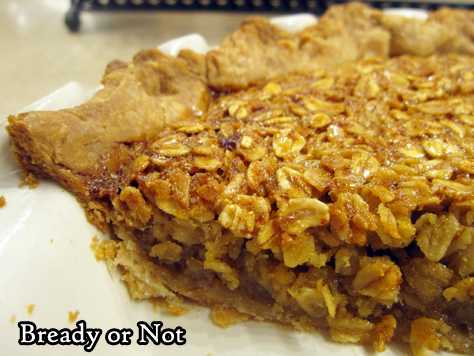
Bready or Not: Honey Oat Pie with a Cinnamon Pie Crust
This is a pie like none I have made before: like a gigantic chewy oatmeal cookie with a spiced crust, embodied with a refreshing zing of whiskey.
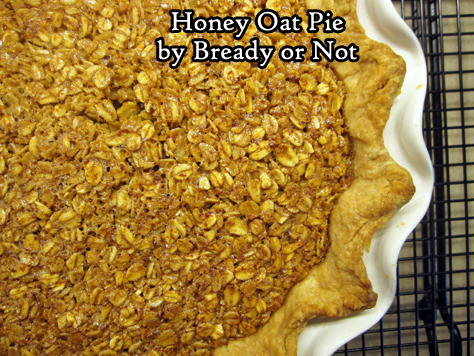
This Honey Oat Pie in a Cinnamon Pie Crust will blow your mind in the best of ways. Texture wise, it is moist and chewy without being soggy (be sure to use old-fashioned/rolled oats!).
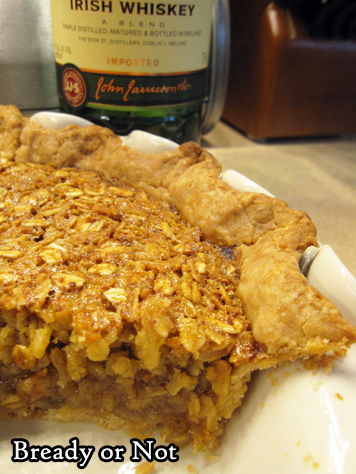
Flavor-wise, you taste the toasted oats, a wonderful mix of warm spices, and the freshness of the whiskey. There’s only a tablespoon and a half in there but the flavor of the whiskey still comes through.
I used Jameson Irish Whiskey, in keeping with the origins of the original version of the recipe: the July/August issue of Bake from Scratch Magazine, my favorite food magazine these days.

I imagine you can omit the whiskey from the recipe without it being detrimental to the taste or texture, but I haven’t tried that myself.
This is a great pie to have for breakfast (the alcohol’s effect burns off in baking), or snack, or dessert.
Bready or Not: Cinnamon Pie Crust
Equipment
- food processor
- pie plate
- plastic wrap
Ingredients
- 1 1/2 cups all-purpose flour
- 1 1/2 Tablespoons white sugar
- 1 teaspoon kosher salt
- 1 1/2 teaspoons ground cinnamon
- 1/2 cup unsalted butter 1 stick, cold, cut into chunks
- 3 Tablespoons ice water plus more if needed
Instructions
- In a large food processor, pulse together the flour, sugar, salt, and cinnamon. Add the butter pieces. Pulse until they are almond-sized, then add the ice water. Pulse until mixture can form a ball, adding a touch more water if needed to make it cohesive.
- Turn out dough onto a lightly floured surface. Gently knead to shape into a disk. Tightly encase in plastic wrap and let chill in fridge for at least an hour, or up to a few days. Dough can also be frozen for up to two months.
OM NOM NOM!
Bready or Not: Honey Oat Pie
Equipment
- pie plate
- parchment paper
- pie weights
Ingredients
- single-layer pie crust
- 1 1/3 cups old-fashioned oats also called rolled oats
- 2/3 cup brown sugar packed
- 1 1/4 teaspoons kosher salt
- 1/4 teaspoon ground ginger
- 1/8 teaspoon ground nutmeg
- 1/2 cup light corn syrup
- 6 Tablespoons unsalted butter melted
- 1/3 cup honey
- 1 1/2 Tablespoons Irish whiskey such as Jameson
- 2 teaspoons vanilla extract
- 4 large eggs room temperature
Instructions
- Preheat oven at 400-degrees
Prepare pie crust
- Let pie dough soften at room temperature for 10 to 15 minutes. Lightly flour a surface and roll out dough to a 12-inch circle and transfer it to a 9-inch pie plate. Press into plate to shape, crimping edges as desired. Freeze crust until firm, about 15 minutes.
- Drape a large piece of parchment paper over pie crust. Fill to the top with pie weights.
- Bake crust until edges are turning golden, about 10 to 15 minutes. Carefully remove weights and parchment paper.
- Bake crust an additional 10 minutes to set. Cover the edges with foil if it is getting brown too quickly. Set aside on rack to cool while the filling is assembled.
Prepare filling
- Reduce oven temperature to 350-degrees.
- Line a rimmed baking pan with parchment paper. Place oats in pan.
- Bake them until they are lightly toasted, about 10 minutes, giving them a stir or two during. Set them aside to cool.
- Lower oven temperature again, this time to 325-degrees. Move the oven rack to the lower third of the oven.
- In a big bowl, mix together the brown sugar, salt, ginger, and nutmeg. Add the corn syrup, melted butter, honey, whiskey and vanilla, making sure to scrape the bottom of the bowl. Add eggs one at a time, stirring well after each addition, and end by incorporating the oats until they are coated. Pour everything into the parbaked crust.
- Bake until the filling is set and slightly puffed, about 40 minutes. Check on the pie about halfway and cover the edges the foil if they are getting too brown. The done pie will register at 200-degrees if checked with an instant thermometer.
- Let pie cool completely on rack before slicing in. Store covered by foil in the fridge or at room temperature. Keeps for several days.
OM NOM NOM!
Bready or Not Original: Honey Cornbread Loaf
Cornbread is good ol’ basic American comfort food, perfect to warm up bellies at this time of year.
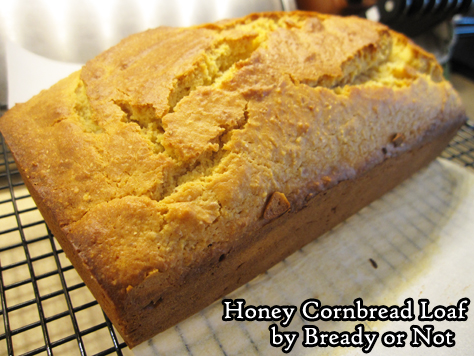
Sometimes, though, you don’t want a huge batch of cornbread. Just enough for a meal or two, maybe. That’s where this recipe comes in.
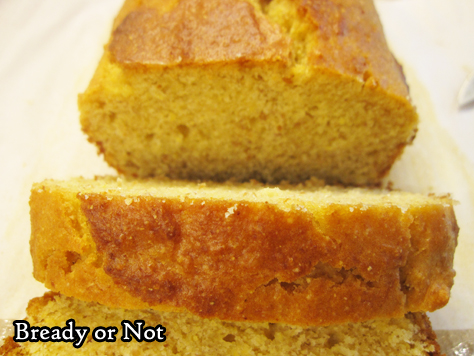
It makes a 9×5 loaf pan of delicious cornbread. Leftovers keep well wrapped up at room temperature, and the bread can also be frozen to eat later.
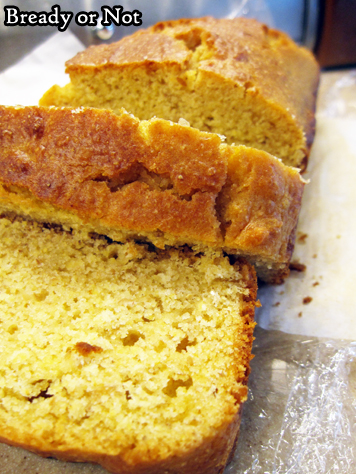
This cornbread is soft with a strong cornbread flavor highlighted with a touch of sweetness. Heat it up, add some butter, and you’re set.
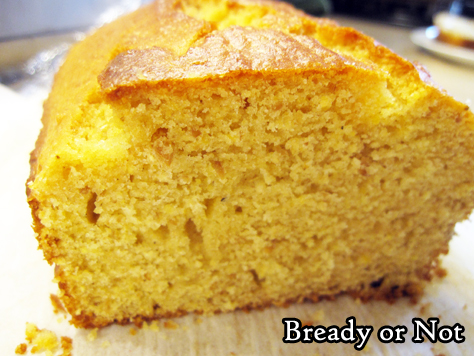
Eat it by itself for a warming snack. Make it to go along with chili or soup or a roast. However you eat it, it’ll be yummy.
Bready or Not Original: Honey Cornbread Loaf
Equipment
- 9x5x3 loaf pan
Ingredients
- 1 1/2 cups cornmeal
- 1/4 cup all-purpose flour
- 1/4 cup golden flax meal
- 1 1/2 teaspoons baking powder
- 1/2 teaspoon salt
- 1/2 cup vegetable oil
- 1/2 cup sour cream or substitute plain yogurt or crème fraiche
- 1/4 cup honey
- 2 large eggs room temperature
Instructions
- Preheat oven at 350-degrees. Line a 9×5-3 loaf pan with a parchment paper sling along the long side, with enough paper sticking up on each side to grip it.
- In a medium bowl, stir together cornmeal, flour, flaxseed meal, baking powder, and salt.
- In a big bowl, beat together oil, sour cream, honey, and eggs. Add in the dry ingredients until just mixed. Pour batter into the pan.
- Bake for 30 to 35 minutes, until the middle passes the toothpick test. Let cool at least 10 minutes before using paper sling to set cornbread on cutting board.
- Cornbread keeps well for days well-wrapped at room temperature. It can also be frozen for later enjoyment.
OM NOM NOM!
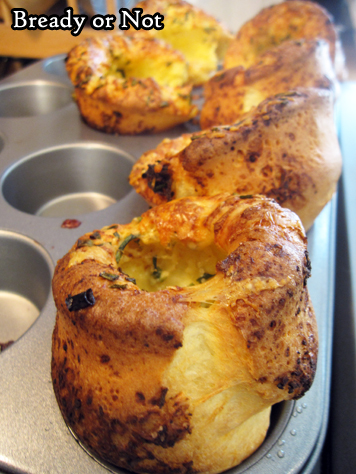
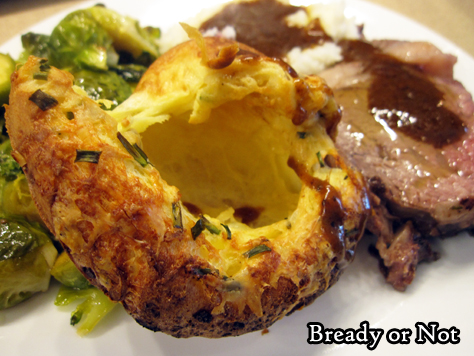
Bready or Not: Cheese and Chives Yorkshire Puddings (Small Batch)
Yorkshire puddings are what many Americans also know of as popovers–light, airy, crisp sponges perfect to eat with a roast and gravy!
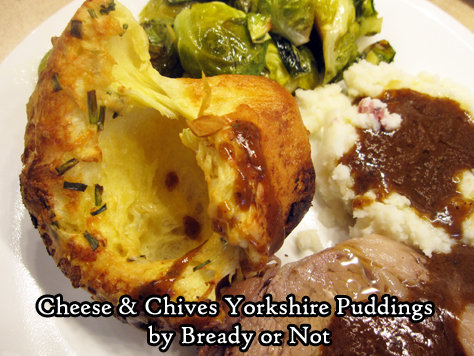
This recipe is for a small batch of puds. Since they are so airy (if they rise right), the six puddings of this recipe are perfect for two or three people.

Cheese makes everything better, of course. I used Dubliner Irish Cheddar, as it is available at my nearest Costcos for a good price.
Use a good quality cheddar here to really take these puddings to the next level.
Modified from Bake from Scratch Magazine.
Bready or Not: Cheese and Chives Yorkshire Puddings (Small Batch)
Equipment
- metal muffin pan
- blender
Ingredients
- 3/4 cup milk or half & half
- 2 large eggs room temperature
- 3 Tablespoons unsalted butter melted, divided
- 3/4 cup all-purpose flour
- 1/2 teaspoon kosher salt
- 1/4 cup quality cheddar cheese (25 grams), freshly grated
- 1 1/2 Tablespoons fresh chives chopped, plus more for garnish
Instructions
- Preheat oven at 425-degrees.
- In the container of a blender, place milk, eggs, 1 tablespoon melted butter, flour, and salt; process just until smooth. Let rest for 10 minutes.
- In a small bowl, toss together grated cheese and chives.
- Place a 12-cup muffin pan in oven for 5 minutes to preheat.
- Remove muffin pan from oven, and quickly spoon the remaining 2 tablespoons melted butter into the 6 muffin cups that are being used. Return pan to oven for 2 minutes.
- Remove pan from oven. Working fast, spoon or pour batter into buttered muffin cups, dividing as evenly as possible. Top each with a spoonful of cheese mixture.
- Bake until puffed and golden brown, 15 to 18 minutes. Garnish with more chives, if desired. Serve immediately. Yorkshires are best fresh as they deflate after baking.
OM NOM NOM!
Follow me


