


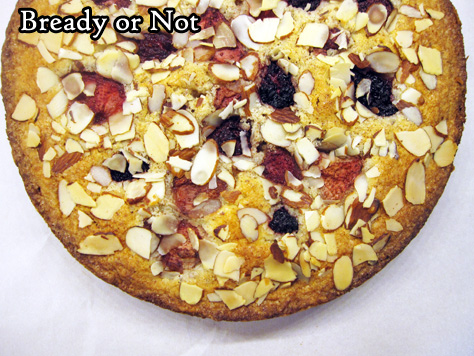
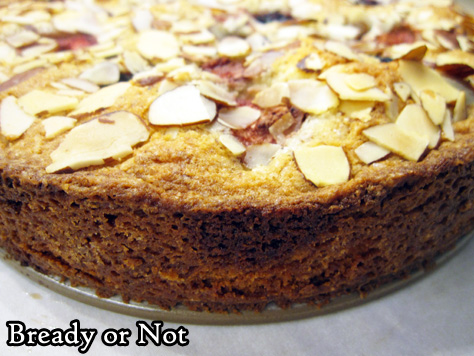
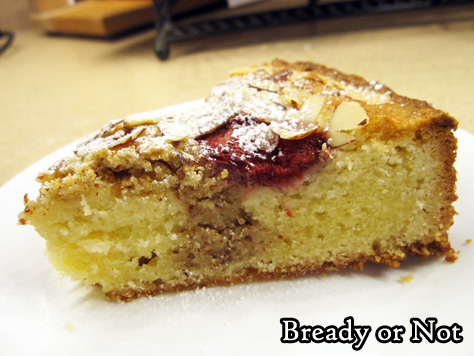
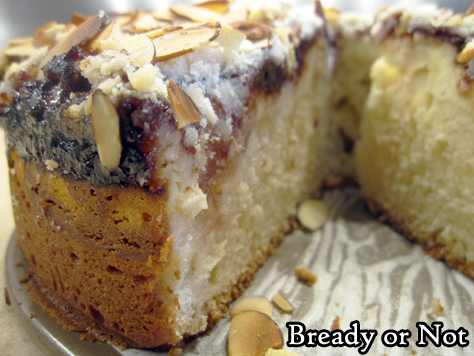
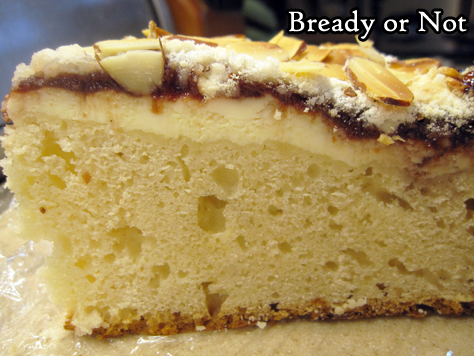
Bready or Not Original: Berry Frangipane Cake
This Berry Frangipane Cake is a lot of work, and it shows! This cake would make for a stunning breakfast, brunch, or dessert.
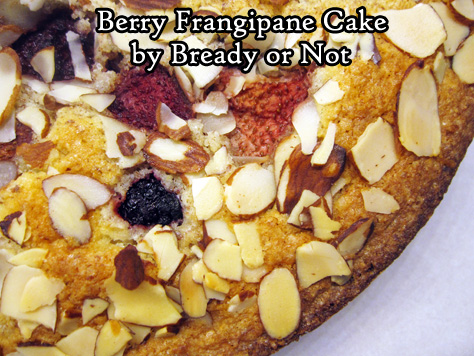
Frangipane is a kind of pastry filling made from almond flour. It is absolutely delicious, imbuing treats with nuttiness and sweetness.
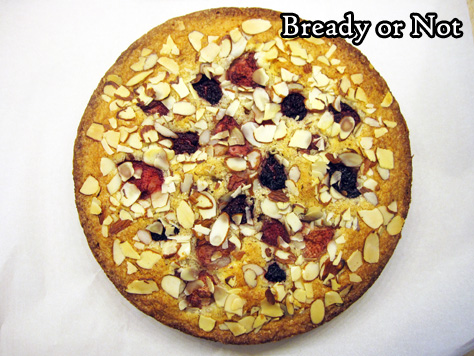
In this cake, frangipane works alongside cake batter to form the base for a lovely topping of formerly-frozen fruit and sliced almonds. I used a pretty standard fruit mix with raspberries, blackberries, and strawberries, and it’d come from the dollar store.
If you want to use a single frozen fruit or a more select mix, go for it. Just remember that it should be thawed, drained, and patted dry, and if the pieces are very large, they should probably be cut to be around bite-size.
I found that this kept perfectly well in individually-wrapped pieces at room temperature for about 2 days. It was also great to freeze. I had pieces frozen for weeks and then thawed them, and it was impossible to tell they’d ever been in the freezer.
Greatly modified from Bake from Scratch January/February 2021 issue.
Bready or Not Original: Berry Frangipane Cake
Equipment
- 9-inch springform pan
- parchment paper
- offset spatula
- 2 cookie scoops
Ingredients
Frangipane
- 2/3 cup unsalted butter room temperature
- 1 1/2 cups superfine almond flour sifted if thick or clumpy
- 3/4 cup white sugar
- 1/4 cup all-purpose flour
- 1 large egg
- 1 large egg white
- 1 teaspoon kosher salt
- 1 teaspoon almond extract
Batter
- 1/2 cup unsalted butter 1 stick, room temperature
- 3/4 cup white sugar
- 1 large egg room temperature
- 3/4 teaspoon vanilla extract
- 1/4 teaspoon almond extract
- 1 cup all-purpose flour
- 3/4 teaspoon baking powder
- 1/4 teaspoon kosher salt
- 1/4 cup milk or half & half
Fruit topping
- 3/4 cup frozen mixed berries drained, thawed, and patted dry
- 3 Tablespoons sliced almonds
- confectioners' sugar for dusting
Instructions
- Preheat oven at 325-degrees. Cut a piece of parchment to fit the base of a 9-inch springform pan. Spray pan with nonstick spray, place paper cut-out inside, then spray that as well. Set aside.
- Make the frangipane. In a bowl, beat the butter until it’s creamy. Add the rest of the ingredients to combine well. Set aside.
- Make the batter. In a large bowl, beat the butter and sugar until they are fluffy. In a stand mixer, this will be 3 to 4 minutes. Add the egg followed by the extracts,
- In a separate bowl, combine the flour, baking powder, and salt. Gradually add the dry ingredients into the butter-batter alternatively with the milk. Scrape the bottom of the bowl often.
- Scoop about 1 cup of the batter into the pan and even out with an offset spatula. Measure out about 1 cup of the frangipane. Use two spring-loaded cookie scoops (tablespoon or teaspoon-sized, or without those, use a normal tablespoon and get your fingers dirty), scoop from the 1 cup frangipane and the batter to create a checkerboard pattern of dollops atop of base. Continue to alternate in a second layer, using up the rest of the batter as well as the 1 cup frangipane. Use a butter knife to swirl through them to create a slight marbled effect. Tap the pan on the counter a few times to knock out bubbles.
- Use a scoop to place the rest of the frangipane on the top of the cake. Even out with offset spatula. Place the berries atop the frangipane, then sprinkle the almonds all over to coat.
- Bake until the cake has set edges, about 50 minutes to 1 hour. An instant-read thermometer plunged into the middle should read over 202-degrees. Let cool in pan 10 minutes, then release the side clasp. Continue to cool the cake on the metal base until room temperature. Add a sprinkle of confectioners' sugar to pretty it up for serving.
- Cake will keep covered for up to 2 days at room temperature. It can also be individually sliced and frozen for later enjoyment.
OM NOM NOM!
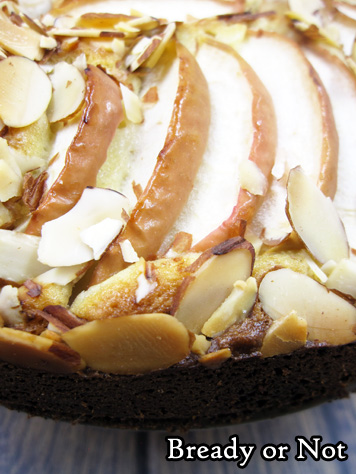
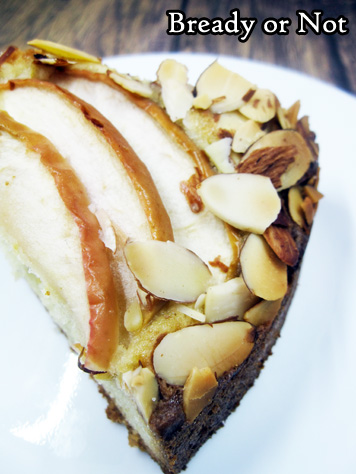
Bready or Not Original: Apple-Almond Olive Oil Cake
This Apple-Almond Cake is an absolute showstopper of a cake, and it’s not difficult to make!
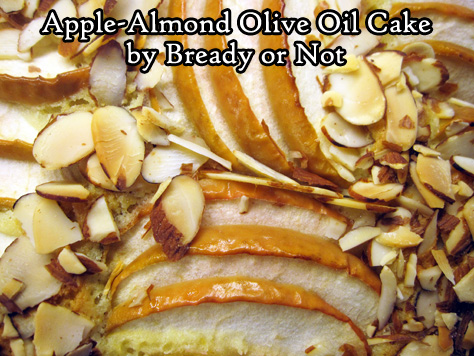
Really, I found cutting the apple into thin, mostly-equal pieces and placing them on the cake to be the most piddly part of the whole process. However, it was all well worth the effort!
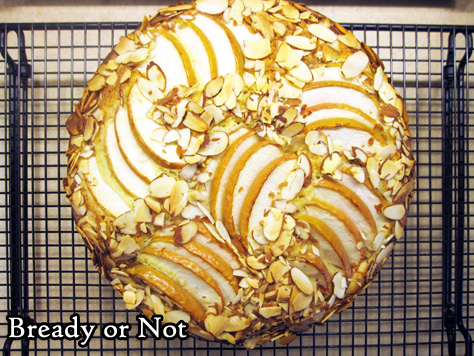
The taste of the cake isn’t super-sweet. The cake really tastes of lemon and almond, a fabulous pairing, with the apple providing a touch of flavor and sweetness.
It’s not a thick or heavy cake, either. This would be fantastic to serve for a breakfast, brunch, or dessert–it can really do all the things!

I modified this recipe greatly from one that was in Bake from Scratch’s September-October 2020 issue, which used a pear instead of an apple. It’s a fantastic issue–you’ll see my takes on several other recipes in the future!
Bready or Not Original: Apple-Almond Olive Oil Cake
Equipment
- 9-inch springform pan
- parchment paper
Ingredients
- 2 large eggs room temperature
- 1 cup white sugar
- 1/2 cup extra-virgin olive oil
- 2/3 cup almond flour sifted to remove clumps
- 1/3 cup half & half or milk
- 1 lemon zested and juiced
- 1 teaspoon vanilla extract
- 1/4 teaspoon almond extract
- 1 1/3 cup all-purpose flour
- 1 1/2 teaspoons baking powder
- 3/4 teaspoon kosher salt
- 1 large Pink Lady apple or other firm baking apple
- 1/2 cup sliced almonds
Instructions
- Preheat oven at 350-degrees. Cut parchment paper to fit the bottom of a 9-inch springform pan. Apply nonstick spray to pan; place parchment round inside, then spray to coat that as well.
- In a stand mixer with a whisk attachment. whip the eggs at high speed until they are foamy, about a minute. Reduce the speed to medium to add the white sugar. Continue to beat until it becomes thick and pale, about 2 minutes.
- With the mixer going, pour in olive oil. Pause to scrape sides of bowl. Add the almond flour, half & half, all of the lemon zest, and both extracts, mixing until combined.
- In another bowl, stir together flour, baking powder, and salt. Fold the dry ingredients into the moist mix. Pour batter into the prepared pan.
- Prep the apple. Core it, leaving the peel intact. Cut into thin slices of equal size. Pour reserved lemon juice over the apples, tossing them to coat.
- Place apple slices on top of batter in fanned-out groups of about five, having them face different angles all around the top. NOTE: as the batter is very sticky, the apples will be nigh impossible to move after they are placed, so make careful decisions. Sprinkle the sliced almonds around the edges and in the gaps between the apples.
- Bake for about 50 minutes, until the middle passes the toothpick test. Set on rack for 15 minutes before removing the ring from the pan. Serve warm, or cool completely, keeping the cake on the round base. When slicing the cake, be aware that the peel is pretty but may resist the blade–it’s easier to snip through with a pair of kitchen shears.
- Cake can be sliced and frozen for later, but it will taste best at room temperature or warmed.
OM NOM NOM!
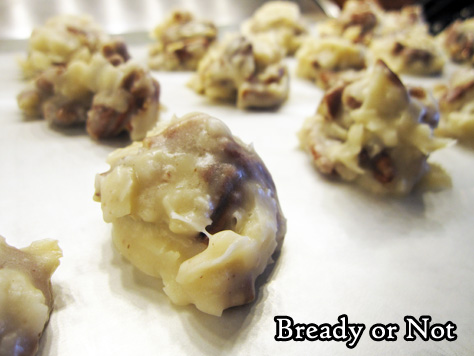
Bready or Not Original: No Bake Pecan Praline Cookies
Do you need cookies ready, FAST? These no-bake wonders are prepared in minutes and just need 15 minutes to set.
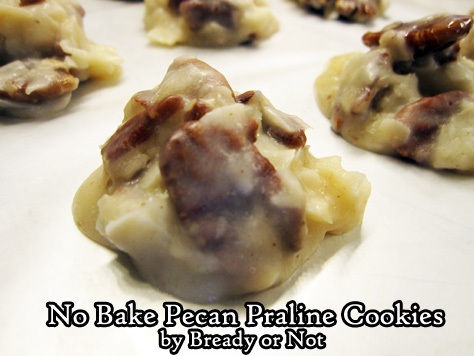
Traditional pecan pralines are crunchy and sweet. This no-bake cookie version definitely has all that going on, with added chewiness from coconut.
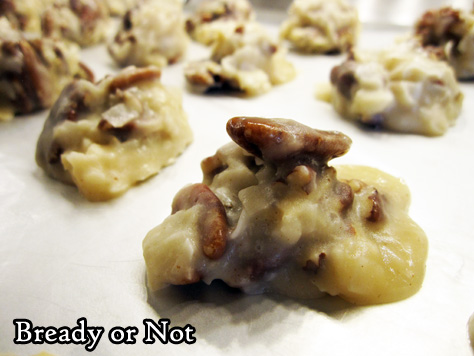
I highly recommend using unsweetened coconut flakes or shreds here, as these cookies are not lacking at all in the sugariness department!
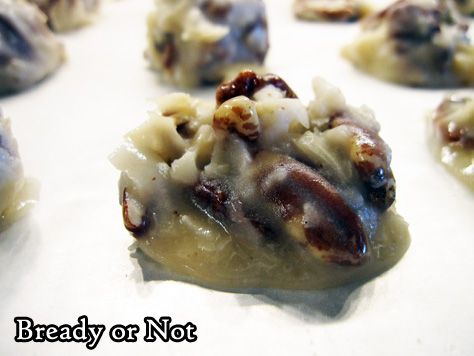
It’s amazing to me how something so goopy and hot can so quickly become set and easy to handle. This is the ultimate in fast-and-delicious cookies.
Bready or Not Original: No Bake Pecan Praline Cookies
Equipment
- large saucepan
- cookie sheet
- waxed paper
- tablespoon scoop
Ingredients
- 2 1/2 cups pecans chopped or whole
- 2 cups unsweetened coconut flakes or coconut shreds
- 2 1/2 cups white sugar
- 1/2 cup milk
- 1/2 cup light corn syrup
- 1 stick unsalted butter 1/2 cup
- 1 teaspoon vanilla extract
Instructions
- Prepare a large cookie sheet, or several sheets, with waxed paper. In a bowl, stir together the pecans and coconut.
- In a saucepan on medium-high heat, stir together the sugar, milk, corn syrup, and butter. Continue to stir while bringing the mixture to a rolling boil. Stabilize the heat so that it continues to boil for 3 minutes.
- Remove pot from heat. Pour in the vanilla. Follow up with the pecans and coconut, stirring well to coat everything in goopy hot sugar.
- Use a tablespoon scoop to dole out cookies on the waxed paper. If they fall apart a bit, carefully use a spoon or the scoop to shape them again. Let cookies set, at least 15 minutes. Carefully peel them away from the waxed paper; note that the first scoops may be more prone to stick.
- Store cookies in a sealed container.
OM NOM NOM!
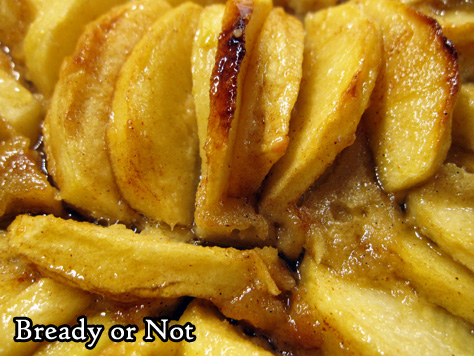
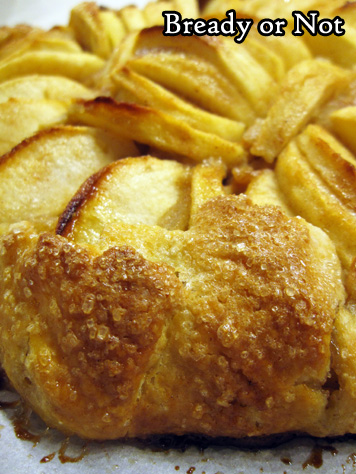
Bready or Not Original: Apple-Frangipane Galette
This Apple-Frangipane Galette is like a leaner apple pie. It’s the way to enjoy a sweet treat without going full overkill.
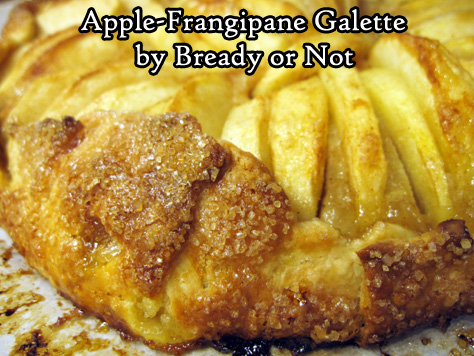
This recipe has a lot of ingredients and steps, but they can be spread out over a few days, if you want. The actual recipe is pretty straightforward!
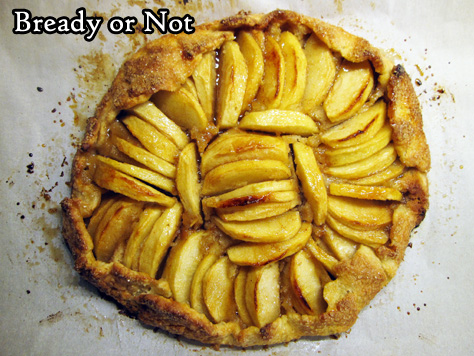
I’ve been doing a number of recipes that use frangipane, and I get asked almost every time: “what is frangipane?”
To quote Wikipedia, it’s: “a sweet almond-flavored custard used in a variety of ways including cakes and… pastries. …Today it is normally made of butter, sugar, eggs, and ground almonds.”
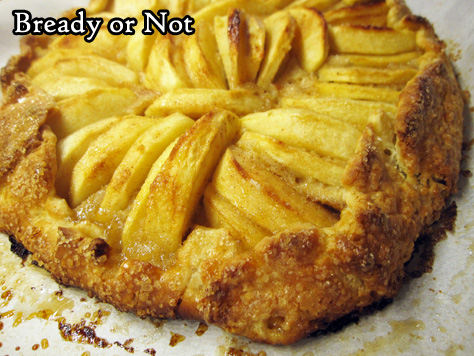
In other words, it’s a spreadable, sweet, nutty layer of goodness. It acts as the perfect complement to apples in this recipe.
Do note that this is best enjoyed the day it is made. It’s fine, though, to freeze slices of it right away. When you thaw them later, enjoy the pieces that same day!
Bready or Not Original: Apple-Frangipane Galette
Equipment
- parchment paper
- food processor
- pastry brush
Ingredients
Crust:
- 1 cup all-purpose flour plus more for dusting
- 4 teaspoons white sugar
- 1/2 teaspoon salt
- 6 Tablespoons cold unsalted butter cut into small pieces
- 1 large egg
Frangipane:
- 2/3 cup almond flour sifted to remove lumps
- 1/4 cup white sugar
- 1 Tablespoon all-purpose flour
- 1 Tablespoon unsalted butter room temperature
- 1 large egg
- 1 Tablespoon apple brandy such as Calvados (optional)
- 1 teaspoon pure vanilla extract
- 1/2 teaspoon apple pie spice
- pinch salt
Apple filling:
- 2 medium apples such as Honeycrisp or Golden Delicious
- 1 Tablespoon brown sugar packed
- 1 Tablespoon white sugar
- 1 teaspoon lemon juice
- 1/4 teaspoon apple pie spice
- 1 large egg beaten
- turbinado or other coarse sugar
Glaze:
- 2 Tablespoons honey
- 2 teaspoons apple brandy such as Calvados
Instructions
Make the crust:
- In a food processor, pulse together the flour, sugar, and salt. Add the butter and chop until it’s pea-sized. Add the egg and pulse until it comes together; if it doesn’t, add tiny drizzles of water until it does–just make sure the dough ends up cohesive, not wet. Turn out the dough onto a big piece of plastic wrap and compress the dough to form a disc. Wrap it up and chill it in fridge for a few hours, minimum, or a few days.
Make the frangipane:
- Use a rubber spatula to combine the almond flour, sugar, flour, butter, egg, apple brandy, vanilla, pie spice and salt, making it smooth. Stash it in the fridge until ready to use.
Assembling the galette:
- Preheat oven at 400-degrees. Prepare a big cookie sheet with a piece of parchment. Bring out the dough to warm for a few minutes, then lightly flour a surface and roll it out to about a 12-inch round. Move it to the parchment paper.
- Spread the frangipane over the dough, leaving a blank 1 1/2-inch border. Set the baking sheet in the fridge while preparing the apples.
Prepare the apples:
- Peel the apples and slice to 1/4-inch thickness. In another bowl, stir together the brown sugar, sugar, lemon juice, and pie spice. Add this to the apples, and toss them to coat. Bring out the galette dough. Arrange the apples on the frangipane starting from the middle, spiraling them outward while slightly overlapping them. Fold the blank edge over the apples to form a thin, pleated crust. Brush the beaten egg over the crust, then sprinkle it with coarse sugar.
- Bake galette for 35 to 40 minutes. Apples in middle should be fork-tender when done. Cool for about 30 minutes.
Make the glaze:
- In a small saucepan on the stovetop or in a microwave-safe bowl in the microwave, warm the honey and brandy until it is loose and spreadable. Using a clean pastry brush, brush glaze over the apples.
- Let galette cool another 30 minutes, minimum, before cutting it–a pizza slicer is great for this. The galette is best eaten the day it is made, or promptly frozen in slices to be eaten soon after it thaws.
OM NOM NOM!
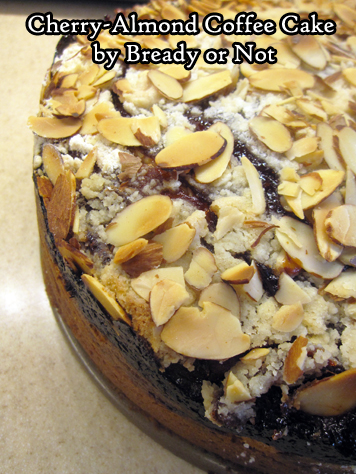
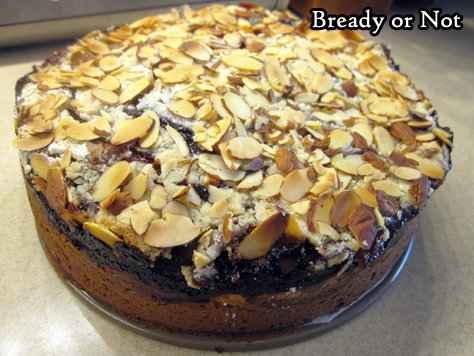
Bready or Not: Cherry-Almond Coffee Cake
This Cherry-Almond Coffee Cake is more cake than cheesecake, and is all sweet, fruity goodness.
If you need a showstopper cake for a brunch or dessert, this one is perfect. It’s great to make ahead of time, too–slices can even be frozen for later, no prob!
I used Murray’s Spiced Cherry Preserves; that little kick of spice was fantastic in the cake. Other bold preserves would be great in this cake, too–raspberry, strawberry, blueberry, even tropical flavors.
This is a thick, rich cake. It tastes best when you get a bit of all the layers in a single bite: the sliced almonds, crumb topping, fruit, cream cheese, sponge.

My husband liked the cake cold but he liked it even more when warmed a bit–and not in the microwave, either, but gently brought to room temperature by letting a slice sit out for 30 to 45 minutes.
Don’t forget a slice on the counter, though. This does contain cream cheese and shouldn’t be left out for hours!
Modified from Taste of Home Magazine December 2015.
Bready or Not: Cherry-Almond Coffee Cake
Equipment
- 9-inch springform pan
- parchment paper
Ingredients
- 2 1/2 cups all-purpose flour
- 1 cup white sugar divided
- 3/4 cup cold unsalted butter cubed
- 1/2 teaspoon baking powder
- 1/2 teaspoon baking soda
- 1/4 teaspoon salt
- 1 cup vanilla yogurt or sour cream, 8 ounces
- 2 large eggs
- 1 teaspoon almond extract
- 8 ounces cream cheese 1 box, softened
- 1 cup cherry preserves
- 1/2 cup slices almonds
Instructions
- Preheat oven at 350-degrees. Cut a parchment round to fit the bottom of the springform pan. Apply nonstick spray or butter on bottom of sides of pan, add the parchment, then grease it as well.
- In a big bowl, mix flour with 3/4 cup of sugar. Cut in butter until it is crumbly. Measure out 1/2 cup crumb mixture for topping; set aside.
- To the bulk of the flour mix, add baking powder, baking soda, and salt. Stir in yogurt, 1 egg, and almond extract, until blended. Spread batter onto bottom of the springform pan.
- In a small bowl, beat together the softened cream cheese, the remaining 1/4 cup sugar, and egg, to make it as smooth as possible. It's okay if it still has some clumps. Pour it onto the pan and smooth out. Spoon the preserves all across the top. Sprinkle with the reserved crumb topping and the sliced almonds.
- Bake for 50 to 60 minutes. The middle should no longer be jiggly, the top a nice golden brown. Cool on a wire rack for 10 to 15 minutes then unlatch and life away the pan's ring to let the cake cool for another hour. Then place cake in fridge to complete set and cool for a few hours.
- Cake can be eaten cold or after slices are brought to room temperature after about 30 to 45 minutes. Do remember to store cake in the fridge, as it does contain cream cheese! Slices can also be individually wrapped and frozen, and will thaw in the fridge with no issue.
OM NOM NOM!
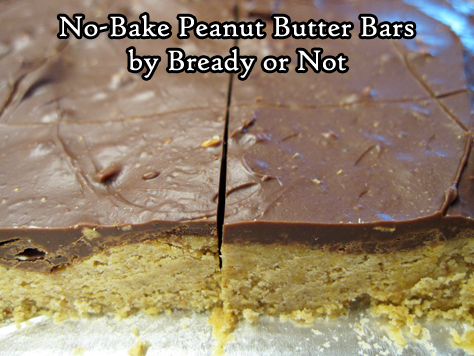
Bready or Not Original: No-Bake Peanut Butter Bars
When you need a dessert in a hurry, these delicious No-Bake Peanut Butter Bars are the way to go.
I especially enjoy this recipe because it doesn’t involve the oven, which is a wonderful thing during Arizona summers.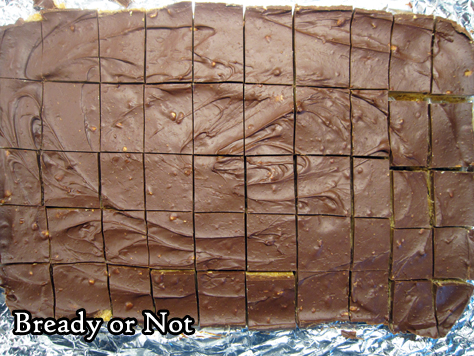
These bars come together in minutes thanks to a microwave, and they only need a few hours to set. You end up with an entire casserole dish of candy bars. Yum.
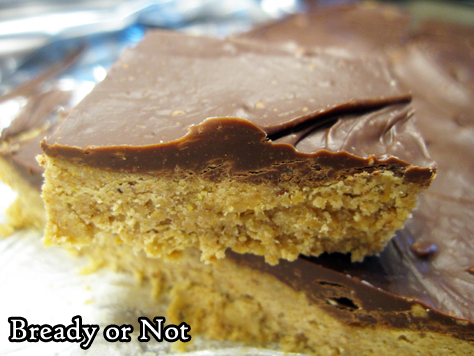
Use crunchy or creamy peanut butter. I used a jar from Trader Joe’s that had flaxseeds mixed in, and my son didn’t like it. This recipe gave me a way to use it up by sending the result with my husband to work!
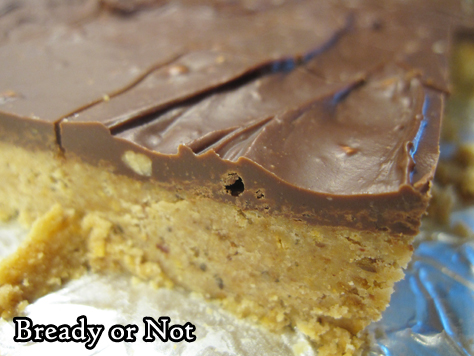
This would be an easy recipe to dress up, too. Add sprinkles, nuts, or cacao nibs atop the chocolate. Have fun with it!
Bready or Not Original: No-Bake Peanut Butter Bars
Equipment
- 13x9 pan
- large microwave-safe bowl
- uneven spatula
Ingredients
Bars
- 2 cups peanut butter crunchy or smooth
- 1 cup unsalted butter 2 sticks
- 2 cups graham cracker crumbs
- 2 cups confectioners' sugar
Ganache
- 1 1/2 cups chocolate chips semisweet, dark, milk, or a mix
- 1/4 cup peanut butter crunchy or smooth
Instructions
- Line a 13x9 pan with foil and apply nonstick spray or butter.
- In a large microwave-safe bowl, melt together the peanut butter and butter by zapping in short increments and stirring well between each pass. Once they mix together, stir in the graham cracker crumbs and confectioners' sugar. Spread the mixture into the prepared pan. Use a hands or maybe a piece of waxed paper and a heavy glass to compress the layer as much as possible.
- Use the same microwave-safe bowl to bowl for the chocolate chips and peanut butter, again zapping in brief increments and stirring well between each burst. Once they can mix together smoothly, dump dollops atop the layer in the pan. Use an uneven spatula to even out the chocolate to the edges.
- Chill in the fridge for at least 2 hours.
- Use the foil to lift the contents onto a cutting board. Let sit for about 10 minutes, enough time to soften the chocolate so that it doesn't shatter when sliced. Use a long knife or sharp bench knife to cut bars. If desired, cut off edges first to produce neater pieces to share.
- Store bars in a sealed container in the fridge with waxed paper between the layers. Keeps for days.
OM NOM NOM!
Follow me


