


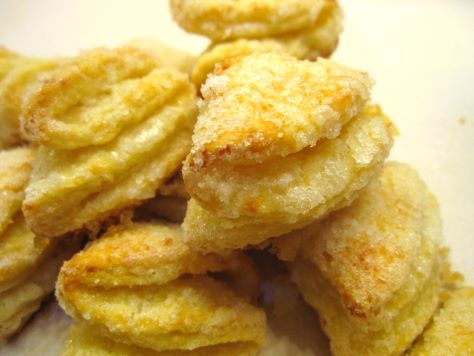
Bready or Not: Farmer’s Cheese Cookies
These Farmer’s Cheese Cookies don’t taste cheesy as one would expect in a gooey, cheese-pull kind of way. Instead, the cheese here adds a touch of savory flavor and a lot of light, chewy texture.
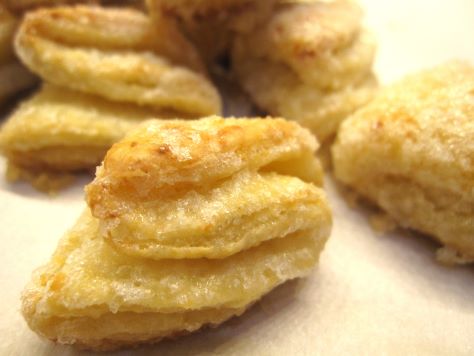
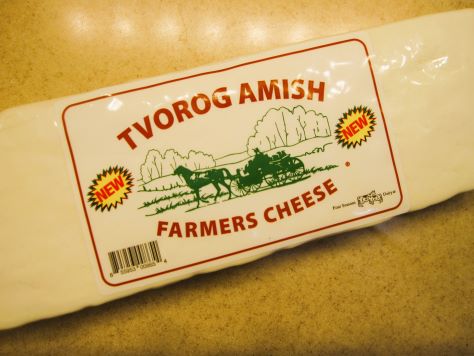
Cookies like this are traditional in Ukraine and Russia. I found a nice block of Ukrainian Tvorog Farmer’s Cheese at Lee Lee Grocery on 75th Ave in Phoenix; check your own local import markets for similar cheese.
Expect a dry, crumbly texture in the cheese. Mine became somewhat powdery as I broke it down, which was fine. I was able to incorporate everything with an extra touch of water, which is a pretty common thing for me to do with roll-out cookies in Phoenix. It’s very dry here compared to most other places.
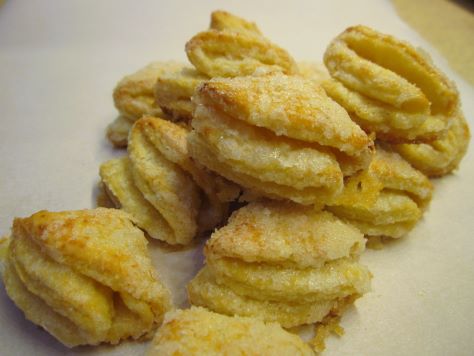
The end result is a cookie that, quite honestly, tastes fancy–light, crisp, sugary, like something that one would find in a fine bakery. Most people wouldn’t guess there’s cheese in the dough, I bet, but they’ll know there’s something different about them. Something delicious.
Bready or Not: Farmer’s Cheese Cookies
Equipment
- grater or food processor
- pastry blender
- 3-inch round cutter or the top of a glass
- parchment paper
- saucer or bowl
- Rolling Pin
Ingredients
- 1 cup unsalted butter 2 sticks, chilled
- 8 oz farmer's cheese such as Ukrainian Tvorog cheese
- 2 cups all-purpose flour
- 2 egg yolks
- 2-3 Tablespoons water
- 1 1/2 cups white sugar
Instructions
- Grate the butter using a hand grater or a grater attachment on a food processor. In a large bowl, use a pastry blender to cut in the cheese, which will be crumbly. Add the flour, followed by the yolks and water. Knead the dough until it comes together in a cohesive mass.
- Form the dough into a disc and encase it in plastic wrap to chill for anywhere from an hour to several days.
- When it’s cookie time, preheat oven at 375-degrees. Line a large baking sheet with parchment paper. Place a small amount of water in a saucer or bowl. Measure the white sugar into a deep bowl.
- Prepare a clean work surface with a dusting of flour. Break off some of the dough and roll it into a thin layer, like for a pie crust. Use the cutter to slice out 3-inch rounds; place the leftover and unused dough to chill in the fridge while cookies are shaped.
- Dampen fingers in the prepared water. Brush wet fingers over one side of a dough round. Dip moist dough into the sugar to coat it. Fold in half with the sugared portion on the inside. Dampen fingers and stroke another folded side of the dough, and dip that in sugar. Fold a final time with the sugared section on the inside. Use wet fingers on outside of cookie and coat that in sugar, too. Gently press the pleats together to prevent them from unfolding during baking. Place formed cookie on sheet and repeat process with remaining rounds.
- Bring together dough scraps, using a little water if needed, to roll out again. Use rest of dough to form cookies.
- Bake in batches for 19 to 22 minutes, until puffed and set with a golden base. Store in a sealed container at room temperature.
OM NOM NOM!
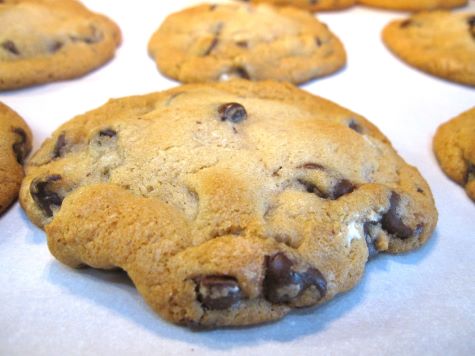
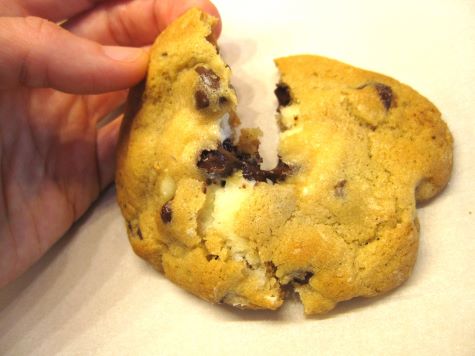
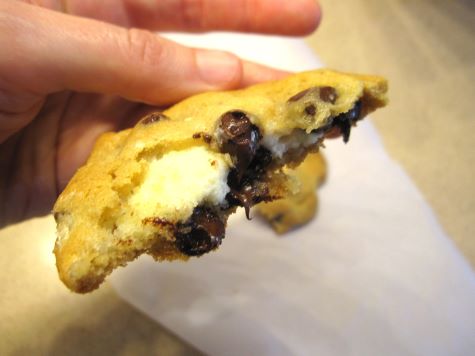
Bready or Not: Cheesecake-Stuffed Chocolate Chip Cookies
These Cheesecake-Stuffed Chocolate Cookies are big, rich, and incredible. You get a core of cream cheese surrounded by chocolate-laden dough. I mean, come on.
For this recipe, you need to make the dough and filling in advance. I made them a day ahead, but you want at least a few hours of refrigeration time. You also chill the cookie dough right after it’s shaped. That means you need some empty room in the fridge for doing this recipe.
This is also a recipe where you really do need a tablespoon and teaspoon scoop to produce even cookies. That, or you just naturally have a good eye for estimating such things.
Modified from Allrecipes Magazine Feb/March 2022.
Bready or Not: Cheesecake-Stuffed Chocolate Chip Cookies
Equipment
- tablespoon and teaspoon scoops
- fridge space
- parchment paper
Ingredients
Filling
- 8 ounces cream cheese room temperature
- 1/2 cup confectioners’ sugar
Cookie Dough
- 3/4 cup unsalted butter (1 and a half sticks) room temperature
- 3/4 cup white sugar
- 3/4 cup brown sugar packed
- 2 large eggs room temperature
- 2 teaspoons vanilla extract
- 2 1/4 cups plus 2 Tablespoons all-purpose flour
- 1 teaspoon baking soda
- 3/4 teaspoon salt
- 12 ounces chocolate chips
Instructions
Make the filling
- Beat together the cream cheese and confectioners' sugar to make a smooth mixture with few if any lumps. Stash it in the fridge to chill for a few hours or overnight.
Make the cookie dough
- Beat together the butter and both sugars until they are creamy. Add the eggs and vanilla.
- In a separate bowl, combine flour, baking soda, and salt. Gradually pour this into the butter mixture, scraping the bottom of the bowl to make certain everything is combined. Fold in the chocolate chips. Chill the dough in the fridge for a few hours or overnight.
Baking the cookies
- Preheat oven at 350-degrees. Line a large baking sheet with parchment paper. Also, make room in the fridge for a small baking pan or plates on which the formed cookies will chill.
- Scoop out a tablespoon of cookie dough. Use a thumb to hollow out the center. Scoop out about 3/4 teaspoon of cream cheese mix using the smaller scoop. Place that inside the hollow. Fold the dough to enclose it, adding additional pinches of dough as needed to form a seal. You don't want any cream cheese visible, or it could ooze out! Flatten cookies between palms to make a fat disc. Set in fridge to chill as more cookies are shaped.
- Once all the cookies are shaped, pull out the coldest cookie balls to set, spaced out, on the baking sheet. Keep the remaining cookie balls chilled while the initial batch(es) bake.
- Bake for 12 to 14 minutes, until the cookies are golden. Let them rest on the sheet for 5 to 10 minutes, then transfer them to a rack to completely cool.
- Store cookies in an airtight container at room temperature for up to 3 days.
OM NOM NOM!
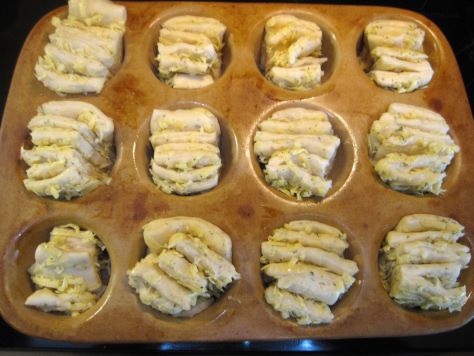
Bready or Not: Cheesy Fantail Rolls
If you know anything about me, you know I’m all about cheese. These Cheesy Fantail Rolls deliver all that good stuff with cheese in the dough and oozing from between the layers of dough.

I based this on a Bake from Scratch recipe for Parmesan-Gouda Fantails. I’m more flexible about the cheese. Just go with a good melter, or a combination of melters. I did a whole block of Roth Dill Havarti. Another firm cheese with herbs would be great. If you like spice? Go with a spicy blend. Have fun with it.
My other big recommendation is that you don’t use pre-shredded cheese, as it’s coated with preservatives and won’t melt as well. But if that’s all you have, well, it won’t end the world.
Do reserve a block of time for this recipe. Shaping the rolls isn’t hard, but it is fiddly, and it will make a mess on your counter or table. However, that effort is well worth it, because these rolls are gorgeous and delicious.
Bready or Not: Cheesy Fantail Rolls
Equipment
- stand mixer
- microwave
- 12-cup muffin pan
- pastry brush
Ingredients
- 1 cup light beer room temperature
- 1 Tablespoon white sugar
- 2 1/4 teaspoons active dry yeast
- 8 Tablespoons unsalted butter melted and divided
- 3 cups all-purpose flour
- 2 cloves garlic minced
- 1 1/2 teaspoons dried parsley divided
- 1 teaspoon kosher salt
- 8 ounces cheese such as cheddar, havarti, or other good melter; shredded
Instructions
- In a microwave-safe bowl, microwave 1/4 cup beer until it is 105-110-degrees Fahrenheit. (If it overheats, cool it for a few minutes.) Add sugar and yeast, stirring to combine. Let it sit about 5 minutes; it should become foamy. Stir in 6 Tablespoons of melted butter and the remaining 3/4 cup beer.
- In a stand mixer with a paddle attachment, mix 2 cups flour, a healthy pinch of shredded cheese, 1 minced garlic clove, 1 teaspoon of dried parsley, and the kosher salt. Add yeast mixture and stir for a minute. Gradually add the remaining 1 cup flour, beating until the dough begins to pull away from the sides of the bowl. That will be after 3 to 4 minutes. Cover the bowl with plastic wrap or a towel, and let it stand in a warm place for about 45 minutes.
- Apply nonstick spray to the wells in a 12-cup muffin pan.
- Punch down dough and divide it in half. On a lightly floured surface, roll a half into a 12-inch square. Sprinkle half of the grated cheese over the dough. Use a bench knife or pizza cutter to slice dough into 6 equal strips. Stack strips, cheese side up, and cut crosswise into 6 equal pieces. Place each segment of 6 stacked mini strips into a muffin cup. Repeat with remaining dough.
- Slightly separate and stretch each piece of dough in the cups. Cover with plastic wrap or a towel to rise in a warm spot for 30 to 45 minutes.
- Preheat oven at 375-degrees, then bake fantails for 20 to 24 minutes, until browned with visible melted cheese.
- In a microwave-safe bowl, melt the remaining 2 Tablespoons butter. Add 1 minced garlic clove and 1/2 teaspoon dried parsley, stirring to distribute. Use a pastry brush to coat each fantail with buttery goodness. Let cool for at least 10 minutes before serving.
- Leftovers should be refrigerated and will reheat beautifully in the coming days. Use an oven or toasted oven, and wrap up the rolls in foil. Add a touch of butter, if desired, to keep them from becoming extra crisp. Heat until warmed.
OM NOM NOM!
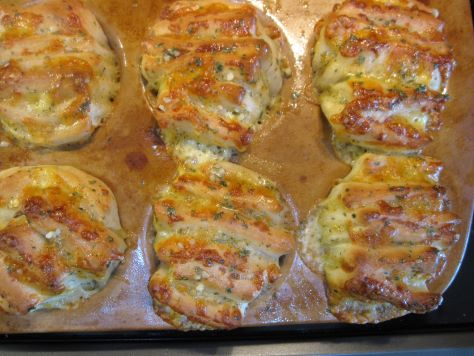
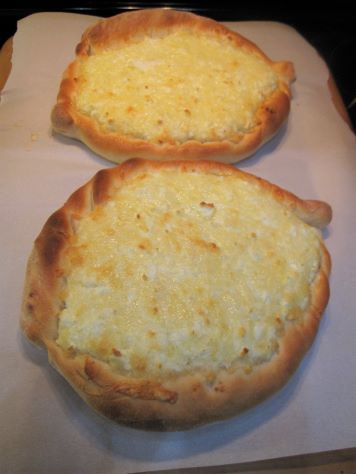
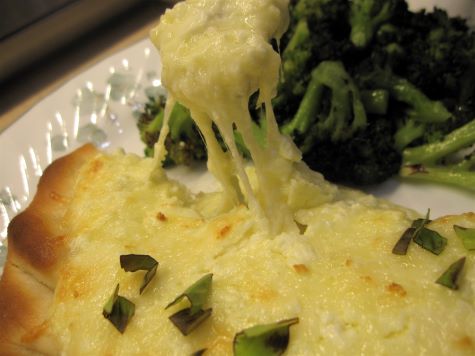
Bready or Not Original: Khachapuri
Let’s start the new year in cheesy fashion! Here’s my take on khachapuri, aka Georgian cheese bread. It’s pretty much the ultimate dish if you like bread and cheese.
This is an original recipe, which I made from studying about four other recipes. I have no way of knowing if this, or the recipes I pull from, are authentic. Really, they can’t be. Those of us in the US likely can’t get the real-deal cheeses, but I did try to go more authentic than some of the other recipe suggestions.

Butterkäse is carried by some supermarkets in the US, especially the Roth brand out of Wisconsin. If you can’t find that, go for a good melter like mozzarella or havarti.
Bulgarian feta is moister than typical domestic fetas and also doesn’t have as strong of a salty flavor. I’ve found that it is regularly carried in Grocery Outlets in California and in larger Asian/European grocery stores. Can’t find it? Go for another moist feta.
Traditional Khachapuri is topped with an egg. Mine is not, because my husband hates eggs. I knew he wouldn’t even want to see a runny egg on my portion!
I include advice on reheating leftovers as well. I can testify that this dish reheats beautifully in the oven.
Bready or Not Original: Khachapuri (Georgian Cheese Bread)
Equipment
- food scale
- parchment paper
- pizza stone
Ingredients
Dough
- 1/4 cup milk
- 1/2 cup water
- pinch sugar
- 1 teaspoon active dry yeast
- 1 3/4 cups all-purpose flour plus more for dusting
- 1 1/4 teaspoon kosher salt
Filling
- 9 ounces butterkäse also known as butter cheese, shredded (substitute mozzarella or havarti)
- 7 ounces Bulgarian feta broken apart with fork (substitute other moist feta)
- 1 large egg room temperature
- 2 large eggs for topping, optional
- fresh basil or other chopped herbs or red pepper flakes for topping, optional
Instructions
To make the dough
- Warm the milk and water together, in the microwave or on the stove, to about 110-degrees. Transfer it to a large mixing bowl. Stir in sugar and yeast. Let stand about 10 minutes to start bubbling; if the room is cold, cover the bowl with plastic wrap or a towel to encourage warmth.
- Add the flour and salt to the bowl. Beat using a dough hook for about five minutes, or longer if by hand, to form a soft dough. Move to a larger greased bowl and cover, letting rise for an hour to an hour and a half.
Shape and fill the khachapuri
- Combine the two cheeses in a bowl. Mash in the egg to completely incorporate.
- Lightly flour a work surface. Turn out the dough onto the surface, dividing in half. Form each into a round; set one aside. Use a rolling pin to extend a piece of dough to be about ten inches across. Lift it onto parchment paper. Repeat with the other piece of dough, either fitting onto the same parchment or a second piece.
- Spoon half the cheese mixture into the middle of a bread sheet, spreading out to about an inch from the edge. Fold the bare edge over to meet the cheese, shaping it into a cheese canoe, pinching the ends together and twisting to seal. Repeat with the second half.
- Preheat oven at 450-degrees and place pizza stone in oven to heat up. Let khachapuri rise for 30 minutes.
- Carefully pull out the pizza stone. Use parchment to lift khachapuris onto the stone. Bake for 12 minutes. If adding the traditional cracked egg to top each piece, then do so now. In any case, turn around khachapuri and bake for another 4 minutes. Crust should be browned with cheese fully melted.
- Let set for 10 minutes. If desired, add chopped basil, red pepper flakes, or other herbs. Serve!
OM NOM NOM!
Notes
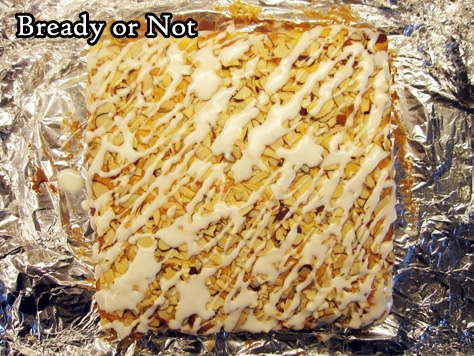
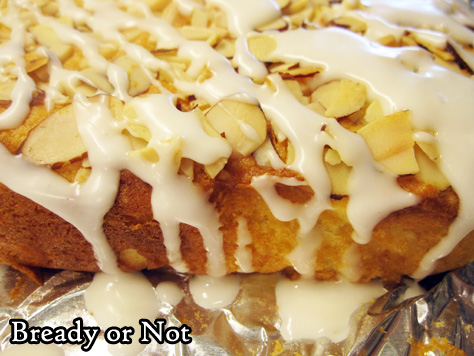
Bready or Not: Kerrygold Almond Breakfast Cake
This Kerrygold Almond Breakfast Cake is moist, light, and delicious thanks to Irish butter, ricotta cheese, and a vivid spark of lemon.
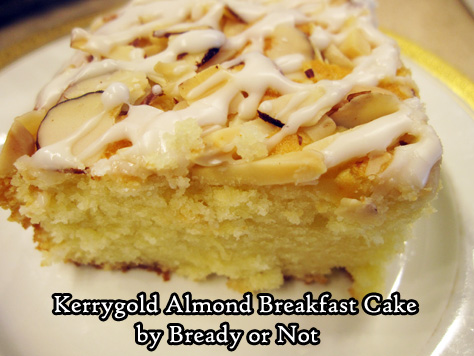
I found the original version of this recipe on the Kerrygold website and modified it quite a bit to make it work for a square 9-inch pan. I also added a glaze because, well, I thought it needed one–and it does. Not only does it boost the sweetness, but it helps that layer of sliced almonds adhere more.
Using ricotta cheese in a cake like this doesn’t make it taste cheesy. The ricotta adds moisture, creating a soft, tender crumb, and it plays beautifully with the potent Kerrygold butter.
Now, about that Kerrygold. For baking purposes, I like to buy it at Costco when it goes on sale a few times a year. Stash it in the freezer and it keeps for a long, long time. It’s sure more cost-effective than buying it at the grocery store.
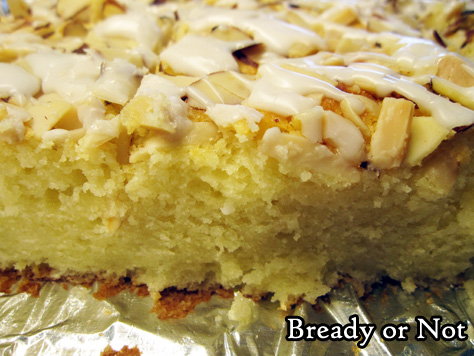
This cake is lemony-bright in flavor with a crisp-top crust thanks to the almonds. It keeps at room temperature for a few days or can be frozen for later.
Bready or Not: Kerrygold Almond Breakfast Cake
Equipment
- 9-inch square pan
- aluminum foil
- uneven spatula
Ingredients
Cake
- 1 1/2 cups all-purpose flour
- 2 teaspoons baking powder
- 3/4 teaspoon kosher salt
- 8 Tablespoons Kerrygold unsalted butter (1 stick) 1/2 cup, room temperature
- 1 cup white sugar
- 1 lemon zested and juiced
- 2 large eggs room temperature
- 1 teaspoon pure almond extract
- 1 1/2 cups whole milk ricotta cheese
- 3/4 cup sliced almonds
Glaze
- 3/4 cup confectioners’ sugar
- 3 teaspoons fresh lemon juice
Instructions
- Preheat oven at 350-degrees. Line 9-inch pan with foil extended up all four sides. Apply nonstick spray.
- Whisk together flour, baking powder, and salt. Set aside.
- In a large mixing bowl, beat together butter, sugar, and lemon zest until light and fluffy, about 4 minutes. Add eggs and almond extract.
- To the mixing bowl, alternatively add the flour mixture and the ricotta. Batter will be thick.
- Pour it into the prepared pan. Level off with an uneven spatula. Sprinkle sliced almonds to cover the top.
- Bake for 33 to 38 minutes, until the middle passes the toothpick test.
- Cool in pan for at least 45 minutes, then use foil to lift it onto a rack to completely cool at room temperature.
- Make glaze and drizzle across the top. Let set for 30 minutes before cutting. Cake will keep at least two days at room temperature, or pieces can be individually wrapped and frozen for later.
OM NOM NOM!
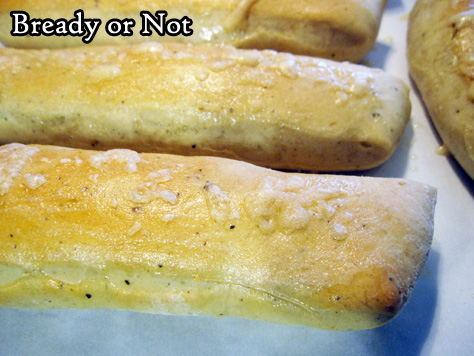
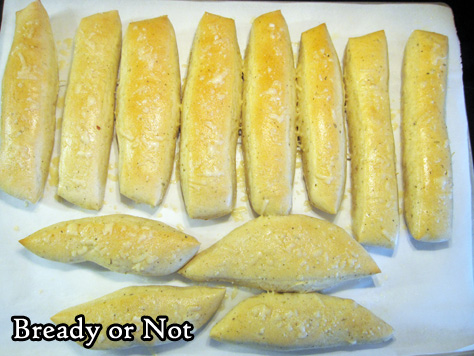
Bready or Not: Soft Breadsticks from the Bread Machine
Soft Breadsticks are so very cozy and comforting. They are even better when they are easy to make from-scratch at home, thanks to a bread machine.
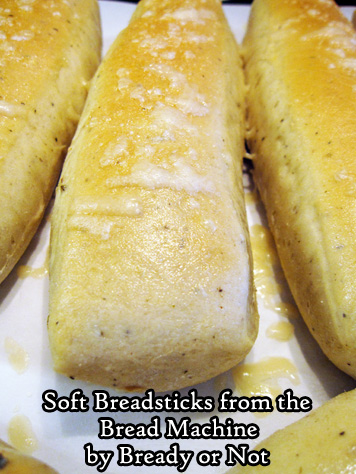
These are truly classic breadsticks. Doughy. Buttery. Just a touch of cheese on top.
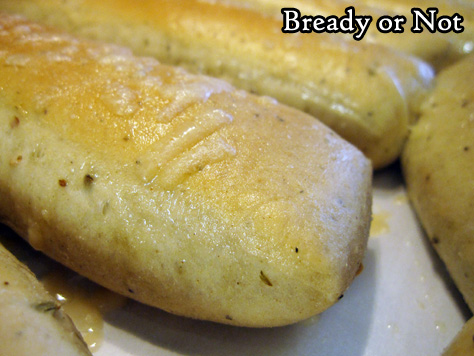
Season these however you want. Italian seasoning is great; I have Penzey’s pizza seasoning around, and I found it delicious in this recipe.
Sometimes I try to be precise with bread recipes when it comes to the baking stage–I pull out my food scale and weigh each round to get equal rolls. Not so here. I just wanted things that were, generally, in stick form.
If you have any leftovers, the sticks do keep well for two days at room temp, or you can freeze them for later. Just wrap them in foil to reheat in an oven or toaster oven.
Modified from the fantastic cookbook Making Artisan Breads in the Bread Machine by Michelle Anderson, available at Amazon, Bookshop, and other stores. [affiliate links]
Bready or Not: Soft Breadsticks from the Bread Machine
Equipment
- large baking sheet
- parchment paper
- pastry brush
Ingredients
- 1 1/4 cups lukewarm water (100-110 F degrees)
- 2 Tablespoons olive oil
- 1 Tablespoon white sugar
- 1 Tablespoon dry Italian seasoning or pizza seasoning
- 1 1/2 teaspoons sea salt
- 3 3/4 cups bread flour plus more for the work surface
- 2 1/4 teaspoons instant dry yeast
- 2 Tablespoons melted butter
- 1/4 cup grated Parmesan cheese or Grana Padano
Instructions
- Follow ingredient order for your bread machine; for most, that means liquids first. Place water, oil, sugar, seasoning, and salt in the bread machine bucket. Add the flour and the yeast. Start the machine on DOUGH cycle.
- Check on the dough as it mixes, if possible, and add a touch more liquid or flour as necessary. Dough should be soft and plush.
- Prepare a large baking sheet with parchment paper. Once the dough cycle is done, transfer the dough to a clean, floured work surface. If equal breadsticks are desired, use a food scale to weigh the dough and divide–or simply pat out the dough and use a pizza cutter or bench knife to slice the bread into stick form. Transfer them to the baking sheet. Cover them with plastic wrap or a towel and let them rise for another 45 minutes to an hour, until nicely puffed.
- Preheat oven at 350-degrees.
- Bake time will vary dependent on their size. If about 12 breadsticks are on the sheet, bake for about 12 minutes. Pull out of oven briefly to brush on melted butter. Sprinkle cheese all over top. Place breadsticks back in oven to bake for another 3 to 5 minutes, until sticks are more golden and cheese is melted.
- Eat breadsticks warm. Store any leftovers in a sealed plastic bag at room temperature for up to 2 days. They can also be frozen for later enjoyment.
OM NOM NOM!
Follow me


