


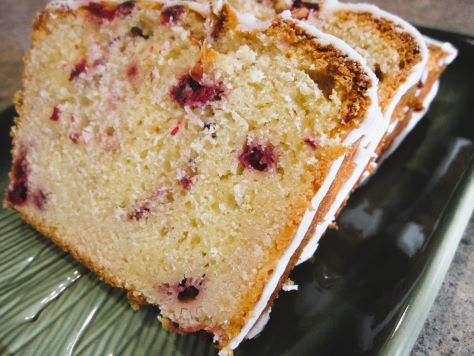
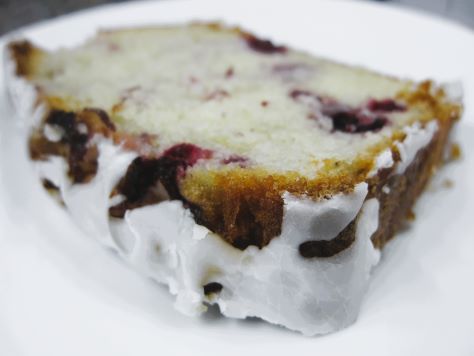
Bready or Not Original: Raspberry Frangipane Loaf Cake
This Raspberry Frangipane takes a little work, but the result is gorgeous and absolutely delicious. This is a great special occasion treat–and it’s easy to make a day ahead!

Layer cakes get a lot of the attention and fuss, but I think loaf cakes need more love. They can be stunning, too. This one certainly is. It contains homemade frangipane, one of my favorite things, and is convenient to make year-round by using frozen raspberries.
As this loaf does involve some labor, I found it simplified things to prepare it over two days. Day 1: make frangipane and chill it. Day 2: make loaf and glaze. Day 3: serve to my husband’s co-workers.
I found the cake kept beautifully, wrapped, for up to 4 days after baking.
Bready or Not Original: Raspberry Frangipane Loaf Cake
Equipment
- 8×4 loaf pan
- parchment paper
- nonstick spray
- kitchen shears
Ingredients
Frangipane
- 1/2 cup unsalted butter (1 stick) room temperature
- 1/2 cup almond flour sifted
- 1/4 cup white sugar
- 2 Tablespoons all-purpose flour
- 1 large egg white
- 1/4 teaspoon kosher salt
- 1/2 teaspoon almond extract
Batter
- 1 1/4 cups frozen raspberries
- 1/2 cup unsalted butter (1 stick) room temperature
- 1 cup white sugar
- 2 large eggs room temperature
- 1 teaspoon vanilla extract
- 1/4 teaspoon almond extract
- 1 3/4 cups all-purpose flour plus 1 Tablespoon
- 1 Tablespoon baking powder
- 1/2 teaspoon kosher salt
- 1/2 cup full-fat vanilla Greek yogurt or plain Greek yogurt
- 2 Tablespoons sliced almonds
Glaze
- 1 cup confectioners’ sugar
- 1 Tablespoon half & half or milk
- 1/2 teaspoon clear vanilla
Instructions
Frangipane
- Frangipane can be made immediately before the batter or prepared a day in advance.
- In a medium bowl, stir butter until creamy. Add almond flour, sugar, all-purpose flour, egg white, salt, and almond extract. Stir until combined. Cover with plastic wrap pressed to the top, and place in fridge until ready to use.
Loaf
- Preheat oven at 375 degrees. Cut parchment paper to fit inside an 8×4 loaf pan like a sling extended up both long sides. Spray inside of pan with nonstick spray, then spray parchment.
- Use kitchen shears to break frozen raspberries into pieces of various size, measuring out 1 1/4 cup total. Stash raspberries back in freezer until ready to use.
- In a large bowl, beat together butter and sugar until fluffy. Add eggs one at a time followed by the extracts.
- In another bowl, sift together the 1 3/4 cups flour, baking powder, and salt. Gradually mix dry ingredients into the wet, mixing alternatively with the yogurt. Scrape the bottom of the bowl to make sure everything is combined.
- Fold the frangipane into the batter.
- Pull out the raspberries. Toss them with the remaining tablespoon of flour. Set aside 1/4 of coated berries for the top; fold the rest of the berries into the batter.
- Spread batter in prepared pan, evening out the top. Sprinkle reserved raspberries on top, followed by the sliced almonds.
- Bake for 20 minutes. Reduce oven temperature to 325 degrees. Continue to bake until the top is golden and the inside registers an interior temperature over 200 degrees, which will be about another 40 minutes. (Total baking time will be between 55 minutes and 1 hour 5 minutes.) If the loaf is looking brown early on, cover with a small piece of foil.
- Let cool in pan about 20 minutes, then use the parchment sling to lift the loaf onto a rack to completely cool.
Glaze
- Once the loaf is completely cool, mix the glaze. It should be fairly thick; add a touch more confectioners’ sugar if needed. Drizzle over loaf so that the top is covered with glaze dripping down the sides.
- Give the glaze at least 30 minutes to set before cutting into the loaf, or wrap loaf to serve later or the next day. Loaf will keep well, wrapped at room temperature, for up to 4 days.
OM NOM NOM!
Bready or Not Original: Cranberry-Date Bars
These Cranberry-Date Bars are thick, hearty and delicious, perfect for dessert, a snack, or as a breakfast bar.

I used fresh cranberries for this recipe, as I had them in-season. I washed and thoroughly dried the cranberries. For the dates, I didn’t use precut, crusty date bits, but freshly chopped up dates that I had purchased at Costco. I much prefer eating those–they are soft, pliable, and especially sweet.

The dates provide a beautiful counterbalance to the tart cranberries. They also act as glue to hold everything together.

The bright red filling makes these especially pretty for the holiday time, too.
Bready or Not Original: Cranberry-Date Bars
Equipment
- medium saucepan
- 9×13 pan
- foil
- nonstick spray
Ingredients
- 16 ounces fresh or frozen cranberries
- 8 ounces chopped dates
- 1 teaspoon vanilla extract
- 2 cups all-purpose flour
- 2 cups quick oats
- 1 1/2 cups brown sugar packed
- 1/2 teaspoon baking soda
- 1/4 teaspoon salt
- 1 cup unsalted butter (2 sticks) melted
Instructions
- Place cranberries and dates in a medium saucepan and cook over low heat, stirring often, until the berries pop. Remove pan from heat to stir in vanilla. Set aside.
- Preheat oven at 350 degrees. Line a 13×9 pan with foil and apply nonstick spray or butter.
- In a mixing bowl, place flour, oats, brown sugar, baking soda, and salt. Pour in butter and stir until it forms a crumbly mixture. Press about half into the prepared pan, compressing to form an even layer.
- Bake for 8 minutes. Pull pan from oven. Dollop cranberry-date mixture over top, gently spreading out to create a layer. Sprinkle the remaining crumb mixture over the top. Put back in oven to bake for 20 to 25 minutes; the top should be golden brown with the crumbs set in the middle.
- Cool to room temperature, speeding the process in the fridge, if desired. Use foil to lift contents from pan onto a cutting board to slice into bars. Store at room temperature in a sealed container.
OM NOM NOM!
Bready or Not Original: Cranberry Swirled Blondies
My original recipe for Cranberry Swirled Blondies is the perfect way to use up leftover cranberry sauce from the holidays. Try out this recipe with a homemade sauce (like my recipe featured just last week) or a canned version.

If you use a jellied version in a can, you should mush it first so that it’s easy to spread. Also note that the varying moisture content of difference sauces could make for a shorter or longer baking time.

For this recipe, 10 ounces of sauce is the minimum because you need enough to spread into an even layer. I’d say you can go up to as much as 15 ounces.

These bars are the perfect breakfast or snack bar in the holiday season. Heck, use them for a cookie tray! They keep fantastically frozen, too.
Bready or Not Original: Cranberry Swirled Blondies
Equipment
- 13×9 pan
- aluminum foil
- uneven spatula
Ingredients
- 2 1/4 cups all-purpose flour
- 1 1/2 teaspoons baking powder
- 1/2 teaspoon salt
- 3/4 cup unsalted butter (1 1/2 sticks) softened
- 1 1/4 cups white sugar
- 1 1/4 cups brown sugar packed
- 2 teaspoons vanilla extract
- 3 large eggs room temperature
- 10 ounces cranberry sauce this is the minimum, use up to 15 ounces
Instructions
- Preheat oven to 350-degrees. Line 13×9 pan with wide aluminum foil and apply nonstick spray or butter.
- In a small bowl, mix together the flour, baking powder, and salt. Set aside.
- In a mixing bowl, beat together the butter, both sugars, and vanilla to create a smooth batter. Beat in eggs, one at a time, followed by the flour mixture. Place about 2/3 of the batter in the pan and carefully spread into a base later using an uneven spatula. Spread cranberry sauce on top. Dollop remaining dough on top. Use a knife to swirl layers together.
- Bake until evenly golden brown and set in the middle, 35 to 40 minutes. Cool completely at room temperature or chill before cutting. Use foil to lift contents onto a cutting board for easy slicing.
- Blondies keep for up to 3 days in a room temperature sealed container and can also be frozen.
OM NOM NOM!
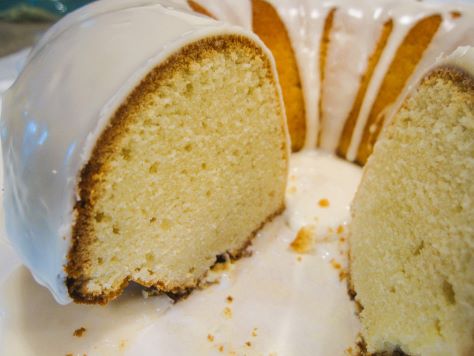
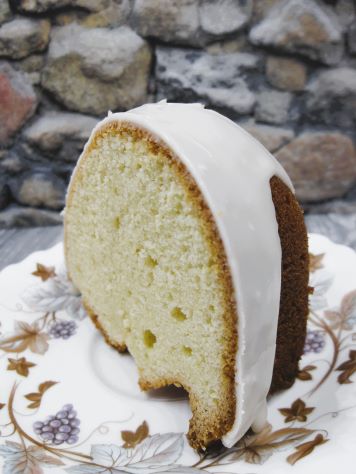
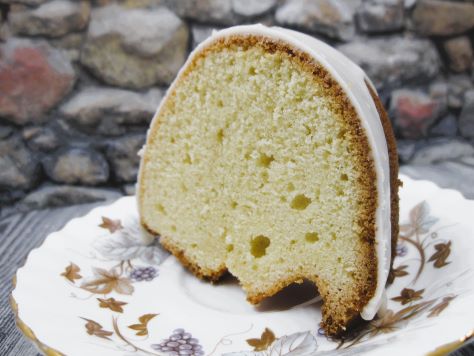
Bready or Not: Maple Bundt Cake with Maple Icing
Yes, it’s time for yet another maple cake on Bready or Not! This time, a straightforward Maple Bundt Cake with Maple Icing. Delicious cake, plain and simple.
This recipe uses both maple syrup and maple flavor. I feel that both are really necessary here. Really, if you love maple, maple flavor is great to have around. It stays good forever. If you need recipes that use it, well, I think I have dozens of them here on my site.
This is the kind of cake that works well for a breakfast, brunch, or dessert. It’s deliciously versatile like that.
Bready or Not: Maple Bundt Cake with Maple Icing
Equipment
- large bundt pan (12 cups/10 inches)
- nonstick spray
- baking sheet
Ingredients
Cake
- 1 cup unsalted butter (2 sticks) room temperature
- 1 cup white sugar
- 1/2 cup pure maple syrup
- 4 large eggs room temperature
- 2 1/2 cups all-purpose flour
- 1 teaspoon baking powder
- 1/2 teaspoon sea salt
- 1/2 cup half & half or milk
- 1/2 teaspoon maple flavor
Icing
- 1 1/2 cups confectioners’ sugar
- 2 Tablespoons pure maple syrup
- 2 Tablespoons half & half or milk
Instructions
- Preheat oven at 350 degrees. Place a baking sheet inside to warm up. Apply nonstick spray to coat the interior of a large bundt pan.
- In a large mixing bowl, cream the butter until smooth. Add the sugar, scraping down the bowl a few times to make sure everything is mixed. Continue to beat until it becomes light and fluffy. Add the maple syrup followed by the eggs, one at a time.
- In another bowl, combine flour, baking powder, and salt. Gradually add the dry ingredients to the main bowl, interspersing it with the addition of the half & half. Add the maple flavor. Once everything is added, scrape the bottom of the bowl.
- Scoop the batter into the prepared bundt pan. Smooth the top with the back of a spoon.
- Place the bundt pan atop the hot baking sheet. Bake for 1 hour to 1 hour and 10 minutes, until a toothpick plunged into the middle of the cake comes out clean.
- Let cake rest in pan for 20 minutes, then invert it onto a rack to cool completely.
- Make the glaze by combining the three ingredients to form a thick texture. Drizzle over the top of the cooled cake.
- Store cake under a cake dome or other cover. Individual slices can be wrapped in plastic for transport or frozen for later.
OM NOM NOM!
Bready or Not: Apples and Honey Cake
Yes, yet another delicious version of apple cake. This Apples and Honey Cake uses apple butter, giving it a darker, moister crumb and a deeper infusion of spices.

This is truly a wonderful breakfast cake or a portable snack cake to tote along to work on school. It’s not messy to eat, and it’s refreshing and filling.

Note that, because of the apple butter, the top is dark in color, so don’t use the coloration to judge doneness in the oven. Rely on the good old toothpick test in the middle.

Bready or Not: Apples and Honey Cake
Equipment
- 9×9 pan
- nonstick spray
Ingredients
- 2 medium baking apples such as Honeycrisp or Cortland
- 1 cup olive oil
- 1 cup white sugar
- 3/4 cup apple butter
- 1/2 cup honey
- 1 teaspoon vanilla extract
- 2 large eggs room temperature
- 2 1/4 cups all-purpose flour
- 1 teaspoon ground cinnamon
- 1 teaspoon ground nutmeg
- 1 teaspoon kosher salt
- 1/2 teaspoon baking soda
- 1/2 teaspoon baking powder
Instructions
- Preheat oven at 350 degrees. Line a 9-inch square pan with foil and apply nonstick spray or butter.
- Peel and dice up the apples. Set aside.
- In a large bowl, whisk together the olive oil, sugar, apple butter, honey, vanilla, and eggs, creating a smooth mixture. Stir in the flour, cinnamon, nutmeg, salt, baking soda, and baking powder. Scrape the bottom of the bowl to make sure everything is combined. Fold in the apples.
- Pour the batter into the prepared pan. Bake for 45 to 55 minutes, until a toothpick plunged into the middle comes out clean. Let cool completely, chilling in fridge to speed the process if desired, then use the foil to lift the cake onto a cutting board for easier slicing.
- Store in a sealed container at room temperature or in the fridge for up to 5 days. Pieces can also be individually wrapped and frozen for weeks.
OM NOM NOM!
Bready or Not Original: Maple Syrup Pie
Do you feel a change in the seasons coming? Or simply want to manifest one? I had to create a psychological autumn and winter when I lived in Arizona, and maple flavor was a big part of that. If you’re in need of some cool weather vibes about now, too, maybe this Maple Syrup Pie will help!

The recipe is pretty straightforward. The most involved process is parbaking the crust, that is, baking the raw dough to form a golden shell that won’t become a soggy mess once it has a wet filling.
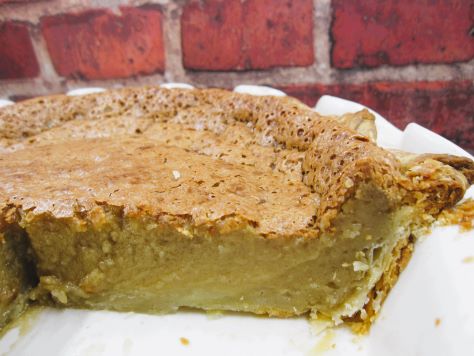
The filling itself comes together quickly in a blender. Mine puffed a LOT in the oven and then dropped down again once the pie cooled.

This is a great pie to make for a treat any time of year, but it would be especially nice for Thanksgiving or at a holiday celebration.
Bready or Not Original: Maple Syrup Pie
Equipment
- baking pan
- aluminum foil or parchment paper
- pie weights
- blender
Ingredients
- 1/4 cup all-purpose flour plus more for work surface
- raw pie dough for one crust or store-bought pie crust
- 1 1/4 cups dark maple syrup
- 1/2 cup unsalted butter (1 stick) melted
- 1/2 cup heavy cream room temperature
- 1/2 cup brown sugar packed
- 3 large eggs room temperature
- 1 1/2 teaspoons pure vanilla extract
- 1/2 teaspoon kosher salt
- canned whipped topping or Cool Whip for top
Instructions
- Place oven racks at the middle and bottom positions. Preheat oven at 375 degrees.
- If working with unshaped pie dough, use some flour on a clean surface to roll out dough to 12 inches. Place it in a 9-inch pie plate and shape to fit, crimping the crust at the rim. Prick the bottom of the crust all over with a fork. Freeze crust for 20 minutes.
- Set out a baking sheet. Line with aluminum foil.
- Line the crust with foil or parchment paper. Fill interior with pie weights, pressing in to make sure there are no gaps along the sides.
- Set pie crust on baking sheet. Bake it on bottom rack for 20 minutes. Carefully use foil or parchment to lift out pie weights onto another baking sheet or a large bowl. Bake crust again until the edges are golden brown and the bottom is dry, 5 to 10 minutes.
- Set the crust to cool on a rack while continuing to make the filling.
- Reduce oven temperature to 350.
- In a blender, place the flour, maple syrup, butter, heavy cream, brown sugar, eggs, vanilla, and salt. Blend on high until the contents are smooth. Pour into pie crust.
- Bake on middle rack in oven for 40 to 50 minutes; the filling should be puffed with only a slight jiggle in the middle. Cool on a rack.
- Store at room temperature, covered with foil. Serve with a dollop of whipped cream or Cool Whip on top. Keeps for at least 4 days.
