


Bready or Not Original: No-Bake Peanut Butter Bars
When you need a dessert in a hurry, these delicious No-Bake Peanut Butter Bars are the way to go.
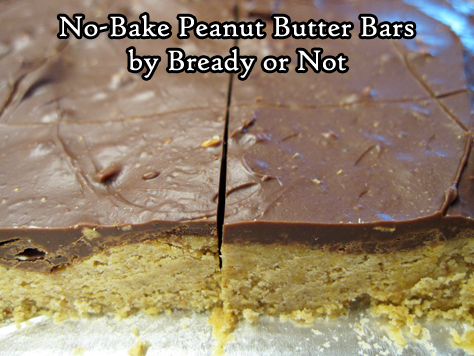
I especially enjoy this recipe because it doesn’t involve the oven, which is a wonderful thing during Arizona summers.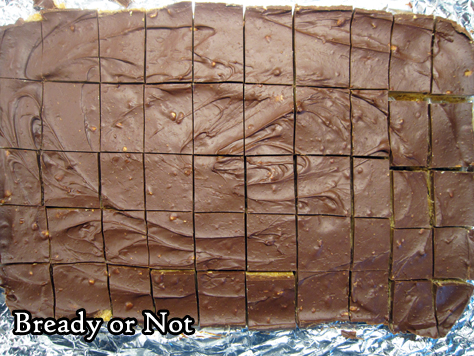
These bars come together in minutes thanks to a microwave, and they only need a few hours to set. You end up with an entire casserole dish of candy bars. Yum.
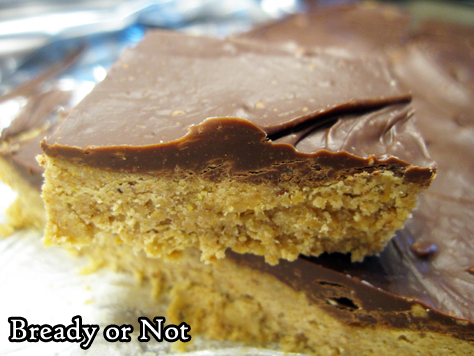
Use crunchy or creamy peanut butter. I used a jar from Trader Joe’s that had flaxseeds mixed in, and my son didn’t like it. This recipe gave me a way to use it up by sending the result with my husband to work!
This would be an easy recipe to dress up, too. Add sprinkles, nuts, or cacao nibs atop the chocolate. Have fun with it!
Bready or Not Original: No-Bake Peanut Butter Bars
Equipment
- 13x9 pan
- large microwave-safe bowl
- uneven spatula
Ingredients
Bars
- 2 cups peanut butter crunchy or smooth
- 1 cup unsalted butter 2 sticks
- 2 cups graham cracker crumbs
- 2 cups confectioners' sugar
Ganache
- 1 1/2 cups chocolate chips semisweet, dark, milk, or a mix
- 1/4 cup peanut butter crunchy or smooth
Instructions
- Line a 13x9 pan with foil and apply nonstick spray or butter.
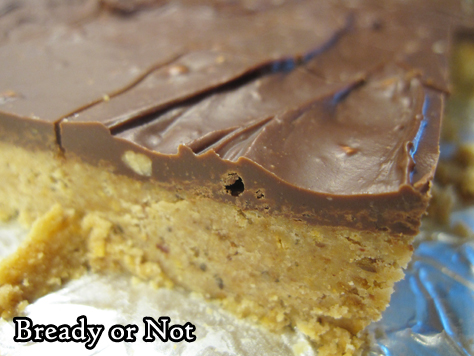
- In a large microwave-safe bowl, melt together the peanut butter and butter by zapping in short increments and stirring well between each pass. Once they mix together, stir in the graham cracker crumbs and confectioners' sugar. Spread the mixture into the prepared pan. Use a hands or maybe a piece of waxed paper and a heavy glass to compress the layer as much as possible.
- Use the same microwave-safe bowl to bowl for the chocolate chips and peanut butter, again zapping in brief increments and stirring well between each burst. Once they can mix together smoothly, dump dollops atop the layer in the pan. Use an uneven spatula to even out the chocolate to the edges.
- Chill in the fridge for at least 2 hours.
- Use the foil to lift the contents onto a cutting board. Let sit for about 10 minutes, enough time to soften the chocolate so that it doesn't shatter when sliced. Use a long knife or sharp bench knife to cut bars. If desired, cut off edges first to produce neater pieces to share.
- Store bars in a sealed container in the fridge with waxed paper between the layers. Keeps for days.
OM NOM NOM!
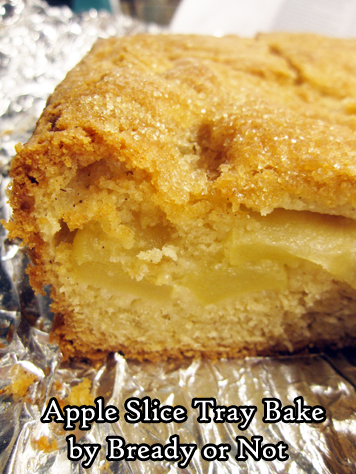
Bready or Not: Apple Slice Tray Bake
This Apple Slice Tray Bake would simply be an Apple Cake to most Americans. Whatever you call it, it’s packed with apples and delicious.
This is third consecutive recipe I’ve modified from the Bake from Scratch Magazine July/August 2020 Ireland-themed issue. I still have a few more things I want to try in the coming months, too!

I’ve found that French, Irish, and British apple cake recipes tend to be lighter on sugar and spices than typical American recipes. The focus is really on the apples.
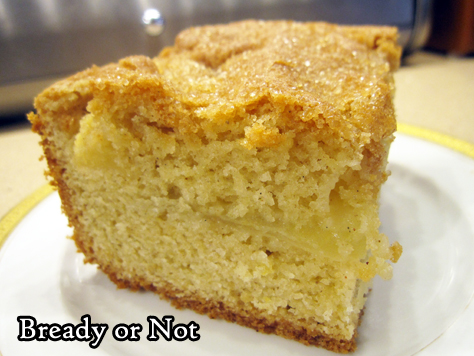
I used Honeycrisps here, which are one of my favorite apples to eat outright or bake with! Two big apples will work.
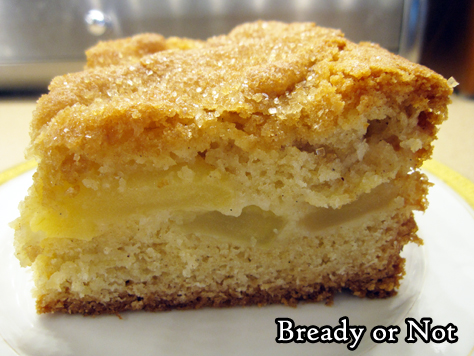
This bakes up light, lofty, and cakey, with a sugar-crusted top and a lovely flavor of apples throughout. The pieces freeze and thaw very well, too, meaning you can enjoy this like it is fresh but spread over days or weeks!
Bready or Not: Apple Slice Tray Bake
Equipment
- 9×9 baking pan
- uneven spatula
Ingredients
Apple layer:
- 2 large baking apples Honeycrisp work well
- 1 Tablespoon lemon juice
- 1 Tablespoon white sugar
Cake:
- 1 1/4 cups unsalted butter (2 and a half sticks) room temperature
- 1 1/2 cups white sugar
- 4 large eggs room temperature
- 1 1/2 teaspoons vanilla bean paste or substitute vanilla extract
- 3 cups all-purpose flour
- 3/4 teaspoon salt
- 4 1/2 teaspoons baking powder
- 1/2 teaspoon cinnamon
- 1/8 teaspoon allspice
- 2 Tablespoons turbinado sugar
Instructions
- Preheat oven at 350-degrees. Line a 9×9 pan with foil and apply nonstick spray.
- Peel and core the apples, then slice to about 1/4-inch thickness. Place slices in a large bowl and toss them with lemon juice and 1 Tablespoon white sugar, until apples are coated. Set aside.
- In a big mixing bowl, beat butter and white sugar for several minutes, until blended and fluffy. Add eggs, one at a time, mixing in well and scraping bowl afterward. Add vanilla. The batter may look curdled, but that’s okay.
- In a separate bowl, stir together flour, salt, baking powder, cinnamon, and allspice. Gradually mix the dry ingredients into the wet.
- Spread about half of the batter into the pan, using an uneven spatula to form an even layer. Arrange apple slices, flat side down, to cover the batter entirely. Top with the remaining batter, using the uneven spatula again to even out as much as possible. Sprinkle turbinado sugar all over the top.
- Bake until the middle of the cake passes the toothpick test, which will be from 1 hour to 1 hour and 15 minutes. Cover pan with foil about halfway through to prevent it from browning too much.
- Let cool in pan for an least 10 minutes, then use foil to lift cake onto a cutting board. Slice into squares. Tastes best warmed and at room temperature. Pieces can also be shrouded in plastic wrap and frozen for later enjoyment.
OM NOM NOM!
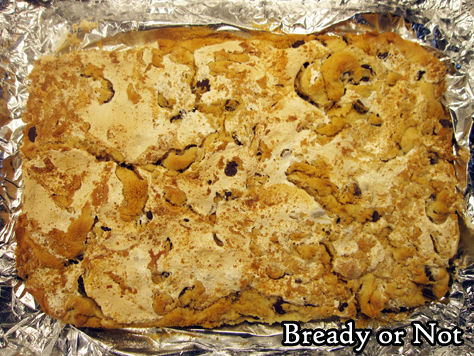
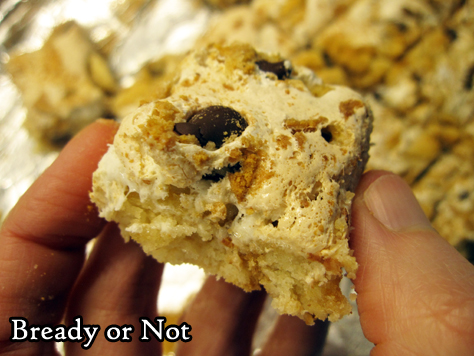
Bready or Not Original: S’mores Cake Mix Bars
Cake mix is fantastic ingredient to keep in the pantry for a quick-fix dessert. It’s easy to doctor into something extraordinary, such as with these S’mores Cake Mix Bars.
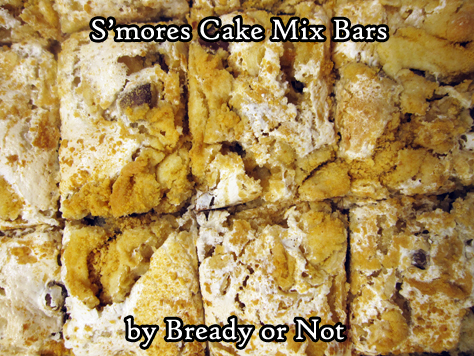
This is a treat that doesn’t taste like cake mix at the end. It’s just sweet and wonderful, courtesy of the lovely combination of ingredients.
I used ready-made graham crackers crumbs here, but really, you could probably use various kind of vanilla cookies, smashed, to mix in. Vanilla wafers or even Golden Oreos would be good substitutes.
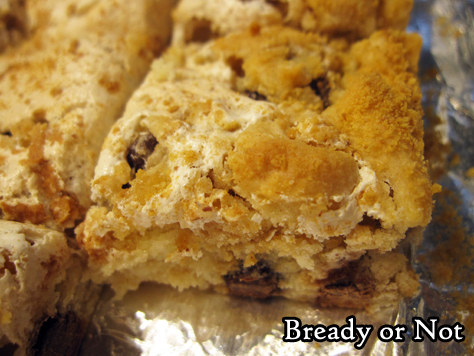
I love bar recipes like this where ingredients are swirled together at the end. There is something visually delightful about that marbled look.
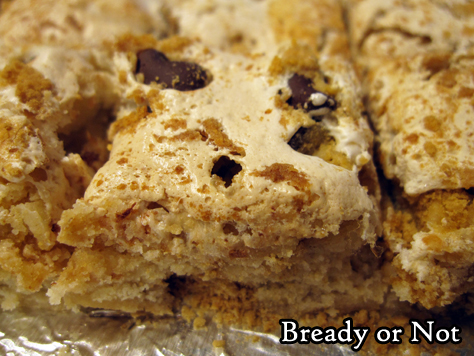
Be sure that when these bars are sliced, they are stores with waxed paper between the layers. Marshmallow makes things a bit sticky! And delicious.
Bready or Not Original: S’mores Cake Mix Bars
Equipment
- 9×13 pan
- waxed paper
Ingredients
- 1 box white cake mix or yellow cake mix or French Vanilla
- 1/2 cup unsalted butter 1 stick, melted
- 1 teaspoon vanilla extract
- 2 eggs room temperature
- 1 cup semisweet chocolate chips
- 7 ounce marshmallow fluff jar
- 1/2 cup graham cracker crumbs
Instructions
- Preheat oven at 350-degrees. Line a 9×13 casserole pan with foil and apply nonstick spray or butter.
- In a large bowl, mix together the cake mix, butter, vanilla extract, and eggs until no dry crumbs remain. Fold in the chocolate chips.
- Pour batter into the prepared pan and even out surface. Add the graham cracker crumbs in little piles scattered across the top. Use a butter knife to partially swirl the crumbs into the dough. Add dollops of marshmallow fluff across the top. Again, swirl the marshmallow into the dough, coating it with graham crackers in the process. Don’t combine everything too much–there should still be visible swirls and varied textures.
- Bake at 350-degrees for 20 to 25 minutes, until edges are golden and contents look set.
- Completely cool at room temperature or speed process in the fridge. Use foil to lift the contents onto a cutting board. Slice into bars. Store in a sealed container with waxed paper between the stacked layers.
OM NOM NOM!
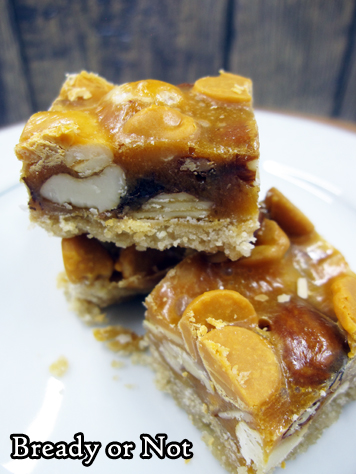
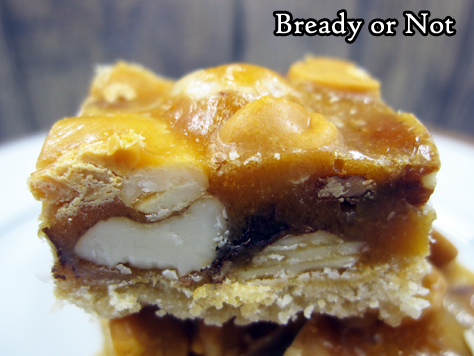
Bready or Not Original: Mixed Nut Bars
This has been a nutty year. Time to make it nutty in a delicious way with these Mixed Nut Bars.
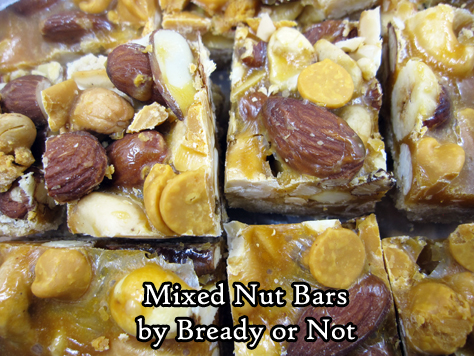
The amount of nuts here is the equivalent of the can size found in many American stores, but I buy my nuts in bulk. (I’m cheap like that.)
Use whatever combination of nuts you like. I would recommend having at least two kinds mixed in, to make it fun. Really, throw in what you like.
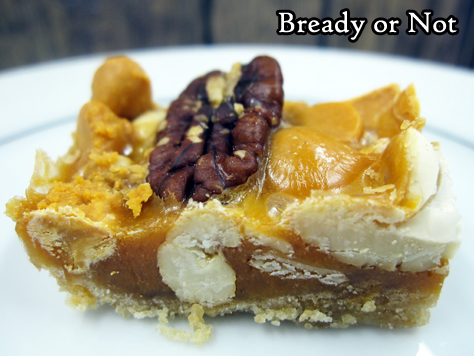
If you’ve followed Bready or Not for a while, you know I love caramel chips. They are awesome in this recipe! They make these bars sweet without it being overkill.
Make this to share with numerous folks. You essentially end up with a 13×9 pan of little candy bars. I imagine that they will keep well for days or even a week, but I can’t testify as to how long. When my husband took these to his work (in those halcyon days when that was allowed), they were gone in hours.
Bready or Not Original: Mixed Nut Bars
Equipment
- 13x9 pan
Ingredients
Dough
- 1 1/2 cups all-purpose flour
- 3/4 cup brown sugar packed
- 1/4 teaspoon salt
- 1/2 cup unsalted butter 1 stick
Nutty layer
- 11 1/2 ounces mixed nuts
- 1 cup caramel chips plus extra 1/2 cup for top, optional
- 2 Tablespoons unsalted butter
- 1/2 cup light corn syrup
- 1/2 teaspoon vanilla extract
Instructions
- Preheat oven at 350-degrees. Line a 13x9 pan with aluminum foil and apply nonstick spray.
- In a small bowl, stir together flour, sugar, and salt. Cut in the cube of butter until it resembles coarse crumbs. Dump into prepared pan and compress into an even layer; a strip of waxed paper and a heavy glass make this easier.
- Bake base layer for 10 to 12 minutes, until it looks set. Sprinkle nuts over the baked dough.
- In the microwave, melt 1 cup caramel chips with the 2 Tablespoons butter by cooking for 20 second increments and stirring well between each pass, until smooth. Stir in corn syrup and vanilla extract. Pour over the nuts to cover as much as possible.
- Bake for 12 minutes. If adding extra caramel chips, do so now, covering any thinner areas atop crust. Bake another 5 minutes.
- Cool completely at room temperature. Use foil sling to lift contents onto a large cutting board. Slice into bars.
- Store at room temperature in sealed containers.
OM NOM NOM!
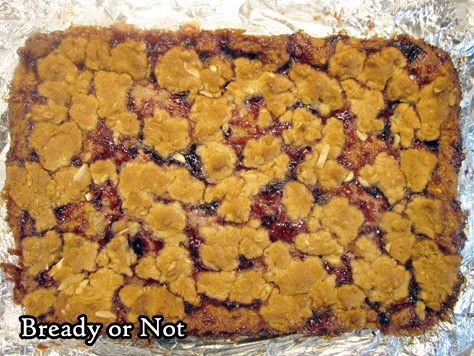
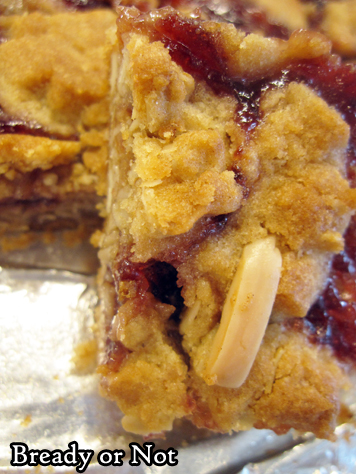
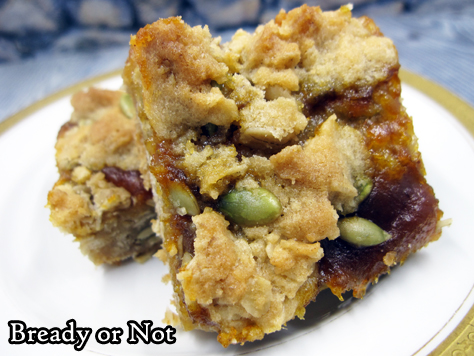
Bready or Not Original: Chewy Filled Bars
I present to you my Chewy Filled Bars: a versatile recipe that can use any number of fruit preserves, fruit butters, or other sweet filling, combined with different nuts or seeds, all to unique, delicious result.
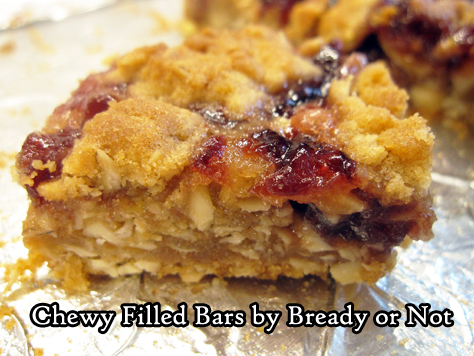
These pictures display the recipe using Sprouts Cherry Preserves (with slivered almonds and almond extract) and Sprouts Maple Pumpkin Butter (with pepitas and almond extract).
However, I also made the same recipe using Trader Joe’s cinnamon bun filling (with chopped pecans and vanilla extract) and Apple Cider Spread (with chopped walnuts and vanilla extract). Every single version was awesome.
The jarred filling I used varied from 12 to 14 ounces. All worked well, though the Cinnamon Bun Filling required a 40 minute bake to set. I liked mixing in different nuts or seeds to pair with the filling, but you could also omit that ingredient completely, if desired.
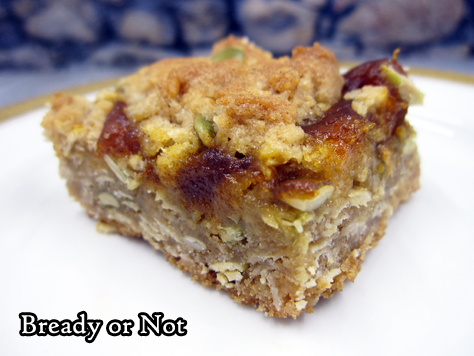
No matter the mix-ins, the result is a pleasantly thick, chewy bar that is just sweet enough.

Bready or Not Original: Chewy Filled Bars
Equipment
- 13x9 pan
Ingredients
- 1 cup unsalted butter room temperature
- 2 cups brown sugar packed
- 2 teaspoons baking powder
- 1 large egg
- 1 teaspoon almond extract or substitute vanilla extract
- 2 cups all-purpose flour
- 2 cups old-fashioned rolled oats
- 1/2 cup slivered almonds or sliced almonds or substitute other nuts or seeds
- 12 to 14 ounce fruit preserves or fruit butter or other sweet filling; possibilities include cherry preserves, pumpkin butter, cinnamon bun filling, etc
Instructions
- Preheat oven at 350-degrees. Line a 13x9 pan with aluminum foil and apply nonstick spray or butter.
- In a large bowl, beat butter until creamy. Add brown sugar and baking powder. Follow up with egg and almond extract. Gradually mix in flour, oats, and sliced almonds.
- Set aside 1 cup of dough. Press the rest into the bottom of the prepared pan. A piece of waxed paper and heavy glass will help to compress it into a form, even layer. Spread preserves over top. Crumble the reserved dough over the fruit.
- Bake for 30 to 35 minutes, until top is lightly brown and no longer wobbly in the middle. Completely cool at room temperature, speeding process in the fridge, if desired. Use foil to lift contents onto cutting board to slice up.
- Store in sealed containers with waxed paper or parchment between the layers. Keeps at room temperature for days, and can also be frozen for weeks.
OM NOM NOM!
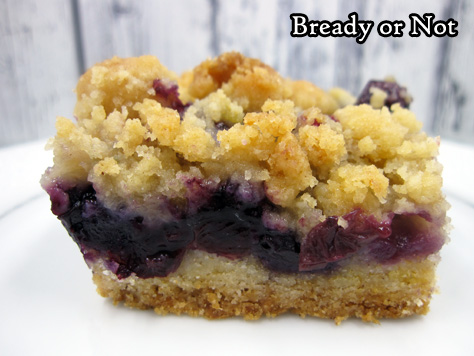
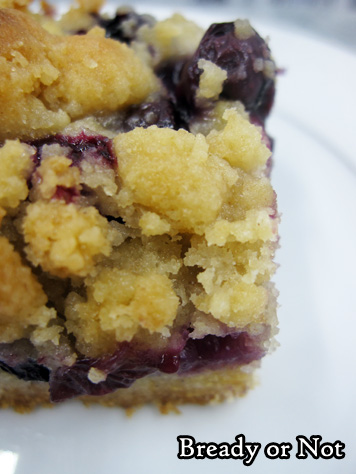
Bready or Not Original: Blueberry Crumble Bars
Nothing says summer to me quite like blueberry bars, and this version has a delectable crumb topping and loads of blueberries!
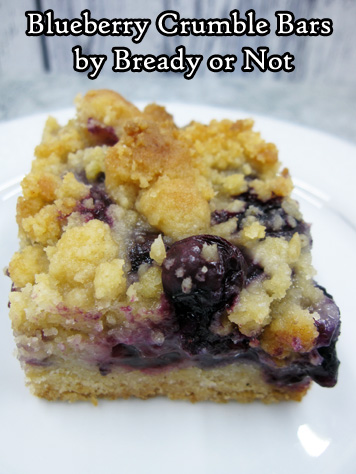
This is really the best kind of fruit and shortbread combo. The bottom and top acquire a buttery crispness as they bake, the perfect contrast for the oozy, sweet berries.

I am frustrated when recipes only list blueberries by cup measurement, which is useless when I’m in the grocery store trying to figure out how much to buy in pints or ounces. I can say that 4 cups or 20 ounces is what you need for this recipe.
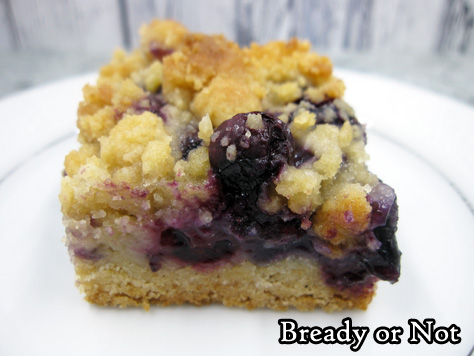
Be careful at the final stage when it’s time to slice into bars. The blueberries can stick to the foil quite a bit. Therefore, be sure to generously grease the pan prior to baking, and gently pry the foil away when ready to slice.
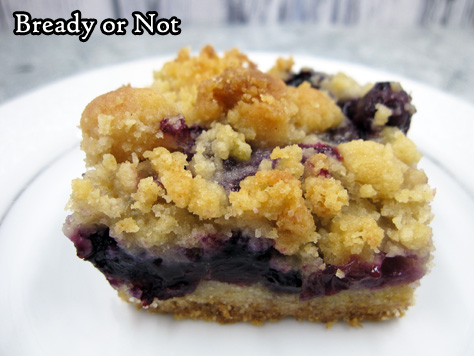
The recipe makes a full 9×13 pan, so be sure you have a lot of people present to eat them. These would be very dangerous treats to keep around when home alone, just sayin’.
Bready or Not Original: Blueberry Crumble Bars
Ingredients
- 3 cups all-purpose flour
- 1 cup white sugar divided
- 1/2 cup brown sugar packed
- 1 teaspoon baking powder
- 1/4 teaspoon salt
- pinch ground cinnamon
- 1 cup unsalted butter 2 sticks, room temperature
- 1 egg
- 3 teaspoons cornstarch
- 4 cups fresh blueberries 20 ounces
Instructions
- Preheat oven at 375-degrees. Line a 9x13 pan with foil and apply nonstick spray. Wash the blueberries and remove any stems or smashed berries, then gently blot dry with a towel.
- In a big bowl, mix together the flour, 1/2 cup white sugar, the brown sugar, and baking powder. Add the salt and cinnamon. Add the butter and mix until it forms crumbly dough.
- Pat about 2/3 of the dough into the prepared pan. A piece of waxed paper and a heavy glass will help compress it into an even layer.
- In another bowl, stir together the remaining 1/2 cup white sugar and cornstarch. Gently stir the blueberries to coat. Sprinkle the blueberries over the bottom crust, then crumble the remaining dough evenly over the top.
- Bake for 45 minutes, but check at the 30 minute point. If it's looking golden on top, cover it with foil then continue to bake.
- Cool at room temperature, then chill in fridge to make it even more cohesive to cut. Use the foil to lift the contents onto a cutting board. Carefully peel back the foil from the edges; a knife might help to hold the bars in place if the blueberry layer is being especially sticky.
- Slice into bars. Store in a sealed container in the fridge, with waxed paper between the stacked layers.
OM NOM NOM!
Follow me


