


Bready or Not Original: Cookie Butter and Jelly Bars
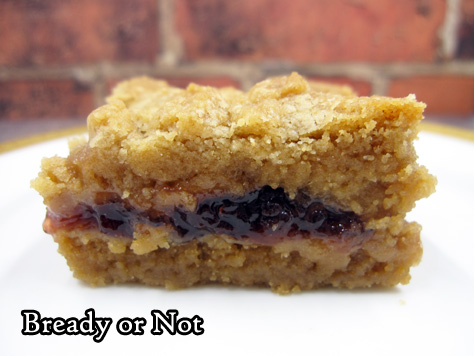
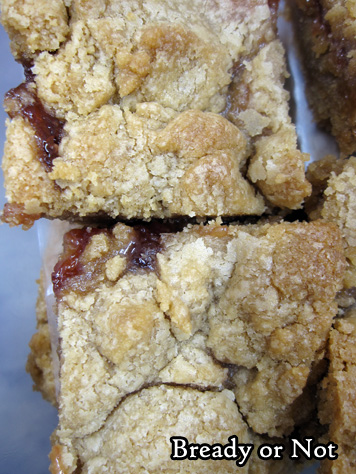
Cookie butter and Jelly Bars! These things are soft and chewy, creating a whole casserole dish-worth of luscious goodies.
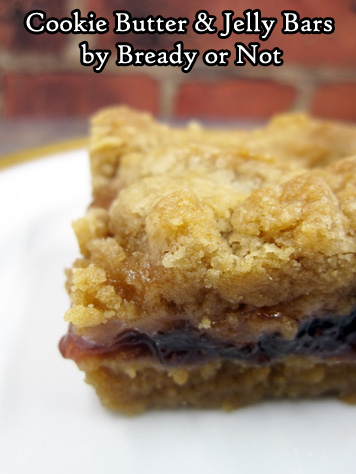
As often as I’ve advocated for cookie butter on Bready or Not, it seems people are always discovering it for the first time. Lucky you! It’s essentially pulverized cookies in spreadable form.
You can find generic versions or Biscoff brand at places like Walmart, Target, and Sprouts, and Trader Joe’s is famous for their Speculoos jars.
In these bars, cookie butter adds incredible softness and amps up the cookie flavor. That’s right, it has this weird ability to make cookies taste more like cookies.

Use whatever jelly or jam or preserves you want. Try not to spread it to the very edge, as it can be very sticky on the foil, even if it’s well-greased.
Bready or Not Original: Cookie Butter and Jelly Bars
Ingredients
- 1 cup unsalted butter 2 sticks, room temperature
- 1 1/2 cups white sugar
- 1 teaspoon vanilla extract
- 2 large eggs
- 2 cups creamy cookie butter
- 3 cups all-purpose flour
- 1 teaspoon baking powder
- 13 ounce jelly or preserves or jam, about 1 1/2 cups
Instructions
- Preheat oven at 350-degrees. Line a 13x9 baking pan with foil and apply nonstick spray or butter.
- In a big bowl, cream together butter and sugar until light and fluffy, scraping bottom of bowl as necessary. Follow up with the eggs, vanilla, and cookie butter, until blended.
- Gradually mix in the flour and baking powder.
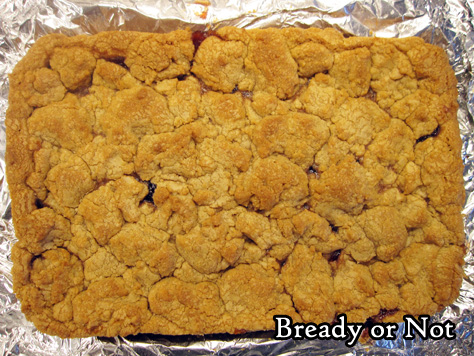
- Spread about 2/3 of the batter in the prepared pan. Spread the jelly but not quite to the edges. Dollop the remaining dough all over the top.
- Bake for 25 to 30 minutes, until the surface is golden and not jiggly, with the middle passing the toothpick test.
- Cool completely at room temperature or in the fridge. Use foil to lift contents onto a cutting board to parcel into bars. Store in a sealed container with waxed paper or parchment paper between the layers, either in the fridge or on the counter.
OM NOM NOM!
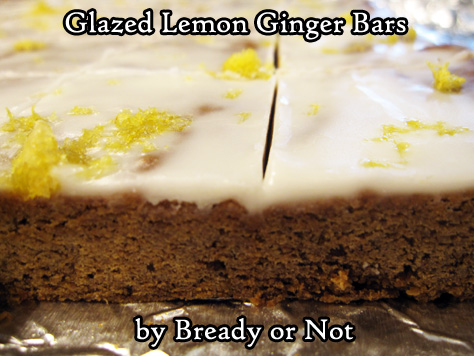
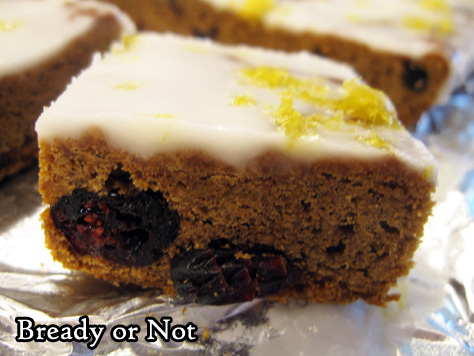
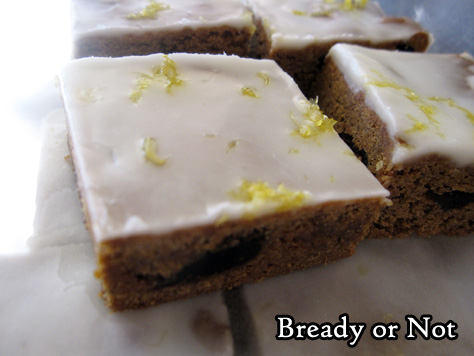
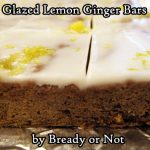
Bready or Not Original: Glazed Lemon Ginger Bars
These Glazed Lemon Ginger Bars are zippy and fresh, perfect to serve at the holidays and year-round!
I firmly believe good food should be enjoyed whenever. I suppose some people would try to classify these as a Christmassy thing because they are a kind of gingerbread bar. To that, I say NOPE.
I’m rebellious. It’s April. Ginger is an awesome spice. It should be confined to no season. Be free, ginger!
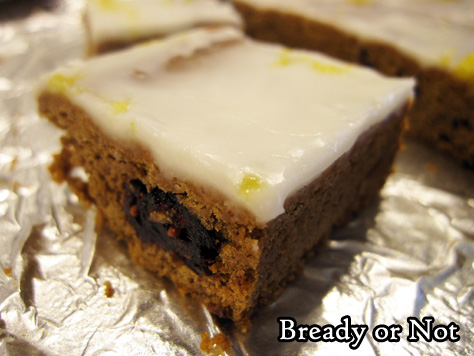
These bars aren’t all about the ginger, though. The spices here are nuanced and delicious, and the lemon plays a pretty big part in the crisp glaze.

Try to make these things at least a day ahead of when they will be served, too, as they taste even BETTER after sitting in the fridge. I say that, but they are pretty awesome while fresh, too.
This is the second entry in my April of lemon recipes. Here’s what else you can look forward to this month!
Lemon Sour Cream Bundt Cake
Glazed Lemon Ginger Bars [you are here]
Cranberry Lemon Biscotti
Cream Cheese Stuffed Lemon Bundt Cake
Lemon Frangipane
Bready or Not Original: Glazed Lemon Ginger Bars
Equipment
- 13x9 pan
Ingredients
Bars
- 10 Tablespoons unsalted butter softened
- 3/4 cup brown sugar packed
- 1/2 cup molasses
- 1 large egg
- 2 cups all-purpose flour
- 2 teaspoons ground ginger
- 1/2 teaspoon baking soda
- 1/2 teaspoon baking powder
- 1/2 teaspoon ground cinnamon
- 1/4 teaspoon salt
- 1/2 cup dried cranberries
Glaze
- 1 Tablespoon unsalted butter melted
- 1 cup confectioners' sugar plus more as needed
- 5 teaspoons lemon juice
- 3/4 teaspoon vanilla extract
- 1/2 teaspoon lemon zest finely grated
Instructions
- Preheat oven at 350-degrees. Line a 13x9 pan with aluminum foil and apply nonstick spray or butter.
- In a large bowl, cream together butter and brown sugar until light and fluffy. Add molasses and egg.
- In a separate bowl, mix together the dry ingredients: flour, ginger, baking soda, baking powder, cinnamon, and salt.
- Gradually mix dry ingredients into the wet, until just combined. Fold in the dried cranberries.
- Pour batter into prepared pan and even out. Bake for 20 to 25 minutes, until middle passes toothpick test. Cool completely.
- To make the glaze, in a small bowl melt the butter. Add the confectioners' sugar, lemon juice, and vanilla extract. Stir to create a thick, spreadable consistency, adding more sugar if needed to thicken or more lemon juice or water to thin. Spread atop bars. Sprinkle zest over the top. Let glaze set before cutting.
- Store bars sliced, with waxed paper between layers, in sealed container in fridge. Note that these bars taste even better after chilling for a day! They keep well for several days, too.
OM NOM NOM!
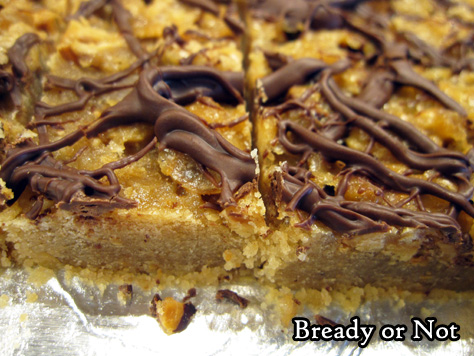
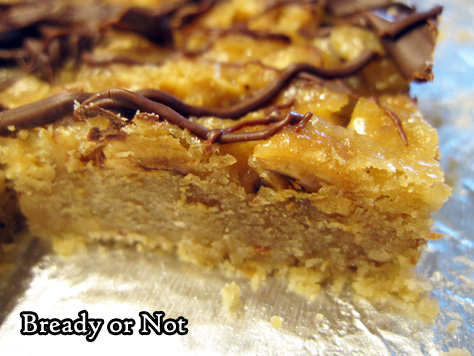
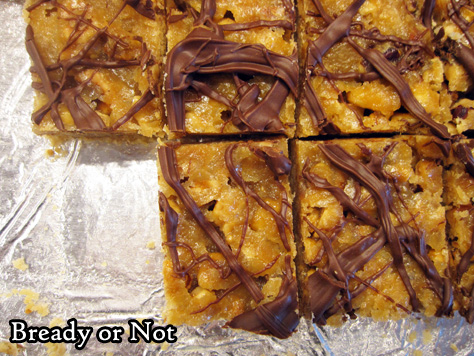
Bready or Not Original: Hazelnut Praline Bars
These delicious Hazelnut Praline Bars are a lot like praline candy, but it fantastic bar form.
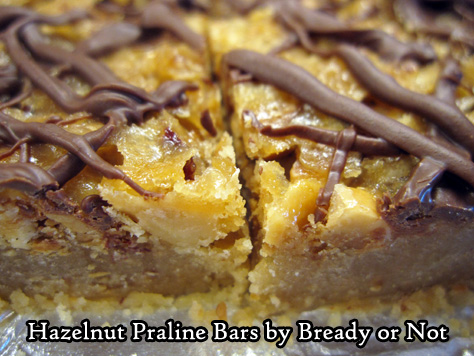
The top of these bars caramelizes. These things are very sweet, with the nuts rendered softly crunchy. The combination of textures is just divine.
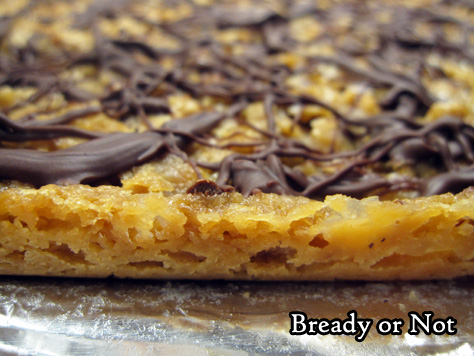
The slight drizzle of chocolate on top is the perfect accent, too. Funny how the tiniest bit of chocolate adds so much in terms of flavor.
A 6 ounce bag of hazelnuts will be the perfect amount for both the crust and nut layer, too.
Can you use other nuts? I haven’t tried it in this recipe, but why not? Praline candy traditionally uses pecans, after all. I bet using other nuts–or a combo–would be fine.
Hazelnuts are sure delicious and fun, though!
Bready or Not Original: Hazelnut Praline Bars
Equipment
- 13x9 pan
- food processor
- small saucepan
Ingredients
Crust
- 1/2 cup hazelnuts
- 1 cup brown sugar packed
- 3/4 cup unsalted butter softened, 1 1/2 sticks
- 2 cups all-purpose flour
Nut Layer
- 1 cup hazelnuts
- 13 Tablespoons unsalted butter
- 1/2 cup brown sugar packed
Topping
- 1/2 cup milk chocolate chips
Instructions
- Preheat oven at 350-degrees. Line a 13x9-inch pan with foil and apply nonstick spray or butter.
- Place the 1/2 cup hazelnuts in a food processor. Process until finely ground.
- In a medium bowl, beat together the next two crust ingredients, the brown sugar and butter. Add the flour and ground hazelnuts. Press crust into pan; a piece of wax paper and a heavy glass makes it easy to form an evenly compressed layer. Bake for 10 minutes.
- In the meantime, put the remaining hazelnuts in the food processor and give them a quick pulse, just to coarsely chop them.
- As soon as the crust comes out, sprinkle the hazelnuts over the top. In a small saucepan, warm the butter and brown sugar to boiling at medium heat. Boil for a minute. Pour over hazelnuts.
- Bake for 15 to 18 minutes, until edges are bubbling and center is set. Cool completely.
- In a small microwave-safe bowl, zap the chocolate in 25 second bursts, stirring well between each pass, until it can be stirred smooth. Use a fork to drizzle the chocolate over the bars.
- Chill in fridge for 30 minutes, or until chocolate is set. Use the foil to lift contents onto a cutting board and slice into bars.
- Store in a sealed container at room temperature or in the fridge with waxed paper or parchment between the layers.
OM NOM NOM!
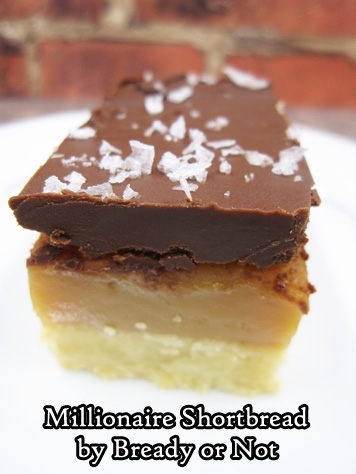
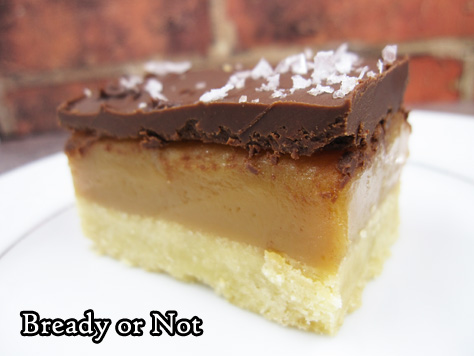
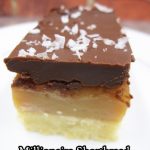
Bready or Not Original: Millionaire Shortbread
Millionaire Shortbread. Gorgeous. Delicious. A little bit of extra effort to make, but SO WORTH IT.
I wanted to concoct the best-possible Millionaire Shortbread. This involved strenuous testing of recipes. Much baking. Much reliance on test subjects (husband and his co-workers).
The resulting feedback? I wrote it down.
“This shortbread is enjoyed, and feared.”
“To call them excellent would be an insult to your wife.”
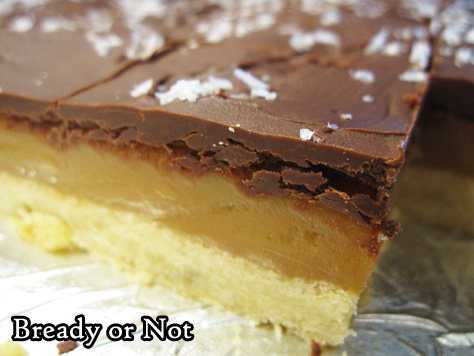
So yeah. The test subjects approved. I personally would rank this up there with my best all-time bakes, because it really combines the best of everything.
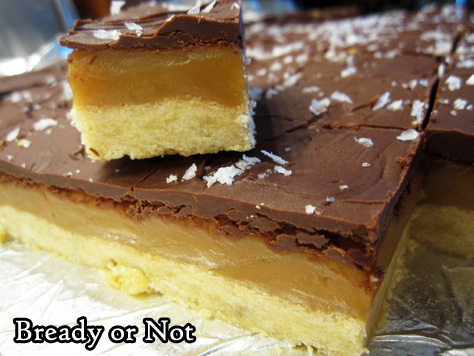
The shortbread layer is firm yet soft. THEN THAT CARAMEL. It is thick, luscious, and sweet. The chocolate provides the perfect balance, especially with the help of some Maldon salt flakes.
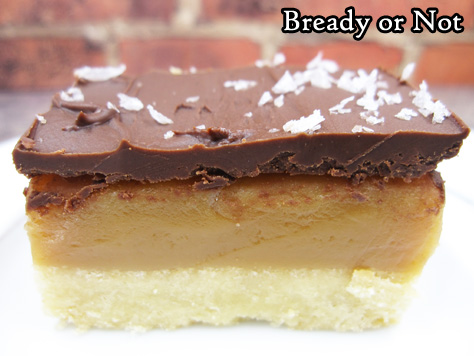
Do note that the ganache needs to be semisweet chocolate, or an even darker variety. Milk chocolate is just too sweet against that thick caramel. I say that, and I usually prefer milk chocolate.
I wish I could say how long this keeps in the fridge, but my test subjects were a bit too voracious to provide perspective on that point.
Bready or Not Original: Millionaire Shortbread
Ingredients
Shortbread Crust
- 1 cup unsalted butter 2 cubes, softened
- 1/3 cup white sugar
- 1/3 cup light brown sugar packed
- 1 egg yolk
- 3/4 teaspoon vanilla extract
- 2 1/4 cups all-purpose flour
- 1/2 teaspoon salt
Caramel
- 2 14-ounce cans sweetened condensed milk
- 14 Tablespoons unsalted butter
- 1 cup light brown sugar packed
- 1/3 cup light corn syrup
- 1 teaspoon vanilla extract
- 1/4 teaspoon salt
Chocolate Ganache
- 11 ounces semisweet chocolate chips
- 4 Tablespoons unsalted butter 1/2 stick
- Maldon sea salt flakes for top, optional
Instructions
Shortbread base
- Preheat oven at 350-degrees. Line a 13x9 baking pan with aluminum foil and apply nonstick spray or butter.
- In a large bowl, beat butter until creamy. Add both sugars and beat until light and fluffy. Follow up with the egg yolk and vanilla extract. Scrape bottom of bowl to make sure everything is incorporated.
- Gradually work in flour along with the salt. Don't overmix. It should still be crumbly. Drop dough into prepared pan and compress into an even layer. (A piece of waxed paper and a heavy glass make this easier.)
- Bake shortbread layer for 20 to 25 minutes, until edges are turning golden brown. Set pan aside to cool while the next layer is made.
Caramel
- In a large saucepan at medium heat, stir together the condensed milk, butter, brown sugar, and corn syrup. Stir constantly as it rises to a boil. Immediately drop heat to low, and continue to stir nonstop for about 10 to 15 minutes, until mixture turns a deep caramel color and thickens up; watch out, the caramel can spit out of the pan at times!
- Remove pot from heat and promptly stir in vanilla extract and salt.
- Pour caramel over the shortbread, using an uneven spatula or knife if needed to smooth it into an even layer. Cool pan for several hours until it reaches room temperature, or set in fridge to chill.
Ganache topping
- In a microwave-safe bowl (or, alternatively, on the stove top in a pot) melt together the chocolate chips and butter. Once it can be stirred smooth, pour over the caramel. Spread out into an even layer. If desired, sprinkle Maldon sea salt flakes over the top.
- Chill in fridge to let chocolate harden for at least 30 minutes. Use foil to lift contents of pan onto a cutting board. Let chocolate warm again, just a touch, perhaps for 5 or 10 minutes, before slicing into bars (otherwise, the chocolate will crack rather than be sliced through).
- Store bars in fridge with waxed paper between layers. Keeps for days.
OM NOM NOM!
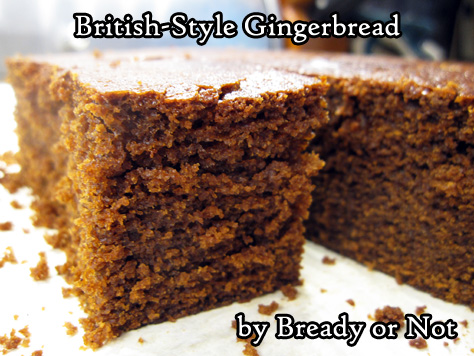
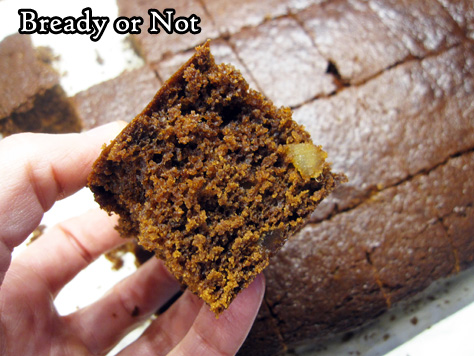
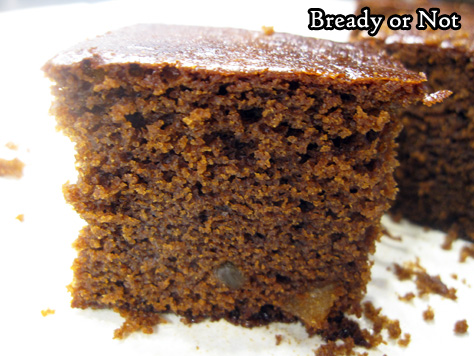
Bready or Not: British-Style Gingerbread
I adore famed British baker Mary Berry, one of the original judges on the Great British Bake Off. This British-Style Gingerbread recipe is modified from her cookbook Cooking with Mary Berry.
She has published a ton of cookbooks in the UK, but this particular cookbook has the measurements translated to American standards! Click on the picture below to order a copy for yourself–but maybe try my take on one of her recipes first, as it’s a great example of what you’ll find.

I’ve eaten and baked a number of American-style gingerbread recipe. This one is different in a lot of ways. First of all, the cooking method. It’s prepared on the stovetop, then baked.
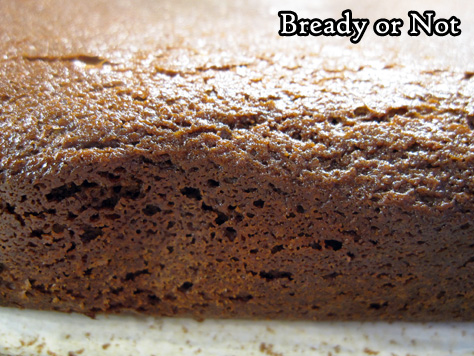
The end result is tall, spongy, and cakey, with a solid ginger kick. And like chocolate recipes, this gingerbread actually improves after a day, as the flavors become deeper and more complex. Almost coffee-like, though it contains no coffee.
Oh yeah, and it’s REALLY REALLY GOOD.
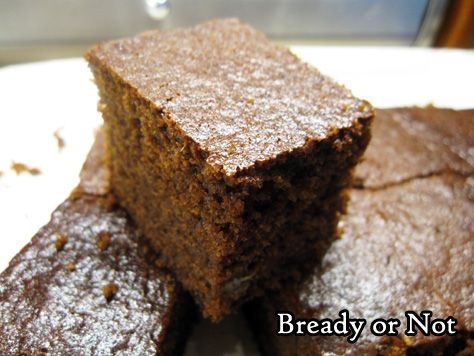
The sporadic candied ginger pieces throughout add vivid pops of flavor, in an already ginger-filled cake.
This would be especially good paired with tea, coffee, or a good, stout beer (Guinness, in particular, comes to mind).
Bready or Not: British-Style Gingerbread
Equipment
- 9x13 casserole pan
Ingredients
- 1 cup unsalted butter 2 sticks
- 1 cup brown sugar light or dark, packed
- 1 cup molasses
- 3 cups all-purpose flour
- 5 teaspoons ground ginger
- 2 teaspoons ground cinnamon
- 2 large eggs
- 3 pieces candied ginger coarsely chopped
- 1 1/4 cups milk
- 2 teaspoons baking soda
Instructions
- Preheat oven at 325-degrees. Line baking pan with aluminum and apply butter or nonstick spray.
- In a large pot, warm the butter, sugar, and molasses until it is combined and smooth. Set aside to cool.
- Mix the flour and spices into the big pot, followed by the eggs and the candied ginger pieces.
- In a small saucepan, warm the milk--don't boil! Add the baking soda. Pour into the gingerbread mixture and mix together.
- Pour everything into the prepared pan. Bake for 1 hour. When done, it will be spongy to the touch and pass the toothpick test in the middle.
- Let cool in pan, either at room temperature or in the fridge. Once cool, use the foil to lift onto a cutting board and slice into bars.
- Store in a covered dish with waxed paper or parchment between the layers. Flavor will grow deeper and more complex over the next day.
OM NOM NOM!
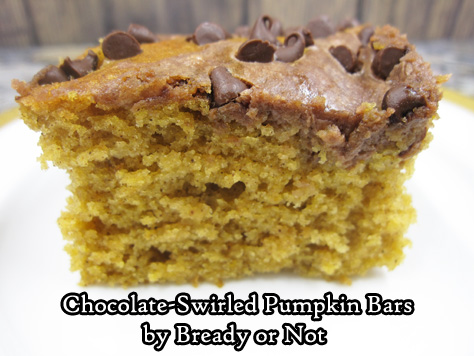
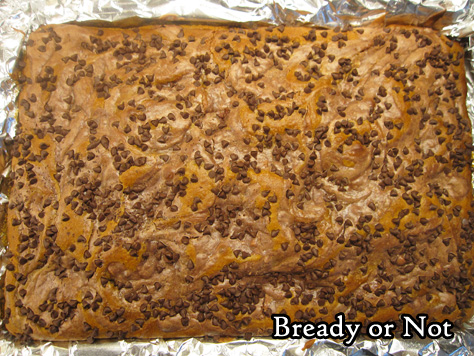
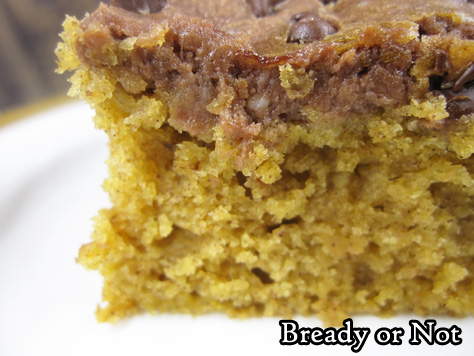
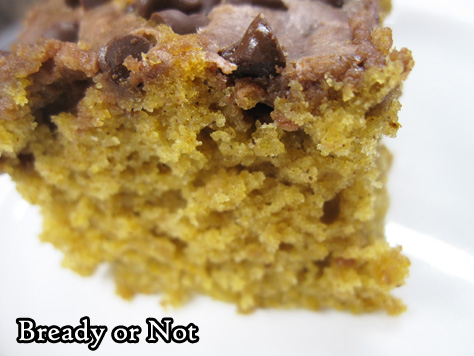
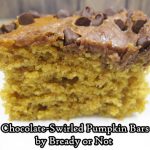
Bready or Not: Chocolate-Swirled Pumpkin Bars
Chocolate-Swirled Pumpkin Bars. Because I will never feature enough iterations of this perfect pairing.
Yeah, every year I do a new take (or a couple) on this lovely Voltron-saving-the-galaxy team-up between pumpkin and chocolate. You know why? Because it’s AWESOME. Like Voltron. With a lot less death and destruction.
This recipe gets extra oomph from cream cheese, but by no means do these taste like cheesecake bars. Here, the cream cheese adds umami richness rather than straight-out cream cheese flavor.

I was amazed by how thick these bars ended up. Really, these are more akin to cake than standard blondies or brownies.
Bake these up and brighten someone’s day. You don’t need to summon up Voltron to save a person’s world. Sometimes, baked goods can do the trick.
Need more pumpkin X chocolate OTP? Check out past posts on Bready or Not!
Pumpkin Chocolate Chip Bars
Pumpkin Nutella Swirl Muffins
Triple Chocolate Pumpkin Bundt Cake
Chocolate Chip Pumpkin Shortbread
Pumpkin Chocolate Chip Bread (2 loaves)
Bready or Not: Chocolate-Swirled Pumpkin Bars
Equipment
- 15x10-x1 jelly roll pan
Ingredients
Pumpkin base layer
- 2 cups all-purpose flour
- 1 1/2 cups white sugar
- 2 teaspoons baking powder
- 2 teaspoons ground cinnamon
- 1 teaspoon baking soda
- 1/2 teaspoon salt
- 1/4 teaspoon ground cloves
- 4 eggs
- 15 ounces pumpkin puree
- 1 cup vegetable oil
Chocolate swirl
- 8 ounces cream cheese softened
- 1/3 cup white sugar
- 1 egg
- 1 Tablespoon milk
- 1/2 cup semi-sweet chocolate chips
Topping
- 1/2 cup semi-sweet chocolate chips
Instructions
Prepare the base layer
- Preheat oven at 350-degrees. Line a jelly roll pan (15x10x1) with aluminum foil, making sure the edges are covered. Add nonstick spray or grease.
- In a large bowl, stir together the flour, sugar, baking powder, cinnamon, baking soda, salt, and cloves. Add the four eggs, the pumpkin, and oil. Pour into the prepared pan.
Start the chocolate swirl
- Microwave 1/2 cup of chocolate chips, zapping in short increments and stirring well between each pass, until it is melted. Set aside.
- In a mixing bowl, beat the cream cheese with the sugar; it's okay if it's still a little lumpy. Follow up with the one egg, milk, and melted chocolate. Dollop the chocolate mixture atop the pumpkin batter. Use a narrow spatula or butter knife to swirl layers together in a marbled effect. Sprinkle the remaining chocolate chips on top.
- Bake 25 to 30 minutes, until it looks puffed and the middle passes the toothpick test. Cool on a rack for at least an hour, then chill in fridge before cutting. This will make it easier to cut.
- Use foil to lift onto a cutting board. Slice into bars then store chilled in a sealed container with waxed paper between stacked layers.
OM NOM NOM!
Follow me


