


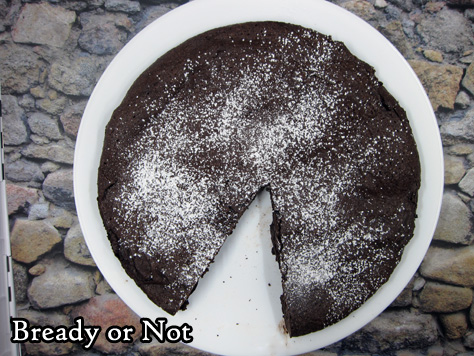
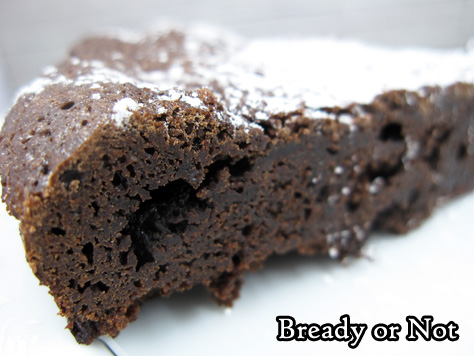
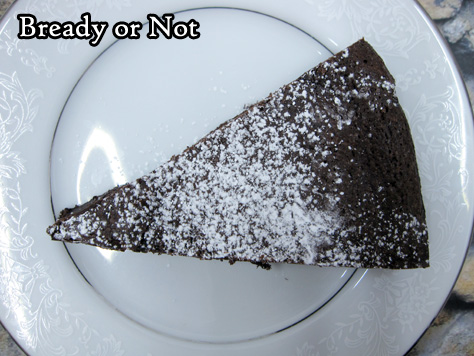
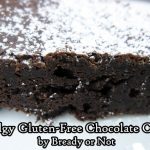
Bready or Not: Fudgy Chocolate Gluten-Free Cake
This incredible Fudgy Chocolate Cake is like a great big grown-up brownie.
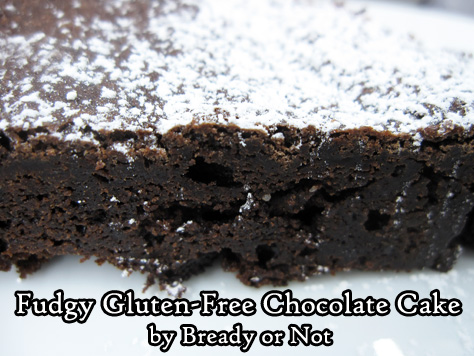
While this can’t be said to be healthy, it IS gluten free, so makes for a wonderful treat for people with that dietary restriction.
It also keeps very well. I sliced it up and kept pieces stored in the fridge for over a week. They never dried out or lost flavor.
Even better, this cake can be frozen to last longer. Freeze slices on waxed paper and keep stored in a plastic container or freezer bag. Defrost in fridge when you want to indulge!

This cake is delicious by itself, but you could easily dress it up with fresh strawberries, cherries, or raspberries, and/or a scoop of vanilla ice cream–all of which are gluten-free as well, of course.
Modified from Allrecipes Magazine February/March 2015.
Bready or Not: Fudgy Chocolate Gluten-Free Cake
Ingredients
- 1/2 cup cocoa powder sifted, plus more to dust pan
- 4 ounces semisweet chocolate chips
- 1/2 cup unsalted butter
- 3/4 cup white sugar
- 3 eggs beaten
- 1 teaspoon vanilla extract
- confectioners' sugar for top, optional
Instructions
- Preheat oven at 300-degrees. Cut parchment to fit in the bottom of an 8-inch cake pan. Grease pan. Set parchment inside. Grease again. Dust paper and sides of pan with cocoa.
- In a large microwave-safe bowl, heat chocolate and butter in short bursts, stirring well between each pass, until smooth. Stir in cocoa powder followed by sugar, eggs, and vanilla. Pour into prepared pan.
- Bake about 40 minutes, until cake begins to pull away from the sides of the pan; a toothpick inserted in the center should come out just slightly wet. Cool in pan for 20 minutes, then invert onto a rack. Remove the parchment, then invert again onto a plate to cool for at least an hour before cutting. Sprinkle with confectioners' sugar, if desired.
- Keep cake covered by plastic wrap in fridge; keeps well as long as a week. Cake can be sliced and frozen for later enjoyment.
- OM NOM NOM!
It’s fruitcake-making time!
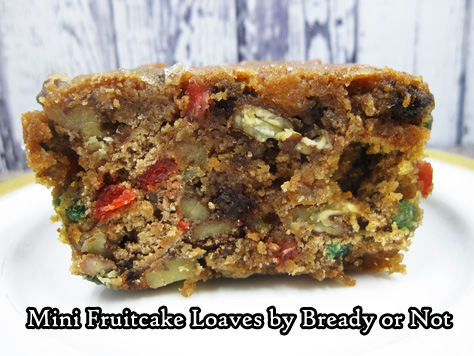
Yes, the subject line is serious, because YES, fruitcake can be delicious–especially if you make it yourself and control the whole process! Follow my Mini Fruitcake Loaves recipe and you’ll see what I mean. Bake these babies now and you’ll have plenty of time to ripen them (that means brushing them down with a simple sugar mix once a week to soak in flavor) in time for holiday festivities.
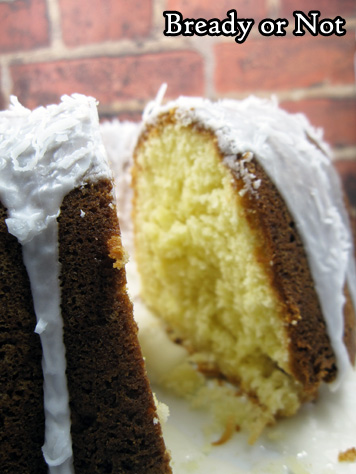
Read MoreBready or Not: Coconut Cream Cheese Pound Cake
This stunning Coconut Cream Cheese Pound Cake is gorgeous and delicious, and will win over even people like me that are not big coconut fans.
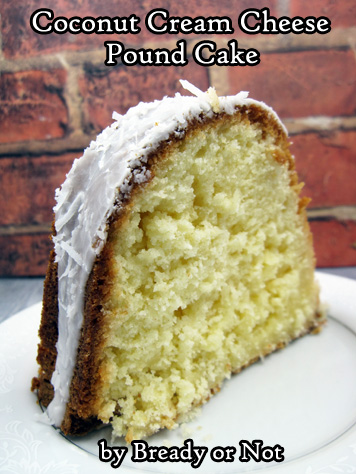
This cake works for me because the cream cheese creates a rich, tender crumb, and the coconut adds a lovely chewiness to it all.

The cake ends up being chewy, but not too chewy; sweet, but not cloyingly. Really, that makes this great as a breakfast, brunch, or dessert cake.
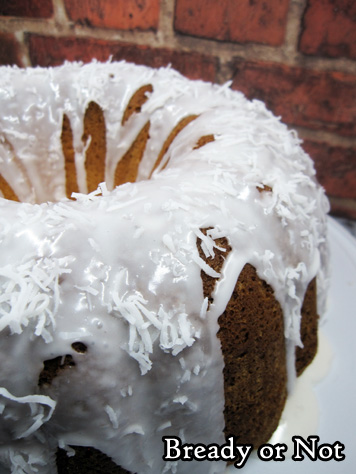
I highly recommend reserving some coconut to sprinkle on top, too. It adds a certain oomph.
Serve this as cake alone, or like with any pound cake, it would be lovely alongside fresh fruit.

Modified from Cookies and Cups.
Bready or Not: Coconut Cream Cheese Pound Cake
Ingredients
Cake
- 1 cup unsalted butter 2 sticks, room temperature
- 8 ounces cream cheese 1 box, room temperature
- 3 cups white sugar
- 6 large eggs room temperature
- 2 teaspoons vanilla extract
- 1 teaspoon kosher salt
- 1 teaspoon baking powder
- 3 cups all-purpose flour
- 2 cups shredded coconut
Glaze
- 2 cups confectioners' sugar
- 2-3 Tablespoons milk
- extra shredded coconut
Instructions
- Preheat oven at 325-degrees. Coat a 10-cup bundt pan with nonstick spray or butter.
- In a large bowl, beat butter and cream cheese together until smooth. Add sugar and mix until light and fluffy.
- Add eggs one at a time, followed by the vanilla extract, salt, and baking powder. Gradually mix in the flour until just combined, then fold in the coconut.
- Pour batter into pan and distribute evenly. Bake for 75 to 80 minutes, until it passes the toothpick test.
- Cool pan for 20 minutes, then invert the cake onto a wire rack to completely cool. Move to a plate or cake platter.
- To make the glaze, stir together the confectioners' sugar and milk to form a smooth yet thick consistency. Pour or spoon glaze over the top, then sprinkle with additional coconut.
OM NOM NOM!
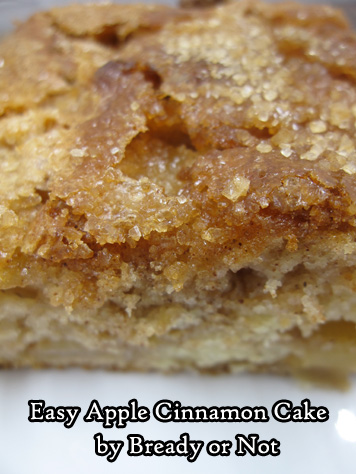
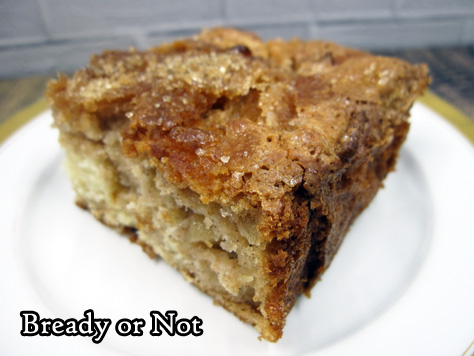
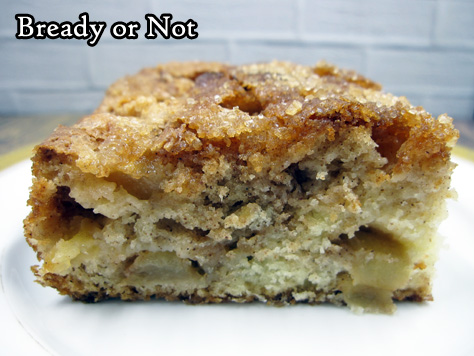
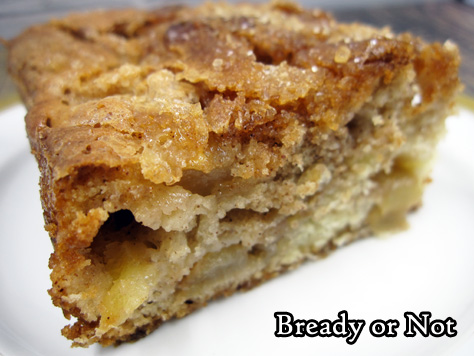
Bready or Not Original: Easy Apple Cinnamon Cake
Easy Apple Cake! This delicious cake is great to bake up, slice, and store in the fridge or freezer to enjoy for weeks to come.
If this recipe looks familiar, it’s because this is a rewrite of a recipe I posted back in 2016. The original version asked the baker to arrange the apple pieces in the middle and again on top.
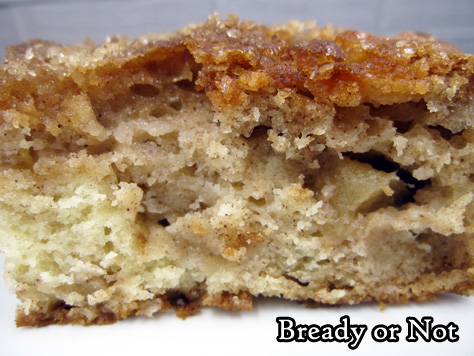
After making this cake many, many times, I realized that was an unnecessarily fussy step. Ain’t nobody got time for that!
I started folding all of the apple chunks into the batter, and this saved a lot of time. The apples were perfectly distributed and the taste was the exact same.
This cake remains a very favorite for both my husband and my dad. They’ll eat it for breakfast, snack, or dessert.
When I travel back home to California, I always make this cake for my dad. Since my mom doesn’t stock baking ingredients, I measure up my own (one sandwich baggy with brown sugar and cinnamon; another with flour, baking soda, and salt; one more with white sugar) and whip him up a cake in no time!
Bready or Not Original: Easy Apple Cinnamon Cake
Ingredients
- 3 medium apples peeled, cored, & chopped into small chunks
- 1 teaspoon cinnamon heaping
- 1/4 cup brown sugar packed
- 1 1/4 cup all-purpose flour
- 1 teaspoon baking powder
- 1/8 teaspoon salt
- 1 cup white sugar
- 1/3 cup vegetable oil
- 1/3 cup sour cream or Greek yogurt
- 1 teaspoon vanilla extract
- 2 eggs room temperature
- turbinado or maple sugar for topping optional
Instructions
- Preheat oven to 350-degrees. Line a 9×9 square pan with foil and apply butter or nonstick spray.
- In a medium bowl, toss peeled and chopped apples with cinnamon and brown sugar.
- In a separate bowl, combine the flour, baking powder, and salt.
- In a larger mixing bowl, whisk together the white sugar, vegetable oil, sour cream/yogurt, and vanilla extract until it's smooth. Add the eggs.
- Add the dry ingredients into the wet ingredients until everything is just mixed. Fold in the apple chunks.
- Pour batter into the prepared pan. Sprinkle turbinado or maple sugar over top, if desired.
- Bake 1 hour, until it passes the toothpick test in middle. Cool completely, chilling in fridge if desired. Use foil to list contents onto a cutting board. Cut into pieces.
- These are great individually plastic wrapped and stored at room temperature or in the fridge; bars can be frozen and keep well for months. Eat from the fridge, or at room temperature, or warm in the microwave or oven. However you eat it, it'll be delicious!
- OM NOM NOM!
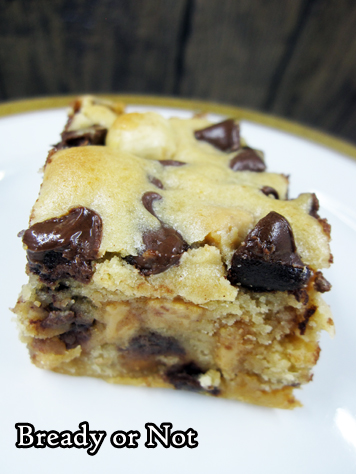
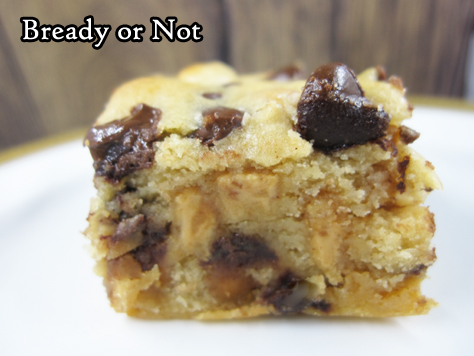
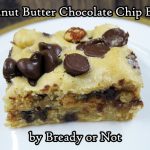
Bready or Not: Peanut Butter Chocolate Chip Bars
These are not mere blondies. No, these Peanut Butter Chocolate Chip Bars are practically cake.
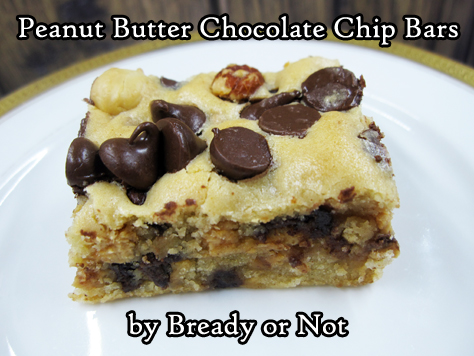
Seriously, this could work as a birthday cake for a chocolate-peanut butter lover. These bars are THICK and loaded with goodness.
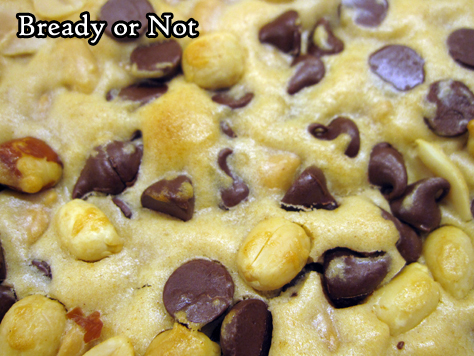
This recipe makes a full 13 by 9 pan, so there’s plenty to share. As dense as each bar is, you probably don’t want to cut them large.
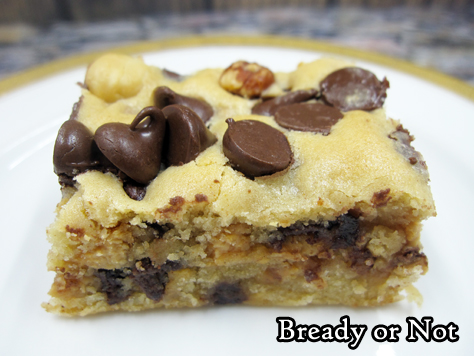
Bars like this freeze very well, too, so you can stash some away to enjoy later.

I can’t help but wonder how this recipe would be with Reese’s Peanut Butter Cups chopped into it, too. I should try that sometime.
Recipes are stories. There will always be other ways to twist them into something new and enjoyable.
Bready or Not: Peanut Butter Chocolate Chip Bars
Ingredients
- 1/2 cup unsalted butter room temperature
- 1 cup brown sugar packed
- 1/4 cup white granulated sugar
- 2 eggs
- 1/2 teaspoon vanilla extract
- 1 cup vanilla Greek yogurt
- 2 cups all-purpose flour
- 1/2 teaspoon cinnamon
- 1 teaspoon baking powder
- 1 3/4 cups peanut butter chips 1 bag
- 1 1/2 cups chocolate chips
- 1/2 cup chopped peanuts
Instructions
- Preheat the oven at 350-degrees. Line a 13X9 baking with aluminum foil and apply nonstick spray or butter.
- In a big bowl, cream together the butter and sugars until light and fluffy. Add the eggs, one at a time, scraping the bowl as necessary.
- Add the vanilla extract and vanilla yogurt next, followed by the flour, cinnamon, and baking powder. Fold in the peanut butter chips and 1 cup of the chocolate chips.
- Scoop the batter into the prepared pan. Sprinkle the remaining chocolate chips and the peanuts over the top and gently press them in.
- Bake pan for 30 minutes or until the center passes the toothpick test. Let cool completely. Use foil to lift contents onto a cutting board to slice into bars.
- Store in a sealed container at room temperature or in the fridge. Freeze bars between waxed paper in a sealed container to make them last even longer.
- OM NOM NOM!
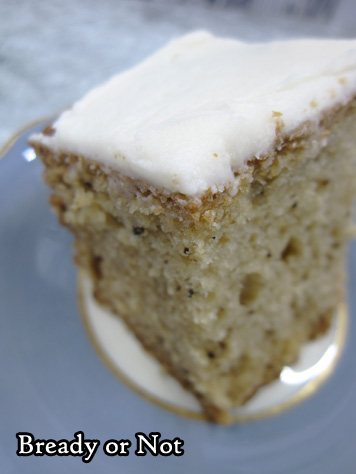
Bready or Not Original: Glazed Earl Grey Maple Gingerbread Sheet Cake
Let’s kick off the 2018 holiday season the right way: with cake! A Glazed Earl Grey Maple Gingerbread Sheet Cake, to be exact.
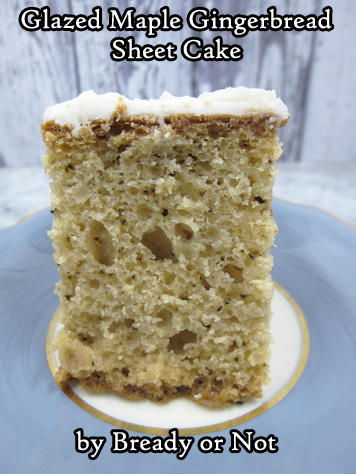
Earl Grey adds a lovely spice and kick that contrasts and complements the sweetness of maple. As you can see, tea flecks freckle the entire cake.
The cake is super-soft, moist, and cakey. I was amazed at how high it rose. It pretty much went to the top of my casserole dish.
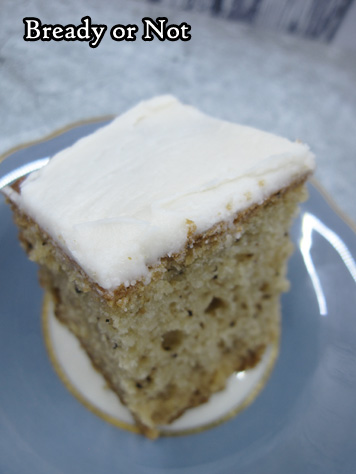
The cake itself isn’t heavily sweet, which is why the thin layer of glaze is just what it needs. It provides a more potent sweet maple flavor.
This is a cake that pairs well with tea (Earl Grey, hot, Picard-style?) and also with coffee. Serve this to a crowd! There’s plenty of cake to go around.
Bready or Not Original: Glazed Earl Grey Maple Gingerbread Sheet Cake
Ingredients
Cake:
- 2 eggs
- 2 cups pure maple syrup
- 2 cups sour cream 16 ounce container
- 1 teaspoon vanilla extract
- 1/2 cup unsalted butter 1 cube, melted
- 4 2/3 cups all-purpose flour
- 3 packets Earl Grey tea a heaping Tablespoon
- 2 teaspoons ground ginger
- 2 teaspoons baking soda
- 1 teaspoon salt
Glaze:
- 2 Tablespoons unsalted butter melted
- 2 cups confectioners' sugar
- 3/4 teaspoon maple flavor
- 2 Tablespoons + milk almond milk works
Instructions
- Preheat oven at 350-degrees. Line a 13x9 pan with aluminum foil and apply nonstick spray or butter.
- In a medium bowl, stir together the eggs, maple syrup, sour cream, vanilla, and butter. Set aside.
- In a large bowl, mix together the flour, Earl Grey tea, ginger, baking soda, and salt. Gradually stir in the egg mixture. Spread batter in the ready pan.
- Bake 45 to 50 minutes, until the middle passes the toothpick test. Cake will have risen a great deal. Cool in pan on wire rack for a few hours.
- Once the cake is room temperature, prepare the glaze. In a medium bowl, melt butter in microwave. Add confectioners' sugar, maple flavor, and two tablespoons milk. Stir until mixed and of spreadable thickness, adding more milk as necessary to loosen it or sugar to thicken.
- Spread glaze atop cake. To slice, lift up by foil and set on cutting board. Store slices in sealed container(s) at room temperature; keeps well for at least 2 days.
- OM NOM NOM!

