


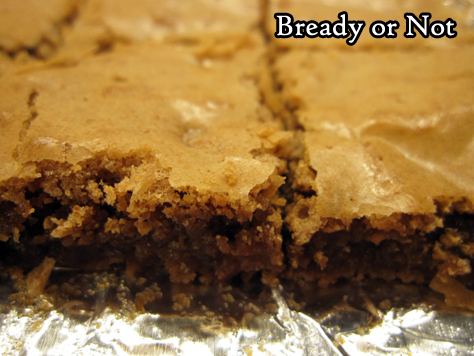
Bready or Not: Snickerdoodle Brookie
Don’t struggle to choose between Snickerdoodles and Brownies. Have them both at the same time in this extraordinary Snickerdoodle Brookie!
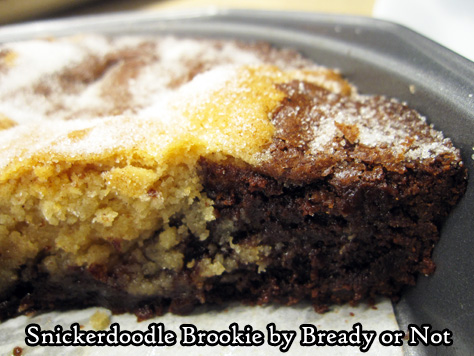
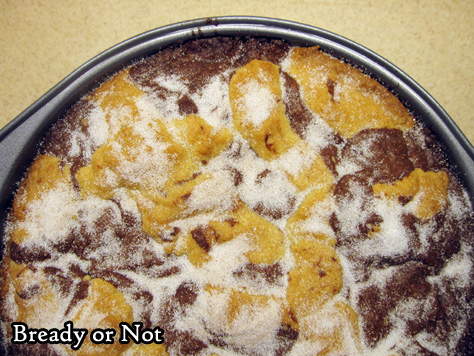
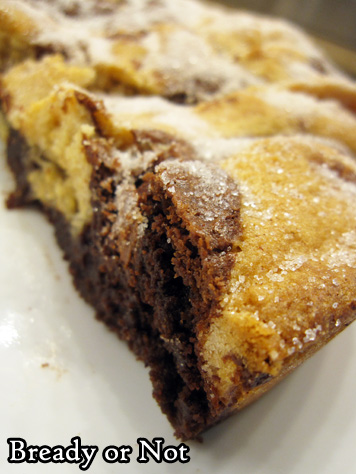
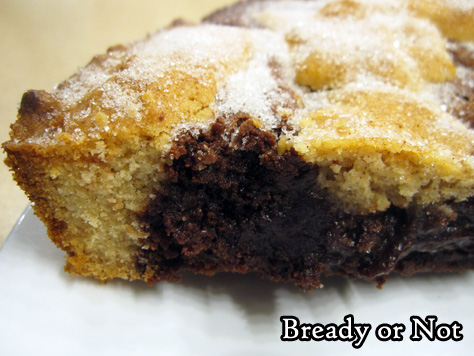
This is essentially like a massive cookie-cake hybrid. It looks impressive, and the flavor is impressive, too. If the layers work out right, you get a bit of everything in every bite.
If you eat the brookie warm, the chocolate flavor is quite strong. I actually liked this best at room temperature. The flavors play together better then.
I mean, it’d be a shame to not get to enjoy the Snickerdoodle side of things. A travesty.
I modified this from the original in my favorite food magazine, Bake from Scratch. I tried to make it easier by using the microwave, prepping the pan with parchment, and clarifying the steps throughout.
I can also testify that this is a great recipe to portion out and freeze. Pieces don’t take long to thaw and the brookie is dense enough to be pretty portable, too, though the dusting of cinnamon and sugar on top can sometimes be messy.
Modified from the March/April 2020 issue of Bake from Scratch Magazine.
Bready or Not: Snickerdoodle Brookie
Equipment
- 9-inch round cake pan
- parchment paper
Ingredients
Brownie batter:
- 6 ounces semisweet chocolate chips or bittersweet (170 grams)
- 1/2 cup unsalted butter 1 cube
- 1 cup white sugar
- 2 large eggs
- 1 teaspoon vanilla extract
- 3/4 cup all-purpose flour
- 1/4 cup Dutch process cocoa powder sifted
- 1/2 teaspoon kosher salt
Snickerdoodle dough:
- 1/3 cup unsalted butter softened
- 1/2 cup white sugar
- 1 large egg
- 1/2 teaspoon vanilla extract
- 1 cup all-purpose flour
- 1/2 teaspoon cream of tartar
- 1/2 teaspoon kosher salt
- 1/2 teaspoon ground cinnamon
- 1/4 teaspoon baking powder
Topping:
- 1 tablespoon white sugar
- 1/8 teaspoon ground cinnamon
Instructions
- Preheat oven to 350-degrees. Cut a piece of parchment to fit inside a 9-inch round cake pan. Apply nonstick spray in pan, place parchment, then spray parchment as well. Set aside.
Make brownie batter
- Melt together the chocolate and butter either in a double boiler on the stove or in the microwave in a microwave-safe bowl. Stir until everything is mixed and smooth. Stir in sugar. Set aside to cool for a few minutes before mixing in the eggs and vanilla.
- In a medium bowl, stir together flour, cocoa, and salt. Fold the dry ingredients into chocolate mixture just until combined. Set aside.
Make snickerdoodle dough
- Beat together the butter and sugar until they are fluffy; in a stand mixer, this will be at about 3 to 4 minutes. Scrape the sides of the bowl a few times. Add the egg and vanilla.
- In a separate bowl, stir together flour, cream of tartar, salt, cinnamon, and baking powder. Gradually mix the dry ingredients into butter mixture. Dough will be quite thick.
Assemble the cake
- Spoon large dollops (about 3 tablespoons each) of brownie batter into bottom of the prepared pan, leaving space between each lump. Crumble dollops of snickerdoodle dough in between brownie batter. Top with any more scoops of brownie batter and snickerdoodle dough. Gently use fingers to even out top.
- Bake until the middle passes the toothpick test, 33 to 40 minutes.
Make topping
- Stir together cinnamon and sugar. As soon as the cake is removed from the oven, sprinkle the mixture across the top.
- Let cool at least 15 minutes before cutting in. Cake can be served warm or at room temperature. It can also be frozen in slices and thawed for later enjoyment.
OM NOM NOM!
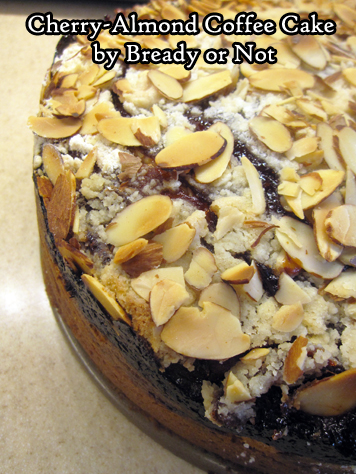
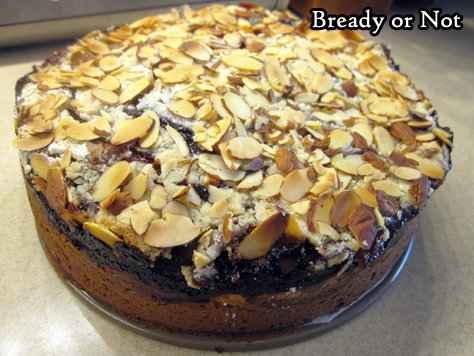
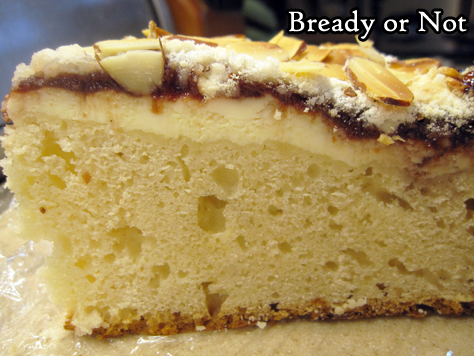
Bready or Not: Cherry-Almond Coffee Cake
This Cherry-Almond Coffee Cake is more cake than cheesecake, and is all sweet, fruity goodness.
If you need a showstopper cake for a brunch or dessert, this one is perfect. It’s great to make ahead of time, too–slices can even be frozen for later, no prob!
I used Murray’s Spiced Cherry Preserves; that little kick of spice was fantastic in the cake. Other bold preserves would be great in this cake, too–raspberry, strawberry, blueberry, even tropical flavors.
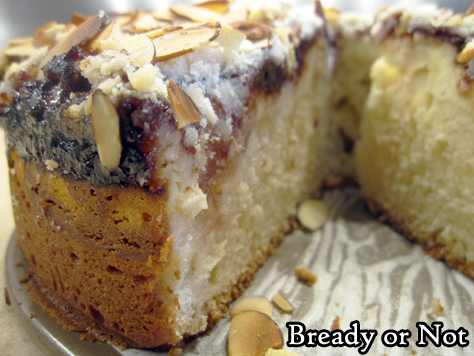
This is a thick, rich cake. It tastes best when you get a bit of all the layers in a single bite: the sliced almonds, crumb topping, fruit, cream cheese, sponge.

My husband liked the cake cold but he liked it even more when warmed a bit–and not in the microwave, either, but gently brought to room temperature by letting a slice sit out for 30 to 45 minutes.
Don’t forget a slice on the counter, though. This does contain cream cheese and shouldn’t be left out for hours!
Modified from Taste of Home Magazine December 2015.
Bready or Not: Cherry-Almond Coffee Cake
Equipment
- 9-inch springform pan
- parchment paper
Ingredients
- 2 1/2 cups all-purpose flour
- 1 cup white sugar divided
- 3/4 cup cold unsalted butter cubed
- 1/2 teaspoon baking powder
- 1/2 teaspoon baking soda
- 1/4 teaspoon salt
- 1 cup vanilla yogurt or sour cream, 8 ounces
- 2 large eggs
- 1 teaspoon almond extract
- 8 ounces cream cheese 1 box, softened
- 1 cup cherry preserves
- 1/2 cup slices almonds
Instructions
- Preheat oven at 350-degrees. Cut a parchment round to fit the bottom of the springform pan. Apply nonstick spray or butter on bottom of sides of pan, add the parchment, then grease it as well.
- In a big bowl, mix flour with 3/4 cup of sugar. Cut in butter until it is crumbly. Measure out 1/2 cup crumb mixture for topping; set aside.
- To the bulk of the flour mix, add baking powder, baking soda, and salt. Stir in yogurt, 1 egg, and almond extract, until blended. Spread batter onto bottom of the springform pan.
- In a small bowl, beat together the softened cream cheese, the remaining 1/4 cup sugar, and egg, to make it as smooth as possible. It's okay if it still has some clumps. Pour it onto the pan and smooth out. Spoon the preserves all across the top. Sprinkle with the reserved crumb topping and the sliced almonds.
- Bake for 50 to 60 minutes. The middle should no longer be jiggly, the top a nice golden brown. Cool on a wire rack for 10 to 15 minutes then unlatch and life away the pan's ring to let the cake cool for another hour. Then place cake in fridge to complete set and cool for a few hours.
- Cake can be eaten cold or after slices are brought to room temperature after about 30 to 45 minutes. Do remember to store cake in the fridge, as it does contain cream cheese! Slices can also be individually wrapped and frozen, and will thaw in the fridge with no issue.
OM NOM NOM!
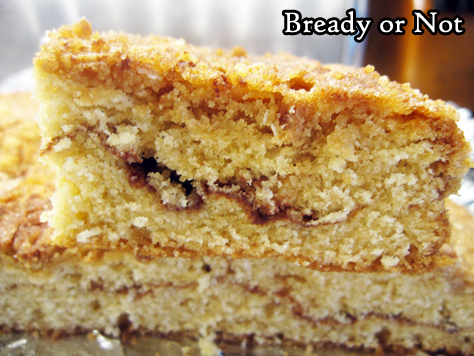
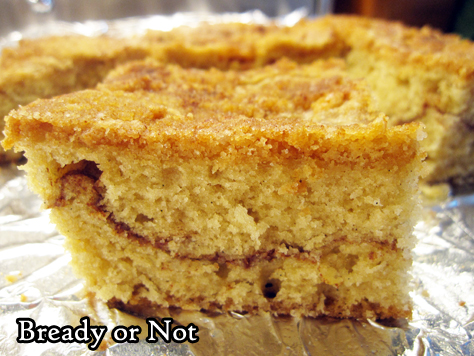
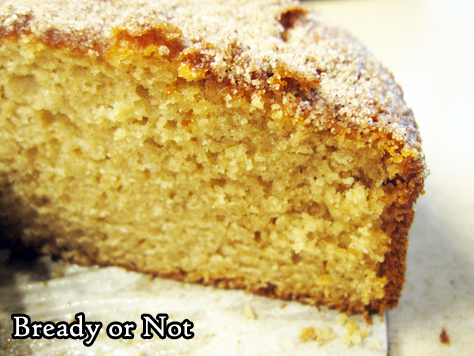
Bready or Not Original: Snickerdoodle Crumb Cake
Snickerdoodles are a regular theme on Bready or Not, and this new Snickerdoodle Crumb Cake version is something amazing.
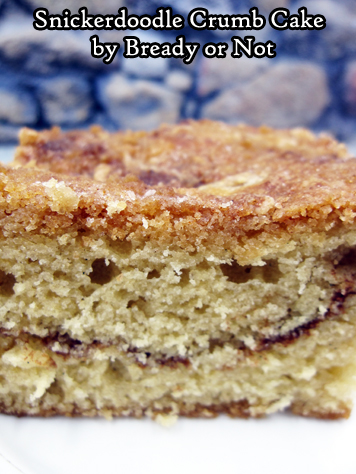
This is a true cake, not simply a bar. It has a light, airy crumb that isn’t too moist or too dry.
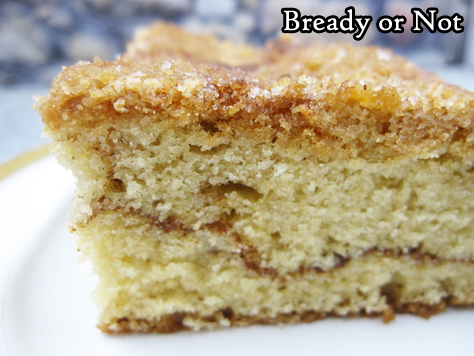
Most importantly, it tastes like a Snickerdoodle. Despite what some store versions think these days, that doesn’t simply mean cinnamon and sugar, but the distinct taste of cream of tartar as well.
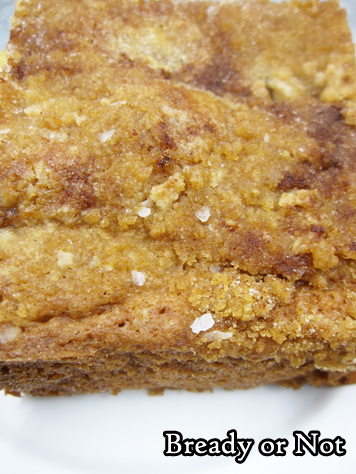
That cinnamon-sugar thing is important too, though. That’s why this cake has a visible layer through the middle–which looks gorgeous when pieces are cut–as well as a crust on top. To which I added a pinch of pretzel salt for contrast, because why not?
This recipe doesn’t produce a massive batch of cake, but if you are baking for a few people, know that you can safely slice up and individually wrap pieces and freeze them for later.
Bready or Not Original: Snickerdoodle Crumb Cake
Equipment
- 8x8 or 9x9 pan
- uneven spatula
Ingredients
Streusel
- 1/2 cup all-purpose flour
- 1/2 cup brown sugar packed
- 1/2 teaspoon kosher salt
- 4 Tablespoons unsalted butter half stick, cut into pieces
Dough
- 1 1/2 cups all-purpose flour
- 1/4 teaspoon baking soda
- 1/2 teaspoon cream of tartar
- 1/2 teaspoon kosher salt
- 3/4 cup unsalted butter 1 1/2 sticks, room temperature
- 1/2 cup brown sugar packed
- 1/2 cup white sugar
- 3 large eggs room temperature
- 1 teaspoon vanilla extract or paste
Filling
- 1 teaspoon cinnamon
- 2 Tablespoons white sugar
Topping
- 1/2 teaspoon cinnamon
- 1 Tablespoon white sugar
- pinch pretzel salt optional
Instructions
Make the streusel
- Stir together the flour, brown sugar, and salt. Use a pastry cutter or butter knife and fork to mash the butter into pea-sized pieces and crumbs. Set in fridge to chill.
Make the dough
- Preheat oven at 350-degrees. Line an 8x8 or 9x9 pan with foil and apply nonstick spray.
- In a small bowl, combine the flour, baking soda, cream of tartar, and salt. Set aside.
- In a big bowl, beat the butter and both sugars until creamy. Mix in eggs one by one followed by the vanilla extract. Gradually mix in dry ingredients until just combined.
- Spread about half the dough in the pan, using an uneven spatula fully coat the bottom.
Make the layers
- Stir together the two filling ingredients. Sprinkle to entirely cover the base layer of dough.
- Dollop the rest of the batter on top, again using the uneven spatula to spread evenly to edges. Sprinkle the streusel across the top. Mix together the cinnamon-sugar topping, then sprinkle that over the crumbs.
- Bake for 33 to 37 minutes, until the middle passes the toothpick test. Cool completely. Use foil to lift cake onto a cutting board to slice into bars.
- Store in airtight container at room temperature for up to 3 days. Can also be sliced into bars, wrapped in plastic, and frozen for an easy treat later.
OM NOM NOM!
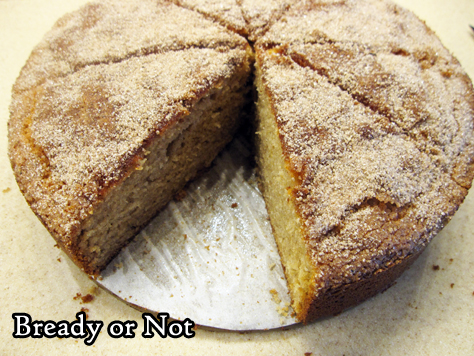
Bready or Not Original: Vanilla Applesauce Cake
Some days call for a no-fuss apple cake. This Vanilla Applesauce Cake is for those kinds of days.
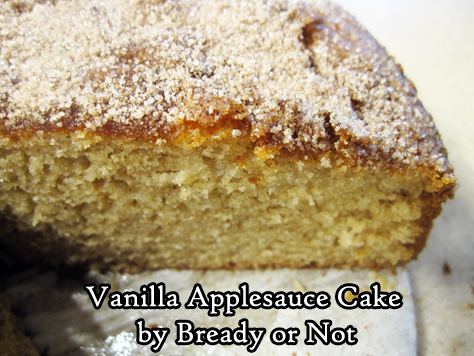
There is no need to worry about procuring apples, or having them go bad, or the effort to peel and slice them. This cake uses applesauce, which loads the cake with beautiful flavor.
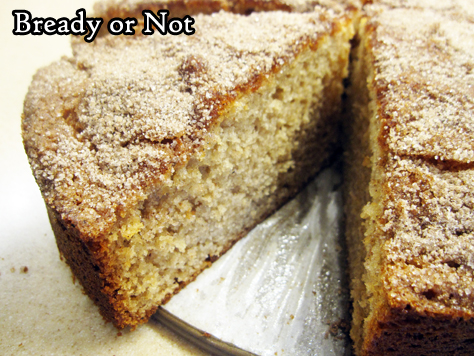
The cake also has the gentle flavor of a great combination of spices. The finisher is no-fuss, too: a top crusted with coarse sugar that adds a touch more sweet and a tiny crunch.
Want to serve this cake for just a few people? No problem. Slice up the cake, and freeze individual slices for later.
Modified greatly from a Heilala Vanilla ad in Bake from Scratch Magazine, September/October 2019.
Bready or Not Original: Vanilla Applesauce Cake
Equipment
- 9-inch springform pan
- offset spatula
- parchment paper
Ingredients
- 2 cups all-purpose flour
- 2 teaspoons baking powder
- 2 teaspoons ground cinnamon
- 1 teaspoon kosher salt
- 1/2 teaspoon baking soda
- 1/2 teaspoon ground ginger
- 1/4 teaspoon ground cloves
- 1 cup white sugar
- 1 cup applesauce or about 2 individual serving cups of applesauce
- 1/2 cup buttermilk or soured milk (see note)
- 1/2 cup vegetable oil
- 2 large eggs room temperature
- 1 teaspoon vanilla extract
- 1/4 cup coarse sugar as topping, such as turbinado, maple, etc
Instructions
- Preheat oven at 350-degrees. Cut parchment paper to fit in the base of a 9-inch springform pan. Apply nonstick spray with flour to bottom and sides of pan. Add parchment and spray again. Set aside.
- In a big bowl, combine flour, baking powder, cinnamon, salt, baking soda, ginger, and cloves.
- In another bowl, whisk together the sugar, applesauce, buttermilk or soured milk, oil, eggs, and vanilla. Gradually pour the wet ingredients into the dry, mixing well.
- Pour batter into the pan and smooth out with an uneven spatula. There will likely be bubbles in the batter. Gently tap the sides of the pan and thump it on the counter to get them to rise and burst. Using a spoon, sprinkle the coarse sugar all over the top as evenly as possible.
- Bake for 35 to 40 minutes, until the middle passes the toothpick test. Let cool in pan for 10 minutes, then release sides. Let cake cool completely on base for several hours.
- Slice into wedges and serve. Cake keeps well in a sealed container at room temperature and pieces can also be wrapped individually and frozen for later enjoyment.
OM NOM NOM!
Notes
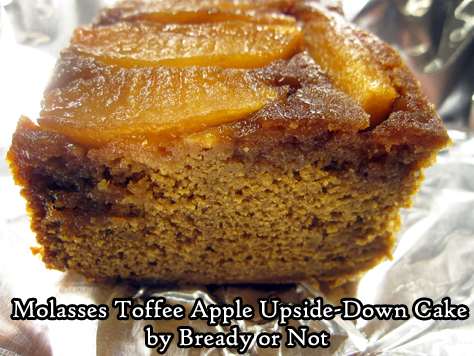
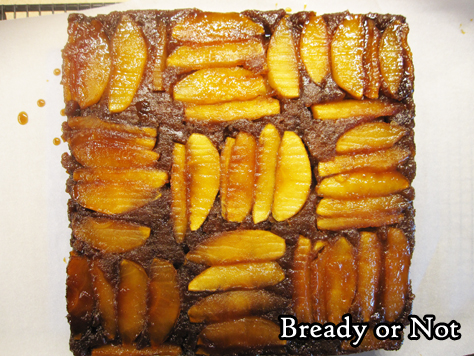
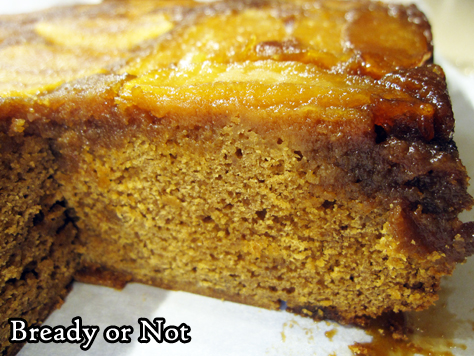
Bready or Not: Molasses Toffee Apple Upside-Down Cake
This Molasses Toffee Apple Upside-Down Cake is as delicious as it is beautiful!
This cake does take a little extra effort. You have to give some thought to placing the apple slices instead of just mixing in the apples. It also dirties a lot of dishes.
But the end result? The cake crumb is reminiscent of a dense, moist gingerbread cake–which goes perfectly with the apples. The combo is sheer bliss.

So, what kind of apples are best? Three medium baking apples! You can always Google that subject for a wide range of recommendations. I can recommend Granny Smiths, Galas, and Pink Lady.
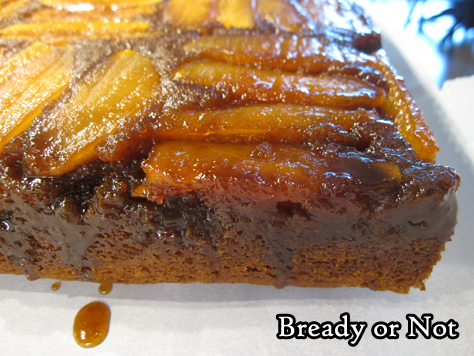
The resulting cake is great warm, recently from the oven. It’s also good cold from the fridge. And reheated, warmed just a touch in the microwave or toaster oven. But not reheated to be super-hot–that actually makes the apples go too soft.
This cake is also great to slice into blocks, wrap in plastic, and freeze for later. It keeps wonderfully that way! Thaw and enjoy at your leisure.
Modified from Bake from Scratch September/October 2019.
Bready or Not: Molasses Toffee Apple Upside Down Cake
Equipment
- 9x9 square pan
- offset spatula
Ingredients
- 1 2/3 cups light brown sugar packed, divided
- 1/4 cup unsalted butter half stick, melted
- 1/2 cup plus 2 Tablespoons molasses divided
- 3 large baking apples about 450 grams after being peeled, cored, and thinly sliced; Granny Smith, Gala, and Pink Lady work well
- 1/2 cup plus 1 Tablespoon unsalted butter softened
- 2 large eggs room temperature
- 1 large egg yolk
- 2 teaspoons vanilla extract
- 2 2/3 cups all-purpose flour
- 2 1/2 teaspoons baking powder
- 1 1/2 teaspoons ground cinnamon
- 3/4 teaspoon kosher salt
- 3/4 teaspoon ground ginger
- 1/2 teaspoon ground nutmeg
- 1/8 teaspoon ground cloves
- 3/4 cup whole milk
Instructions
- Preheat oven to 350-degrees. Cut a square of parchment paper to fit in the bottom of a 9x9 square pan. Grease pan with butter or nonstick spray. Place parchment, and grease paper as well. Set aside.
- In a small bowl, whisk together 2/3 cup brown sugar, melted butter, and 2 tablespoons molasses. Pour into prepared pan. Arrange apple slices in groups of 5 in alternating patterns on top of sugar mixture.
- In a big mixing bowl, beat softened butter and remaining 1 cup brown sugar until fluffy. This will be about 3 to 4 minutes in a stand mixer. Scrape sides of bowl as needed.
- Beat in remaining 1/2 cup molasses until no streaks remain. One at a time, add the eggs and egg yolk followed by the vanilla.
- In a medium bowl, whisk together the dry ingredients: the flour, baking powder, cinnamon, salt, ginger, nutmeg, and cloves.
- Gradually mix the dry ingredients into butter mixture alternately with the milk. Beat until just smooth. Pour batter over apples, smoothing with an offset spatula.
- Bake until the middle passes the toothpick test, about 45 to 50 minutes. Let cool in pan for 10 minutes. Run a knife around edges of pan to release sides of cake, if needed. Carefully invert onto a flat serving plate or small cutting board.
- The cake is fantastic eaten fresh, cold, or just warmed. It can also be cut into squares and frozen for later enjoyment.
OM NOM NOM!
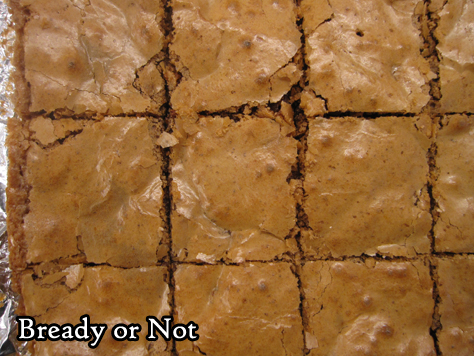
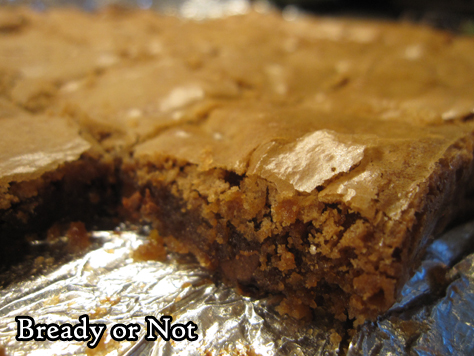
Bready or Not Original: Small Batch Cakey Brownies
Sometimes you just need a few brownies. That’s the perfect time for this Small Batch Cakey Brownies recipe.
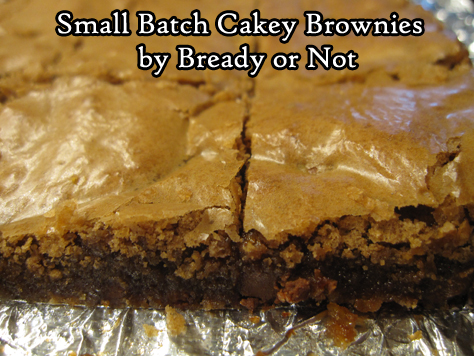
These are not monstrously thick brownies. They are thin with a crackled top, with a nice, cakey moist crumb.
I created this recipe by combining about four other recipes, trying to find a middle ground recipe that my son would like. This is the one that turned out to be the winner.
Even better, I found out these brownies kept well for an entire week in a sealed container at room temperature–and who knows, maybe they could last a lot longer? In any case, there’s no urgent need to gorge on them lest they go bad.
These brownies are all about goodness.
Bready or Not Original: Small Batch Cakey Brownies
Ingredients
- 2 ounces semi-sweet chocolate
- 6 Tablespoons unsalted butter
- 1 cup white sugar
- 2 large eggs
- 1/2 teaspoon vanilla extract
- 1/2 teaspoon fine sea salt
- 1/4 cup all-purpose flour
- 1/4 cup cake flour
- 1/2 cup milk chocolate chips
Instructions
- Preheat the oven to 350-degrees. Line a 9x9 or 8×8-inch pan with foil, letting foil overhang each side. Apply nonstick cooking spray.
- In a microwave-safe bowl, microwave the chocolate and butter on high in 30 second increments, stirring between each burst, until everything is melted. Let cool slightly.
- Using a stand mixer or hand mixer, in a large bowl beat together the sugar and eggs for 3 to 5 minutes, until they are pale, light, and fluffy. Pour in the cooled chocolate and butter mixture, followed by the vanilla.
- Combine the salt and both flours in a bowl. Stir in the chocolate chips. Fold flour mix into the wet ingredients. Pour into the prepared pan and even out.
- Bake for 20 minutes, or until a toothpick inserted in the center comes out with moist crumbs attached. Cool completely. Use foil onto a cutting board to slice into bars.
- Brownies will keep for upwards of a week in a sealed container at room temperature.
