


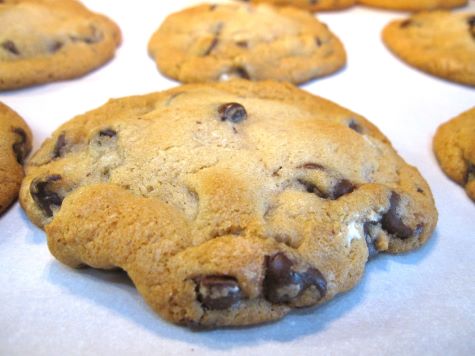
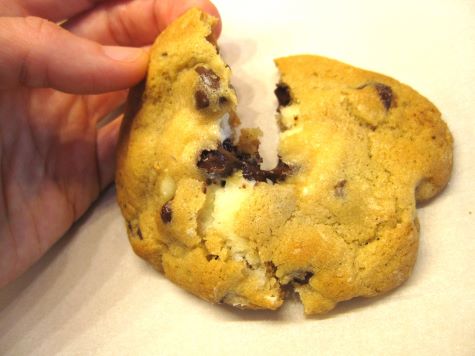
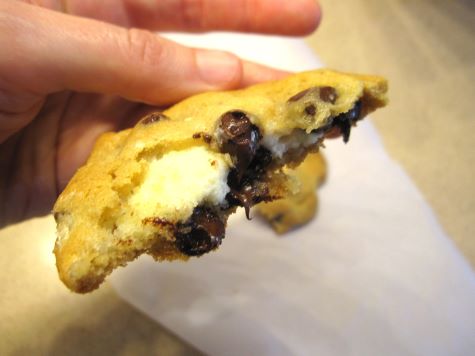
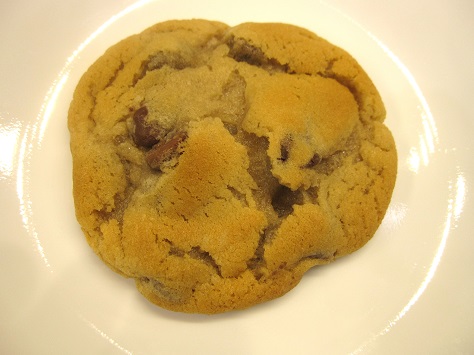
Bready or Not: Cheesecake-Stuffed Chocolate Chip Cookies
These Cheesecake-Stuffed Chocolate Cookies are big, rich, and incredible. You get a core of cream cheese surrounded by chocolate-laden dough. I mean, come on.
For this recipe, you need to make the dough and filling in advance. I made them a day ahead, but you want at least a few hours of refrigeration time. You also chill the cookie dough right after it’s shaped. That means you need some empty room in the fridge for doing this recipe.
This is also a recipe where you really do need a tablespoon and teaspoon scoop to produce even cookies. That, or you just naturally have a good eye for estimating such things.
Modified from Allrecipes Magazine Feb/March 2022.
Bready or Not: Cheesecake-Stuffed Chocolate Chip Cookies
Equipment
- tablespoon and teaspoon scoops
- fridge space
- parchment paper
Ingredients
Filling
- 8 ounces cream cheese room temperature
- 1/2 cup confectioners’ sugar
Cookie Dough
- 3/4 cup unsalted butter (1 and a half sticks) room temperature
- 3/4 cup white sugar
- 3/4 cup brown sugar packed
- 2 large eggs room temperature
- 2 teaspoons vanilla extract
- 2 1/4 cups plus 2 Tablespoons all-purpose flour
- 1 teaspoon baking soda
- 3/4 teaspoon salt
- 12 ounces chocolate chips
Instructions
Make the filling
- Beat together the cream cheese and confectioners' sugar to make a smooth mixture with few if any lumps. Stash it in the fridge to chill for a few hours or overnight.
Make the cookie dough
- Beat together the butter and both sugars until they are creamy. Add the eggs and vanilla.
- In a separate bowl, combine flour, baking soda, and salt. Gradually pour this into the butter mixture, scraping the bottom of the bowl to make certain everything is combined. Fold in the chocolate chips. Chill the dough in the fridge for a few hours or overnight.
Baking the cookies
- Preheat oven at 350-degrees. Line a large baking sheet with parchment paper. Also, make room in the fridge for a small baking pan or plates on which the formed cookies will chill.
- Scoop out a tablespoon of cookie dough. Use a thumb to hollow out the center. Scoop out about 3/4 teaspoon of cream cheese mix using the smaller scoop. Place that inside the hollow. Fold the dough to enclose it, adding additional pinches of dough as needed to form a seal. You don't want any cream cheese visible, or it could ooze out! Flatten cookies between palms to make a fat disc. Set in fridge to chill as more cookies are shaped.
- Once all the cookies are shaped, pull out the coldest cookie balls to set, spaced out, on the baking sheet. Keep the remaining cookie balls chilled while the initial batch(es) bake.
- Bake for 12 to 14 minutes, until the cookies are golden. Let them rest on the sheet for 5 to 10 minutes, then transfer them to a rack to completely cool.
- Store cookies in an airtight container at room temperature for up to 3 days.
OM NOM NOM!
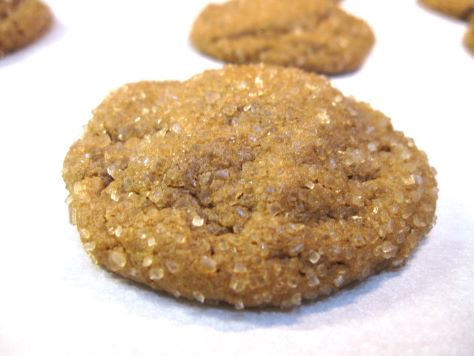
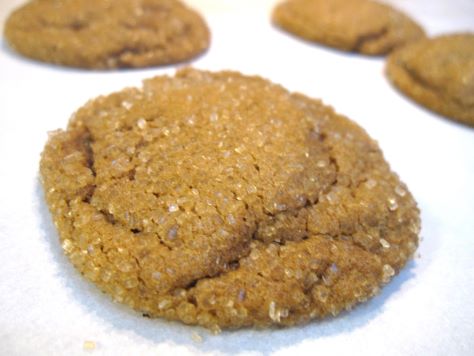
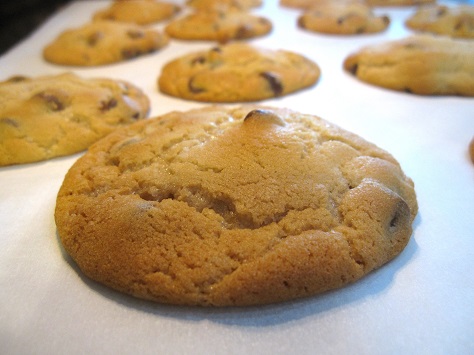
Bready or Not: Big Soft Ginger Cookies
These Big Soft Ginger Cookies are delicious any time of year!
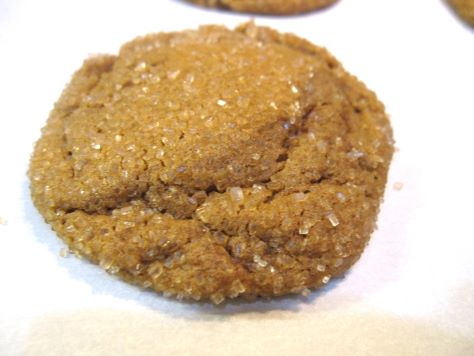
These things taste like gingerbread. They are soft, chewy, and fragrant, with a delicate crunch from the coarse sugar topping. They are good on their own, or with a hot drink!
These take some planning, as the dough is soft and could use some chill time. Make it a little bit ahead of when you plan to bake. A few hours will do; overnight is great, too. Then bake away!
Modified from Allrecipes Magazine Dec/Jan 2014 issue.
Bready or Not: Big Soft Ginger Cookies
Equipment
- baking sheet
- parchment paper
- tablespoon scoop
- plastic wrap or sealed bag
Ingredients
- 2 1/4 cups all-purpose flour
- 2 teaspoons ground ginger
- 1 teaspoon baking soda
- 3/4 teaspoon ground cinnamon
- 1/2 teaspoon ground cloves
- 1/4 teaspoon salt
- 3/4 cup unsalted butter (1 1/2 sticks) room temperature
- 1 cup white sugar
- 1 large egg room temperature
- 1 Tablespoon water
- 1/4 cup molasses
- 3/4 cup coarse sugar such as turbinado
Instructions
- In a medium bowl, combine flour, ginger, baking soda, cinnamon, cloves, and salt. Set aside.
- In a big bowl, cream together butter and sugar until light and fluffy. Beat in the egg followed by the water and molasses. Slowly mix in the dry ingredients, scraping the bottom of the bowl a few times.
- Once everything is mixed, encase the dough in plastic wrap and chill in fridge for a few hours or a day or two.
- When ready to bake, preheat oven at 350-degrees. Line a large baking sheet with parchment. Measure coarse sugar into a bowl.
- Using a tablespoon scoop or tablespoon, shape dough into small balls. Roll dough in coarse sugar. Set spaced-out on prepared baking sheet.
- Bake for 10 to 12 minutes, until cookies are set and starting to crinkle across the top. Let rest on sheet for another 10 minutes, then transfer to a rack to fully cool. Store in a sealed container at room temperature.
OM NOM NOM!
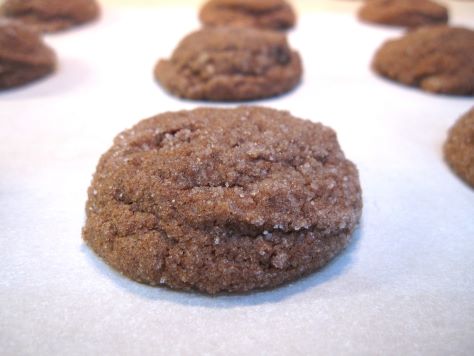
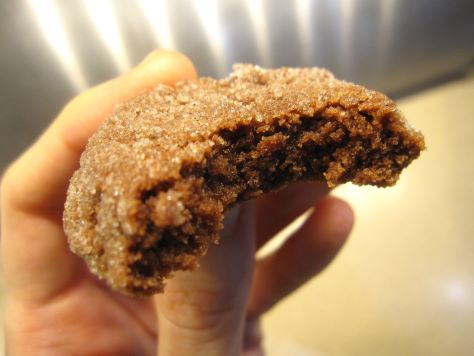
Bready or Not Original: Chocolate Chai Snickerdoodles
I reinvent Snickerdoodles on a regular basis, and here’s a fun new take: Chocolate Chai Snickerdoodles.
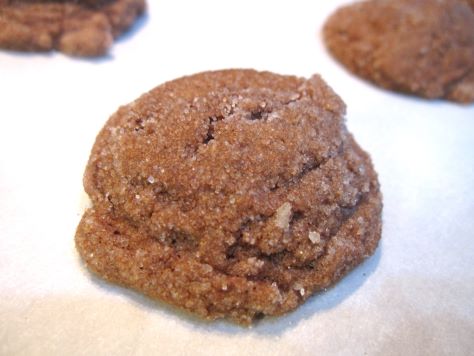
The flavor of these is chocolate-forward, followed by the warm combination of spices. The combo is fantastic, and the texture of the cookies is soft and chewy.
I highly recommend mixing up the sugar and spices a day or so in advance. There is such a variety involved that the measuring and washing of the measuring spoon ends up being the most tedious aspect of the entire recipe.
Bready or Not Original: Chocolate Chai Snickerdoodles
Equipment
- parchment paper
- baking sheet
- teaspoon scoop
Ingredients
- 2 1/2 cups white sugar
- 1 teaspoon ground cinnamon
- 1 teaspoon ground ginger
- 1 teaspoon ground cardamom
- 1/2 teaspoon ground allspice
- 1/4 teaspoon white pepper
- 1 cup unsalted butter (2 sticks) room temperature
- 2 large eggs room temperature
- 2 1/4 cups all-purpose flour
- 1/2 cup baking cocoa sifted
- 2 teaspoons cream of tartar
- 1 1/2 teaspoons baking powder
- 1/2 teaspoon salt
Instructions
- Preheat the oven at 350-degrees. Line a baking sheet with parchment. Combine the first six ingredients; reserve a 1/2 cup in a separate bowl.
- Beat the butter until soft. Add the bulk of the spice mix, continuing to beat until light and fluffy. Add the eggs and vanilla.
- In a separate bowl, combine the flour, cocoa, cream of tartar, baking powder, and salt. Slowly work this into the butter mix.
- Use a teaspoon scoop or spoon to form small balls. Roll them in the reserved sugar-spice mix. Set them spaced out on the baking sheet.
- Bake for 10 to 12 minutes. Due to the cocoa, it is hard to gauge doneness by color, so look for them to be set with some light crackling. These don’t crackle as much as standard snickerdoodles, though. Let them rest on the sheet for about 10 minutes, then transition them to a rack to completely cool.
- Store in a sealed container at room temperature.
OM NOM NOM!
Bready or Not: No-Bake Cookie Bars
When you have no time to bake and you need sweets fast–or you don’t have an oven or can’t heat the house–no-bake treats are the way to go. These No-Bake Cookie Bars involve little fuss and are sweet and tasty.
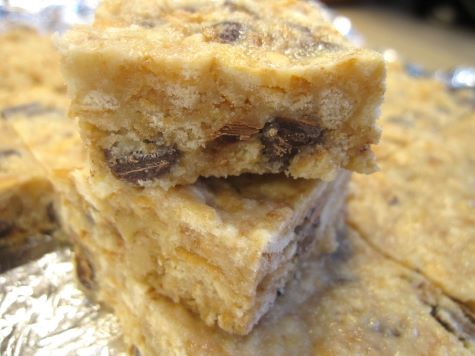
Also, these are pretty cheap to make. I used a generic kind of vanilla wafers that were a dollar-something.
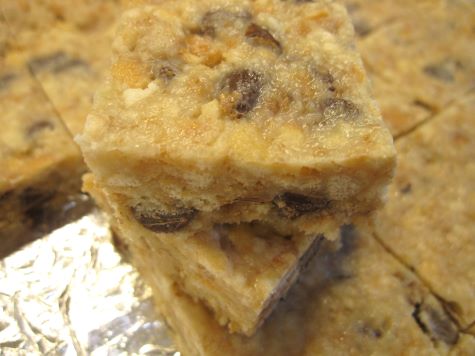
Since I live in Arizona, I had to store these in the fridge, but in most places, you’d probably be fine keeping them at room temperature.
Bready or Not: No-Bake Cookie Bars
Equipment
- 9×9 pan
- nonstick spray
- aluminum foil
- waxed paper
- heavy glass
Ingredients
- 11 ounces vanilla wafer cookies generic is fine
- 14 ounces sweetened condensed milk
- 1 cup chocolate chips semisweet or milk
- 1/2 cup chopped walnuts or pecans
- 1 teaspoon pure vanilla extract
- 1/4 teaspoon salt
Instructions
- Line a 9×9 pan with foil and apply nonstick spray.
- Use a food processor or a gallon bag, rolling pin, and muscle to crush all of the vanilla wafers.
- In a big bowl, stir together the cookies crumbs, sweetened condensed milk, chocolate chips, nuts, vanilla, and salt. Completely mix and coat.
- Dump the mixture into the prepared pan. Level it out, then use waxed paper and a heavy object such as a glass to evenly compress the crumbs. Chill in fridge for at least 2 hours.
- Use the foil to lift the contents onto a cutting board. Slice up and store in a sealed container either at room temperature or in the fridge.
OM NOM NOM!
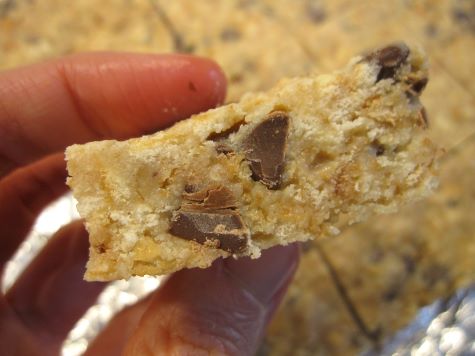
Bready or Not: Soft Batch-Style Chocolate Chip Cookies Stuffed with Chocolate
How do you make Chocolate Chip Cookies better? More chocolate, of course–in this case, a chocolate disc inside these Soft Batch-Style Chocolate Chip Cookies Stuffed with Chocolate makes them extra delicious.
Fun fact up front: this is a modification of my most reliable, most-baked cookie recipe. The differences: add another cup of chocolate chips, and remove the chocolate discs. These Soft Batch-esque cookies are the ones I make whenever I go home to California. I usually have a round or two frozen in case of urgent cookie needs at home, too.
This new take on my old favorite adds a luscious chocolate layer right in the middle. If you can’t find the Ghirardelli version of these discs, seek out another one, or even use a pinch of chocolate chips! A Hershey’s Kiss or Reese’s Peanut Butter Cup would work, too, though you might need to add some extra dough to seal them inside.
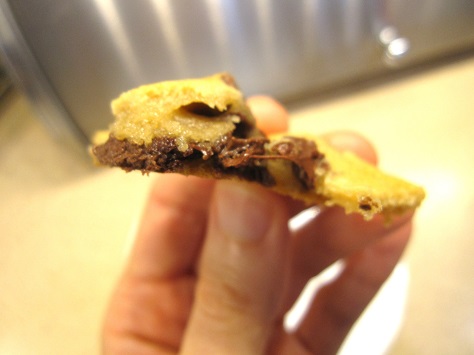
Even better, these cookies will keep for weeks, if you have the fortitude to make them last. That makes these great for gift-giving, cookie exchanges, and mailing (if you’re not someplace hellishly hot).
Bready or Not: Soft Batch-Style Chocolate Chip Cookies Stuffed with Chocolate
Equipment
- tablespoon scoop
- cookie sheet
Ingredients
- 1 cup unsalted butter (2 sticks) room temperature
- 1 1/2 cups brown sugar packed
- 1/2 cup white sugar
- 2 large eggs room temperature
- 1 teaspoon vanilla extract
- 3 cups all-purpose flour
- 4 teaspoons cornstarch
- 2 teaspoons baking soda
- 1 teaspoon kosher salt
- 2 cups chocolate chips
- 10- ounces Ghirardelli Dark Melting Wafers
- flaked salt or coarse sugar to sprinkle on top, optional
Instructions
- Cream butter and sugars together until light and fluffy, which takes several minutes in a mixer. Add eggs and vanilla. Mix in flour, cornstarch, baking soda, and salt. Fold in the chocolate chips.
- The cookies can be made right away, but texture is thicker if the dough is chilled for several hours or overnight. Cover with plastic wrap if it will be in for a while.
- When it’s time to bake, preheat oven at 350-degrees. Use a tablespoon scoop to form a ball of dough. Make a deep imprint and shove a chocolate wafer inside. Fold and press the dough to completely encase. Repeat, spacing them out to allow for spread on the pan. If desired, sprinkle some flaked salt or coarse sugar atop each to provide extra texture and flavor.
- Bake for 11 to 13 minutes, until the cookies look golden and set. Let them continue to rest on pan for 5 to 10 minutes before moving them to a cooling rack.
- Store in a sealed container at room temperature. These cookies can keep for weeks.
OM NOM NOM!
Bready or Not Original: Quick Maple Cookie Fudge Redux
Let’s finish off the year 2022 by reviving a recipe first on Bready or Not in 2016: Maple Cookie Fudge!
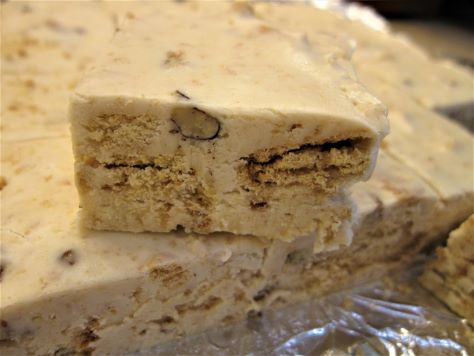
This is a shortcut fudge without any need of a candy thermometer or stress. I like to use the microwave, but you can use the stovetop if you want. You can keep the maple cookies chunky, if you desire, or grind everything to crumbs–your choice! I actually like some small chunks mixed in for texture.
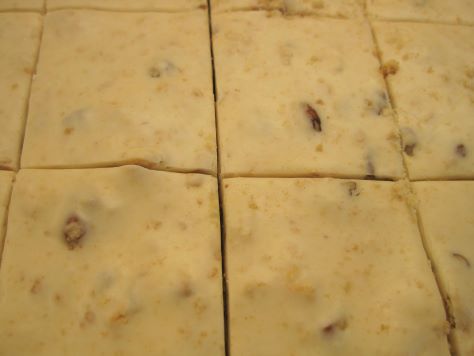
The maple flavor is nice and consistent here, not cloying, while the marshmallow fluff grants the texture some extra oomph. The nuts add an extra flavor and crunch, but you can omit them if you want.
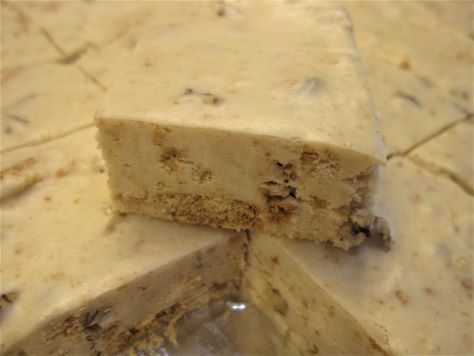
This maple cookie fudge is just about perfect if you ignore the pesky nutritional side of things.
Bready or Not Original: Quick Maple Cookie Fudge
Equipment
- 9×13 pan
- aluminum foil
- nonstick spray or butter
Ingredients
- 3 cups white chocolate chips
- 12.3 ounces maple crème cookies crushed/chopped/maimed, about 20 cookies
- 7 ounces marshmallow fluff
- 14 ounces sweetened condensed milk
- 1 teaspoon maple flavor
- 1 teaspoon vanilla extract
- 1/2 cup chopped nuts walnuts, pecans, macadamias, etc
Instructions
- Prepare a 9×13 pan by lining it with foil and applying nonstick spray.
- Either in microwave or on stovetop, carefully melt chocolate with sweetened condensed milk and marshmallow cream. If microwaving, do it in short bursts because it can burn fast! Stir often.
- When the mix is smooth, add the maple flavor and vanilla. Fold in the maple cookies and nuts. Pour fudge into the prepared pan. Use an uneven spatula to smooth out the top.
- Refrigerate at least 3 hours, until the fudge is firm. Cut into bite size pieces. Keep stored in fridge between layers of wax paper. Unlike some other quick fudges, this will keep well for hours at room temperature.
