


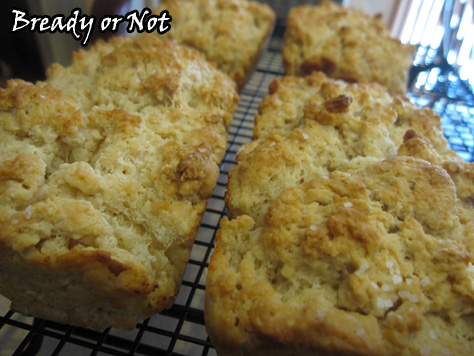
Bready or Not: Pretzel Sandwich Buns
It seems a lot of standard buns are just… there. A thing to hold meat. They aren’t memorable or flavorful.
You want something better than a mere meat sling? MAKE THIS.

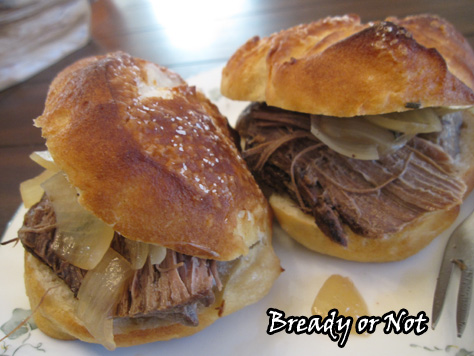
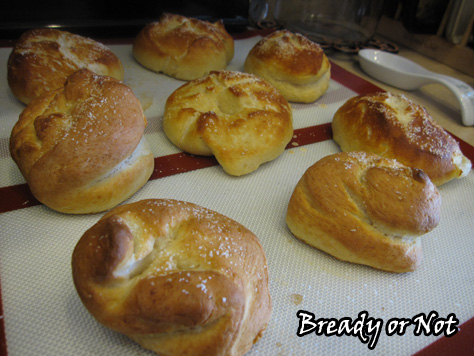
These buns are soft and chewy, tender yet strong. They can cradle juicy meat without instantly becoming a soggy mess, but they won’t break your teeth, either. That little bit of salt on the top complements just about everything. Want to use these for hamburger buns? Make big rounds. Or shape them into hot dog buns. Or as rolls that you can use for sliders, or simply slice open to add butter.
They keep great in a sealed container for a few days, and also freeze and thaw in a fabulous way.
Trust me, once you make these buns, you’ll never settle for the grocery store stuff again.
Bready or Not: Pretzel Sandwich Buns
Ingredients
Dough Ingredients
- 1 3/4 cups warm water
- 2 tablespoons unsalted butter
- 3/4 teaspoon salt
- 4 1/2 cups all-purpose flour or bread flour bread flour is best
- 1/4 cup nonfat dry milk
- 2 teaspoons instant yeast
Topping Ingredients
- coarse sea salt like pretzel salt or kosher salt
Water Bath
- 2 quarts water
- 1 Tablespoon salt
- 1/4 cup baking soda
Instructions
- Mix and knead the dough ingredients — by hand, mixer, or bread machine — to make a smooth, slightly sticky dough. If you're making by hand, allow the dough to rise in a lightly greased bowl, covered, for about 1 hour, until doubled. In bread machine, let the full dough cycle run through.
- Gently deflate the dough, and transfer it to a lightly greased work surface.
- Divide the dough into as many buns as you want. About 8 to 10 will work for sandwich size, while about 12 can be done at about slider size. Shape each piece into a smooth ball.
- Place the balls on a lightly greased baking sheet, cover with plastic wrap, and let rest for 15 minutes.
- While that's happening, preheat the oven to 400°F and prepare the water bath for the stovetop. Bring the water, salt, and baking soda to a boil in a large pot.
- Gently lower several dough balls at a time into the water bath. Cook for 30 seconds, flip over, and cook for 30 seconds longer. Using a slotted spoon, return the buns to the baking sheet.
- Using scissors or a sharp knife, cut half-inch deep crosses into the center of each bun. Sprinkle with coarse salt.
- Bake the buns for 20 to 24 minutes (lower time for smaller rolls/buns), or until they're brown. Remove them from the oven, and transfer to a rack to cool.
OM NOM NOM
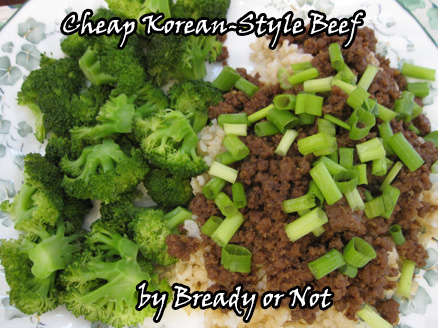
Bready or Not: Korean-Style Ground Beef
Holy cow. You’d think all cows are holy with how beef costs have gone up, and it’s supposed to get worse through the summer.
That’s one reason why I like this dish. It uses lean ground beef (which has still gone up 50% in price the past few years…) but enables me to do something different than the standard taco filling. It’s also cheaper than the flank steak you typically see used for home versions of Korean or Mongolian-style dishes.
This doesn’t taste like teriyaki, but has a sweet, savory flavor that goes fabulously with the meat.
So if ground beef goes on sale, don’t go for the tortillas. Pick up some extra rice and make this instead!
Recipe modified from Elizabeth Bryant.
Bready or Not: Korean-Style Ground Beef
Ingredients
- 1 pound lean ground beef
- 1/4 cup brown sugar packed
- 1/4 cup soy sauce
- 1/2 Tablespoon sesame oil
- 3 cloves garlic minced
- 1/4 teaspoon ginger powder or 1/2 teaspoon fresh ginger minced
- 1/2 teaspoon crushed red pepper
- salt and pepper
- diced green onions
Instructions
- Heat a large skillet over medium heat. Add in sesame oil and garlic, stir, then add in the hamburger and brown it. Drain most of the fat.
- Add brown sugar, soy sauce, ginger, salt and pepper, and red pepper. Simmer for a few minutes to blend the flavors.
- Serve over rice or noodles, and top with green onions.
OM NOM NOM!

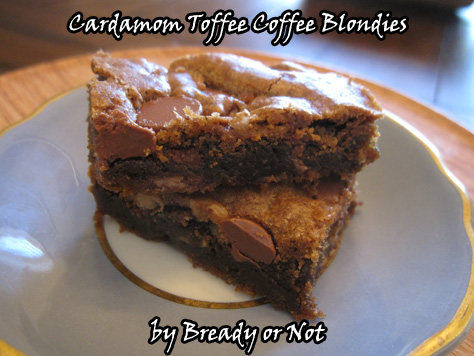
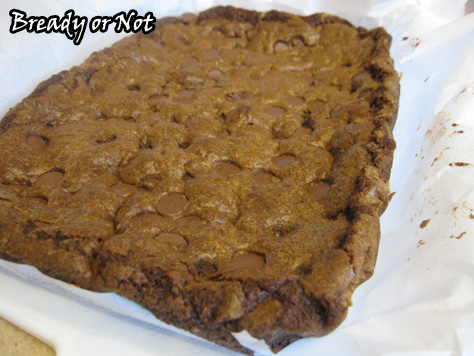
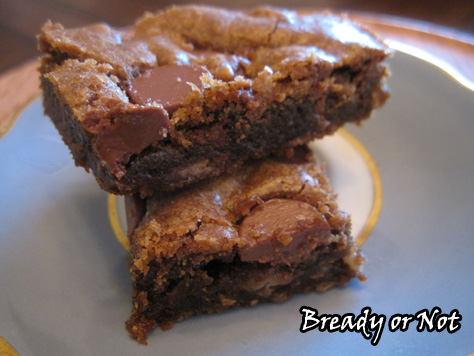
Bready or Not: Cardamom Toffee Coffee Blondies
My modified version of this recipe came about because I misread the original name on Pinterest. It was “Cardamom Coffee Blondies,” but at first glance I thought it said “Toffee.” Which sounded really good.
Once I read the recipe, I knew I had it in my power to make these with coffee and toffee. That’s because I had a bag of Heath Bits with Milk Chocolate stashed in my fridge.
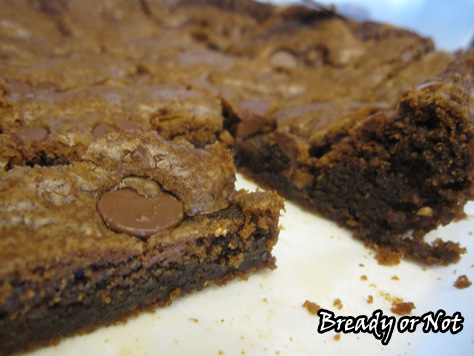
The flavors here play very well together. You have the lovely flavor of cardamom, the sweetness of toffee, the touch of chocolate, and the incorporated espresso powder. It sounds like a lot, but it works.
The texture is amazing, too. These are soft, chewy, and keep well for several days at room temp or in a closed container in the fridge (a necessity in Arizona, alas).
Bready or Not: Cardamom Toffee Coffee Blondies
Ingredients
- 1 cup unsalted butter room temperature
- 1 cup brown sugar packed
- 1/2 cup white sugar
- 1 Tbsp instant espresso powder heaping
- 1 Tbsp ground cardamom heaping
- 2 eggs room temperature
- 1 teaspoon pure vanilla extract
- 2 cups all-purpose flour
- 1 tsp baking soda
- 1 tsp salt
- 1 bag of Heath bits with chocolate or chop up some Heath or other toffee bars
For the top
- 1/2 cup chocolate chips
Instructions
- Preheat oven at 350-degrees. Prepare a 9x13 pan by lining it with parchment or aluminum foil and apply butter or nonstick spray.
- Cream the butter, espresso powder, cardamom and sugars together until fluffy; this takes several minutes. Beat in eggs, one at a time, followed by the vanilla.
- In a small bowl, whisk together flour, baking soda and salt. Add dry ingredients to the wet, mixing just until combined. Add the bag of Heath Bits last.
- Spread the thick batter into the prepared casserole dish. Sprinkle the chocolate chips across the top and gently press in.
- Bake for 30-35 minutes, until the edges are set and the middle passes the toothpick test. Don't over bake! Let cool a while before cutting.
OM NOM NOM.
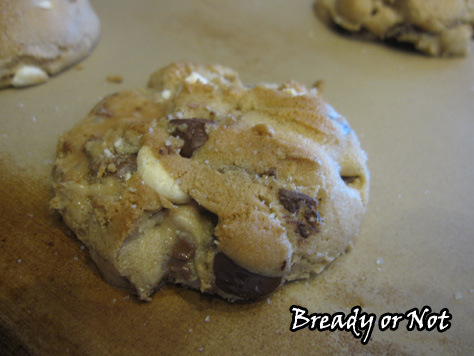
Bready or Not: Soft Batch-Style Chocolate Chip Cookies
As I grew up, I ate a lot of grocery store cookies and junk. Stuff that makes me shudder to think of now–those cinnamon rolls with spackle for frosting, and those cheap frozen pizzas with cardboard crusts and pseudo-pepperoni bits.

But there was some good stuff to be found, too… like Keebler Soft Batch Cookies. As I grew older, Soft Batches became the clear chocolate chip cookie preference for both me and my brother. Chips Ahoy were too crunchy (though they did come out with a soft version in recent years). Soft Batch is well… soft. Chewy. The texture is amazing.
Want to duplicate them at home? Want to know the secret? Corn starch. That’s right. It’s the miracle ingredient.
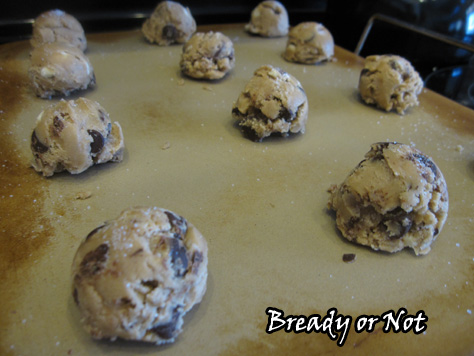
I’ve made this recipe a bunch of times, doubled it from the original, and added a few tweaks. Don’t limit yourself to chocolate chips. Add in whatever you want (chopped candy, chopped Oreos or other cookies, M&Ms, whatever–just don’t go over that 3 cup limit or you’ll have problems with structural integrity.
Structural integrity is very important. Chocolate chip cookies are serious business.
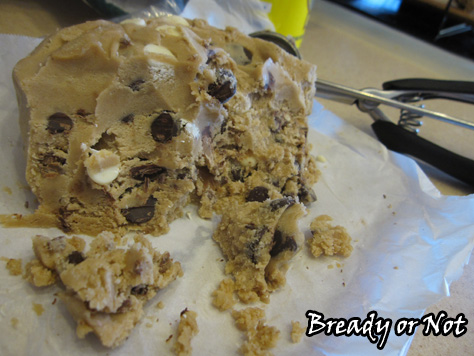
*One more note. This dough is great to make and freeze. You can freeze it in a large lump, wrapped in wax paper or parchment and kept in a freezer bag, or shaped into tablespoon-sized balls (freeze them on a cookie sheet and then bag them). If they’re shaped, you can take them straight from the freezer to the oven. Just add a few minutes to the cooking time.
Recipe modified from Picky Palate.

Bready or Not: Soft Batch-Style Chocolate Chip Cookies
Ingredients
- 1 cup unsalted butter room temperature
- 1 1/2 cups brown sugar packed
- 1/2 cup white sugar
- 2 large eggs room temperature
- 1 teaspoon vanilla extract
- 3 cups all-purpose flour
- 4 teaspoons cornstarch
- 2 teaspoons baking soda
- 1 teaspoon kosher salt
- 3 cups chocolate chips or other chips
- extra sea salt or turbinado sugar to sprinkle on top
Instructions
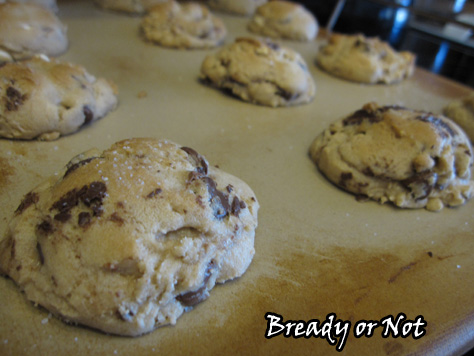
- Cream butter and sugars together until light and fluffy, which takes several minutes in a mixer. Add eggs and vanilla. Next slowly mix in flour, cornstarch, baking soda, salt, and the chocolate chips.
- You can make them straight away, but texture is thicker if the dough is chilled for several hours or overnight. Cover with plastic wrap if it will be in for a while.
- Preheat oven to 350-degrees. Scoop the dough onto parchment or silpat-lined cookie sheet. Sprinkle with a little extra salt or turbinado sugar, if desired. Bake for 10-13 minutes, watching for desired coloration. Let them cool on cookie sheet for 10 minutes before transferring to rack.
- OM NOM NOM.
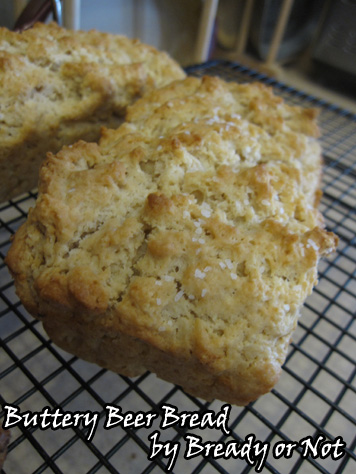
Bready or Not: Buttery Beer Bread
My husband loves beer. He recently decided to start collecting beer growlers from small breweries. I do not like beer. Therefore, he ends up with a sizable amount of artisan beer that needs to be consumed in a short amount of time.
“And this is a problem… how?” he asked.
“Of course. Moderation and all.”
“What? What do you think I could do with beer other than drink it?“
“I could make beer bread!”

He gave me one of those patented husband looks that says you would suggest I use this precious elixir for bread. But that’s exactly what I’ve done twice now, and you know what? He thinks it’s a pretty awesome thing because he loves bread, too.
I have only made this using my Pampered Chef mini loaf pan. I love the size of those loaves! One is perfect for a meal or two, and they freeze fabulously. I just wrap them individually in plastic wrap, defrost in the breadbox, and then warm them with some butter.
My breadbox gets a lot of use. [There’s a joke there that a few select people will get. The rest of you, just nod.]
Recipe modified from Veronica’s Buttery Beer Bread at Jenna’s Everything Blog.
Bready or Not: Buttery Beer Bread
Ingredients
- 3 cups all-purpose flour
- 1/4 cup white sugar
- 1 Tb baking powder
- 1 tsp salt
- 12 oz beer
- 1/4 - 1/2 cup unsalted butter 1/2 stick to 1 stick, melted (make as buttery as desired)
- kosher salt or pretzel salt
Instructions
- Preheat the oven to 375-degrees. Prepare your big loaf pan or mini loaf pans by buttering lightly on the bottom (the sides will be well-buttered later on).
- Sift together flour, salt, baking powder, and sugar. Stir in the beer. It may be sticky and need to be incorporated by greased hands.
- Drop the dough into pan(s) and even out the top as much as possible. Melt desired amount of butter and pour over dough.
- Using four mini loaf pans, it will bake for 30-35 minutes. The original recipe stated that a full-size bread pan needs to bake for an hour. Let it cool in the pan for about five minutes, and then because of all the butter, the bread should pop right out.
- OM NOM NOM!
