


Bready or Not Original: Paprika Cheddar Crackers
These Paprika Cheddar Crackers are a perfect snack or appetizer, and they even keep well for travel!
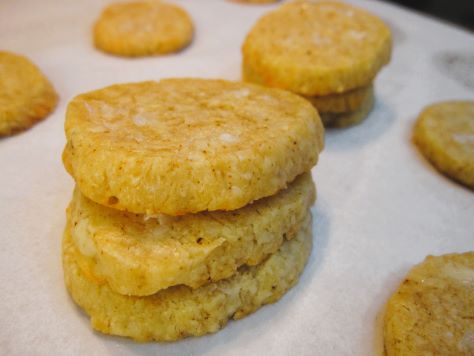
Use a good aged cheese here–or one labeled extra sharp. The cheese should be the main thing here, with the paprika and salt serving to heighten that flavor. Of course, you can mix in some other spices as well–or even use chipotle pepper for a zing.
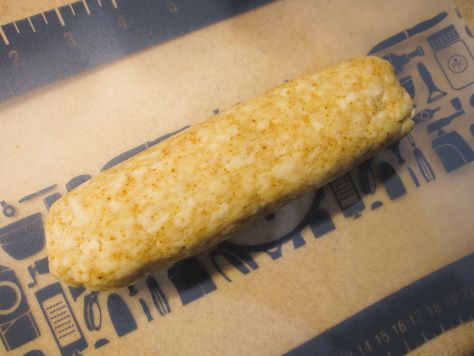
I split up this batch and baked them months apart. One of the nice things about these tubes of dough is that they don’t take up much room in the freezer–or in the fridge when it’s time to thaw them.
I got 16 crackers out of each batch (so 32 total), and mind you, these are pretty thick, hearty crackers. These aren’t the kind you grab a handful of, maybe just a few at a time. They would be great at a fancier function, served with wine or champagne, but are good with pretty much any drink. Cheese is versatile like that.
Bready or Not Original: Paprika Cheddar Crackers
Equipment
- food scale
- plastic wrap
- parchment paper
- baking sheet
- knife
Ingredients
- 1/2 cup unsalted butter (1 stick) room temperature
- 8 ounces aged cheddar shredded
- 1 cup plus 2 Tablespoons all-purpose flour
- 1/2 teaspoon paprika
- 1 1/2 Tablespoons water
- 1 teaspoon kosher salt
- flaked sea salt
Instructions
- Mix together the butter, cheddar, flour, paprika, and salt. Add the water. Continue to mix together until it forms a cohesive dough; add a touch more flour if it’s too wet, or a dribble of water if it’s dry.
- Use a food scale to weigh the dough and divide it in half. Roll out the plastic wrap to about 10 inches. Place half the dough on the plastic and shape into a thick tube, then wrap it in plastic to compress it and make it into an even log about an inch in diameter. Completely seal in plastic wrap. Repeat with other half of dough.
- The dough can be kept in the fridge for up to 4 days, or frozen for several months.
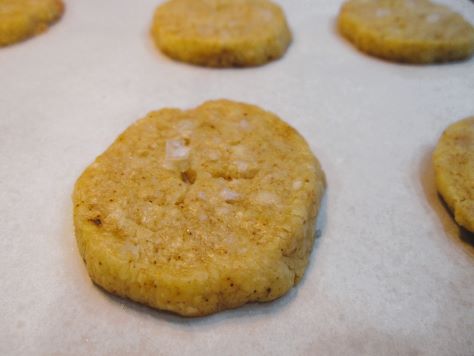
- When ready to bake, preheat the oven at 350-degrees. Place parchment paper on baking sheet. Place a chilled (thawed) dough tube on a cutting board and slice about 1/4-inch thick. Place with minimal spacing on the parchment. Add a pinch of flaked sea salt onto each cracker and gently press it into the surface.
- Bake for 17 to 20 minutes, until edges are just starting to turn golden. Let set to cool on cookie sheet. Store in a sealed container. They are best eaten within 3 days.
OM NOM NOM!
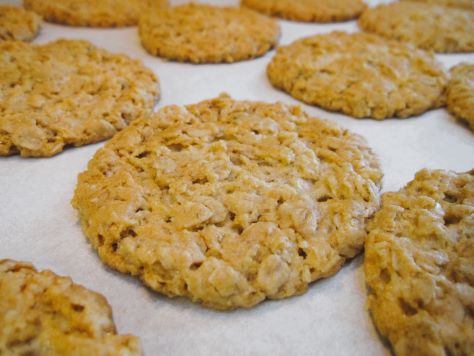
Bready or Not: Crunchy Biscuits
These are Crunchy Biscuits in the British sense–that is, they are crunchy cookies with a satisfying snap.
I found the recipe in Bigger Bolder Baking by Gemma Stafford [affiliate link], a book gifted to me by my mother-in-law. Gemma is Irish-born and now lives in America, and her fantastic cookbook has ingredients and cooking temperatures in both British and American measurements.
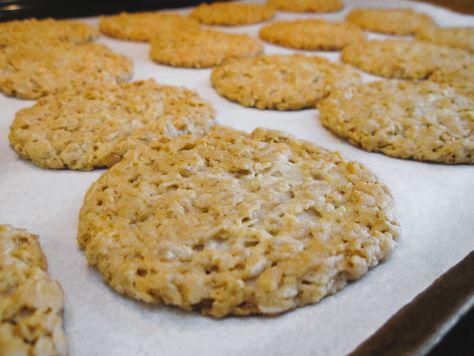
This small-batch recipe includes a quintessentially British ingredient, golden syrup, that has no real American parallel. I’ve seen some recommendations to substitute with half measures of light corn syrup and honey, and while that works as a liquid replacement, the flavor isn’t quite the same.

That said, golden syrup isn’t hard to find in America, it just tends to be expensive. Even in the wastelands of Phoenix, I could find Lyle’s Golden Syrup in the small British goods section of my local Fry’s (Kroger) chain.
Bready or Not: Crunchy Biscuits
Equipment
- parchment paper
- baking sheet
- tablespoon scoop
- cooling rack
Ingredients
- 1 cup unsalted butter (2 sticks) softened
- 3/4 cup white sugar
- 3 Tablespoons golden syrup
- 1 cup self-rising flour
- 2 2/3 cup rolled oats also called old fashioned oats
- 1 teaspoon baking soda
- 1/4 teaspoon salt
Instructions
- Preheat oven to 350-degrees. Line a baking sheet with parchment paper.
- In a large bowl, cream together butter and sugar until it is soft and light in color. Add golden syrup. Follow up with the flour, oats, baking soda, and salt, mixing until just combined.
- Use a tablespoon scoop to shape dough, rolling each lump briefly with hands to compress and flatten, then place spaced out two-inches apart on baking sheet. They will spread as they bake.
- Bake 12 to 14 minutes, until golden brown and set. Let them idle on the cookie sheet about 5 to 10 minutes, then transfer them to a cooling rack. Store them in an airtight container at room temperature.
OM NOM NOM!
Bready or Not Original: Cookie Butter and Jelly Bars (Big Pan)
This big casserole dish of Cookie Butter and Jelly Bars is chewy and sweet, perfect to feed a crowd! Customize it by using your favorite jelly.
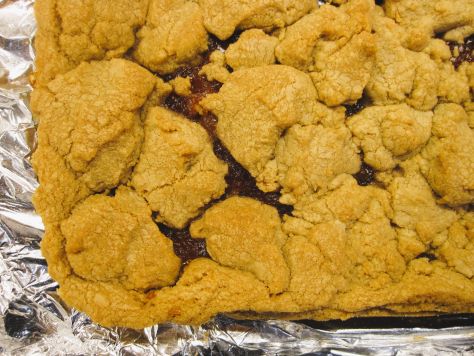
I love cookie butter. You can find it in jars near the nut butters in a lot of grocery stores. There’s nothing healthy about it–it’s spice cookies pulverized with oil to make a smearable paste that you can use however you use peanut butter, such as on sandwiches or in baked goods like this.
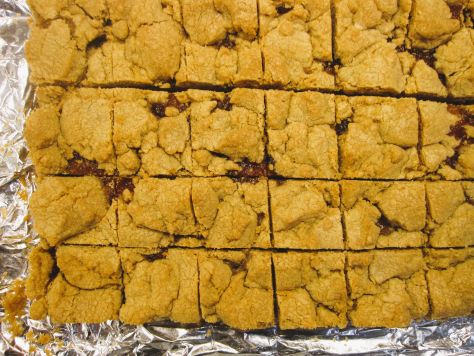
Cookie butter makes everything taste inherently more cookie-like. It’s fantastic with jelly! I recommend using about 10-12 ounces of jelly here; less than that and the layer is thin, more than that, it can gush at the sides of the pan and stick to the foil.
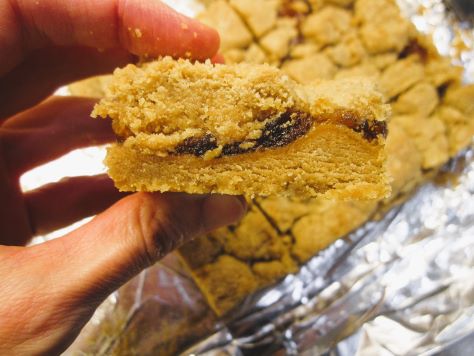
These bars are best eaten within two days. After that, they will dry out a bit but they are still tasty.
Bready or Not Original: Cookie Butter and Jelly Bars (Big Pan)
Equipment
- 13×9 pan
- aluminum foil
- nonstick spray
- offset spatula
Ingredients
- 1 cup unsalted butter (2 sticks) room temperature
- 1 1/2 cups white sugar
- 1 teaspoon vanilla extract
- 2 large eggs room temperature
- 2 cups creamy cookie butter such as Biscoff and Trader Joe's Speculoos
- 3 cups all-purpose flour
- 1 teaspoon baking powder
- 10-12 ounces jelly or jam or preserves
Instructions
- Preheat oven at 350-degrees. Line a 13×9 pan with foil and apply nonstick spray.
- In a large mixing bowl, beat together butter and sugar until light and fluffy. Add the eggs, vanilla, and cookie butter. Follow up with the flour and baking powder.
- Spread about 2/3 of the dough in the prepared pan. Using an offset spatula, spread the jam in an even layer up to about 1/2 inch of the edge. Dollop the remaining dough all over the top. Use a knife to gently form into swirls with the jelly.
- Bake for 25 to 30 minutes until the edges start to brown and the middle is set and passes the toothpick test. Let cool completely on wire rack. Use foil to lift contents onto a cutting board to slice into bars. Store in a sealed container at room temperature.
OM NOM NOM!
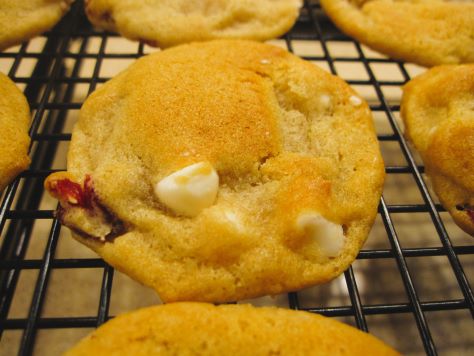
Bready or Not Original: Chewy Honey Strawberries and Cream Cookies
These Chewy Honey Strawberries and Cream Cookies are my own invention inspired by these soft-dried strawberries I found at Costco. (They are also on Amazon for a much higher price. Affiliate link.)

If you love strawberries AND cookies, welcome to the recipe of your dreams. My base chewy honey cookie recipe has ingredients swapped out to make this work.
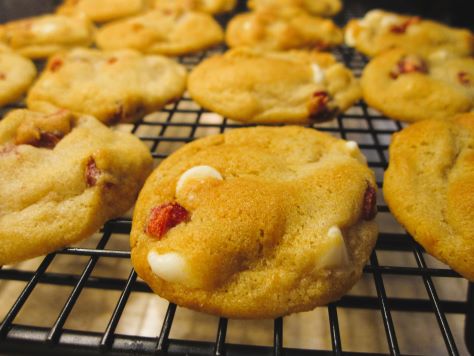
Chopped up (I used kitchen shears) soft-dried strawberries are distributed throughout the dough. White chocolate chips are the fantastic accompaniment that is easy to find, but I also tried this recipe again using some limited edition Hershey’s Cream Cheese Chips, which delivered an even richer flavor.

Who knows where or how long these chips will be available, but if you can find them, use them in this recipe or any other good chocolate chip cookie recipe.
Like my other variations of this base recipe, these cookies will keep for weeks in a sealed container.
Bready or Not Original: Chewy Honey Strawberries and Cream Cookies
Equipment
- plastic wrap
- tablespoon or teaspoon scoop
- baking sheet
Ingredients
- 3/4 cup unsalted butter (1 1/2 sticks) softened
- 1/2 cup light brown sugar packed
- 1/2 cup white sugar
- 2 Tb honey
- 1 large egg room temperature
- 1 Tablespoon vanilla extract
- 1 cup bread flour
- 1 cup all-purpose flour
- 2 teaspoons cornstarch
- 1 teaspoon baking soda
- 1/2 teaspoon salt
- 1 cup white chocolate chips or Hershey's Cream Cheese Chips
- 3/4 cup soft-dried strawberries chopped
Instructions
- In a large bowl, beat the butter until smooth. Add the sugar and honey and beat until creamy and fluffy, about 3 minutes. Scrape down the sides of the bowl and then mix in the egg and vanilla extract.
- In a separate bowl, combine the dry ingredients: bread flour, all-purpose flour, cornstarch, baking soda, and salt. Sift together.
- Slowly stir together the wet ingredients and flour mix until just combined. Fold in the white chocolate chips and strawberries pieces. Wrap the dough in plastic wrap and stash in the fridge for several hours or days; dough can also be frozen at this stage.
- When ready to bake, preheat the oven at 350-degrees. Use greased stoneware, parchment paper, or silpat mats. The cookie dough, even straight from the fridge, has a soft Play-Doh-like consistency, and will spread when it bakes; keep this in mind when spacing cookie dough.
- Teaspoon-sized cookies need to bake 9 to 12 minutes; Tablespoon-sized take 11 to 13 minutes. Let set on cookie sheet for 10 to 15 minutes before moving to a rack to cool completely.
- Stored cookies will keep in a sealed container, between waxed paper or parchment layers, for weeks. They are excellent for travel or shipping.
OM NOM NOM!
Bready or Not Original: Almond Blondies
These Almond Blondies are proof that simple can be oh-so-good.

There’s no chocolate here. No fancy presentation. This is all about a basic, pan-mixed batter with almonds on top.
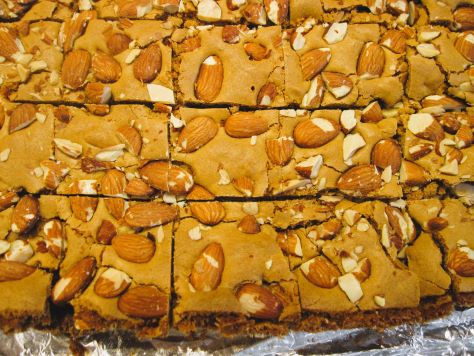
These things are a sensory delight. You have thick, chewy bars infused with deep sweetness thanks to a heady application of brown sugar. The chopped almonds add a hearty crunch in contrast.
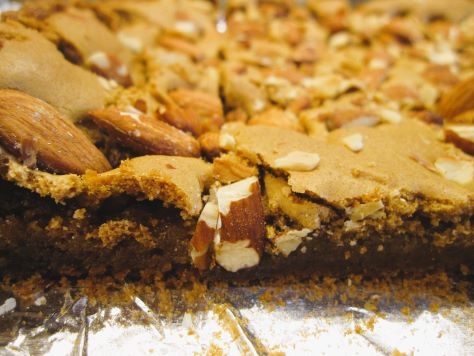
Some almonds and crumbs will fall off as the bars are sliced, but these remnants are delicious. Let nothing go to waste!
Bready or Not Original: Almond Blondies
Equipment
- 13×9 pan
- nonstick spray
- large saucepan
Ingredients
- 2 cups brown sugar packed
- 2/3 cup unsalted butter
- 2 large eggs room temperature
- 2 teaspoons vanilla extract
- 1 teaspoon almond extract
- 2 cups all-purpose flour
- 1 teaspoon baking powder
- 1 teaspoon baking soda
- 3/4 cups almonds chopped
Instructions
- Preheat oven at 350-degrees. Line a 13×9 pan with foil and apply nonstick spray. Set aside.
- In a large sauce pan on medium heat, place the brown sugar and butter, stirring constantly until the ingredients combine to be smooth. Set on another burner to cool for about 15 minutes.
- Whisk in the eggs one at a time, followed by the two extracts. Stir in the flour, baking powder, and baking soda until no white streaks remain.
- Spread batter in the prepared pan. Sprinkle the almonds all over the top. Bake for 25 to 30 minutes. The middle should pass the toothpick test. Let cool for a bit, but cut into the blondies while they are still warm. Store in a sealed container at room temperature.
OM NOM NOM!
Bready or Not: Country Loaf
The blog is called Bready or Not, and today we are definitely bready with this gorgeous, old-fashioned Country Loaf.

This is a basic boule in the French style. Water, salt, sugar, flour, yeast. Baking is done with added steam–boiling water in a pan below the bread, sending up a cloud to give this loaf the perfect crust.
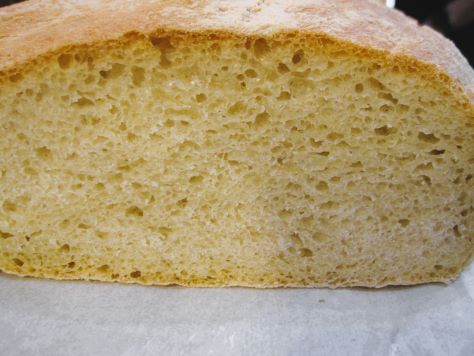
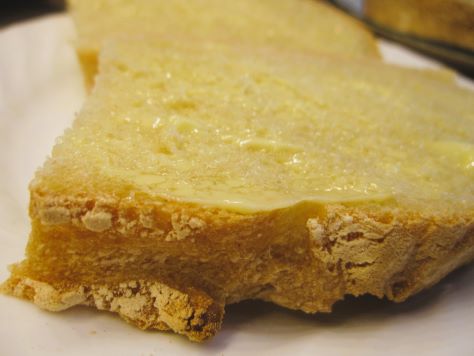
This bread is absolute perfection toasted with butter, but it’s also great for sandwiches or to go along with soup. Some breads are best hot, but this one is more versatile.
I modified this recipe from a fantastic cookbook called Making Artisan Breads in the Bread Machine by Michelle Anderson. Click here to get it through my affiliate link.
Bready or Not: Country Loaf
Equipment
- bread machine
- large bowl
- parchment paper
- baking sheet or pizza stone
- cake pan
- kettle for boiling water
Ingredients
- 1 3/4 cups lukewarm water 100-110-degrees
- 2 teaspoons sea salt
- 1 teaspoon white sugar
- 4 1/4 cups bread flour
- 1 1/4 teaspoons active dry yeast or bread machine yeast
Instructions
- Add ingredients to bread machine bucket, which usually means liquids first–so water, sea salt, sugar, bread flour, and yeast. Let the dough cycle run.
- Transfer the dough to a large greased bowl, tucking dough under the sides to form a tight ball. Cover with a towel or plastic wrap to let rise for an 1 1/2 to 2 hours.
- Lay out a large piece of parchment paper. Flour lightly. Roll dough onto it, deflating the round and tucking the dough to form a new, smooth round. Flour lightly on top. Cover with towel or plastic wrap again to let rise, 1 to 1 1/2 hours.
- Preheat oven at 500-degrees. Place baking pan or stone on middle rack. On rack below that, place a cake pan with 1 or 2-inch sides. In an electric or stovetop kettle, boil about 2 cups of water.
- Use a sharp knife to score a hash mark across the top of the risen dough. Place the hot baking sheet or stone on the stovetop. Very carefully, use the parchment paper as a sling to move the bread onto the hot pan. Place it in the oven. Immediately use the kettle to carefully pour water into the cake pan on the lower rack; no need to measure the water, but get the pan about half full. Close the oven and do not open it again until the end of baking.
- Bake for 5 minutes. Lower the temperature to 400-degrees. Bake an additional 30 minutes. The bread should be risen and golden. Cool for at least 30 minutes before slicing in.
- This bread is fantastic at room temperature or heated up again. Use it with butter, for sandwiches, whatever you want! While the bread is still fresh, freeze leftovers for later enjoyment, too.
