


Bready or Not Original: Big Batch Chocolate Chip Shortbread
Do you need a whole lot of cookies? This Big Batch Chocolate Chip Shortbread recipe has got you covered.

This recipe doubles my Pride O’ Scotland Shortbread Recipe (one of the first cookie recipes I ever called ‘mine’ back in my teens) and adds chocolate chips. I’ve reworked my basic shortbread recipe many ways over the years; check out versions with Cookie Butter, Lemon, and Chocolate Chip Espresso.

A few important things to mention here. Before the shortbread is baked, be sure to use a fork to poke holes over the top and then cut into the dough to form the shapes of the future cookies. Then, as soon as the pan is out of the oven, cut again along those lines. A lot of classic shortbread recipes produce cookies that are firm and soft, and if they are cut after being cooled, they may just fall apart.

Bready or Not Original: Big Batch Chocolate Chip Shortbread
Equipment
- jelly roll pan (15x10x1)
Ingredients
- 2 cups unsalted butter (4 sticks) softened
- 2 egg yolks
- 2 teaspoons vanilla extract or vanilla bean paste
- 4 cups all-purpose flour
- 1 1/2 cups white sugar
- 1/2 teaspoon salt
- 1 cup chocolate chips
Instructions
- Preheat oven at 375-degrees. Line jelly roll pan with foil and apply nonstick spray.
- In a large bowl, beat together the butter, egg yolks, and vanilla. In another bowl, stir together the flour, sugar, and salt. Gradually add the dry ingredients to the wet. If using something like a KitchenAid, by the end, the thick dough will likely require setting the beater aside and using both hands. Distribute the chocolate chips throughout.
- Press dough into prepared pan. Flatten evenly with palms. Prick surface all over with floured fork. Use a knife or bench knife to score the dough into finger-sized wedges.
- Bake for at least 20 minutes; the tops should just be turning golden, with the middle set and dry. Remove from oven. Immediately cut again following slash marks.
- Let shortbread cool. Cut again along slash marks. Use the foil to carefully lift the shortbread onto a cutting board to pull apart the pieces. Shortbread will keep in a sealed container for several days.
OM NOM NOM!
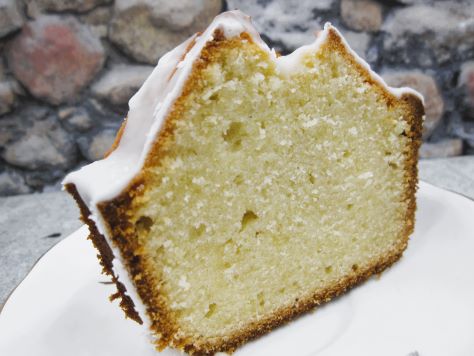
Bready or Not: Cider Pound Cake
This luscious Cider Pound Cake, made in a tube pan, is great by itself or eaten alongside fruit and/or ice cream.

There are no apples in this cake. That means it’s fast and easy to make, too. No peeling, or dicing or grating. Instead, the recipe relies on sparkling apple cider for sweetness and gentle flavor.

“Sparkling cider” means nonalcoholic. That doesn’t mean you should use any old apple juice, though. Apple cider has more flavor and heft (i.e. not so watery). I used a seasonal version from Aldi that is all Honeycrisp, but any basic sparkling cider will do!
Modified from Centennial Kitchen Fall Baking Magazine 2021.
Bready or Not: Cider Pound Cake
Equipment
- large tube pan
- nonstick spray
Ingredients
Cake
- 2 cups unsalted butter (4 sticks) softened
- 2 cups white sugar
- 6 large eggs room temperature
- 3 1/4 cups all-purpose flour
- 1/4 teaspoon salt
- 1/2 cup sparkling apple cider
Glaze
- 1 cup confectioners’ sugar
- 1 teaspoon clear vanilla extract
- 1 Tablespoon sparkling apple cider
Instructions
- Preheat oven to 350 degrees. Coat a tune pan with nonstick spray.
- In a big bowl, cream together the butter and sugar until they are fluffy. Add the eggs in sequence, beating well after each addition.
- In another bowl, stir together the flour and salt. Gradually add it to the large bowl along with the apple cider, going back and forth in increments. Scrape the bottom of the bowl to ensure everything is mixed. Pour batter into prepared pan and smooth out the top.
- Bake for 1 hour and 5 minutes to 1 hour and 20 minutes, until a toothpick plunged into the center of the cake comes out clean. Cool in pan for 20 minutes, then invert onto a cooling rack to completely cool.
- Once the cake is cool, in a small bowl, combine the three glaze ingredients to make a thick but moveable glaze. Dribble over cake so that it oozes over sides.
- Let set at least 30 minutes before cutting. Store under a cake dome or cut into individual slices to encase in plastic wrap.
OM NOM NOM!
Bready or Not: Cookie Butter Pound Cake
This Cookie Butter Pound Cake, topped with a Cookie Butter Glaze, is lush, indulgent, and oh so good.

Because someone always asks, “What’s cookie butter?” The answer is: an addictive substance found near the peanut butter in most every grocery store in America; even my local Walmart has it in the main Biscoff brand or as a Walmart generic, and Trader Joe’s calls it Speculoos. It’s essentially pulverized cookies and oil. It has the exact same texture as peanut butter and can substitute for it in most any recipe. There is nothing healthy about it and it is incredibly delicious.
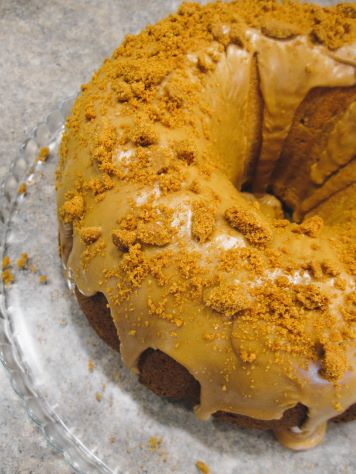
Cookie butter makes everything taste more inherently like cookie dough. In this recipe, you have cookie dough in the cake batter, in the glaze, and actual cookies crumbled on top. If you love cookie butter, this is your recipe–and if you haven’t had it yet, prepare to be converted.

Modified from Bake from Scratch September-October 2023 issue.
Bready or Not: Cookie Butter Pound Cake
Equipment
- large bundt cake pan (15 cups)
- baking spray with flour
- stand mixer
Ingredients
Cake
- 1 cup unsalted butter (2 sticks) softened
- 1 1/2 cups white sugar
- 3/4 cups brown sugar packed
- 3/4 cup cookie butter
- 5 large eggs room temperature
- 1 teaspoon vanilla extract
- 3 cups all-purpose flour
- 1 1/4 teaspoons kosher salt
- 1 teaspoon ground cinnamon
- 1/4 teaspoon ground nutmeg
- 1 cup milk or half & half, room temperature
Cookie Butter Glaze
- 1 cup confectioners’ sugar
- 1/2 cup cookie butter
- 1/4 cup milk or half & half
- 2 Biscoff cookies crushed, for garnish
Instructions
Make the cake
- Preheat oven at 325 degrees. Generously apply nonstick spray with flour to a large (15 cup) bundt pan.
- In a stand mixer with a paddle attachment, beat butter, sugars, and cookie butter until light and fluffy, about 3 to 4 minutes. Add eggs one at a time, beating well after each addition. Follow up with vanilla.
- In another bowl, stir together flour, salt, cinnamon, and nutmeg. Gradually add the dry mix to the wet, alternatively adding in the milk as well. Scrape the bottom of the bowl to make sure everything is combined.
- Spoon batter into the greased pan. Even out the batter over the top.
- Bake for an hour to an hour and 5 minutes, until the middle of the cake passes the toothpick test. Let it cool in pan for 20 minutes, then invert it onto a cooling rack to cool completely.
Make the glaze
- In a mixing bowl, beat together the confectioners’ sugar, cookie butter, and milk. Beat for 1 to 2 minutes, until it is nice and smooth; if it is too loose, add more confectioners’ sugar, and if it’s too thick, add a touch more milk. Immediately drizzle over cake to form thick drizzles. Crush the two Biscoff cookies and crumble them over the top.
- Store cake under a cake dome, or cut into individual slices to encase in plastic wrap.
OM NOM NOM!
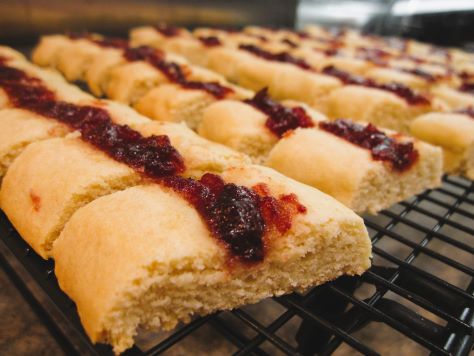
Bready or Not Original: Jammy Shortbread
This Jammy Shortbread is a fun recipe that’s easy to customize with your favorite jam! Go for raspberry, cranberry, blueberry… something sweet and delicious.
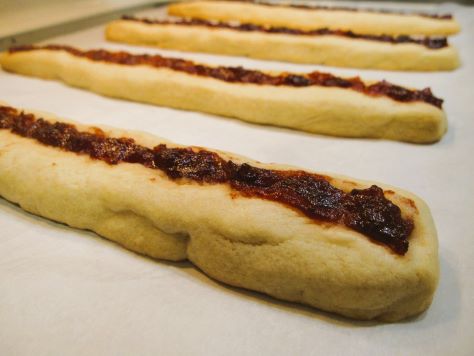
I had to make this recipe a few times to get it right. Specifically, shaping the dough was the issue. That’s why I give instructions to form the divided dough into a 12-inch stick that is 1 inch across. That makes the dough thick enough to form a trench that will hold the jam.
What initially foiled me was that the dough was too wide, and then it spread with baking. I had these wide cookies with just a little bit of jam in the middle. Oops.
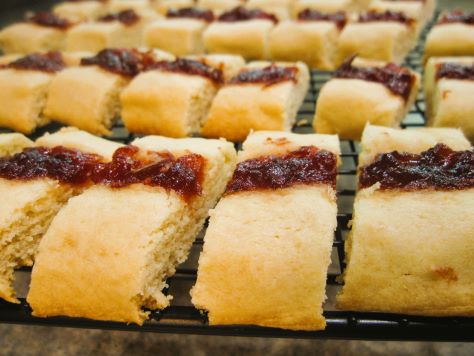
Leave it to me to make the screw-ups so that your cookies can turn out great from the first batch!
Bready or Not Original: Jammy Shortbread
Equipment
- food scale
- plastic wrap or bags
- parchment paper
Ingredients
- 3/4 cup unsalted butter (1 1/2 sticks) softened
- 2/3 cup white sugar
- 1 large egg room temperature
- 1 teaspoon vanilla extract
- 2 cups all-purpose flour
- 1/2 teaspoon baking powder
- 1/2 teaspoon salt
- 1/3 cup thick fruit jam
Instructions
- In a large bowl, cream together butter and sugar until light and fluffy. Beat in egg and vanilla. In another bowl, sift together the flour, baking powder, and salt. Gradually add the dry ingredients to the wet to form a cohesive dough.
- Use a food scale to divide the dough into four portions. Wrap them each in plastic wrap or in a sealable bag, and chill for at least an hour.
- Preheat oven at 350 degrees. Prepare a large baking sheet with parchment paper.
- Pull out a portion of chilled dough. On a far side of the baking sheet, form it into a 12-inch-long stick, 1 inch across. Use fingertips to form a trench down the middle. Spoon jam to fill the trench. Repeat the process with the other three portions of dough, creating long lines on the pan.
- Bake for 18 to 22 minutes, until dough looks set and is light golden brown. Let cool for 2 minutes. Slice each stick 3/4-inch apart to form individual cookies. Move them to a rack to completely cool. Store in a sealed container at room temperature.
OM NOM NOM!
New Book Deal with 47North
Happy news! I’ll have another book published with 47North, the same wonderful people who published A Thousand Recipes for Revenge. The Cottage That Sways Between Sea and Sky (and that title may well change) is something different, a 1926-set cozy piece of historical fiction with a touch of fantasy and a lot of heart. It’ll come out in fall 2025.

#SFWAPro
Read MoreBready or Not Original: Easy Flatbread Crackers
These Easy Flatbread Crackers are delicious, much better than anything you find in stores, and they are quick to make, too.

Anyone who knows me can figure out how I used these crackers: as a base for cheese. I need crackers to go with all kinds of cheese, so I don’t go heavy on savory flavors. The light seasonings here make for versatility. That versatility also makes these useful for dips, soups, or just eating straight.

A quick note on the cheese, too: whatever kind of Parmigiano-Reggiano or similar hard cheese you use inside these crackers, don’t get the pre-shredded kind if you can help it. Those shreds are coated with preservative, anti-stick stuff. That said, if you need to get shredded cheese for accessibility reasons, I understand–but be aware it can throw off recipes sometimes.

Bready or Not Original: Easy Flatbread Crackers
Equipment
- baking sheet
- parchment paper
- Rolling Pin
- pizza cutter or knife
Ingredients
- 1 1/2 cups bread flour plus flour for surface
- 1 1/2 teaspoons kosher salt
- 1 teaspoon white sugar
- 1/2 cup Parmigiano-Reggiano or a quality domestic version, freshly grated
- 1 teaspoon celery flakes
- 1/2 teaspoon dried thyme
- 1/2 cup cold water
- 3 Tablespoons extra virgin olive oil
- flaked sea salt to top
Instructions
- Preheat oven at 400 degrees. Line a baking sheet with parchment paper.
- In a medium bowl, toss together the flour, salt, sugar, and cheese. Add the herbs along with the olive oil and water, stirring until it just comes together as a dough. Add a touch more water if it’s too dry or flour if it is too wet.
- Transfer to a lightly floured surface and knead the dough briefly to smooth it out. It shouldn’t be sticky. Divide the dough in half.
- Roll out a portion on the floured surface. Use a pastry brush to lightly coat the top with water. Sprinkle with flaked sea salt. Use a pizza cutter or other blade to portion the dough into rectangles or other shapes a few inches in diameter. Transfer pieces to prepared parchment. Repeat process with remaining dough.
- Bake for 18 to 21 minutes, until lightly browned. Let harden and cool for at least an hour. Store in a sealed container for up to 3 days, or immediately freeze portions for later enjoyment.
OM NOM NOM!
Follow me


