


Bready or Not: Snickerdoodle Brookie
Don’t struggle to choose between Snickerdoodles and Brownies. Have them both at the same time in this extraordinary Snickerdoodle Brookie!
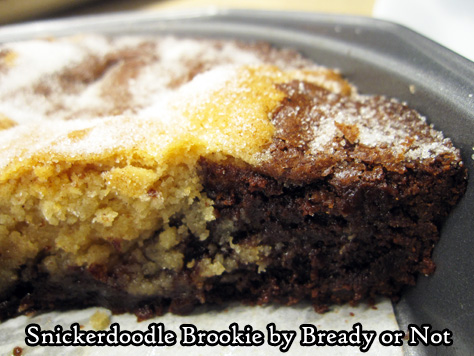
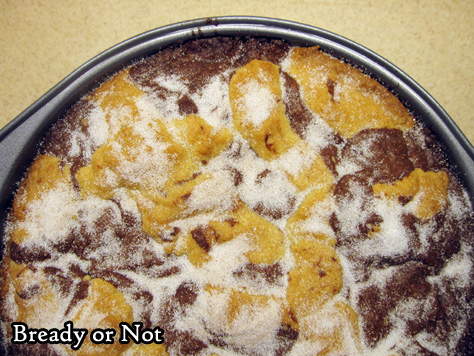
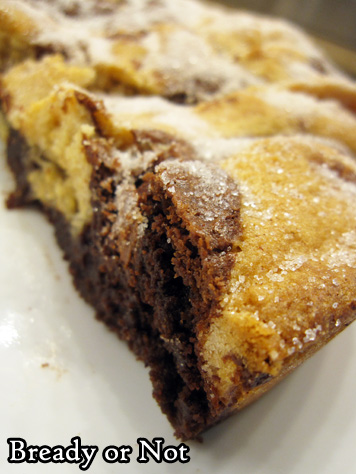
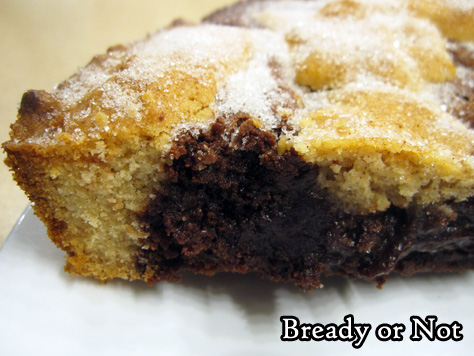
This is essentially like a massive cookie-cake hybrid. It looks impressive, and the flavor is impressive, too. If the layers work out right, you get a bit of everything in every bite.
If you eat the brookie warm, the chocolate flavor is quite strong. I actually liked this best at room temperature. The flavors play together better then.
I mean, it’d be a shame to not get to enjoy the Snickerdoodle side of things. A travesty.
I modified this from the original in my favorite food magazine, Bake from Scratch. I tried to make it easier by using the microwave, prepping the pan with parchment, and clarifying the steps throughout.
I can also testify that this is a great recipe to portion out and freeze. Pieces don’t take long to thaw and the brookie is dense enough to be pretty portable, too, though the dusting of cinnamon and sugar on top can sometimes be messy.
Modified from the March/April 2020 issue of Bake from Scratch Magazine.
Bready or Not: Snickerdoodle Brookie
Equipment
- 9-inch round cake pan
- parchment paper
Ingredients
Brownie batter:
- 6 ounces semisweet chocolate chips or bittersweet (170 grams)
- 1/2 cup unsalted butter 1 cube
- 1 cup white sugar
- 2 large eggs
- 1 teaspoon vanilla extract
- 3/4 cup all-purpose flour
- 1/4 cup Dutch process cocoa powder sifted
- 1/2 teaspoon kosher salt
Snickerdoodle dough:
- 1/3 cup unsalted butter softened
- 1/2 cup white sugar
- 1 large egg
- 1/2 teaspoon vanilla extract
- 1 cup all-purpose flour
- 1/2 teaspoon cream of tartar
- 1/2 teaspoon kosher salt
- 1/2 teaspoon ground cinnamon
- 1/4 teaspoon baking powder
Topping:
- 1 tablespoon white sugar
- 1/8 teaspoon ground cinnamon
Instructions
- Preheat oven to 350-degrees. Cut a piece of parchment to fit inside a 9-inch round cake pan. Apply nonstick spray in pan, place parchment, then spray parchment as well. Set aside.
Make brownie batter
- Melt together the chocolate and butter either in a double boiler on the stove or in the microwave in a microwave-safe bowl. Stir until everything is mixed and smooth. Stir in sugar. Set aside to cool for a few minutes before mixing in the eggs and vanilla.
- In a medium bowl, stir together flour, cocoa, and salt. Fold the dry ingredients into chocolate mixture just until combined. Set aside.
Make snickerdoodle dough
- Beat together the butter and sugar until they are fluffy; in a stand mixer, this will be at about 3 to 4 minutes. Scrape the sides of the bowl a few times. Add the egg and vanilla.
- In a separate bowl, stir together flour, cream of tartar, salt, cinnamon, and baking powder. Gradually mix the dry ingredients into butter mixture. Dough will be quite thick.
Assemble the cake
- Spoon large dollops (about 3 tablespoons each) of brownie batter into bottom of the prepared pan, leaving space between each lump. Crumble dollops of snickerdoodle dough in between brownie batter. Top with any more scoops of brownie batter and snickerdoodle dough. Gently use fingers to even out top.
- Bake until the middle passes the toothpick test, 33 to 40 minutes.
Make topping
- Stir together cinnamon and sugar. As soon as the cake is removed from the oven, sprinkle the mixture across the top.
- Let cool at least 15 minutes before cutting in. Cake can be served warm or at room temperature. It can also be frozen in slices and thawed for later enjoyment.
OM NOM NOM!
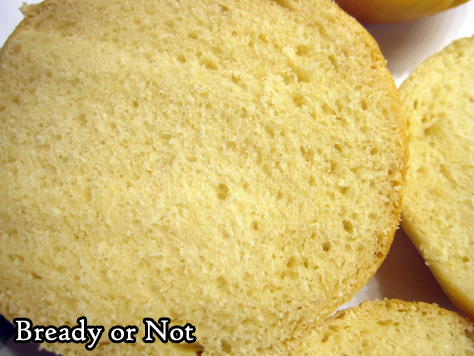
Bready or Not: Potato Rolls
These Potato Rolls are perfect for a hearty sandwich with a wet filling like BBQ sauce.
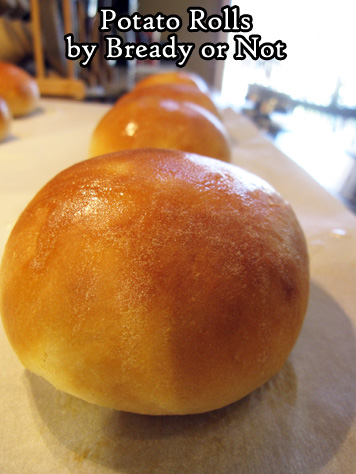
The ‘potato’ here is potato flour, a not-so-secret ingredient to create soft bread with a tender crumb. It handles moisture in a different way than standard wheat flours.
It’s not the kind of thing carried by a standard grocery store, but the internet comes to the rescue! I use the kind sold by King Arthur Flour (an all-around fantastic purveyor of bready goods), but it is also sold by Bob’s Red Mill and (of course) Amazon. Check your local natural goods store, too.
Nonfat dry milk powder IS sold by many grocery stores, but I like the results of King Arthur Flour’s version best.
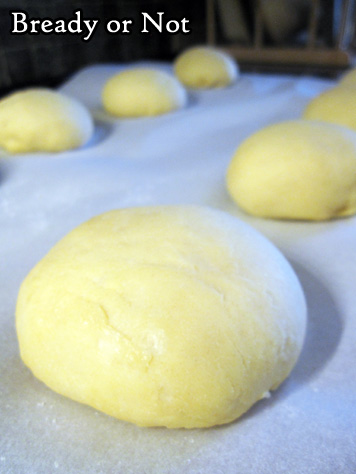
I’ve made these rolls several times and I find they didn’t double for me during the rise stages, but did they puff, and at the end the crumb showed a good texture inside.
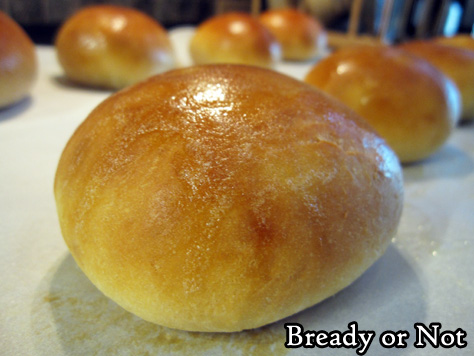
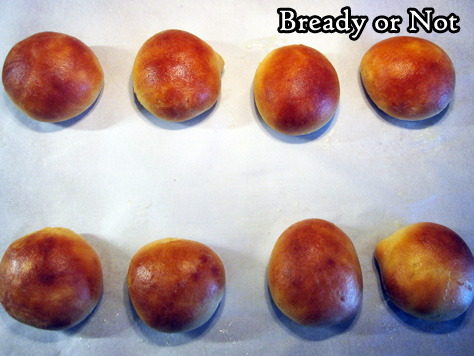
I found that dividing by 8 made for good-sized sandwich rolls, but you can make these as big or small as you want, and any shape, too.
Modified from Food & Wine Magazine June 2020.
Bready or Not: Potato Rolls
Equipment
- parchment paper
- food scale
- basting brush
Ingredients
- 2 2/3 cups bread flour
- 1/3 cup potato flour available from King Arthur Flour and Bob's Red Mill
- 1/3 cup nonfat dry milk powder
- 2 1/2 Tablespoons white sugar
- 2 teaspoons kosher salt
- 2 1/4 oz active dry yeast or one store-bought envelope
- 1 cup warm water 100 to 110-degrees
- 5 Tablespoons unsalted butter divided
Instructions
- In the bowl of a stand mixer, combine the warm water and 4 Tablespoons of melted butter. Add the bread flour, potato flour, milk powder, sugar, salt and yeast, and mix using the dough hook. Beat until the dough is cohesive, about 3 minutes.
- Increase the mixer’s speed and beat for another 6 minutes to make it smooth and elastic. Dough might be sticky. Grease another large bowl and dump the dough in there. Cover with plastic wrap or a towel and let it rise for 45 minutes to 1 hour.
- Place parchment paper on a large baking sheet. Use the food scale to weigh the dough. To make rolls of a good sandwich size, divide the total by eight; if smaller rolls are desired, go smaller. Pull off pieces of dough and shape into rounds. To smooth the surface, keep a saucer with water in it nearby, and use moistened fingers to smooth the dough. Set rounds spaced out on parchment. Loosely cover rolls with plastic wrap or a towel and let rise until they are puffy, about 35 to 45 minutes.
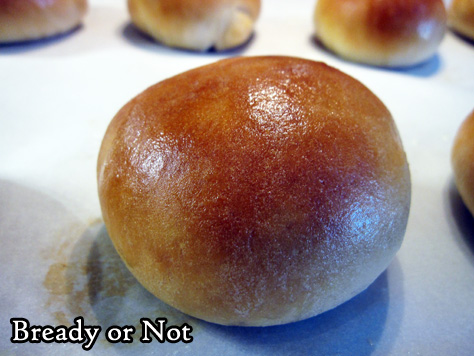
- Preheat oven at 350-degrees. Remove plastic wrap or towel. For sandwich-sized rolls, bake for 15 to 19 minutes, until the outside is nicely browned. Dip the basting brush into the remaining tablespoon of butter, and paint butter atop each roll to make glossy.
- Let rolls cool at least 15 minutes before cutting in. Rolls will keep for at least 2 days in a sealed bag at room temperature. They can also be frozen and thawed for later consumption.
OM NOM NOM!
Listen to my story “Headspace” in The Overcast
Space travel is cool. Cats traveling in space is even cooler, right? My story “Headspace,” originally published years ago in the themed anthology Cats in Space, is now available in podcast form! The narrator, Steve Quinn, did a great job. Please take a listen–you can even download it to listen on the go!
Listen to “Headspace” over at The Overcast.
#SFWAPro
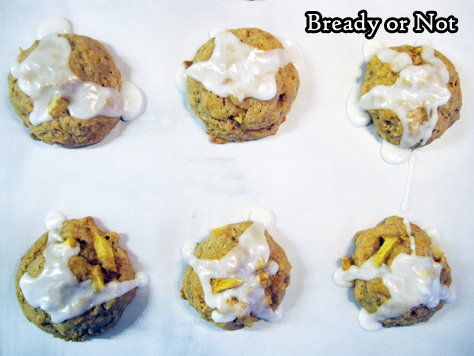
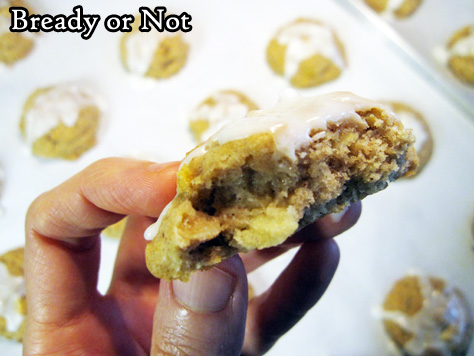
Read MoreBready or Not Original: Apple-Oat Cookies
These Apple-Oat Cookies are like a cross between apple oatmeal and apple pie, in a convenient portable form.
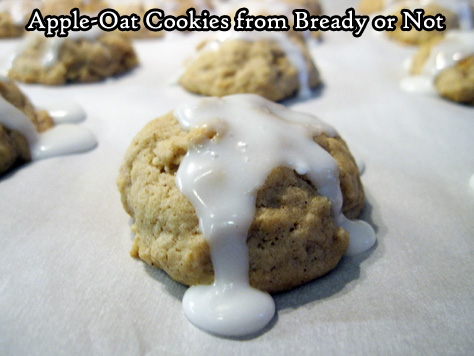
Really, these cookies feel homey. They take like comfort, with the apples and oats a little dense but not too heavy. The glaze on top adds a touch of sweetness that is just right.
As I have a husband who loves apple oatmeal AND apple pie, he enjoyed these cookies greatly. They are a perfect breakfast cookie!

I found that they kept for at least three days at room temperature. Even better–as these were all for my husband to enjoy–I found they froze and thawed without a problem. I actually froze most of the batch straight away. Portion control is a good thing, especially with over thirty cookies offering temptation!
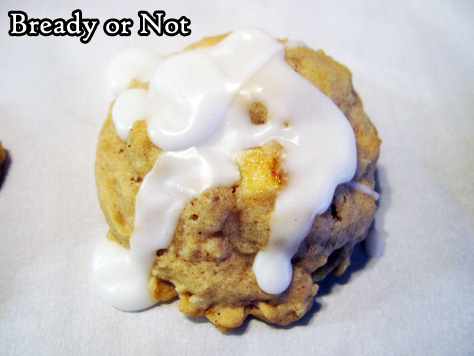
I used a Gala apple, but I say any sweet baking apple would work well.
Bready or Not Original: Apple-Oat Cookies
Equipment
- tablespoon cookie scoop
- parchment paper
- waxed paper
Ingredients
Cookies
- 2 1/4 cups all-purpose flour
- 1 cup old-fashioned oats also called rolled oats
- 1 teaspoon ground cinnamon
- 3/4 teaspoon baking powder
- 1/2 teaspoon baking soda
- 1/2 teaspoon salt
- 1/4 teaspoon ground allspice
- 3/4 cup unsalted butter 1 1/2 sticks, room temperature
- 1/2 cup brown sugar packed
- 1/2 cup white sugar
- 2 large eggs room temperature
- 2 teaspoons vanilla extract
- 1 large baking apple peeled and finely chopped; Gala and Fuji are ideal
Glaze
- 1 cup confectioners' sugar plus more if needed
- 2 Tablespoons milk or half & half, plus more if needed
Instructions
- Preheat oven at 350-degrees. Line a large baking pan with parchment paper.
- In a medium bowl, whisk together flour, oats, cinnamon, baking powder, baking soda, salt, and allspice.
- In a big mixing bowl, combine the soft butter, brown sugar, and white sugar. Follow up with the eggs and vanilla. Slowly mix in the dry ingredients. Fold in the apple pieces.
- Use a tablespoon scoop or spoon to dole out dough spaced an inch apart on the cookie sheet. Bake until set, about 10 to 12 minutes. Let set on rack for 10 minutes, then move to a cooling rack. Continue with the next batch.
- Once all of the cookies are cool, make the glaze. Stir together the confectioners’ sugar and milk to form a thick but oozy consistency. Spoon over the cookies.
- Store in a sealed container at room temperature, with waxed paper between the stacked layers. They will keep for at least three days. Cookies will freeze and thaw without issue.
OM NOM NOM!

New poem in Fantasy Magazine: “How to Find Yourself Again”

I’m thrilled to have achieved a long-time goal to have something published in Fantasy Magazine. For a few years there, it looked like it wouldn’t be possible at all, as the magazine was no more… but now it’s back, I had my second chance, and I’m in with a very appropriate poem!
Read “How to Find Yourself Again” in Fantasy Magazine.
#SFWAPro
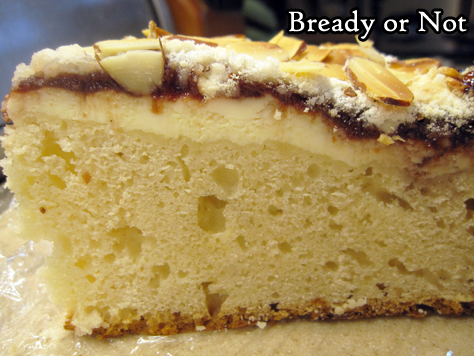
Read MoreBready or Not: Cherry-Almond Coffee Cake
This Cherry-Almond Coffee Cake is more cake than cheesecake, and is all sweet, fruity goodness.
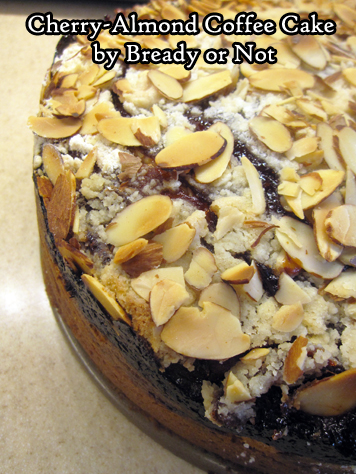
If you need a showstopper cake for a brunch or dessert, this one is perfect. It’s great to make ahead of time, too–slices can even be frozen for later, no prob!
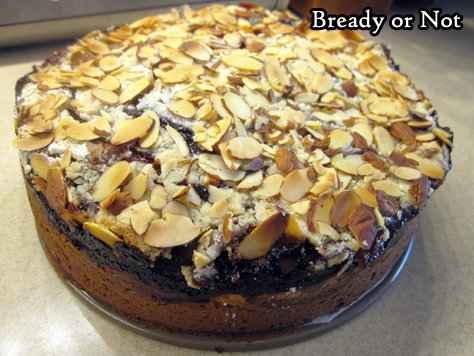
I used Murray’s Spiced Cherry Preserves; that little kick of spice was fantastic in the cake. Other bold preserves would be great in this cake, too–raspberry, strawberry, blueberry, even tropical flavors.
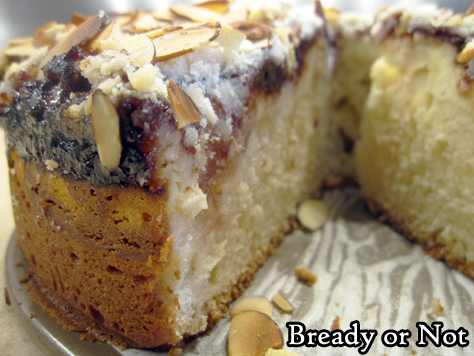
This is a thick, rich cake. It tastes best when you get a bit of all the layers in a single bite: the sliced almonds, crumb topping, fruit, cream cheese, sponge.

My husband liked the cake cold but he liked it even more when warmed a bit–and not in the microwave, either, but gently brought to room temperature by letting a slice sit out for 30 to 45 minutes.
Don’t forget a slice on the counter, though. This does contain cream cheese and shouldn’t be left out for hours!
Modified from Taste of Home Magazine December 2015.
Bready or Not: Cherry-Almond Coffee Cake
Equipment
- 9-inch springform pan
- parchment paper
Ingredients
- 2 1/2 cups all-purpose flour
- 1 cup white sugar divided
- 3/4 cup cold unsalted butter cubed
- 1/2 teaspoon baking powder
- 1/2 teaspoon baking soda
- 1/4 teaspoon salt
- 1 cup vanilla yogurt or sour cream, 8 ounces
- 2 large eggs
- 1 teaspoon almond extract
- 8 ounces cream cheese 1 box, softened
- 1 cup cherry preserves
- 1/2 cup slices almonds
Instructions
- Preheat oven at 350-degrees. Cut a parchment round to fit the bottom of the springform pan. Apply nonstick spray or butter on bottom of sides of pan, add the parchment, then grease it as well.
- In a big bowl, mix flour with 3/4 cup of sugar. Cut in butter until it is crumbly. Measure out 1/2 cup crumb mixture for topping; set aside.
- To the bulk of the flour mix, add baking powder, baking soda, and salt. Stir in yogurt, 1 egg, and almond extract, until blended. Spread batter onto bottom of the springform pan.
- In a small bowl, beat together the softened cream cheese, the remaining 1/4 cup sugar, and egg, to make it as smooth as possible. It's okay if it still has some clumps. Pour it onto the pan and smooth out. Spoon the preserves all across the top. Sprinkle with the reserved crumb topping and the sliced almonds.
- Bake for 50 to 60 minutes. The middle should no longer be jiggly, the top a nice golden brown. Cool on a wire rack for 10 to 15 minutes then unlatch and life away the pan's ring to let the cake cool for another hour. Then place cake in fridge to complete set and cool for a few hours.
- Cake can be eaten cold or after slices are brought to room temperature after about 30 to 45 minutes. Do remember to store cake in the fridge, as it does contain cream cheese! Slices can also be individually wrapped and frozen, and will thaw in the fridge with no issue.
