


Bready or Not Original: Earl Grey Shortbread Bars
Whether you are coping with cold weather right now or psychologically easing into winter (something I know well from my time in Arizona), these Earl Grey Shortbread Bars will make you feel warm and cozy. Also, caffeinated.

These bars are dense, soft, and a touch crumbly, the flavor of warm spice throughout. The drizzle of glaze adds sweetness and prettiness.

The tea flavor is quite strong here–it actually seemed to get bolder after a day–so the 1/4 cup amount is best made for people who like Earl Grey. I used Bigelow bags, but the amount of tea likely varies across brands. If you want a milder flavor, use less tea.

Bready or Not Original: Earl Grey Shortbread Bars
Equipment
- 9×13 pan
- spice grinder or mortar and pestle
- wax paper or plastic wrap
- heavy glass or other weight
- piping bag or freezer bag
Ingredients
Dough
- 1/4 cup Early Grey tea leaves about 4-5 Bigelow bags
- 4 cups all-purpose flour
- 1/2 teaspoon salt
- 2 cups unsalted butter (4 sticks) room temperature
- 2 1/2 cups confectioners’ sugar
- 2 teaspoons vanilla extract
Glaze
- 1 cup confectioners’ sugar
- 1 1/2 Tablespoons milk or half & half
Instructions
- Preheat oven at 350 degrees. Line a 9×13 baking pan with aluminum foil and apply nonstick spray or butter.
- Use a spice grinder or a mortar and pestle to grind the Earl Grey leaves down a bit more, but not fully to powder. Move the tea to a medium bowl and stir with the flour and salt.
- In a large bowl, beat the butter until fluffy. Gradually add the confectioners’ sugar, followed by the vanilla. Beat until smooth. Gradually beat in the flour mixture to incorporate.
- Dollop the dough into the prepared pan. Use a piece of wax paper or plastic wrap to spread out the dough, then use something like a heavy glass to evenly compress the dough into the pan.
- Bake until shortbread is firm with golden edges, about 40 to 45 minutes. Cool in pan on rack.
- After the pan comes to room temperature, mix the glaze ingredients. Transfer them to a piping bag or to a freezer bag. Snip the corner to pipe the glaze in stripes over the pan. Let set for an hour, then use foil to lift contents onto a cutting board to slice into bars.
- Store in sealed container at room temperature. Bars will keep for an least 2 days.
OM NOM NOM!
Bready or Not Original: Raspberry Frangipane Loaf Cake
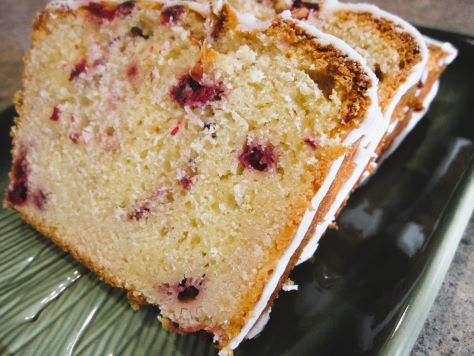
This Raspberry Frangipane takes a little work, but the result is gorgeous and absolutely delicious. This is a great special occasion treat–and it’s easy to make a day ahead!

Layer cakes get a lot of the attention and fuss, but I think loaf cakes need more love. They can be stunning, too. This one certainly is. It contains homemade frangipane, one of my favorite things, and is convenient to make year-round by using frozen raspberries.
As this loaf does involve some labor, I found it simplified things to prepare it over two days. Day 1: make frangipane and chill it. Day 2: make loaf and glaze. Day 3: serve to my husband’s co-workers.
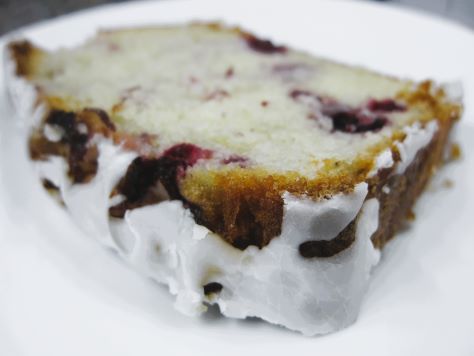
I found the cake kept beautifully, wrapped, for up to 4 days after baking.
Bready or Not Original: Raspberry Frangipane Loaf Cake
Equipment
- 8×4 loaf pan
- parchment paper
- nonstick spray
- kitchen shears
Ingredients
Frangipane
- 1/2 cup unsalted butter (1 stick) room temperature
- 1/2 cup almond flour sifted
- 1/4 cup white sugar
- 2 Tablespoons all-purpose flour
- 1 large egg white
- 1/4 teaspoon kosher salt
- 1/2 teaspoon almond extract
Batter
- 1 1/4 cups frozen raspberries
- 1/2 cup unsalted butter (1 stick) room temperature
- 1 cup white sugar
- 2 large eggs room temperature
- 1 teaspoon vanilla extract
- 1/4 teaspoon almond extract
- 1 3/4 cups all-purpose flour plus 1 Tablespoon
- 1 Tablespoon baking powder
- 1/2 teaspoon kosher salt
- 1/2 cup full-fat vanilla Greek yogurt or plain Greek yogurt
- 2 Tablespoons sliced almonds
Glaze
- 1 cup confectioners’ sugar
- 1 Tablespoon half & half or milk
- 1/2 teaspoon clear vanilla
Instructions
Frangipane
- Frangipane can be made immediately before the batter or prepared a day in advance.
- In a medium bowl, stir butter until creamy. Add almond flour, sugar, all-purpose flour, egg white, salt, and almond extract. Stir until combined. Cover with plastic wrap pressed to the top, and place in fridge until ready to use.
Loaf
- Preheat oven at 375 degrees. Cut parchment paper to fit inside an 8×4 loaf pan like a sling extended up both long sides. Spray inside of pan with nonstick spray, then spray parchment.
- Use kitchen shears to break frozen raspberries into pieces of various size, measuring out 1 1/4 cup total. Stash raspberries back in freezer until ready to use.
- In a large bowl, beat together butter and sugar until fluffy. Add eggs one at a time followed by the extracts.
- In another bowl, sift together the 1 3/4 cups flour, baking powder, and salt. Gradually mix dry ingredients into the wet, mixing alternatively with the yogurt. Scrape the bottom of the bowl to make sure everything is combined.
- Fold the frangipane into the batter.
- Pull out the raspberries. Toss them with the remaining tablespoon of flour. Set aside 1/4 of coated berries for the top; fold the rest of the berries into the batter.
- Spread batter in prepared pan, evening out the top. Sprinkle reserved raspberries on top, followed by the sliced almonds.
- Bake for 20 minutes. Reduce oven temperature to 325 degrees. Continue to bake until the top is golden and the inside registers an interior temperature over 200 degrees, which will be about another 40 minutes. (Total baking time will be between 55 minutes and 1 hour 5 minutes.) If the loaf is looking brown early on, cover with a small piece of foil.
- Let cool in pan about 20 minutes, then use the parchment sling to lift the loaf onto a rack to completely cool.
Glaze
- Once the loaf is completely cool, mix the glaze. It should be fairly thick; add a touch more confectioners’ sugar if needed. Drizzle over loaf so that the top is covered with glaze dripping down the sides.
- Give the glaze at least 30 minutes to set before cutting into the loaf, or wrap loaf to serve later or the next day. Loaf will keep well, wrapped at room temperature, for up to 4 days.
OM NOM NOM!
Bready or Not Original: Big Batch Sugar Cookies and Mini Chocolate Chip Cookies
This recipe for a Big Batch Sugar Cookies and Mini Chocolate Chip Cookies makes it easy to get two kinds of cookies in one batch. It makes about 90 total cookies!

One thing to keep in mind: there is such a huge quantity of dough, stirring it can be tricky. Use your biggest bowl. I did a lot of the mixing in my KitchenAid, then had to finish stirring my hand.

The foundation of this recipe is a classic sugar cookie. Soft, sweet, and crumbly. That base is fantastic with additional chocolate. Do note that mini chips are a must here, because the dough is so crumbly.
Bready or Not Original: Big Batch Sugar Cookies and Mini Chocolate Chip Cookies
Equipment
- cookie scoop or spoon
- food scale
Ingredients
- 1 cup unsalted butter (2 sticks) softened
- 1 cup vegetable oil
- 1 cup white sugar
- 1 cup confectioners’ sugar
- 2 large eggs room temperature
- 1 teaspoon vanilla extract
- 4 1/2 cup all-purpose flour
- 1 teaspoon baking soda
- 1 teaspoon cream of tartar
- 1 cup mini chocolate chips
Instructions
- In a large bowl, beat together the butter, oil, and sugars. Add the eggs and vanilla. In another bowl, sift together the flour, baking soda, and cream of tartar. Gradually beat the dry ingredients into the wet. This will be a lot of dough; if an electric mixer was being used, it may be necessary to switch to stirring by hand.
- Use a food scale to divide the dough in half. Place one half back in the bowl. Remove a small handful, transferring that to the other portion. Add the mini chocolate chips to the bowl and stir to combine.
- Wrap each portion of dough in plastic wrap and chill for at least 2 hours, or up to 3 days. Freeze if it needs to be baked beyond that time frame.
- Preheat oven at 375 degrees. Prepare a baking sheet with parchment paper.
- Use a cookie scoop or spoon to portion out the dough. The chocolate chip kind will need to be compressed slightly to make it cohesive.
- Bake for 9 to 11 minutes, until cookies are set and tinted golden. Set on a rack to cool, and then place in sealed containers at room temperature.
OM NOM NOM!
Bready or Not: Pumpkin Spice Latte Pie
I’ve made many, many pumpkin pies. My husband said this Pumpkin Spice Latte Pie is now his all-time favorite.

This really is a special pie. Espresso powder is in both the crust and filling, but the regular pie spices come through, too. Pumpkin plays well with everything, and the texture of the filling is silky-smooth.

I want to note that this pie is best consumed within 3 days. At that third day, the pie crust began to soften. It was still edible and enjoyable, but the texture just wasn’t as good.

Modified from Food Network Magazine November 2023.
Bready or Not: Pumpkin Spice Latte Pie
Equipment
- food processor
- Rolling Pin
- deep 9-inch pie plate
- pie weights
- aluminum foil
Ingredients
Crust
- 1 1/4 cups all-purpose flour plus more for dusting
- 1 teaspoon instant espresso powder
- 1 teaspoon white sugar
- 1/2 teaspoon apple cider vinegar
- 1/4 teaspoon kosher salt
- 1/2 cup unsalted butter (1 stick) cut into small pieces
- 2 to 4 Tablespoons water
Filling
- 1 1/4 cups heavy cream
- 1 Tablespoon instant espresso powder
- 15 ounces pure pumpkin puree
- 2/3 cup white sugar
- 2 large eggs room temperature
- 2 teaspoons pumpkin pie spice
- 1/2 teaspoon vanilla bean paste
- 1/4 teaspoon kosher salt
Instructions
Make the crust
- In a food processor, pulse together the flour, espresso powder, sugar, vinegar, and salt. Add the butter and pulse until everything forms pea-sized pieces. Sprinkle in 2 tablespoons water and pulse the dough. If it comes together, great, but if not, add another tablespoon, pulse, then add another tablespoon if necessary. The dough should look crumbly but become cohesive when squeezed.
- Put dough on a strip of plastic wrap and pat into a disc shape. Encase in wrap and chill at least an hour, or a day or two.
- Sprinkle flour on a work surface then roll dough into a 12-inch round. Use the rolling pin to lift it onto a pie plate. Press into place, folding over extra at edges to crimp. Prick the bottom and sides with a fork. Cover with plastic wrap (such as the one just used to chill dough) and freeze for at least an hour, or overnight.
- Preheat oven at 350 degrees. Line the crust with foil. Fill pie with pie weights or dried beans. Bake until edges are golden, 20 to 25 minutes. Remove the foil and weights–such as lifting them onto a rimmed baking pan to cool–and continue baking crust for 10 to 15 minutes, until it is golden all over. Transfer to a rack to cool.
Make the filling
- Whisk together heavy cream and espresso powder in a large bowl until the powder has dissolved. Add the pumpkin puree, white sugar, eggs, pumpkin pie spice, vanilla paste and salt. Scrape the bottom a few times to incorporate everything.
- Pour filling into the cooled crust and smooth out the top. Bake until filling is set at edges but still slightly jiggly in center, 50 to 60 minutes. Transfer to a rack to cool for 3 hours.
- Store at room temperature, covered by foil. Slice and top with whipped topping. Pie is best eaten within 3 days.
