


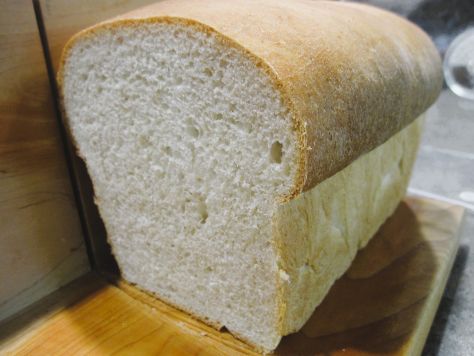
Bready or Not Original: Soft Sourdough Loaf or Bratwurst Buns mixed in a bread machine
Today’s Bready or Not features two variations on the same ingredients: a Soft Sourdough Loaf baked in a pan or Soft Sourdough Bratwurst Buns.
This recipe is written for use in a bread machine, for maximum physical and time accessibility, but it can absolutely be made by hand or with a stand mixer.
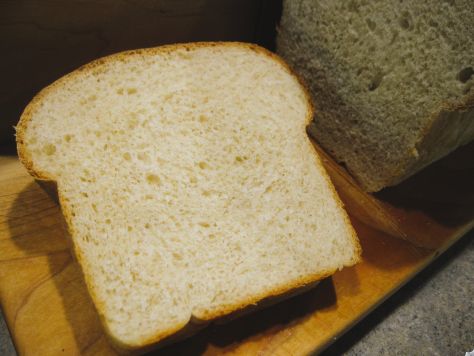
The recipe includes two leaveners, which means it is done in hours rather than all day or over multiple days, as is usually the case with sourdough. The sourdough flavor still comes through beautifully.
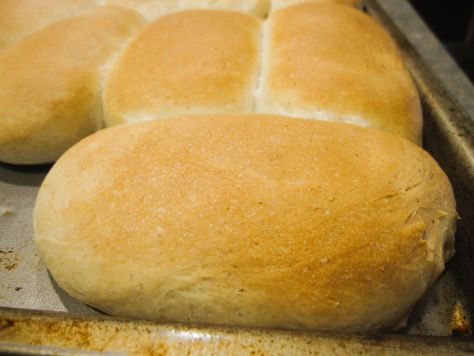
This loaf is ideal for sandwiches or garlic bread. The buns, made by dividing the dough into eighths, are the perfect size for a bratwurst or other large sausage. Yes, it takes practice to get the shaping right by hand. The important thing is to remember to make the top look smooth and nice, and hide the messy seams underneath.

This bread will keep in a sealed, room temperature bag for up to 3 days, and it is fantastic to freeze for later.
By the way, I baked up sourdough recipes like this one because I have maintained a starter for book research reasons: my next release, A House Between Sea and Sky, features a sourdough starter named Mother as an important character. Find out more (and preorder) here!
Bready or Not Original: Soft Sourdough Loaf mixed in a bread machine
Equipment
- digital thermometer
- kitchen scale
- bread machine
- loaf pan
- nonstick spray
- aluminum foil
- pastry brush
Ingredients
Dough
- 3/4 cup active sourdough starter room temperature (about 170 to 190 grams)
- 1/3 cup lukewarm milk or half & half (about 100-110 degrees)
- 1 large egg
- 3 Tablespoons melted butter
- 2 Tablespoons white sugar
- 1 1/2 teaspoons sea salt
- 3 cups white bread flour plus more for surface
- 1 1/2 teaspoons instant dry yeast
Topping
- softened butter to brush on loaf at end
Instructions
- Add ingredients to the bread machine bucket in the order specified by the manufacturer; it is usually wet ingredients first. Set machine on Dough mode and begin. Monitor the dough as it begins mixing, adding a touch more milk if it is lumpy or flour if it is too loose. Dough should come together smoothly.
- After the cycle ends, apply nonstick spray to the loaf pan.
- Dump the dough onto a lightly floured surface. Shape, folding and tucking the dough to tighten what will become the top. Place dough in pan. Set in a warm place to rise, such as on a counter, a cabinet, or in an oven on proofing mode.
- After about 45 minutes to an hour, the dough should rise about 2 inches over the rim of the pan. If it is in the warm oven, remove from there. Preheat oven at 350 degrees.
- Bake bread about 20 minutes. Cover with shaped foil to prevent overbrowning. Continue to bake for about another 20 minutes. Bread should sound hollow when tapped, and if tested with a digital thermometer, over 190 degrees inside.
- Immediately tip loaf from pan, carefully setting upright on a cooling rack. Brush on the softened butter.
- Let cool for at least an hour before slicing. Bread will keep in a sealed bag at room temperature for up to 3 days, and can also be frozen for several months either whole or in slices.
OM NOM NOM!
Bready or Not Original: Soft Sourdough Bratwurst Buns
Equipment
- kitchen scale
- parchment paper
Ingredients
- 3/4 cup active sourdough starter room temperature (about 170-190 grams)
- 1/3 cup lukewarm milk or half & half (about 100-110 degrees)
- 1 large egg
- 3 Tablespoons melted butter
- 2 Tablespoons white sugar
- 1 1/2 teaspoons sea salt
- 3 cups white bread flour plus more for surface
- 1 1/2 teaspoons instant dry yeast
Instructions
- Add ingredients to the bread machine bucket in the order specified by the manufacturer; it is usually wet ingredients first. Set machine on Dough mode and begin. Monitor the dough as it begins mixing, adding a touch more milk if it is lumpy or flour if it is too loose. Dough should come together smoothly.
- After the cycle ends, prepare a sheet pan with parchment paper. Use a kitchen scale to divide the dough by 8.
- Shape each piece, folding and tucking the dough while elongating it, creating a tightened top. Place each bun slightly spaced out on pan; baker’s choice as to if they touch or not after rising. After all of the buns are shaped, place in a warm place to rise, such as on a counter, a cabinet, or in an oven on proofing mode.
- After about 45 minutes to 1 1/2 hours, the buns should look rounded and puffy. If pan is in the oven, remove from there. Preheat oven at 350 degrees.
- Bake bread about 21 to 25 minutes, until they are lightly browned. Bread should sound hollow when tapped, and if tested with a digital thermometer, over 190 degrees inside.
- Cool on pan or rack for at least an hour before eating. Slice bun from the side or top to insert the bratwurst and other toppings.
- Buns will keep in a sealed bag at room temperature for up to 3 days, and can also be frozen for several months.
OM NOM NOM!
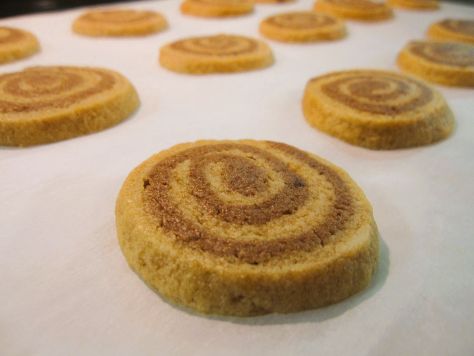
Bready or Not Original: Cookie Butter and Chocolate Pinwheel Cookies
These Cookie Butter and Chocolate Pinwheel Cookies are loaded with flavor and in an incredibly fun shape.
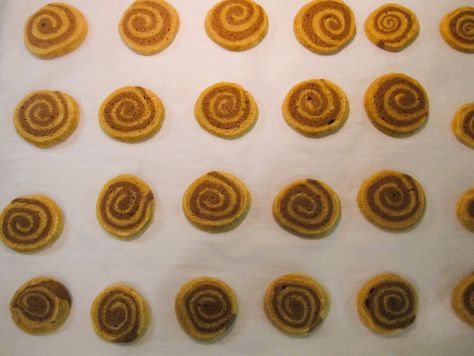
As there is always someone out there who hasn’t encountered the wonders of cookie butter yet: it consists of pulverized spice cookies and oil, combined to form a cohesive, spreadable mix very similar to peanut butter. You can actually substitute it for peanut butter in most any recipe. You can buy brands like Biscoff or generic brands at stores like Walmart; look for it with the peanut butter. Speculoos is found at Trader Joe’s.

Cookie butter tastes like cookies in their purest, sweetest form. Therefore, it is awesome paired with chocolate. Both flavors shine through in these firm yet softly-chewy cookies.
Bready or Not Original: Cookie Butter and Chocolate Pinwheel Cookies
Equipment
- kitchen scale
- plastic wrap
- waxed paper
Ingredients
- 1 ounce semisweet chocolate chips
- 1/2 cup white sugar
- 1/2 cup unsalted butter (1 stick) softened
- 1 egg
- 1 teaspoon vanilla extract
- 1 1/2 cups all-purpose flour
- 1/2 teaspoon baking powder
- 1/4 teaspoon salt
- 1/4 cup creamy cookie butter such as Biscoff or Speculoos
Instructions
- In a microwave-safe bowl, carefully zap the chocolate chips long enough to make them soft and smooth when stirred. Set aside to cool.
- In a large mixing bowl, beat together the sugar, butter, egg, and vanilla until creamy. Gradually mix in the flour, baking powder, and salt, until just combined.
- Weigh the dough and divide in half.
- To one half, add the melted chocolate, beating until the color is consistent. In another bowl, mix together the cookie butter and dough until the color is again consistent. Shape each piece into a disc, wrap them separately in plastic wrap, then chill for at least an hour.
- Roll out the chocolate dough between two sheets of waxed paper to form a 12×7-inch rectangle. Repeat with the cookie butter dough. Peel away the waxed paper, setting one dough atop the other. Gently press together. Roll up, like a jelly roll, starting with the long 12-inch side. Again wrap the dough in plastic to chill for at least 2 hours, or add extra wrap and freeze up to a few weeks.
- When it is time to bake, preheat the oven at 375 degrees. Line a sheet with parchment paper. Use a sharp knife or piece of unwaxed dental floss to cut 1/4-inch slices of dough. Set spaced out on parchment.
- Bake 8 to 9 minutes. Cool for a few minutes before transferring to a cooling rack. Store cookies in a sealed container at room temperature.
OM NOM NOM!
Bready or Not Original: Sourdough Oatmeal Cookies
These Sourdough Oatmeal Cookies are cakey and delicious, a perfect comfort food.

The sourdough doesn’t act as a leavening agent here, but adds nuanced flavor and lends a unique breadiness to the texture. I doubt anyone would eat these and immediately identify they include a starter, but they would probably know something is different.

I added dried cranberries and walnuts to these cookies, but mix in whatever dried fruit, nuts, seeds, or chocolate chips that you want. Just don’t exceed 2 1/2 cups of add-ins. Or try to fool people into thinking dark raisins are chocolate chips. That’s just evil.
By the way, I baked up sourdough recipes like this one because I have maintained a starter for book research reasons: my next release, A House Between Sea and Sky, features a sourdough starter named Mother as an important character. Find out more (and preorder) here!
Bready or Not Original: Sourdough Oatmeal Cookies
Equipment
- parchment paper
- cookie scoop or spoon
Ingredients
- 1 cup unsalted butter (2 sticks) softened
- 3/4 cup brown sugar packed
- 1/2 cup white sugar
- 2 large eggs room temperature
- 2 teaspoons vanilla extract
- 1/2 cup sourdough discard (113 grams)
- 3 cups rolled oats also called old fashioned oats
- 2 cups all-purpose flour
- 1 teaspoon baking soda
- 1/2 teaspoon baking powder
- 2 teaspoons ground cinnamon
- 1 teaspoon salt
- 1 1/2 cups dried cranberries
- 1 cup walnuts chopped
Instructions
- Preheat oven at 350 degrees. Line baking sheet with parchment paper.
- In a large bowl, beat together butter, brown sugar, and sugar until light and fluffy. Add eggs one at a time followed by the vanilla and sourdough discard.
- In another bowl, stir together rolled oats, flour, baking soda, baking powder, cinnamon, and salt. Gradually mix the dry ingredients into the wet, scraping the bottom of the bowl a few times to make sure everything is incorporated. Fold in the cranberries and walnuts to distribute.
- Use a cookie scoop or spoon to dole out the dough, spaced out, on the parchment paper. Bake for 10 to 12 minutes; the cookies should be golden at the edges and no longer glossy on top.
- Transfer cookies to a rack to fully cool. Store in a sealed container at room temperature. Cookies keep for at least 3 days.
OM NOM NOM!
Bready or Not Original: Raspberry Brownies
So, that Roasted Cherry Brownies recipe I posted back in March? This Raspberry Brownies recipe is based on that. It uses different berries (obviously) and has no roasting involved, and if you are like me and have/had a solid chunk of raspberries in your freezer, this will give you a delicious way to use them up.

Raspberries and chocolate are such a good combo. I feel like that really doesn’t get as much attention as pairings with strawberries or cherries. The fruit amount is pretty high here, and that also means a long bake time because of the moisture involved.

On that note, if you’re using fresh raspberries, the bake time will likely be less, so please, adapt the recipe to keep your brownies and yourself safe!

Bready or Not Original: Raspberry Brownies
Equipment
- 9×13 dish
- aluminum foil
- uneven spatula
Ingredients
- 2 cups frozen raspberries
- 3/4 cup unsalted butter (1 1/2 sticks)
- 8 ounces dark chocolate
- 1 1/2 cups all-purpose flour
- 1/2 cup cocoa powder sifted
- 1/2 teaspoon salt
- 2 cups white sugar
- 6 large eggs room temperature
- 1 1/2 cups semisweet chocolate chips or milk chocolate chips or a mix
Instructions
- Preheat oven at 325. Break apart the frozen raspberries into pieces of various size using a tool such as kitchen shears. Place the berries back inside the freezer for now.
- In a large microwave-safe bowl or in a pot on the stovetop, melt together the butter and dark chocolate until smooth. Set aside to cool slightly.
- Line a 9×13 pan with foil and apply nonstick spray or butter. In a small bowl, combine the flour, cocoa powder, and salt.
- Return to the large container with the melted butter and chocolate. Stir in the white sugar until no pale streaks remain. Beat in the eggs one at a time. Gradually fold in the dry ingredients until no white is visible. Fold in 1 cup of chocolate chips and most of frozen raspberries.
- Pour batter into the prepared dish. Use an uneven spatula to spread it into an even layer. Sprinkle the remaining 1/2 cup chocolate and remaining raspberries over the top.
- Bake for 70 to 80 minutes, until the middle passes the toothpick test; the raspberries release a lot of moisture, hence a long baking time. Set on a rack to cool for at least an hour, speeding process in fridge if desired. Use foil to lift contents onto a cutting board to slice up. Store in a sealed container at room temperature. Keeps for at least 3 days.
