


Bready or Not Original: Raspberry Brownies
So, that Roasted Cherry Brownies recipe I posted back in March? This Raspberry Brownies recipe is based on that. It uses different berries (obviously) and has no roasting involved, and if you are like me and have/had a solid chunk of raspberries in your freezer, this will give you a delicious way to use them up.

Raspberries and chocolate are such a good combo. I feel like that really doesn’t get as much attention as pairings with strawberries or cherries. The fruit amount is pretty high here, and that also means a long bake time because of the moisture involved.

On that note, if you’re using fresh raspberries, the bake time will likely be less, so please, adapt the recipe to keep your brownies and yourself safe!

Bready or Not Original: Raspberry Brownies
Equipment
- 9×13 dish
- aluminum foil
- uneven spatula
Ingredients
- 2 cups frozen raspberries
- 3/4 cup unsalted butter (1 1/2 sticks)
- 8 ounces dark chocolate
- 1 1/2 cups all-purpose flour
- 1/2 cup cocoa powder sifted
- 1/2 teaspoon salt
- 2 cups white sugar
- 6 large eggs room temperature
- 1 1/2 cups semisweet chocolate chips or milk chocolate chips or a mix
Instructions
- Preheat oven at 325. Break apart the frozen raspberries into pieces of various size using a tool such as kitchen shears. Place the berries back inside the freezer for now.
- In a large microwave-safe bowl or in a pot on the stovetop, melt together the butter and dark chocolate until smooth. Set aside to cool slightly.
- Line a 9×13 pan with foil and apply nonstick spray or butter. In a small bowl, combine the flour, cocoa powder, and salt.
- Return to the large container with the melted butter and chocolate. Stir in the white sugar until no pale streaks remain. Beat in the eggs one at a time. Gradually fold in the dry ingredients until no white is visible. Fold in 1 cup of chocolate chips and most of frozen raspberries.
- Pour batter into the prepared dish. Use an uneven spatula to spread it into an even layer. Sprinkle the remaining 1/2 cup chocolate and remaining raspberries over the top.
- Bake for 70 to 80 minutes, until the middle passes the toothpick test; the raspberries release a lot of moisture, hence a long baking time. Set on a rack to cool for at least an hour, speeding process in fridge if desired. Use foil to lift contents onto a cutting board to slice up. Store in a sealed container at room temperature. Keeps for at least 3 days.
OM NOM NOM!
Bready or Not: Apple Fritter Cake
I have many different kinds of apple cake here on Bready or Not. This Apple Fritter Cake is special because it tastes like the luscious apple fritters found in donut shops and bakeries!

This is not a thick cake. The crumb is really there to hold a lot of apple pieces together. The use of apple butter versus applesauce adds a deeper color and richer flavor.

Then there is, of course, the icing. That’s essential to make this cake like the pastry. It adds sweetness and a delicate crunch that’s fast to melt in the mouth.

Really, I look at this as a special occasion kind of apple cake, something for a birthday, special guest, or date.
Bready or Not: Apple Fritter Cake
Equipment
- 8×8 pan
- aluminum foil
- nonstick spray or butter
Ingredients
Cake
- 1 3/4 cups all-purpose flour
- 1 1/2 teaspoons baking powder
- 1 teaspoon ground cinnamon
- 3/4 teaspoon kosher salt
- 2 cups crisp baking apples diced and divided (232 grams) (use apples like Honeycrisp, State Fair, or Kindercrisp)
- 1 cup brown sugar packed
- 1 large egg
- 1 large egg white
- 1/2 cup unsalted butter (1 stick) melted and slightly cooled
- 1/3 cup vanilla yogurt or sour cream or crème fraiche
- 1/3 cup apple butter
- 1 Tablespoon lemon juice
- 1 teaspoon vanilla extract
Glaze
- 1 cup confectioners’ sugar
- 2 Tablespoons half & half
Instructions
- Preheat oven at 350 degrees. Line an 8×8 with foil and apply butter or nonstick spray.
- In a medium bowl, stir together flour, baking powder, cinnamon, and salt. Add 1 1/2 cups of the diced apples. Toss to coat.
- In a big mixing bowl, beat the brown sugar, egg, and egg white until light and fluffy. Mix in the melted butter, yogurt, apple butter, lemon juice, and vanilla. Fold in the dry ingredients, making sure to scrape the bottom, until everything is just combined.
- Pour batter into the prepared pan. Smooth out top. Sprinkle on the remaining 1/2 cup of apple pieces.
- Bake until browned, with the middle passing the toothpick test, about 45 to 55 minutes.
- Cool completely before mixing the glaze. Drizzle it all over the top. Serve warmed or at room temperature. Individual slices can also be frozen for later enjoyment.
OM NOM NOM!
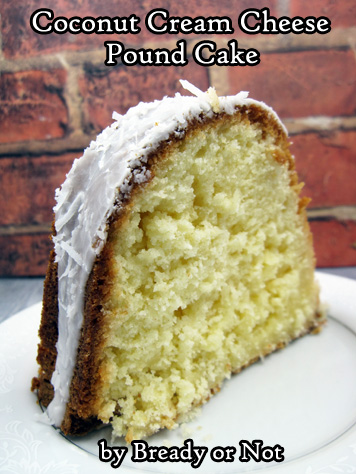
Bready or Not EXTRA CHEESY: Coconut Cream Cheese Pound Cake
Welcome to the last installment of our special month of Bready or Not. My cheese-centric cozy mystery Cheddar Luck Next Time just came out a few weeks ago, so we’re celebrating with another cheesy recipe from the Bready or Not archives.
This week’s feature is Coconut Cream Cheese Pound Cake. Only right to end things with cake, right?
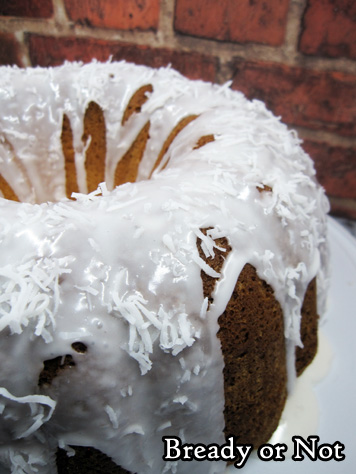
This stunning Coconut Cream Cheese Pound Cake is gorgeous and delicious, and will win over even people (like me) who are not big coconut fans. The cake ends up being chewy, but not too chewy; sweet, but not cloying. Really, this is great as a breakfast, brunch, or dessert cake.

Serve this as cake alone, or like with any pound cake, it would be lovely alongside fresh fruit.
Please grab a copy of Cheddar Luck Next Time, which features an autistic (like me!) lead character with a passion for cheese (like me!).

Amazon: paperback | ebook (affiliate links)
Barnes & Noble: paperback & ebook
Bookshop: paperback
Bready or Not: Coconut Cream Cheese Pound Cake
Ingredients
Cake
- 1 cup unsalted butter 2 sticks, room temperature
- 8 ounces cream cheese 1 box, room temperature
- 3 cups white sugar
- 6 large eggs room temperature
- 2 teaspoons vanilla extract
- 1 teaspoon kosher salt
- 1 teaspoon baking powder
- 3 cups all-purpose flour
- 2 cups shredded coconut
Glaze
- 2 cups confectioners’ sugar
- 2-3 Tablespoons milk
- extra shredded coconut
Instructions
- Preheat oven at 325-degrees. Coat a 10-cup bundt pan with nonstick spray or butter.
- In a large bowl, beat butter and cream cheese together until smooth. Add sugar and mix until light and fluffy.
- Add eggs one at a time, followed by the vanilla extract, salt, and baking powder. Gradually mix in the flour until just combined, then fold in the coconut.
- Pour batter into pan and distribute evenly. Bake for 75 to 80 minutes, until it passes the toothpick test.
- Cool pan for 20 minutes, then invert the cake onto a wire rack to completely cool. Move to a plate or cake platter.
- To make the glaze, stir together the confectioners’ sugar and milk to form a smooth yet thick consistency. Pour or spoon glaze over the top, then sprinkle with additional coconut.
OM NOM NOM!
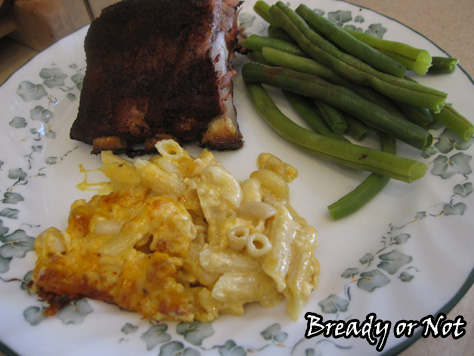
Bready or Not EXTRA CHEESY: Legendary Macaroni and Cheese
Welcome to the fourth installment of our special month of Bready or Not. My cheese-centric cozy mystery Cheddar Luck Next Time came out earlier this month, so we’re celebrating with another cheesy recipe from the Bready or Not archives.
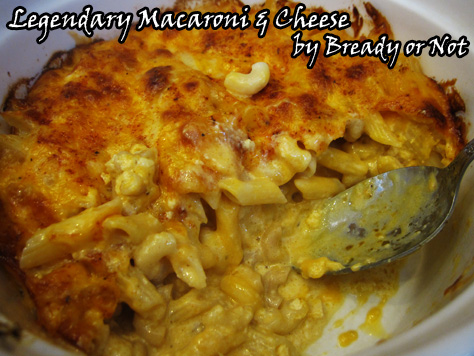
This week’s feature is Legendary Macaroni and Cheese. This one gained incredible popularity during the shut-down in 2020.
There are a gazillion macaroni and cheese recipes out there. This one is special because it can be prepared ahead of time, making it incredibly convenient to heat up for a meal during a busy week or during a holiday event.
This is a heavily modified version of musician John Legend’s macaroni recipe, which he originally shared on the Martha Stewart Show a long time ago.
Please grab a copy of Cheddar Luck Next Time, which features an autistic (like me!) lead character with a passion for cheese (like me!).
Amazon: paperback | ebook (affiliate links)
Barnes & Noble: paperback & ebook
Bookshop: paperback
Bready or Not: Legendary Macaroni and Cheese
Ingredients
- 2 Tablespoons unsalted butter plus more for baking dish
- 1 1/2 cups elbow macaroni
- 1 can evaporated milk
- 1 large egg
- 3/4 teaspoon seasoning salt
- 1/2 teaspoon garlic powder
- 1/2 teaspoon salt
- 1/4 teaspoon pepper
- 12 ounces sharp cheddar cheese or a mix of cheddars, shredded
- sprinkle paprika
- bread crumbs
Instructions
- If you plan to bake this right away, preheat oven to 375-degrees. Butter or spray a 9×9 baking dish.
- Bring a large pot of water to a boil and add salt and macaroni. Cook until al dente. Drain the water and return the macaroni to the pot. Add butter and stir until it has melted.
- In a medium bowl, whisk together evaporated milk and egg. Add seasoned salt, garlic powder, salt, and pepper.
- Place about 1/3 of the macaroni in an even layer in the bottom of prepared baking dish. This should be just enough to cover the bottom. Cover with 1/3 of the cheese. Repeat twice more with remaining macaroni and cheese.
- Pour the milk and seasonings mixture evenly over the contents of the baking dish. At this point, you can stash the dish in the fridge overnight or during the day until it’s meal time.
- When you’re ready to bake, make sure the oven is preheated. Sprinkle the top of the macaroni with paprika and bread crumbs.
- Bake until top layer is lightly browned, 25 to 30 minutes; note that if the dish is cold, bake time will likely need to be extended to closer to 40 minutes. Let stand 10 minutes before serving.
- OM NOM NOM!
