


Bready or Not EXTRA CHEESY: Farmer’s Cheese Cookies
Welcome to the second installment of our special month of Bready or Not. My cheese-centric cozy mystery Cheddar Luck Next Time just came out yesterday (picture the Kermit-flail gif) so we’re celebrating with another cheesy recipe from the Bready or Not archives.
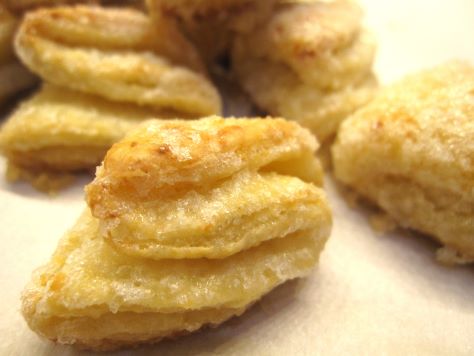
This week’s feature is Farmer’s Cheese Cookies.
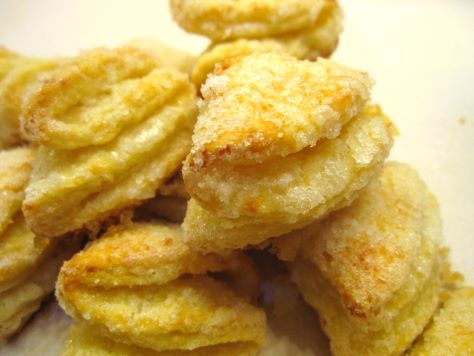
These cookies aren’t cheesy in a gooey, cheese-pull kind of way. Instead, the cheese here adds a touch of savory flavor and a lot of light, chewy texture. Expect a dry, crumbly texture in the cheese. Mine became somewhat powdery as I broke it down, which was fine. I was able to incorporate everything with an extra touch of water.
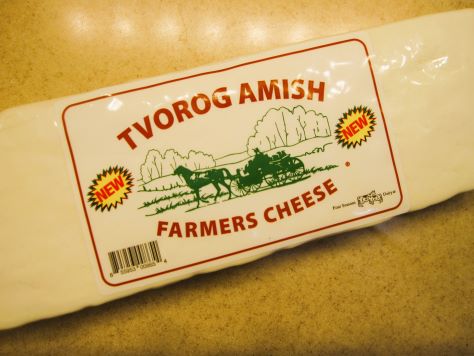
Cookies like this are traditional in Ukraine and Russia. Look for a product like Ukrainian Tvorog Farmer’s Cheese at your local import markets.
The end result is a cookie that, quite honestly, tastes fancy–light, crisp, sugary, like something that one would find in a fine bakery. Most people wouldn’t guess there’s cheese in the dough, I bet, but they’ll know there’s something different about them. Something delicious.

Please grab a copy of Cheddar Luck Next Time, which features an autistic (like me!) lead character with a passion for cheese (like me!).
Amazon: paperback | ebook (affiliate links)
Barnes & Noble: paperback & ebook
Bookshop: paperback
Bready or Not: Farmer’s Cheese Cookies
Equipment
- grater or food processor
- pastry blender
- 3-inch round cutter or the top of a glass
- parchment paper
- saucer or bowl
- Rolling Pin
Ingredients
- 1 cup unsalted butter 2 sticks, chilled
- 8 oz farmer's cheese such as Ukrainian Tvorog cheese
- 2 cups all-purpose flour
- 2 egg yolks
- 2-3 Tablespoons water
- 1 1/2 cups white sugar
Instructions
- Grate the butter using a hand grater or a grater attachment on a food processor. In a large bowl, use a pastry blender to cut in the cheese, which will be crumbly. Add the flour, followed by the yolks and water. Knead the dough until it comes together in a cohesive mass.
- Form the dough into a disc and encase it in plastic wrap to chill for anywhere from an hour to several days.
- When it’s cookie time, preheat oven at 375-degrees. Line a large baking sheet with parchment paper. Place a small amount of water in a saucer or bowl. Measure the white sugar into a deep bowl.
- Prepare a clean work surface with a dusting of flour. Break off some of the dough and roll it into a thin layer, like for a pie crust. Use the cutter to slice out 3-inch rounds; place the leftover and unused dough to chill in the fridge while cookies are shaped.
- Dampen fingers in the prepared water. Brush wet fingers over one side of a dough round. Dip moist dough into the sugar to coat it. Fold in half with the sugared portion on the inside. Dampen fingers and stroke another folded side of the dough, and dip that in sugar. Fold a final time with the sugared section on the inside. Use wet fingers on outside of cookie and coat that in sugar, too. Gently press the pleats together to prevent them from unfolding during baking. Place formed cookie on sheet and repeat process with remaining rounds.
- Bring together dough scraps, using a little water if needed, to roll out again. Use rest of dough to form cookies.
- Bake in batches for 19 to 22 minutes, until puffed and set with a golden base. Store in a sealed container at room temperature.
OM NOM NOM!
Publication day for CHEDDAR LUCK NEXT TIME!
My first cozy mystery has oozed into the world today! Cheddar Luck Next Time features an autistic protagonist, a small town murder mystery, a screaming orange cat, and more cheese puns/jokes than you can shake a mozzarella stick at. It’s available in print, ebook, and audiobook (narrated by the wonderful Dominique Salvacion).
Happy birthday, little book!
Amazon: paperback | ebook (affiliate links)
Barnes & Noble: paperback & ebook
Bookshop: paperback
Audible: download

Bready or Not EXTRA CHEESY: Swirled Goat Cheese Brownies
Welcome to a special month of Bready or Not. My cheese-centric cozy mystery Cheddar Luck Next Time will be released on April 8–next Tuesday–so we’re celebrating with a month of cheesy recipes from the Bready or Not archives. These recipes haven’t been featured for years and are well worth a revisit.
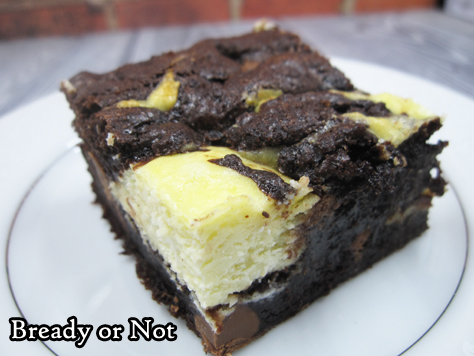
We’re starting with a luscious and indulgent recipe for Swirled Goat Cheese Brownies.
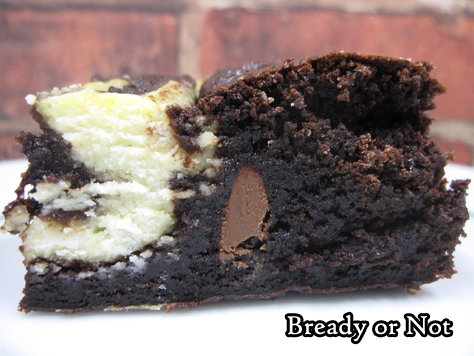
This recipe makes a small pan of brownies, 8×8 or 9×9, but it’s heavy on the cheese. A plain goat cheese log from Costco or Sam’s Club is especially cost efficient here, or get a couple of small logs from Aldi, if you’re so fortunate as to have one nearby. There’s a good dose of chocolate flavor here as well through both cocoa powder and chocolate chips.
These brownies are thick and rich, perfect alongside some tea or coffee–and a good book.
Please grab a copy of Cheddar Luck Next Time, which features an autistic (like me!) lead character with a passion for cheese (like me!).
Amazon: paperback | ebook (affiliate links)
Barnes & Noble: paperback & ebook
Bookshop: paperback
Bready or Not Original: Swirled Goat Cheese Brownies
Ingredients
Goat Cheese Swirl
- 10 1/2 ounces goat cheese room temperature
- 2 Tablespoons confectioners’ sugar
- 2 Tablespoons all-purpose flour
- 2 large eggs room temperature
Brownie Base
- 2/3 cup Dutch process cocoa powder sifted
- 1 cup white sugar
- 1/2 cup brown sugar packed
- 1/2 cup confectioners’ sugar
- 3/4 teaspoon sea salt
- 1 cup all-purpose flour
- 1 cup semisweet chocolate chips or milk chocolate chips
- 3 large eggs room temperature
- 1/2 cup canola oil
- 1 teaspoon vanilla extract
Instructions
- Preheat oven to 350-degrees. Line an 8×8 or 9×9-inch square pan with aluminum foil and apply nonstick spray or butter.
- Mix goat cheese swirl ingredients. Set aside.
- Make the brownie base by whisking together the cocoa, sugars, salt, flour, and chips in a big mixing bowl. Add the eggs, oil, and water and vanilla extract until everything is just combined.
- Spoon half the brownie batter into the prepared pan. Dollop the cheese mixture atop it, then add the remaining brownie batter into the open spots. Use a knife to swirl the two layers together while still keeping them a bit distinct.
- Bake the brownies for 35 to 45 minutes, depending on the pan size. Use the toothpick test to check for doneness. The center should be set with the consistency still moist and fudgy. Cool to room temperature, then place in fridge to chill an hour or two prior to cutting.
- Use foil to lift brownies onto cutting board for easy slicing. Store in a sealed container in fridge, with parchment or waxed paper between the layers.
- OM NOM NOM!
Bready or Not Original: Cadbury Egg Brownies 13×9 Size (Redux)
Eight years have passed since I shared one of my signature recipes: it is time to revisit Cadbury Egg Brownies.

These homemade brownies taste like the Cadbury Eggs I was obsessed with as a kid. If you’re not familiar with this candy, it features a hollow chocolate egg the size of a real large chicken egg. Inside is a gooey super-sweet filling that is white and yellow to simulate the white and yolk of a real egg.
These special brownies are not hard to make; if you can make brownies from scratch, you can do this recipe. There is some extra planning involved, though, as the layers must be worked on in spurts, with chilling time in between.
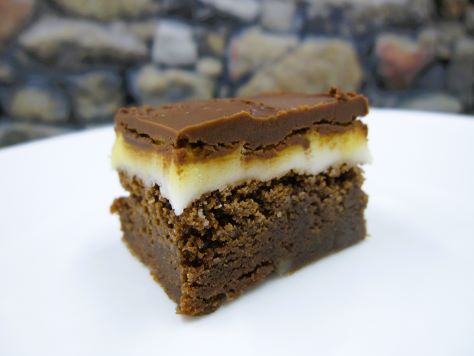
Truly, these Cadbury Egg Brownies are a showstopper recipe. They look cool. They taste amazing. Keep in mind that this recipe makes a lot, so do make sure you’re sharing these with a crowd.
Bready or Not: Cadbury Egg Brownies
Equipment
- 9×13 pan
- aluminum foil or parchment paper
- uneven spatula
- microwave safe bowl or double boiler
Ingredients
For Brownies:
- 1 1/3 cup all-purpose flour
- 1/4 cup cocoa powder sifted
- 1 teaspoon salt
- 1 teaspoon espresso powder optional
- 12 ounces milk chocolate chopped
- 1 cup unsalted butter (2 sticks) cut into cubes
- 1/2 cup white sugar
- 1 cup light brown sugar packed
- 4 large eggs room temperature, lightly beaten
- 2 teaspoons vanilla extract
For Cream Filling:
- 1/2 cup light corn syrup
- 4 tablespoons unsalted butter (half stick) room temperature
- 1 teaspoon vanilla extract
- 1/4 teaspoon salt
- 3 cups confectioners' sugar sifted
- yellow food coloring gel
For Glaze:
- 8 ounces milk chocolate chopped
- 4 Tablespoons unsalted butter half stick, cut into cubes
Instructions
Brownie stage
- Preheat oven to 350-degrees. Line the bottom and sides of a 9×13-inch pan with aluminum foil or parchment paper, making sure to overlap the sides to create handles. Cover with nonstick spray.
- Sift together flour, cocoa, and salt (and espresso powder, if using) in a small bowl and set aside.
- Melt chocolate and butter together in a double boiler or in slow increments in microwave. Stir until smooth. Whisk in sugars and stir until dissolved and mixture has cooled slightly, then add eggs and vanilla extract until just combined.
- Fold together the chocolate and flour mixes until just incorporated. Pour into prepared pan.
- Bake for 25 to 30 minutes or until toothpick inserted into the middle comes out clean. Transfer pan to a wire rack and allow to cool completely.
Cream filling stage
- Beat together corn syrup, butter, vanilla, and salt on medium-high speed until smooth. Add powdered sugar, a little bit at a time, mixing until creamy.
- Dump 3/4 of the cream mixture on top of cooled brownies and spread into an even layer. Add a drop of yellow food coloring gel to remaining cream mixture and stir until evenly colored. Drop dollops of yellow cream on top of white layer, and then swirl gently with a spatula. Refrigerate for at least 2 hours or until set.
Glaze stage
- Slowly melt the chocolate and butter together in a double boiler or microwave bowl. Stir until smooth. Pour over cream filling, carefully spreading into a thin, even layer.
- Chill in the fridge long enough for the chocolate to not quite harden, 15-20 minutes, OR let it chill for several hours and then let set at room temperature for about 15 minutes. The chocolate needs to be soft enough to cut through without cracking, but not soft enough to smear with each cut.
- Use the foil/paper to lift the entire block out of the pan and onto a cutting board. Using a large sharp knife, cut into 2-inch squares. Keep in sealed container in fridge; brownies will keep upward of a week.
