Bready or Not: Dutch Letter Bars
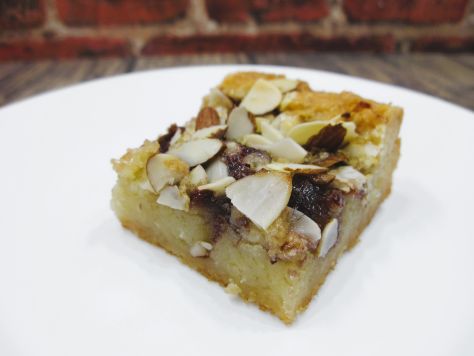
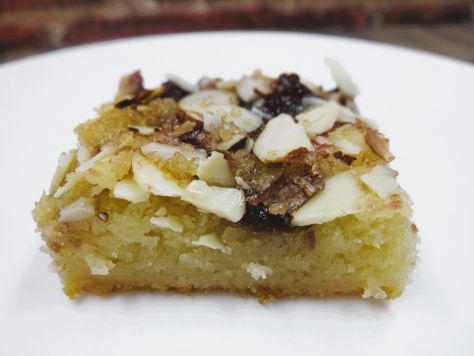
These Dutch Letter Bars are super-easy to make. Soft, chewy, and crunchy, these have it all.
The name for these bars is kind of weird, isn’t it? These are bars, no letter involved. Well, they are made to taste like a Dutch pastry that is traditionally shaped in a letter S. You can read all about it here.
The bar version mimics the flavor and texture, but is a lot easier to make! In the US, it’s apparently more common to find in Iowa.
This is modified from a recipe in Better Homes & Gardens Christmas Cookies 2021.
Bready or Not: Dutch Letter Bars
Equipment
- 13×9 pan
- aluminum foil
- nonstick cooking spray
Ingredients
- 1 cup unsalted butter (2 sticks) softened
- 7-8 ounces almond paste store-bought or homemade
- 2 large eggs
- 2 cups white sugar
- 2 cups all-purpose flour
- 3/4 cup raspberry jam or mixed fruit jam
- 1/2 cup sliced almonds
- 1 Tablespoon turbinado sugar
Instructions
- Preheat oven at 350 degrees. Line the 13×9 pan with foil. Add a coating of nonstick spray.
- In a large bowl, beat together butter, almond paste, and eggs. Add the white sugar, beating until light and fluffy. Gradually beat in the flour until combined. Spread dough in the prepared pan.
- Measure the jam into a microwave-safe bowl and gently warm until it is soft and spreadable. Dollop the jam on top of the dough and spread out, swirling with dough slightly. Sprinkle the almonds on top followed by the turbinado sugar.
- Bake for 35 to 45 minutes, until the top is golden brown and a toothpick in the middle comes out clean. Cool completely.
- Use the foil to lift the contents onto a cutting board, slice into bars. If stacking in storage containers, place waxed paper to make it tidier. Store at room temperature.
OM NOM NOM!
Bready or Not Original: Toffee Blondies
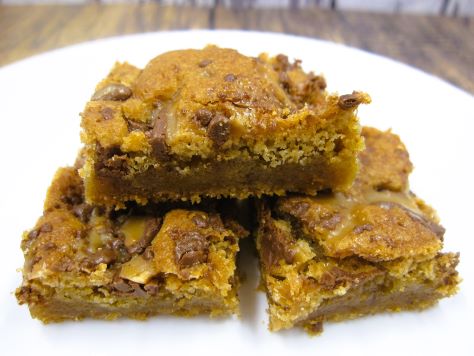
Why have a candy bar when you can have a chewy, luxurious treat that’s filled with candy bar pieces? These Toffee Blondies are a glorious combination of textures and sweetness.
If you can find it, use an 8 ounce bag of Heath Bits that include chocolate. All is not lost if that is unavailable, though. You can chop up normal Heath Bars, or use an all-toffee bag and add separate chocolate.
The result is a thick, chewy bar with crunchy little bits of toffee and pockets of chocolate. These things keep for days, too.
Bready or Not Original: Toffee Blondies
Equipment
- 9×13 pan
- aluminum foil
- nonstick spray
Ingredients
- 2 cups all-purpose flour
- 2 cups brown sugar packed
- 2 teaspoons baking powder
- 1/4 teaspoon salt
- 1/2 cup unsalted butter (1 stick) melted and cooled
- 2 large eggs room temperature
- 1 teaspoon vanilla extract
- 8 ounces Heath Bits with Chocolate
Instructions
- Preheat oven at 350 degrees. Line a 13×9 pan with foil and apply nonstick spray.
- In a bowl, mix together the flour, brown sugar, baking powder, and salt. Set aside.
- In a large bowl, beat the butter, eggs, and vanilla until smooth. Gradually mix in the dry ingredients. Fold in about 2/3 of the Heath Bits.
- Scoop the thick batter into the prepared pan and level out with an uneven spatula. Sprinkle the rest of the Heath pieces over the top.
- Bake for 24 to 27 minutes. Middle should be set and pass the toothpick test. Cool to room temperature, speeding the process in the fridge if desired.
- Use the foil to lift onto cutting board to slice into bars. Store in a sealed container at room temperature. They will keep for up to 3 days.
OM NOM NOM!
Bready or Not: Gingerbread Cookie Cheesecake Bars
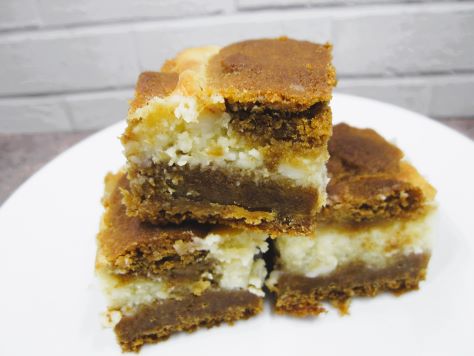
If you love both gingerbread cookies and cheesecake, oh boy, do I have the recipe for you. These Gingerbread Cookie Cheesecake Bars are dense, rich, and outright divine.
The creation process also dirties a lot of dishes, but hey, sometimes that’s what is required to make something that truly comes across as special. This recipe makes a 9×13 pan of thick bars, so bake this to feed a crowd!
Modified from Holiday Cookies magazine 2019.
Bready or Not: Gingerbread Cookie Cheesecake Bars
Equipment
- 9×13 pan
- aluminum foil
- nonstick spray
- uneven spatula
Ingredients
Gingerbread
- 1 1/2 cups unsalted butter (3 sticks) softened
- 1 1/4 cups white sugar
- 3/4 cup brown sugar packed
- 1/2 cup molasses
- 2 large eggs room temperature
- 4 cups all-purpose flour
- 2 teaspoons ground cinnamon
- 2 teaspoons ground ginger
- 1 1/2 teaspoons kosher salt
- 1 teaspoon baking powder
- 1 teaspoon baking soda
- 1/4 teaspoon nutmeg
- 1/8 teaspoon allspice
- 1/8 teaspoon cloves
- 3 Tablespoons minced candied ginger
Cheesecake
- 16 ounces cream cheese (2 blocks) softened
- 1 cup white sugar
- 1 Tablespoon all-purpose flour
- 2 large eggs room temperature
- 1 Tablespoon vanilla extract
Instructions
- Preheat oven at 350 degrees. Line a 13×9-inch pan with aluminum foil. Apply nonstick spray.
- In a large bowl, beat the butter and sugars until fluffy. Add the molasses, mixing until no streaks remain. Add eggs, one at a time, scraping the bottom of the bowl on occasion.
- In a separate bowl, combine the flour, cinnamon, ground ginger, salt, baking powder, baking soda, nutmeg, allspice, and cloves. Gradually add the dry ingredients to the wet. Fold in the candied ginger.
- Measure out 2 cups of the dough and set it aside.
- Press the remainder of the dough into the pan, forming an even layer.
- Time to make the cheesecake layer. Beat the cream cheese until creamy. Add the sugar and flour. Add the eggs one at a time, followed by the vanilla. The mixture should be fairly consistent in color and texture, but it’s okay if there are some small lumps.
- Use an uneven spatula to spread the cheesecake into an even layer. Crumble the reserved topping over it.
- Bake for 50 to 60 minutes; the middle should not look jiggly and should pass the toothpick test. If the top is browning too much, cover with foil.
- Cool at room temperature for about an hour, then place in fridge to completely chill for a few hours. Use foil to lift onto cutting board to slice into small pieces. Store in fridge in a sealed container.
OM NOM NOM!
Bready or Not Original: Earl Grey Shortbread Bars
Whether you are coping with cold weather right now or psychologically easing into winter (something I know well from my time in Arizona), these Earl Grey Shortbread Bars will make you feel warm and cozy. Also, caffeinated.
These bars are dense, soft, and a touch crumbly, the flavor of warm spice throughout. The drizzle of glaze adds sweetness and prettiness.
The tea flavor is quite strong here–it actually seemed to get bolder after a day–so the 1/4 cup amount is best made for people who like Earl Grey. I used Bigelow bags, but the amount of tea likely varies across brands. If you want a milder flavor, use less tea.
Bready or Not Original: Earl Grey Shortbread Bars
Equipment
- 9×13 pan
- spice grinder or mortar and pestle
- wax paper or plastic wrap
- heavy glass or other weight
- piping bag or freezer bag
Ingredients
Dough
- 1/4 cup Early Grey tea leaves about 4-5 Bigelow bags
- 4 cups all-purpose flour
- 1/2 teaspoon salt
- 2 cups unsalted butter (4 sticks) room temperature
- 2 1/2 cups confectioners’ sugar
- 2 teaspoons vanilla extract
Glaze
- 1 cup confectioners’ sugar
- 1 1/2 Tablespoons milk or half & half
Instructions
- Preheat oven at 350 degrees. Line a 9×13 baking pan with aluminum foil and apply nonstick spray or butter.
- Use a spice grinder or a mortar and pestle to grind the Earl Grey leaves down a bit more, but not fully to powder. Move the tea to a medium bowl and stir with the flour and salt.
- In a large bowl, beat the butter until fluffy. Gradually add the confectioners’ sugar, followed by the vanilla. Beat until smooth. Gradually beat in the flour mixture to incorporate.
- Dollop the dough into the prepared pan. Use a piece of wax paper or plastic wrap to spread out the dough, then use something like a heavy glass to evenly compress the dough into the pan.
- Bake until shortbread is firm with golden edges, about 40 to 45 minutes. Cool in pan on rack.
- After the pan comes to room temperature, mix the glaze ingredients. Transfer them to a piping bag or to a freezer bag. Snip the corner to pipe the glaze in stripes over the pan. Let set for an hour, then use foil to lift contents onto a cutting board to slice into bars.
- Store in sealed container at room temperature. Bars will keep for an least 2 days.
OM NOM NOM!
Bready or Not Original: Cranberry-Date Bars
These Cranberry-Date Bars are thick, hearty and delicious, perfect for dessert, a snack, or as a breakfast bar.
I used fresh cranberries for this recipe, as I had them in-season. I washed and thoroughly dried the cranberries. For the dates, I didn’t use precut, crusty date bits, but freshly chopped up dates that I had purchased at Costco. I much prefer eating those–they are soft, pliable, and especially sweet.
The dates provide a beautiful counterbalance to the tart cranberries. They also act as glue to hold everything together.
The bright red filling makes these especially pretty for the holiday time, too.
Bready or Not Original: Cranberry-Date Bars
Equipment
- medium saucepan
- 9×13 pan
- foil
- nonstick spray
Ingredients
- 16 ounces fresh or frozen cranberries
- 8 ounces chopped dates
- 1 teaspoon vanilla extract
- 2 cups all-purpose flour
- 2 cups quick oats
- 1 1/2 cups brown sugar packed
- 1/2 teaspoon baking soda
- 1/4 teaspoon salt
- 1 cup unsalted butter (2 sticks) melted
Instructions
- Place cranberries and dates in a medium saucepan and cook over low heat, stirring often, until the berries pop. Remove pan from heat to stir in vanilla. Set aside.
- Preheat oven at 350 degrees. Line a 13×9 pan with foil and apply nonstick spray or butter.
- In a mixing bowl, place flour, oats, brown sugar, baking soda, and salt. Pour in butter and stir until it forms a crumbly mixture. Press about half into the prepared pan, compressing to form an even layer.
- Bake for 8 minutes. Pull pan from oven. Dollop cranberry-date mixture over top, gently spreading out to create a layer. Sprinkle the remaining crumb mixture over the top. Put back in oven to bake for 20 to 25 minutes; the top should be golden brown with the crumbs set in the middle.
- Cool to room temperature, speeding the process in the fridge, if desired. Use foil to lift contents from pan onto a cutting board to slice into bars. Store at room temperature in a sealed container.
OM NOM NOM!
Bready or Not Original: Nutella-Swirled Blondies
These Nutella-Swirled Blondies are quick to make and delicious, making it a fantastic go-to recipe when you need to make a moderately-sized batch of goodies without a lot of fuss.
The amount of Nutella called for here is 12 ounces. You can use more than that, if you want, but don’t use less or it’ll be challenging to spread the layer to the edges.
Look for this base recipe used again in the coming months, too. I first experimented with this format using a fresh cranberry filling, but I won’t share that version until the timing is more seasonal. A Nutella filling has no such restrictions.
Bready or Not Original: Nutella-Swirled Blondies
Equipment
- 13×9 pan
- aluminum foil
- nonstick spray
- uneven spatula
Ingredients
- 2 1/4 cups all-purpose flour
- 1 1/2 teaspoons baking powder
- 1/2 teaspoon salt
- 3/4 cup unsalted butter (1 1/2 sticks) softened
- 1 1/4 cups white sugar
- 1 1/4 cups brown sugar packed
- 2 teaspoons vanilla extract
- 3 large eggs room temperature
- 12 ounces Nutella or similar hazelnut spread
Instructions
- Preheat oven to 350-degrees. Line 13×9 pan with wide aluminum foil and apply nonstick spray or butter.
- In a small bowl, mix together the flour, baking powder, and salt. Set aside.
- In a mixing bowl, beat together the butter, both sugars, and vanilla to create a smooth batter. Beat in eggs, one at a time, followed by the flour mixture. Dollop about 2/3 of the dough in the pan; dough will be sticky, making it tricky to even out without smearing away the nonstick coating.
- Spread Nutella on top and to the edges. Add dollops of remaining dough. Use a knife to swirl layers together.
- Bake until evenly golden brown and set in the middle, 28 to 32 minutes. Cool completely at room temperature or chill before cutting. Blondies keep for up to 3 days in a room temperature sealed container.


