


Bready or Not Original: Slow Cooker Apple Steel Cut Oats
These Slow Cooker Apple Steel Cut Oats are not the most photogenic of foods, but they are delicious, healthy, and good, and probably one of the most convenient meals in my cooking repertoire.
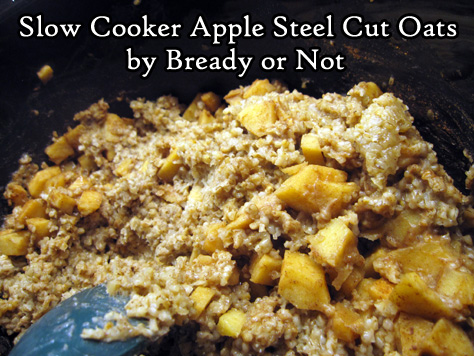
I’ve been cooking this recipe for over five years now, tweaking it here and there, making it better. What I present here is really a foundation. This recipe can be customized all kinds of ways–either when the food is being assembled, by adding in different spices or apples, or by tweaking it at serving time.
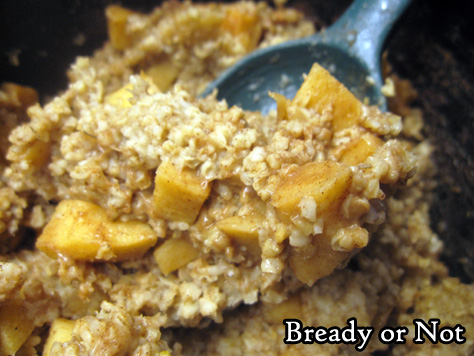
I love using Gala, Honeycrisp, or Pink Lady apples, but go for any good baking-type apple or a variety thereof. You don’t want the apples to go to mush. Or maybe you do? That might not be a terrible thing here.

I typically use unsweetened vanilla almond milk or cashew milk, but any plain or vanilla nut, soy, or oat milks would work, or you can opt for dairy milk.
This isn’t an overnight slow cooker oats recipe. I’ve tried that. Even on low and warm settings, the oats just plain overcooked for my preference. The consistency goes brick-like and the pot requires some intense scraping if you don’t use a removable liner. I prefer to make this during the day, and then portion out the oats to go in the fridge and freezer. They reheat beautifully.
Bready or Not Original: Slow Cooker Apple Steel Cut Oats
Equipment
- large slow cooker
Ingredients
- 2 cups steel cut oats no substitutes
- 2 cups nut milk or oat milk, regular or vanilla, sweetened or unsweetened
- 2 cups water
- 2 medium apples peeled and chopped
- 1/4 cup brown sugar packed
- 1/4 cup pure maple syrup
- 2 teaspoons ground cinnamon
- 1/4 teaspoon sea salt
- 2 teaspoons vanilla extract
Instructions
- Place all ingredients in slow cooker and stir to distribute. Place lid on pot and put heat level to LOW. Cook for 3 hours before lifting lid again. Stir and taste to test doneness. Continue to cook for 30 minutes to an hour more, dependent on the desired texture for the oats. The longer it cooks, the thicker it will be.
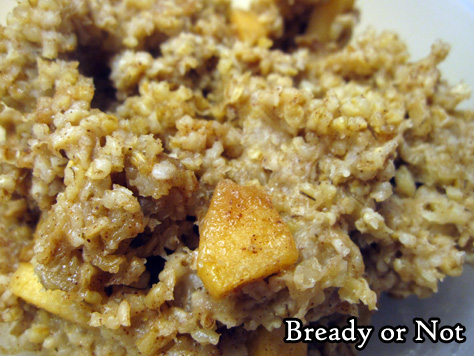
- Serve oats fresh, or stash in fridge to reheat in microwave over the next week. These oats are great to portion out and freeze for later. If desired, add more spices, fresh fruit, or extra milk when serving–the customization possibilities are endless!
*OM NOM NOM!*
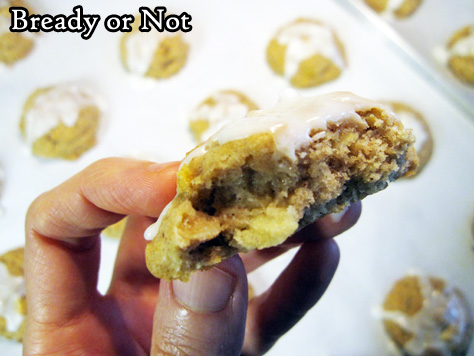
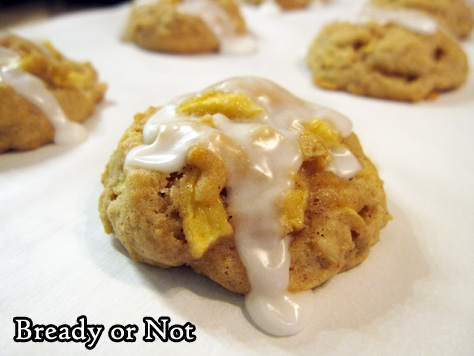
Bready or Not Original: Apple-Oat Cookies
These Apple-Oat Cookies are like a cross between apple oatmeal and apple pie, in a convenient portable form.
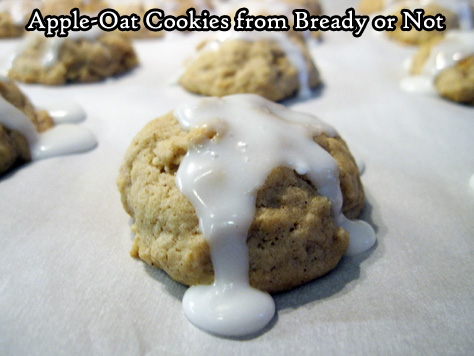
Really, these cookies feel homey. They take like comfort, with the apples and oats a little dense but not too heavy. The glaze on top adds a touch of sweetness that is just right.
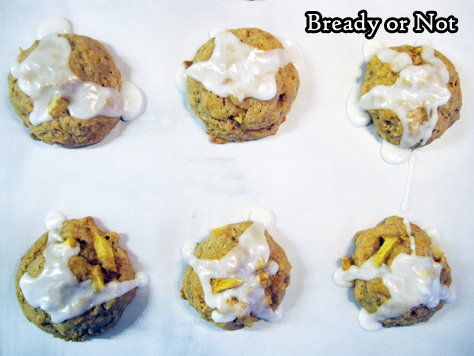
As I have a husband who loves apple oatmeal AND apple pie, he enjoyed these cookies greatly. They are a perfect breakfast cookie!

I found that they kept for at least three days at room temperature. Even better–as these were all for my husband to enjoy–I found they froze and thawed without a problem. I actually froze most of the batch straight away. Portion control is a good thing, especially with over thirty cookies offering temptation!
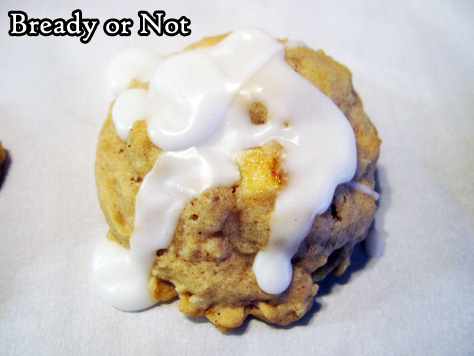
I used a Gala apple, but I say any sweet baking apple would work well.
Bready or Not Original: Apple-Oat Cookies
Equipment
- tablespoon cookie scoop
- parchment paper
- waxed paper
Ingredients
Cookies
- 2 1/4 cups all-purpose flour
- 1 cup old-fashioned oats also called rolled oats
- 1 teaspoon ground cinnamon
- 3/4 teaspoon baking powder
- 1/2 teaspoon baking soda
- 1/2 teaspoon salt
- 1/4 teaspoon ground allspice
- 3/4 cup unsalted butter 1 1/2 sticks, room temperature
- 1/2 cup brown sugar packed
- 1/2 cup white sugar
- 2 large eggs room temperature
- 2 teaspoons vanilla extract
- 1 large baking apple peeled and finely chopped; Gala and Fuji are ideal
Glaze
- 1 cup confectioners' sugar plus more if needed
- 2 Tablespoons milk or half & half, plus more if needed
Instructions
- Preheat oven at 350-degrees. Line a large baking pan with parchment paper.
- In a medium bowl, whisk together flour, oats, cinnamon, baking powder, baking soda, salt, and allspice.
- In a big mixing bowl, combine the soft butter, brown sugar, and white sugar. Follow up with the eggs and vanilla. Slowly mix in the dry ingredients. Fold in the apple pieces.
- Use a tablespoon scoop or spoon to dole out dough spaced an inch apart on the cookie sheet. Bake until set, about 10 to 12 minutes. Let set on rack for 10 minutes, then move to a cooling rack. Continue with the next batch.
- Once all of the cookies are cool, make the glaze. Stir together the confectioners’ sugar and milk to form a thick but oozy consistency. Spoon over the cookies.
- Store in a sealed container at room temperature, with waxed paper between the stacked layers. They will keep for at least three days. Cookies will freeze and thaw without issue.
OM NOM NOM!
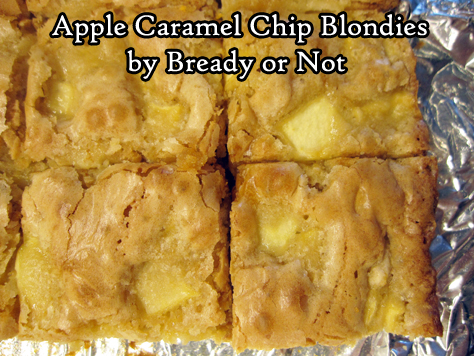
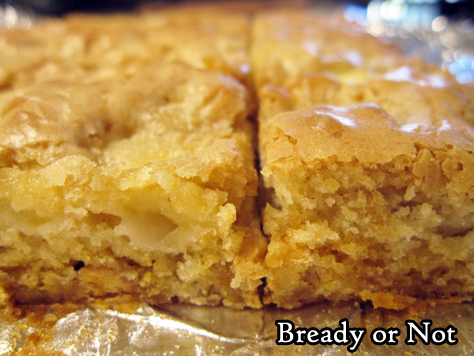
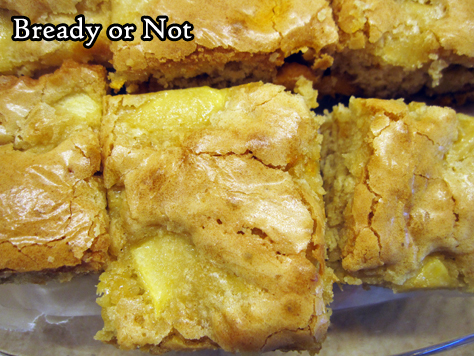
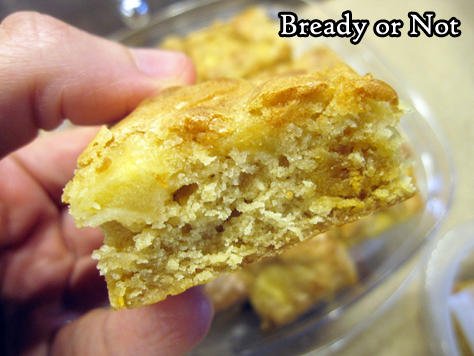
Bready or Not Original: Apple Caramel Chip Blondies
These Apple Caramel Chip Blondies are soft, sweet, and dangerously snackable, perfect for a quick bite to get you through the day.
I have other apple bar recipes like my tried-and-true Apple Cake that are thicker and more meal-like.
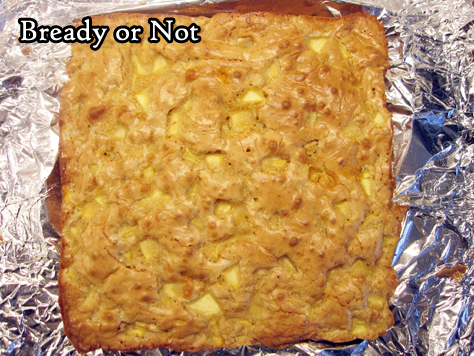
These bars are thin and light. They aren’t even heavy with apples, but the apple flavor is definitely there.
This is the kind of thing to use for a light breakfast, snack, or dessert, and they’d be great to wrap up and pack to go.
I used caramel chips for this recipe, but butterscotch or white chocolate would be great, too–or even seasonal sweet chips like pumpkin spice!
Bready or Not Original: Apple Caramel Chip Blondies
Equipment
- 9x9 pan
- medium saucepan
Ingredients
- 1 cup all-purpose flour
- 1/2 teaspoon kosher salt
- 1/4 teaspoon baking powder
- 6 Tablespoons unsalted butter
- 3/4 cup light brown sugar packed
- 1 teaspoon pure vanilla extract
- 2 large eggs room temperature
- 1 apple such as Ambrosia or Honeycrisp, peeled and chopped into raisin-sized pieces
- 1/3 cup caramel chips or substitute butterscotch chips or white chocolate chips
Instructions
- Preheat oven at 350-degrees. Line a 9x9 pan with foil and apply nonstick spray or butter.
- In a small bowl, whisk together flour, salt, and baking powder. Set aside.
- In a medium saucepan, melt the butter, and continue to monitor a few more minutes, stirring often, to brown the butter. It should have a fresh, nutty smell. Remove from heat. Stir in the brown sugar and vanilla until the sugar is less grainy. Let the pan cool for a few minutes. Beat in the eggs until smooth. Stir in the dry ingredients next, followed by the apple pieces. Fold in the chips last.
- Pour the batter into the pan and smooth out the top. Bake for about 25 minutes, until the middle passes the toothpick test.
- Cool to room temperature. Use the foil to lift the contents onto a cutting board to slice up. Store the bars in a sealed container, with waxed paper or parchment between stacked layers.
OM NOM NOM!
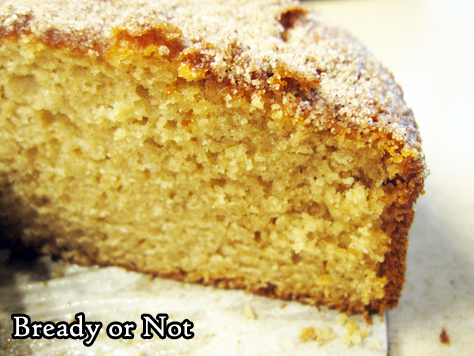
Bready or Not Original: Vanilla Applesauce Cake
Some days call for a no-fuss apple cake. This Vanilla Applesauce Cake is for those kinds of days.
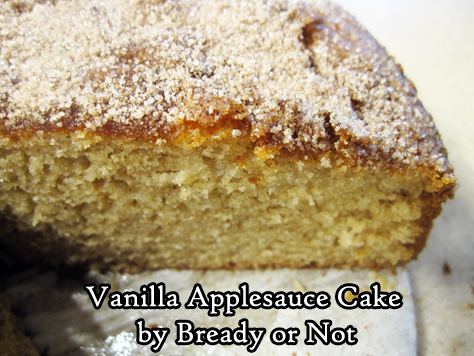
There is no need to worry about procuring apples, or having them go bad, or the effort to peel and slice them. This cake uses applesauce, which loads the cake with beautiful flavor.
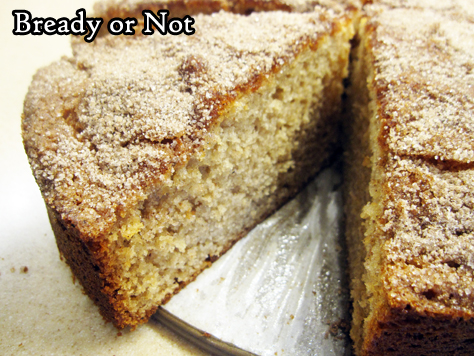
The cake also has the gentle flavor of a great combination of spices. The finisher is no-fuss, too: a top crusted with coarse sugar that adds a touch more sweet and a tiny crunch.
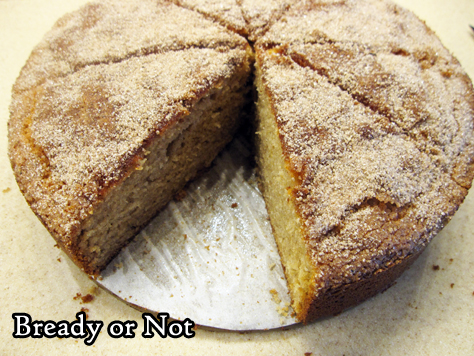
Want to serve this cake for just a few people? No problem. Slice up the cake, and freeze individual slices for later.
Modified greatly from a Heilala Vanilla ad in Bake from Scratch Magazine, September/October 2019.
Bready or Not Original: Vanilla Applesauce Cake
Equipment
- 9-inch springform pan
- offset spatula
- parchment paper
Ingredients
- 2 cups all-purpose flour
- 2 teaspoons baking powder
- 2 teaspoons ground cinnamon
- 1 teaspoon kosher salt
- 1/2 teaspoon baking soda
- 1/2 teaspoon ground ginger
- 1/4 teaspoon ground cloves
- 1 cup white sugar
- 1 cup applesauce or about 2 individual serving cups of applesauce
- 1/2 cup buttermilk or soured milk (see note)
- 1/2 cup vegetable oil
- 2 large eggs room temperature
- 1 teaspoon vanilla extract
- 1/4 cup coarse sugar as topping, such as turbinado, maple, etc
Instructions
- Preheat oven at 350-degrees. Cut parchment paper to fit in the base of a 9-inch springform pan. Apply nonstick spray with flour to bottom and sides of pan. Add parchment and spray again. Set aside.
- In a big bowl, combine flour, baking powder, cinnamon, salt, baking soda, ginger, and cloves.
- In another bowl, whisk together the sugar, applesauce, buttermilk or soured milk, oil, eggs, and vanilla. Gradually pour the wet ingredients into the dry, mixing well.
- Pour batter into the pan and smooth out with an uneven spatula. There will likely be bubbles in the batter. Gently tap the sides of the pan and thump it on the counter to get them to rise and burst. Using a spoon, sprinkle the coarse sugar all over the top as evenly as possible.
- Bake for 35 to 40 minutes, until the middle passes the toothpick test. Let cool in pan for 10 minutes, then release sides. Let cake cool completely on base for several hours.
- Slice into wedges and serve. Cake keeps well in a sealed container at room temperature and pieces can also be wrapped individually and frozen for later enjoyment.
OM NOM NOM!
Notes
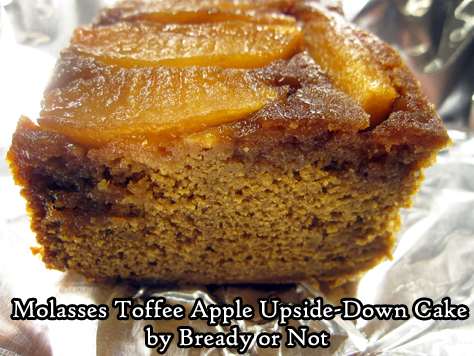
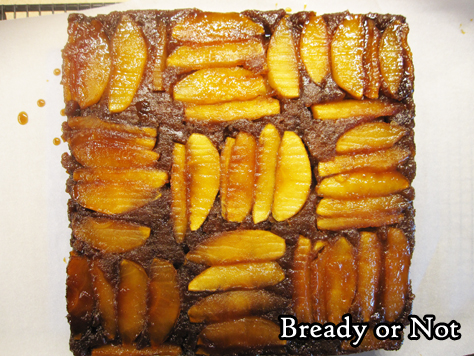
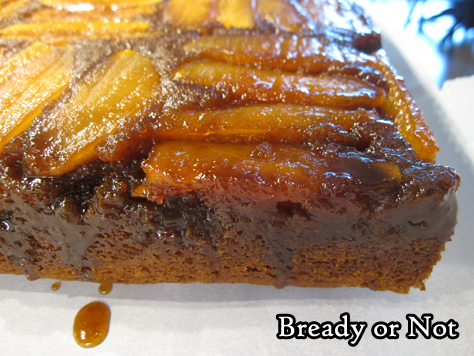
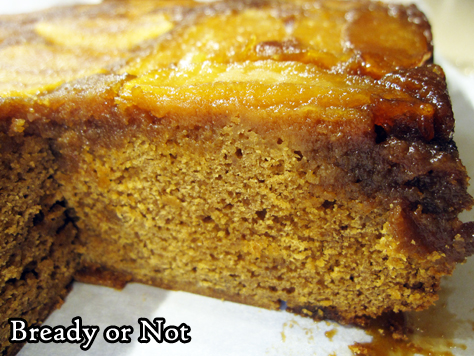
Bready or Not: Molasses Toffee Apple Upside-Down Cake
This Molasses Toffee Apple Upside-Down Cake is as delicious as it is beautiful!
This cake does take a little extra effort. You have to give some thought to placing the apple slices instead of just mixing in the apples. It also dirties a lot of dishes.
But the end result? The cake crumb is reminiscent of a dense, moist gingerbread cake–which goes perfectly with the apples. The combo is sheer bliss.

So, what kind of apples are best? Three medium baking apples! You can always Google that subject for a wide range of recommendations. I can recommend Granny Smiths, Galas, and Pink Lady.
The resulting cake is great warm, recently from the oven. It’s also good cold from the fridge. And reheated, warmed just a touch in the microwave or toaster oven. But not reheated to be super-hot–that actually makes the apples go too soft.
This cake is also great to slice into blocks, wrap in plastic, and freeze for later. It keeps wonderfully that way! Thaw and enjoy at your leisure.
Modified from Bake from Scratch September/October 2019.
Bready or Not: Molasses Toffee Apple Upside Down Cake
Equipment
- 9x9 square pan
- offset spatula
Ingredients
- 1 2/3 cups light brown sugar packed, divided
- 1/4 cup unsalted butter half stick, melted
- 1/2 cup plus 2 Tablespoons molasses divided
- 3 large baking apples about 450 grams after being peeled, cored, and thinly sliced; Granny Smith, Gala, and Pink Lady work well
- 1/2 cup plus 1 Tablespoon unsalted butter softened
- 2 large eggs room temperature
- 1 large egg yolk
- 2 teaspoons vanilla extract
- 2 2/3 cups all-purpose flour
- 2 1/2 teaspoons baking powder
- 1 1/2 teaspoons ground cinnamon
- 3/4 teaspoon kosher salt
- 3/4 teaspoon ground ginger
- 1/2 teaspoon ground nutmeg
- 1/8 teaspoon ground cloves
- 3/4 cup whole milk
Instructions
- Preheat oven to 350-degrees. Cut a square of parchment paper to fit in the bottom of a 9x9 square pan. Grease pan with butter or nonstick spray. Place parchment, and grease paper as well. Set aside.
- In a small bowl, whisk together 2/3 cup brown sugar, melted butter, and 2 tablespoons molasses. Pour into prepared pan. Arrange apple slices in groups of 5 in alternating patterns on top of sugar mixture.
- In a big mixing bowl, beat softened butter and remaining 1 cup brown sugar until fluffy. This will be about 3 to 4 minutes in a stand mixer. Scrape sides of bowl as needed.
- Beat in remaining 1/2 cup molasses until no streaks remain. One at a time, add the eggs and egg yolk followed by the vanilla.
- In a medium bowl, whisk together the dry ingredients: the flour, baking powder, cinnamon, salt, ginger, nutmeg, and cloves.
- Gradually mix the dry ingredients into butter mixture alternately with the milk. Beat until just smooth. Pour batter over apples, smoothing with an offset spatula.
- Bake until the middle passes the toothpick test, about 45 to 50 minutes. Let cool in pan for 10 minutes. Run a knife around edges of pan to release sides of cake, if needed. Carefully invert onto a flat serving plate or small cutting board.
- The cake is fantastic eaten fresh, cold, or just warmed. It can also be cut into squares and frozen for later enjoyment.
OM NOM NOM!
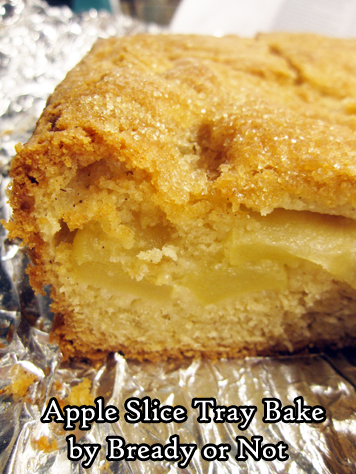
Bready or Not: Apple Slice Tray Bake
This Apple Slice Tray Bake would simply be an Apple Cake to most Americans. Whatever you call it, it’s packed with apples and delicious.
This is third consecutive recipe I’ve modified from the Bake from Scratch Magazine July/August 2020 Ireland-themed issue. I still have a few more things I want to try in the coming months, too!

I’ve found that French, Irish, and British apple cake recipes tend to be lighter on sugar and spices than typical American recipes. The focus is really on the apples.
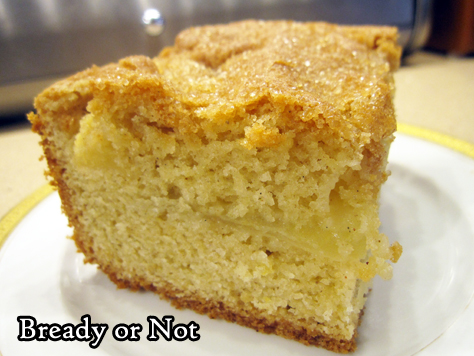
I used Honeycrisps here, which are one of my favorite apples to eat outright or bake with! Two big apples will work.
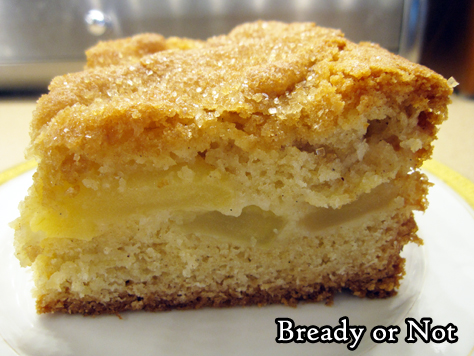
This bakes up light, lofty, and cakey, with a sugar-crusted top and a lovely flavor of apples throughout. The pieces freeze and thaw very well, too, meaning you can enjoy this like it is fresh but spread over days or weeks!
Bready or Not: Apple Slice Tray Bake
Equipment
- 9×9 baking pan
- uneven spatula
Ingredients
Apple layer:
- 2 large baking apples Honeycrisp work well
- 1 Tablespoon lemon juice
- 1 Tablespoon white sugar
Cake:
- 1 1/4 cups unsalted butter (2 and a half sticks) room temperature
- 1 1/2 cups white sugar
- 4 large eggs room temperature
- 1 1/2 teaspoons vanilla bean paste or substitute vanilla extract
- 3 cups all-purpose flour
- 3/4 teaspoon salt
- 4 1/2 teaspoons baking powder
- 1/2 teaspoon cinnamon
- 1/8 teaspoon allspice
- 2 Tablespoons turbinado sugar
Instructions
- Preheat oven at 350-degrees. Line a 9×9 pan with foil and apply nonstick spray.
- Peel and core the apples, then slice to about 1/4-inch thickness. Place slices in a large bowl and toss them with lemon juice and 1 Tablespoon white sugar, until apples are coated. Set aside.
- In a big mixing bowl, beat butter and white sugar for several minutes, until blended and fluffy. Add eggs, one at a time, mixing in well and scraping bowl afterward. Add vanilla. The batter may look curdled, but that’s okay.
- In a separate bowl, stir together flour, salt, baking powder, cinnamon, and allspice. Gradually mix the dry ingredients into the wet.
- Spread about half of the batter into the pan, using an uneven spatula to form an even layer. Arrange apple slices, flat side down, to cover the batter entirely. Top with the remaining batter, using the uneven spatula again to even out as much as possible. Sprinkle turbinado sugar all over the top.
- Bake until the middle of the cake passes the toothpick test, which will be from 1 hour to 1 hour and 15 minutes. Cover pan with foil about halfway through to prevent it from browning too much.
- Let cool in pan for an least 10 minutes, then use foil to lift cake onto a cutting board. Slice into squares. Tastes best warmed and at room temperature. Pieces can also be shrouded in plastic wrap and frozen for later enjoyment.
