


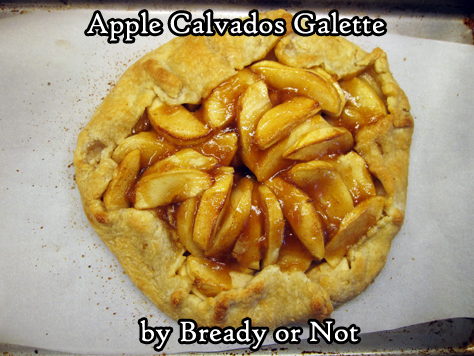
Bready or Not Original: Apple Calvados Galette
This Apple Calvados Galette is a perfect dessert for one or two people. Plus, it’s rustic and pretty to behold!
Calvados is an apple brandy made in Normandy. The price point of it can vary quite a bit. Feel free to use another kind of apple brandy in the recipe.
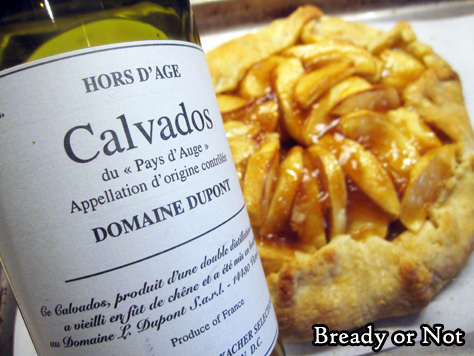
The delicious, original aspect of this treat is that you use the calvados to make a quick stovetop jelly that you then coat the apples with at the end of the bake time.
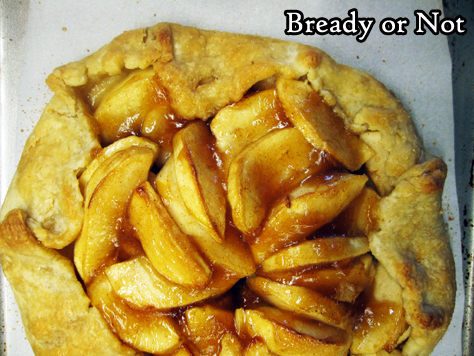
The alcohol flavor doesn’t linger. What you get is a concentrated sweet flavor of apples, right atop the fresh apples.
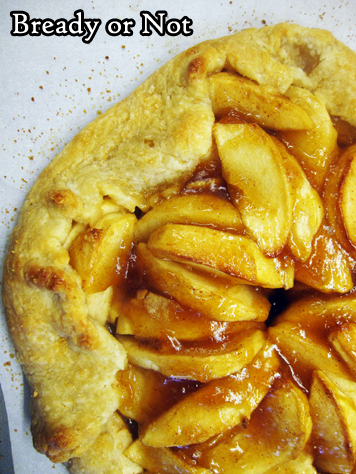
The baked galette keeps for days wrapped up in foil in the fridge. A quarter slice is the perfect amount for breakfast or dessert, and it’s not anywhere near as bready and dense as a full piece of pie.
Bready or Not Original: Apple Calvados Galette
Equipment
- baking sheet
- parchment paper
- basting brush
Ingredients
Galette
- 1 single-layer pie dough store-bought or homemade
- 4 medium apples such as Gala, Fuji, and Ambrosia
- 1 Tablespoon lemon juice
- 1/3 cup calvados or other apple brandy
- 1 Tablespoon cornstarch
- 3 Tablespoons brown sugar packed
- 1/2 teaspoon ground cinnamon
Glaze
- 1 Tablespoon pure maple syrup
- 1 Tablespoon maple sugar or turbinado sugar
Instructions
- Preheat oven at 400-degrees. Line a baking sheet with parchment paper.
- On a lightly floured surface, roll out the pie crust to about a 10-inch diameter circle. Transfer it to the baking sheet and set in fridge while the other ingredients are prepared.
- Peel, core, and thinly slice the apples, placing them in a large bowl. Pour in the lemon juice, calvados, cornstarch, brown sugar, and cinnamon. Toss the apples to coat them completely.
- Pull out the chilled crust. Begin to arrange apple slices in the middle, fanning them out and stacking them, but leaving a 2-inch border of dough around the outside. DO NOT DISCARD THE LIQUID IN THE BOWL! Once the apples are arranged, fold the dough over to partially cover the apples.
- Start baking the galette for 15 minutes. While that is cooking, pour the leftover liquid into a small pot on medium-high. Stay close to the stove and stir liquid often. As soon as it gels, which is right at right about boiling temperature, remove it from heat. Set aside.
- Reduce oven temperature to 350-degrees. Bake galette for another 20 minutes.
- Pull out the galette. Drizzle the gel over the exposed apples in the middle of the galette then use basting brush to coat every nook and cranny. Measure out maple syrup. Use same brush (no need to wash it) to coat the top crust, then sprinkle maple sugar or coarse sugar over it to add a crystalline crunch.
- Bake for another 10 to 15 minutes, until apples in middle are fork-tender.
- Let cool slightly before cutting–a pizza cutter is ideal. Leftovers can be kept wrapped up in foil in the fridge for days.
*OM NOM NOM!*
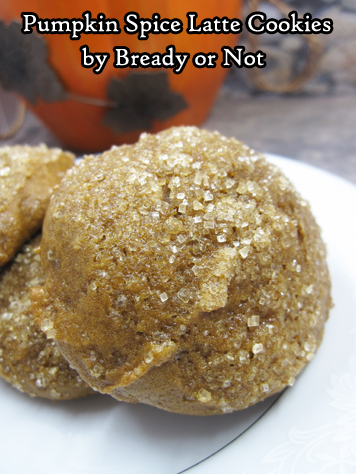
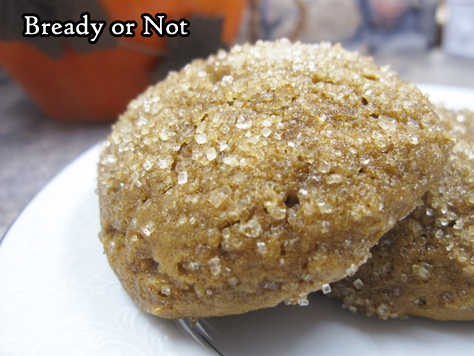
Bready or Not Original: Pumpkin Spice Espresso Cookies
These Pumpkin Spice Espresso Cookies look a perfect autumnal orange and taste like fall, too–with an added kick of espresso.
I love pumpkin recipes that use a whole can of puree. No messing with leftovers, y’know? This recipe will use a full 15-ounce can!

The pumpkin flavor comes through in the baked cookies, too, along with warm spices and coffee.
Expect a texture that is light and cakey in the mouth, and slightly tacky to the fingertips. That’s pretty common with pumpkin cookies–or ones with applesauce, and this recipe includes both.

I stored these cookies in the fridge because I live in Arizona and my kitchen is warm through fall, but these should keep fine at room temperature elsewhere.
The recipe does make about 50 cookies, but as light and delicious as they are, they might not last that long at all.
Bready or Not Original: Pumpkin Spice Espresso Cookies
Equipment
- tablespoon cookie scoop
- parchment paper
- waxed paper
Ingredients
- 3 cups all-purpose flour
- 1 teaspoon baking powder
- 1 teaspoon baking soda
- 1 teaspoon salt
- 2 large eggs room temperature
- 15 ounces pure pumpkin puree
- 2 cups light brown sugar packed
- 1/4 cup unsalted butter (4 Tablespoons) room temperature
- 1/2 cup applesauce
- 2 Tablespoons half & half or milk
- 1 Tablespoon pumpkin pie spice
- 2 teaspoons espresso powder
- 2 teaspoons vanilla extract
- turbinado sugar for top
Instructions
- Preheat oven at 375-degrees. Line large cookie sheets with parchment paper.
- In a medium bowl, mix together the flour, baking powder, baking soda, and salt. Set aside.
- In a large mixing bowl, beat together the eggs, pumpkin, brown sugar, butter, and applesauce. Add the half & half, pumpkin pie spice, espresso powder, and vanilla, until well combined. Gradually mix in the dry ingredients.
- Use a tablespoon scoop to dollop dough onto the parchment paper, spacing out to allow for slight spread. Sprinkle turbinado sugar over the tops.
- Bake for 9 to 11 minutes, until the tops are dry and set. Move to a rack to completely cool.
- Cookies will be slightly tacky, as many pumpkin cookies are, and should be stored with waxed paper between the layers to prevent them from sticking together. Store in a sealed container at room temperature or in the fridge.
OM NOM NOM
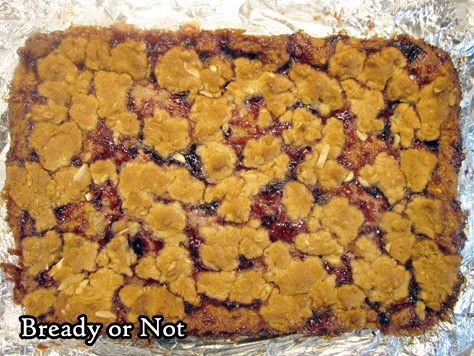
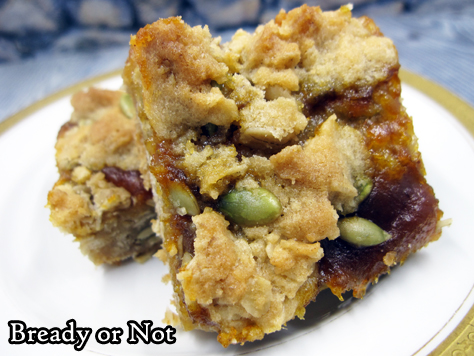
Bready or Not Original: Chewy Filled Bars
I present to you my Chewy Filled Bars: a versatile recipe that can use any number of fruit preserves, fruit butters, or other sweet filling, combined with different nuts or seeds, all to unique, delicious result.
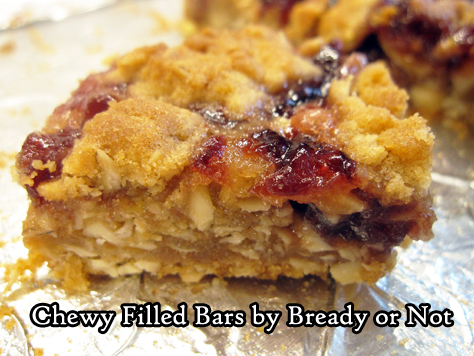
These pictures display the recipe using Sprouts Cherry Preserves (with slivered almonds and almond extract) and Sprouts Maple Pumpkin Butter (with pepitas and almond extract).
However, I also made the same recipe using Trader Joe’s cinnamon bun filling (with chopped pecans and vanilla extract) and Apple Cider Spread (with chopped walnuts and vanilla extract). Every single version was awesome.
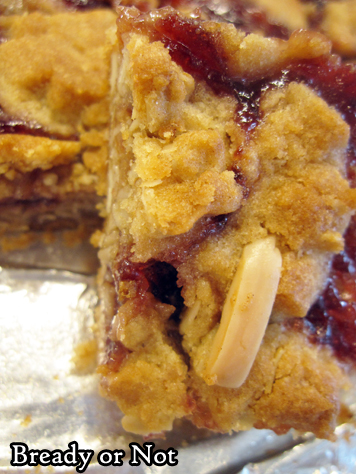
The jarred filling I used varied from 12 to 14 ounces. All worked well, though the Cinnamon Bun Filling required a 40 minute bake to set. I liked mixing in different nuts or seeds to pair with the filling, but you could also omit that ingredient completely, if desired.
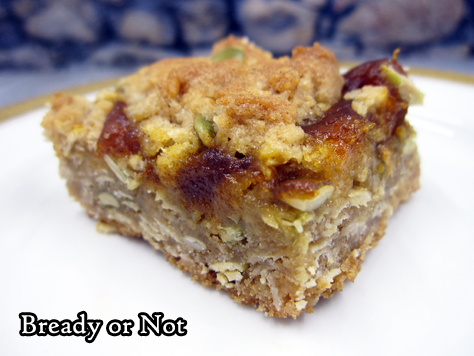
No matter the mix-ins, the result is a pleasantly thick, chewy bar that is just sweet enough.

Bready or Not Original: Chewy Filled Bars
Equipment
- 13x9 pan
Ingredients
- 1 cup unsalted butter room temperature
- 2 cups brown sugar packed
- 2 teaspoons baking powder
- 1 large egg
- 1 teaspoon almond extract or substitute vanilla extract
- 2 cups all-purpose flour
- 2 cups old-fashioned rolled oats
- 1/2 cup slivered almonds or sliced almonds or substitute other nuts or seeds
- 12 to 14 ounce fruit preserves or fruit butter or other sweet filling; possibilities include cherry preserves, pumpkin butter, cinnamon bun filling, etc
Instructions
- Preheat oven at 350-degrees. Line a 13x9 pan with aluminum foil and apply nonstick spray or butter.
- In a large bowl, beat butter until creamy. Add brown sugar and baking powder. Follow up with egg and almond extract. Gradually mix in flour, oats, and sliced almonds.
- Set aside 1 cup of dough. Press the rest into the bottom of the prepared pan. A piece of waxed paper and heavy glass will help to compress it into a form, even layer. Spread preserves over top. Crumble the reserved dough over the fruit.
- Bake for 30 to 35 minutes, until top is lightly brown and no longer wobbly in the middle. Completely cool at room temperature, speeding process in the fridge, if desired. Use foil to lift contents onto cutting board to slice up.
- Store in sealed containers with waxed paper or parchment between the layers. Keeps at room temperature for days, and can also be frozen for weeks.
OM NOM NOM!
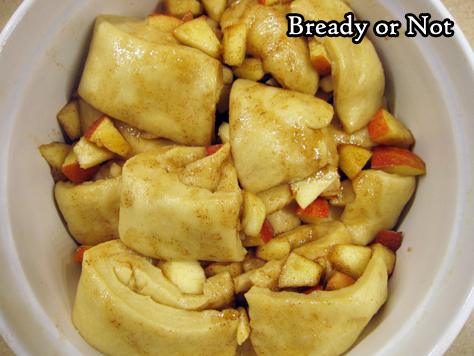
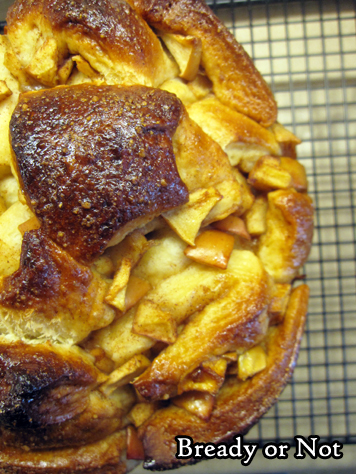
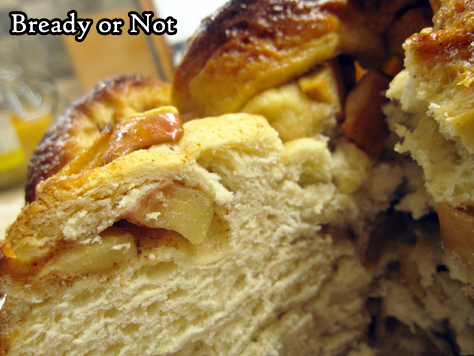
Bready or Not: Harvest Apple Challah
Welcome autumn with this big beautiful Harvest Apple Challah, packed with fruit and spice.
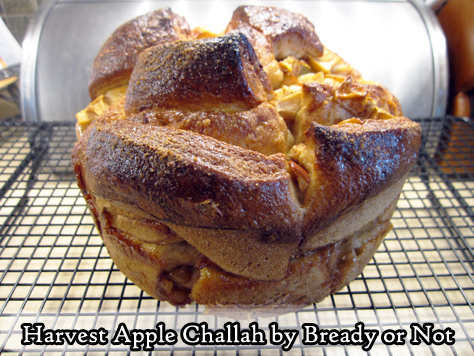
This recipe might look intimidating, but let me assure you, it’s not. The cutting stage is supposed to be messy.
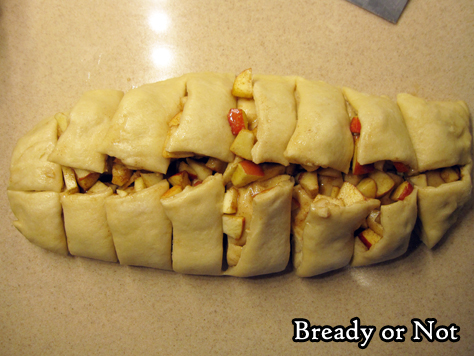
Take comfort that this is not a loaf that is supposed to look tidy. The end goal is rustic–and delicious.
Challah is an enriched dough. Eggs and honey add extra richness plus soft texture.
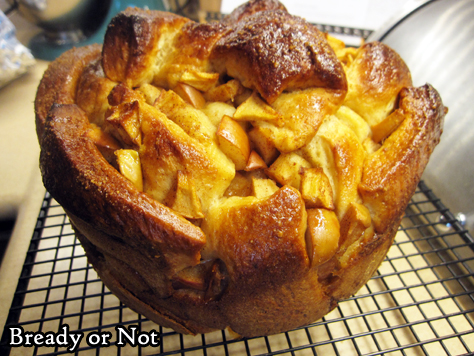
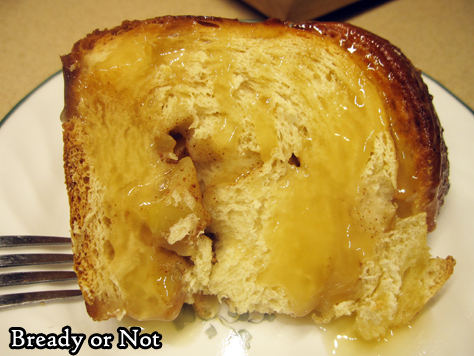
The final result is best served warm with an additional dollop or drizzle of honey. Use the good stuff here! I found that using the toaster oven for 5 to 7 minutes was about perfect for thick slices of bread.
I also found that this bread was great to freeze in slices. Pull out frozen pieces to thaw overnight, and breakfast is quick, convenient, and delicious the next morning!
Modified from a recipe at King Arthur Flour.
Bready or Not: Harvest Apple Challah
Equipment
- deep 9-inch round cake pan or casserole dish
- bench knife
- kitchen thermometer
Ingredients
Dough
- 1/2 cup lukewarm water
- 6 Tablespoons vegetable oil
- 1/4 cup honey
- 2 large eggs room temperature
- 4 cups all-purpose flour
- 1 1/2 teaspoons salt
- 1 Tablespoon instant yeast or active yeast
Filling
- 2 medium apples
- 1/2 teaspoon cinnamon
- 1/4 cup white sugar
Topping
- 1 large egg
- coarse sugar optional
- honey for serving optional
Instructions
Make the dough
- Mix together the dough ingredients by hand or using a mixer with dough hook, until well-incorporated and not stiff. Place dough in a greased bowl to let rise about 2 hours, or until puffy; if poked with a finger, the dent in the dough should remain and not bounce back.
- Prepare a deep round cake pan or casserole dish (at least 4 inches) by greasing thoroughly.
- Also lightly grease a large stretch of counter top or table. Gently deflate dough and transfer to the surface, and flatten dough to an 8x10-inch rectangle.
Prepare the filling
- Core the apples but leave on the peels. Chop apples into chunks about 1/2 to 3/4-inch in size. Should equal about 3 cups total. Toss pieces in cinnamon and sugar.
Assemble the bread
- Spread half the apples in the center of the dough. Fold one short edge over the apples to cover them, and press down the edge to seal them inside.
- Place the remaining apples on top of the existing apple-dough mound. Cover these apples with the other flap of dough, patting again to seal. It's okay if it is bulging and messy!
- Use a bench knife or paring knife to cut the dough down the middle, long-ways. Then cut again along the long side, edge to edge, to create a series of broad, messy stacks of dough with apples overflowing onto the surface.
- Start transferring pieces of dough and scattered apples into the prepared pan, forming a bottom layer, then keep stacking more dough and fruit on top until everything is in the pan.
- Cover loosely with plastic wrap, and let rise for another hour, until it is puffed again.
- Preheat oven at 325-degrees, with a rack in the lower third of the oven.
- Uncover the dough. Brush the top with an egg beaten with a tablespoon of water. If desired, sprinkle coarse sugar all over the top.
- Bake for 55 to 65 minutes, until the top is deep brown. As the dough is so thick, if a kitchen thermometer is available, use it to test the middle; bread should be at least 190-degrees.
- Set pan of bread on a rack to cool for 10 minutes. Carefully remove bread from pan.
- Serve challah warm, ideally with extra honey drizzled on top. Store covered at room temperature up to 4 days. Bread can also be sliced and frozen.
OM NOM NOM!
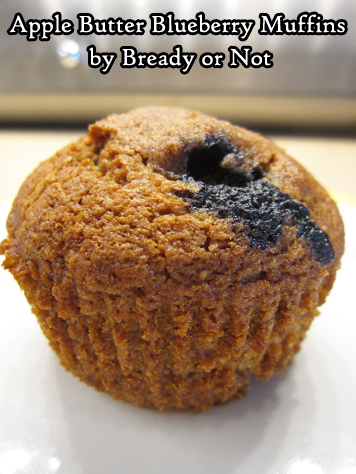
Bready or Not Original: Apple Butter Blueberry Muffins
Apple Butter Blueberry Muffins! Fruity flavors combine in a delicious way in this original recipe.
I love apple butter. It’s delicious, versatile stuff. I’ve found it can work as a substitute in recipes that call for things like applesauce, bananas, and pumpkin puree.
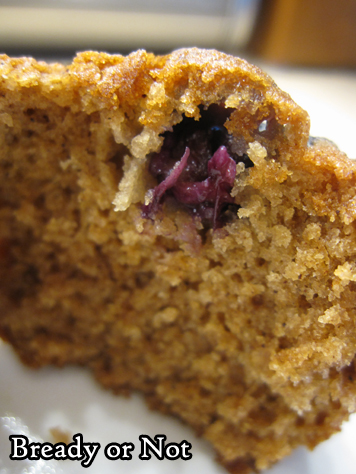
Here, the inherent spiciness in apple butter adds a lot of flavor without the need to measure out extra spices–and the thick texture creates a cakey, moist crumb.
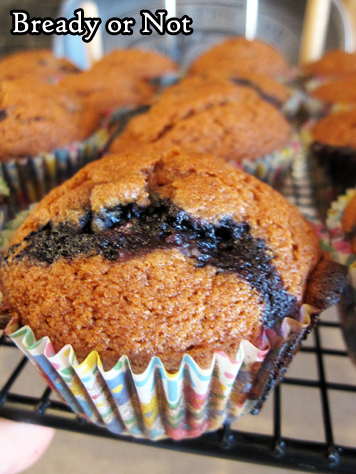
The fresh blueberries throughout are like flavor bombs, introducing a different kind of sweetness in contrast.

Do note that this recipe makes 24 muffins. It saves a lot of time if you have two pans, but this recipe could certainly be done with one. Make sure you have paper liners, though. There’s no sadness like my-muffin-is-stuck-in-the-pan sadness.
Bready or Not Original: Apple Butter Blueberry Muffins
Equipment
- muffin liners
- 2 muffin pans
Ingredients
- 1 cup fresh blueberries
- 2 cups all-purpose flour plus extra
- 1 cup white sugar
- 1/2 cup light brown sugar packed
- 1 teaspoon baking powder
- 1 teaspoon baking soda
- 1/2 teaspoon salt
- 1 teaspoon cinnamon heaping
- 2 eggs room temperature
- 2 teaspoons vanilla extract
- 1 1/2 cups apple butter
- 3/4 cup coconut oil liquid
Instructions
- Preheat oven at 425-degrees. Place muffin liners in two 12-count pans and apply a heavy dose of nonstick spray. Set aside.
- Wash and sort through blueberries, picking out stems or mushy berries. Pat dry. Place in a bowl. Add a tablespoon or so of flour and gently stir to coat berries. This will prevent them from sinking in the batter.
- In a medium bowl, combine the flour, white sugar, brown sugar, baking powder, baking soda, salt, and cinnamon. Set aside.
- In a big mixing bowl, beat together the eggs, vanilla, apple butter, and coconut oil. Gradually pour in the dry ingredients, scraping bottom several times, until everything is just incorporated. Carefully fold in the blueberries.
- Scoop batter into prepared liners, filling each no more than 3/4 full.
- Bake for 5 minutes at 425-degrees. Don't open oven door. Lower temperature to 375-degrees and bake for an additional 16 to 18 minutes, until middle muffins pass the toothpick test.
- Remove pans from oven. Immediately (and carefully) use a fork to pry out each muffin. Keeping them in liners, set on rack to completely cool.
- Once cooled, pack in sealed containers. If freezing muffins, remove liners first.
OM NOM NOM!
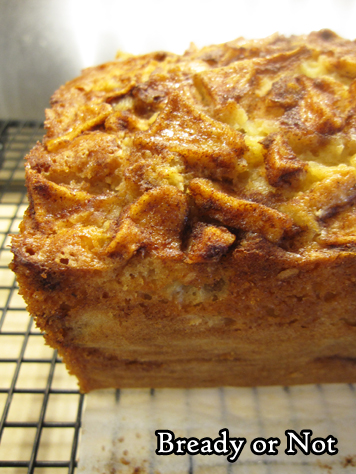
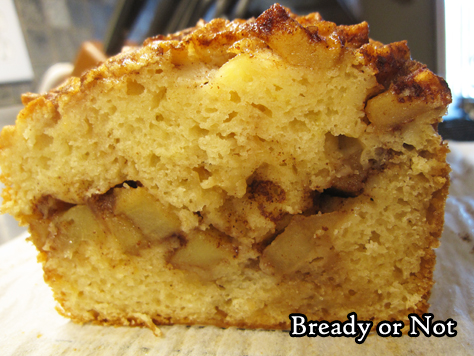
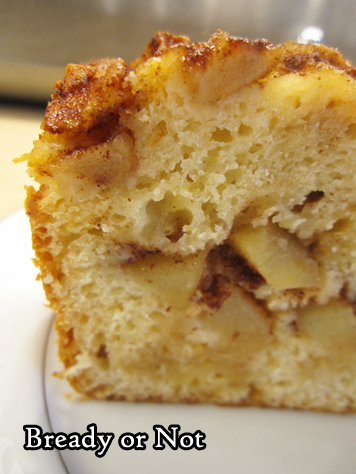
Bready or Not Original: Apple Cinnamon Loaf Cake
This Apple Cinnamon Loaf Cake is tender and delicious, perfect for breakfast, snack, or dessert.
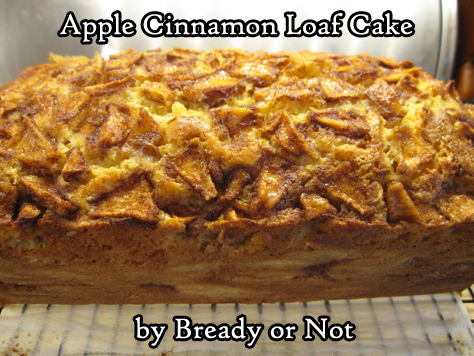
This loaf cake is a lot like my small casserole-sized Easy Apple Cinnamon Cake. If you like one, you’ll like the other!
My husband, see, looooves apple pie and apple cake. Apples in baked goods, period. And yes, he loved this loaf cake.
One of the great things about this recipe is that this loaf kept for about a week, all wrapped up and stored in a safe place at room temperature.
(In my house, that means tucked inside my stainless steel breadbox, as otherwise my cats would tear their way inside the plastic wrap. Because my cats are weird.)
Bready or Not Original: Apple Cinnamon Loaf Cake
Equipment
- 9x5 loaf pan
Ingredients
- 2 medium apples such as Gala, peeled, cored, and chopped
- 1/3 cup brown sugar packed
- 1 teaspoon ground cinnamon
- 2/3 cup white sugar
- 1/2 cup applesauce
- 2 large eggs room temperature
- 1 1/2 teaspoons vanilla extract
- 1 1/2 cups all-purpose flour
- 1 3/4 teaspoons baking powder
- 1/4 teaspoons salt
- 1/2 cup milk or half & half
Instructions
- Preheat oven at 350-degrees. Cut parchment paper to fit long-ways in a loaf pan, sticking up on either side as a sling. Apply nonstick spray into pan, place paper, then spray again. Set aside.
- Prepare apples. Add brown sugar and cinnamon to bowl and toss with chopped apples to coat.
- In a big bowl, mix white sugar and applesauce until smooth and creamy. Add eggs one at a time, then the vanilla extract.
- In another small bowl, stir together the flour, baking powder, and salt. Gradually stir this into the egg mixture, followed by the milk.
- Spoon about half of the batter into the prepared pan. Layer about half of the apples on top. Scoop the remaining batter over it, and add the rest of the apples. Pat them into the top.
- Bake for 50 to 55 minutes, until a toothpick stuck into the middle emerges clean.
- Use parchment sling to immediately lift loaf onto a rack to completely cool. Once the loaf is at room temperature, shroud in plastic wrap and store at room temperature--or freeze all or part of loaf for later.
