


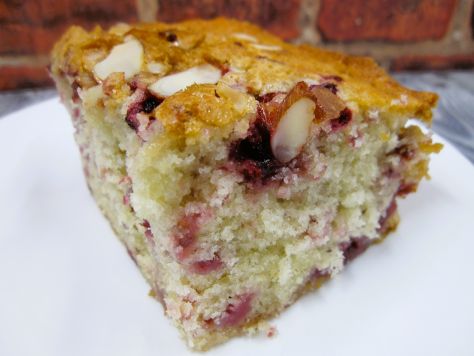
Bready or Not Original: Raspberry-Almond Snack Cake
This Raspberry-Almond Snack Cake is a delicious treat. It’s great for everything from breakfast to snack to dessert.
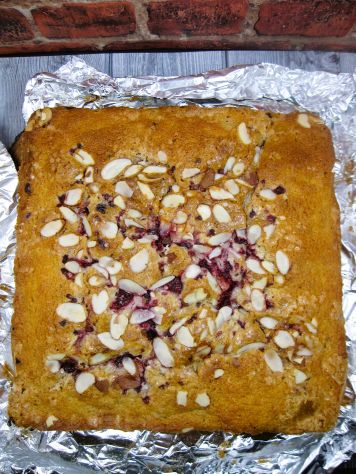
What I like about it is that it’s packable. This is not a fragile coffee cake. Encase this in plastic wrap or stick it in a sandwich bag, and it’s a dense homemade treat-to-go.
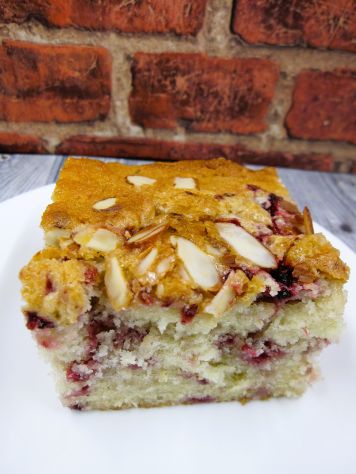
This is also a good cake to bake, cool, slice up, and freeze some for later. It keeps for weeks like that, and is fast to thaw later on.
Bready or Not Original: Raspberry-Almond Snack Cake
Equipment
- 9×9 pan
- aluminum foil
- nonstick spray
- food scale
Ingredients
Cake
- 300 grams frozen raspberries
- 3/4 cup unsalted butter (1 1/2 sticks) softened
- 1 3/4 cups white sugar
- 3 large eggs room temperature
- 1/2 teaspoon vanilla extract or vanilla bean paste
- 1/4 teaspoon almond extract
- 2 1/4 cups all-purpose flour
- 1/4 cup corn starch
- 1 1/2 teaspoons baking powder
- 1 teaspoon kosher salt
- 1/4 teaspoon baking soda
- 1/2 cup milk or half & half
- 1/2 cup Greek vanilla yogurt or sour cream
Topping
- 2 Tablespoons turbinado sugar
- 1/4 cup sliced almonds
Instructions
- Preheat oven at 375 degrees. Press foil into a 9×9 pan. Apply nonstick spray.
- Weigh out the 300 grams of raspberries. Use kitchen shears or a knife to gently shatter the berries into smaller pieces. Place back in freezer as the recipe is assembled.
- In a mixing bowl, beat together the butter and sugar until they are fluffy. Add the eggs one at a time, followed by both the extracts.
- In a separate bowl, stir together the flour, corn starch, baking powder, kosher salt, and baking soda. In another bowl, combine the milk and the yogurt.
- Take turns adding the dry ingredients and the milk mix in the big mixing bowl with the butter. Scrape the bottom of the bowl to make certain everything is combined. Gently fold in the frozen raspberries.
- Spread the batter in the prepared pan and even out. Sprinkle the turbinado sugar over the top, followed by the sliced almonds. Gently press in.
- Bake for 15 minutes, then reduce the oven temperature to 350. Continue baking for an additional 45 to 55 minutes. (Note that the bake time is longer because of the moisture in the frozen berries. If you’re using fresh instead, the bake time will likely be reduced, so monitor closely.) The middle should pass the toothpick test.
- Let cool in pan for 10 minutes. Use the foil to lift the cake onto a rack to fully cool.
- Store in an airtight container or bag in the fridge or at room temperature for up to 3 days. This is also a great cake to freeze in slices.
OM NOM NOM!
Bready or Not: Apple Fritter Cake
I have many different kinds of apple cake here on Bready or Not. This Apple Fritter Cake is special because it tastes like the luscious apple fritters found in donut shops and bakeries!

This is not a thick cake. The crumb is really there to hold a lot of apple pieces together. The use of apple butter versus applesauce adds a deeper color and richer flavor.

Then there is, of course, the icing. That’s essential to make this cake like the pastry. It adds sweetness and a delicate crunch that’s fast to melt in the mouth.

Really, I look at this as a special occasion kind of apple cake, something for a birthday, special guest, or date.
Bready or Not: Apple Fritter Cake
Equipment
- 8×8 pan
- aluminum foil
- nonstick spray or butter
Ingredients
Cake
- 1 3/4 cups all-purpose flour
- 1 1/2 teaspoons baking powder
- 1 teaspoon ground cinnamon
- 3/4 teaspoon kosher salt
- 2 cups crisp baking apples diced and divided (232 grams) (use apples like Honeycrisp, State Fair, or Kindercrisp)
- 1 cup brown sugar packed
- 1 large egg
- 1 large egg white
- 1/2 cup unsalted butter (1 stick) melted and slightly cooled
- 1/3 cup vanilla yogurt or sour cream or crème fraiche
- 1/3 cup apple butter
- 1 Tablespoon lemon juice
- 1 teaspoon vanilla extract
Glaze
- 1 cup confectioners’ sugar
- 2 Tablespoons half & half
Instructions
- Preheat oven at 350 degrees. Line an 8×8 with foil and apply butter or nonstick spray.
- In a medium bowl, stir together flour, baking powder, cinnamon, and salt. Add 1 1/2 cups of the diced apples. Toss to coat.
- In a big mixing bowl, beat the brown sugar, egg, and egg white until light and fluffy. Mix in the melted butter, yogurt, apple butter, lemon juice, and vanilla. Fold in the dry ingredients, making sure to scrape the bottom, until everything is just combined.
- Pour batter into the prepared pan. Smooth out top. Sprinkle on the remaining 1/2 cup of apple pieces.
- Bake until browned, with the middle passing the toothpick test, about 45 to 55 minutes.
- Cool completely before mixing the glaze. Drizzle it all over the top. Serve warmed or at room temperature. Individual slices can also be frozen for later enjoyment.
OM NOM NOM!
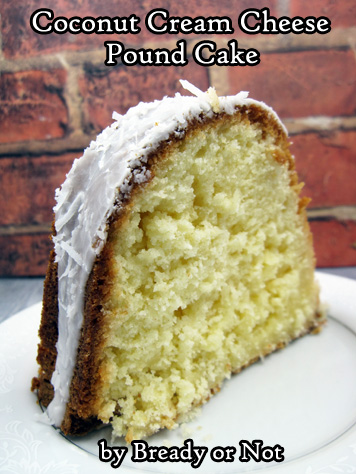
Bready or Not EXTRA CHEESY: Coconut Cream Cheese Pound Cake
Welcome to the last installment of our special month of Bready or Not. My cheese-centric cozy mystery Cheddar Luck Next Time just came out a few weeks ago, so we’re celebrating with another cheesy recipe from the Bready or Not archives.
This week’s feature is Coconut Cream Cheese Pound Cake. Only right to end things with cake, right?
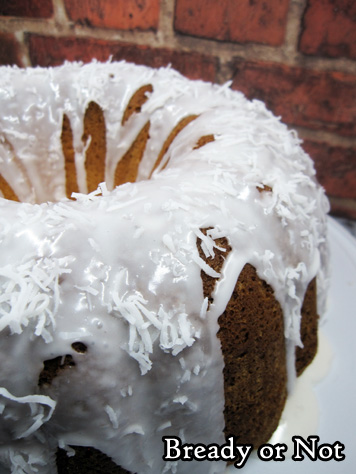
This stunning Coconut Cream Cheese Pound Cake is gorgeous and delicious, and will win over even people (like me) who are not big coconut fans. The cake ends up being chewy, but not too chewy; sweet, but not cloying. Really, this is great as a breakfast, brunch, or dessert cake.

Serve this as cake alone, or like with any pound cake, it would be lovely alongside fresh fruit.
Please grab a copy of Cheddar Luck Next Time, which features an autistic (like me!) lead character with a passion for cheese (like me!).

Amazon: paperback | ebook (affiliate links)
Barnes & Noble: paperback & ebook
Bookshop: paperback
Bready or Not: Coconut Cream Cheese Pound Cake
Ingredients
Cake
- 1 cup unsalted butter 2 sticks, room temperature
- 8 ounces cream cheese 1 box, room temperature
- 3 cups white sugar
- 6 large eggs room temperature
- 2 teaspoons vanilla extract
- 1 teaspoon kosher salt
- 1 teaspoon baking powder
- 3 cups all-purpose flour
- 2 cups shredded coconut
Glaze
- 2 cups confectioners’ sugar
- 2-3 Tablespoons milk
- extra shredded coconut
Instructions
- Preheat oven at 325-degrees. Coat a 10-cup bundt pan with nonstick spray or butter.
- In a large bowl, beat butter and cream cheese together until smooth. Add sugar and mix until light and fluffy.
- Add eggs one at a time, followed by the vanilla extract, salt, and baking powder. Gradually mix in the flour until just combined, then fold in the coconut.
- Pour batter into pan and distribute evenly. Bake for 75 to 80 minutes, until it passes the toothpick test.
- Cool pan for 20 minutes, then invert the cake onto a wire rack to completely cool. Move to a plate or cake platter.
- To make the glaze, stir together the confectioners’ sugar and milk to form a smooth yet thick consistency. Pour or spoon glaze over the top, then sprinkle with additional coconut.
OM NOM NOM!
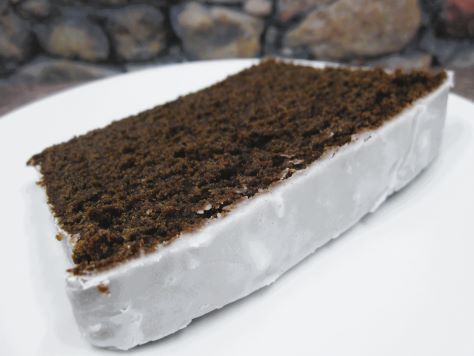
Bready or Not: Sourdough Chocolate Loaf Cake
This Sourdough Chocolate Loaf Cake is rich with a deep chocolate flavor and tender crumb. It’s a fancy way to use up sourdough discard. My starter imbued this cake with a flavor like malt, so combined with chocolate, I was reminded of a chocolate milkshake.

When I say discard, I mean the mother starter should be 1) active and 2) likely fed the evening before if this is being made in the morning. After the starter is divided to be used in this recipe, feed the mother starter again and tend as usual.
Now, a confession: my first attempt at this recipe was a cake fail. The original Bake from Scratch recipe calls for baking an hour and five minutes. I did that, and the center of my loaf collapsed during cooling because it was completely raw inside. I did salvage the bottom, top, and sides, though.
On my second attempt, I monitored closely after the hour point, and I kept baking. At an 1 hour 30 minutes, I declared it baked, and slicing into it later revealed it was just barely done. So, keep an eye on things. I’d rather have a bake overdone than underdone.
Bready or Not: Sourdough Chocolate Loaf Cake
Equipment
- loaf pan
- parchment paper
- nonstick spray
Ingredients
Loaf
- 1/2 cup unsalted butter (1 stick) softened
- 1 cup brown sugar firmly packed
- 1/2 cup white sugar
- 1 large egg room temperature
- 1 cup sourdough starter discard 275 grams
- 1/2 cup buttermilk or soured milk
- 1 teaspoon vanilla extract
- 1 cup all-purpose flour
- 3/4 cup cocoa powder sifted
- 1/2 teaspoon baking powder
- 1/4 teaspoon baking soda
- 1/4 teaspoon kosher salt
Glaze
- 1 cup confectioners’ sugar
- 1 Tablespoon milk or half & half
Instructions
- Preheat oven at 325 degrees. Cut parchment to fit inside the loaf pan like a sling, sticking up at the two long sides. Use nonstick spray in the pan and on the parchment paper.
- Beat butter and both sugars until fluffy. Add egg. Add sourdough discard, buttermilk or soured milk, and vanilla, scraping the bottom of the bowl a few times to make sure everything is incorporated.
- In another bowl, combine flour, cocoa powder, baking powder, baking soda, and salt. Gradually add the dry ingredients to the wet, scraping the bottom again. Pour the batter into the prepared pan.
- Bake for somewhere between 1 hour and 10 minutes to 1 hour and 40 minutes. After the hour point, use the toothpick test every so often to check for doneness; a digital thermometer is also a good way to check inside, with a goal of seeing over 190-degrees in the middle.
- After about 15 minutes, use the paper sling to lift the loaf out. Let cool completely on a wire rack, speeding in the fridge if desired.
- Make the glaze. Spoon it over the loaf pan to dribble over the sides. Let set at least 30 minutes. Slice and enjoy! Store in a sealed bag or container. Cake can also be frozen in slices for later enjoyment.
OM NOM NOM!
Notes
Bready or Not: Gingerbread Cookie Cheesecake Bars
If you love both gingerbread cookies and cheesecake, oh boy, do I have the recipe for you. These Gingerbread Cookie Cheesecake Bars are dense, rich, and outright divine.
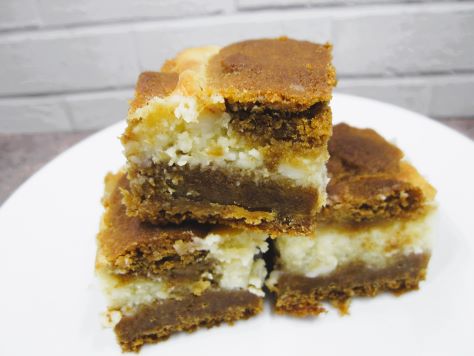
The creation process also dirties a lot of dishes, but hey, sometimes that’s what is required to make something that truly comes across as special. This recipe makes a 9×13 pan of thick bars, so bake this to feed a crowd!

Modified from Holiday Cookies magazine 2019.

Bready or Not: Gingerbread Cookie Cheesecake Bars
Equipment
- 9×13 pan
- aluminum foil
- nonstick spray
- uneven spatula
Ingredients
Gingerbread
- 1 1/2 cups unsalted butter (3 sticks) softened
- 1 1/4 cups white sugar
- 3/4 cup brown sugar packed
- 1/2 cup molasses
- 2 large eggs room temperature
- 4 cups all-purpose flour
- 2 teaspoons ground cinnamon
- 2 teaspoons ground ginger
- 1 1/2 teaspoons kosher salt
- 1 teaspoon baking powder
- 1 teaspoon baking soda
- 1/4 teaspoon nutmeg
- 1/8 teaspoon allspice
- 1/8 teaspoon cloves
- 3 Tablespoons minced candied ginger
Cheesecake
- 16 ounces cream cheese (2 blocks) softened
- 1 cup white sugar
- 1 Tablespoon all-purpose flour
- 2 large eggs room temperature
- 1 Tablespoon vanilla extract
Instructions
- Preheat oven at 350 degrees. Line a 13×9-inch pan with aluminum foil. Apply nonstick spray.
- In a large bowl, beat the butter and sugars until fluffy. Add the molasses, mixing until no streaks remain. Add eggs, one at a time, scraping the bottom of the bowl on occasion.
- In a separate bowl, combine the flour, cinnamon, ground ginger, salt, baking powder, baking soda, nutmeg, allspice, and cloves. Gradually add the dry ingredients to the wet. Fold in the candied ginger.
- Measure out 2 cups of the dough and set it aside.
- Press the remainder of the dough into the pan, forming an even layer.
- Time to make the cheesecake layer. Beat the cream cheese until creamy. Add the sugar and flour. Add the eggs one at a time, followed by the vanilla. The mixture should be fairly consistent in color and texture, but it’s okay if there are some small lumps.
- Use an uneven spatula to spread the cheesecake into an even layer. Crumble the reserved topping over it.
- Bake for 50 to 60 minutes; the middle should not look jiggly and should pass the toothpick test. If the top is browning too much, cover with foil.
- Cool at room temperature for about an hour, then place in fridge to completely chill for a few hours. Use foil to lift onto cutting board to slice into small pieces. Store in fridge in a sealed container.
OM NOM NOM!
Bready or Not Original: Earl Grey Shortbread Bars
Whether you are coping with cold weather right now or psychologically easing into winter (something I know well from my time in Arizona), these Earl Grey Shortbread Bars will make you feel warm and cozy. Also, caffeinated.

These bars are dense, soft, and a touch crumbly, the flavor of warm spice throughout. The drizzle of glaze adds sweetness and prettiness.

The tea flavor is quite strong here–it actually seemed to get bolder after a day–so the 1/4 cup amount is best made for people who like Earl Grey. I used Bigelow bags, but the amount of tea likely varies across brands. If you want a milder flavor, use less tea.

Bready or Not Original: Earl Grey Shortbread Bars
Equipment
- 9×13 pan
- spice grinder or mortar and pestle
- wax paper or plastic wrap
- heavy glass or other weight
- piping bag or freezer bag
Ingredients
Dough
- 1/4 cup Early Grey tea leaves about 4-5 Bigelow bags
- 4 cups all-purpose flour
- 1/2 teaspoon salt
- 2 cups unsalted butter (4 sticks) room temperature
- 2 1/2 cups confectioners’ sugar
- 2 teaspoons vanilla extract
Glaze
- 1 cup confectioners’ sugar
- 1 1/2 Tablespoons milk or half & half
Instructions
- Preheat oven at 350 degrees. Line a 9×13 baking pan with aluminum foil and apply nonstick spray or butter.
- Use a spice grinder or a mortar and pestle to grind the Earl Grey leaves down a bit more, but not fully to powder. Move the tea to a medium bowl and stir with the flour and salt.
- In a large bowl, beat the butter until fluffy. Gradually add the confectioners’ sugar, followed by the vanilla. Beat until smooth. Gradually beat in the flour mixture to incorporate.
- Dollop the dough into the prepared pan. Use a piece of wax paper or plastic wrap to spread out the dough, then use something like a heavy glass to evenly compress the dough into the pan.
- Bake until shortbread is firm with golden edges, about 40 to 45 minutes. Cool in pan on rack.
- After the pan comes to room temperature, mix the glaze ingredients. Transfer them to a piping bag or to a freezer bag. Snip the corner to pipe the glaze in stripes over the pan. Let set for an hour, then use foil to lift contents onto a cutting board to slice into bars.
- Store in sealed container at room temperature. Bars will keep for an least 2 days.
