


Bready or Not: Crunchy Biscuits
These are Crunchy Biscuits in the British sense–that is, they are crunchy cookies with a satisfying snap.
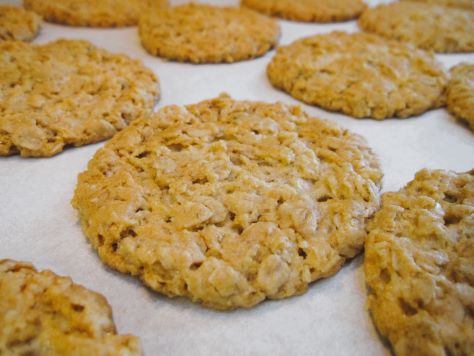
I found the recipe in Bigger Bolder Baking by Gemma Stafford [affiliate link], a book gifted to me by my mother-in-law. Gemma is Irish-born and now lives in America, and her fantastic cookbook has ingredients and cooking temperatures in both British and American measurements.
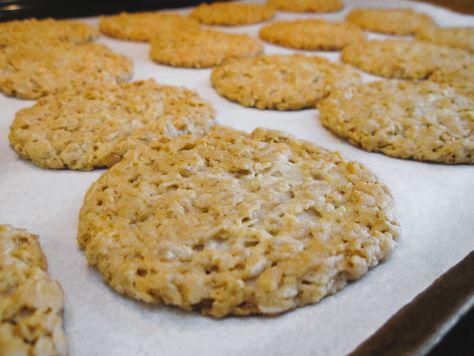
This small-batch recipe includes a quintessentially British ingredient, golden syrup, that has no real American parallel. I’ve seen some recommendations to substitute with half measures of light corn syrup and honey, and while that works as a liquid replacement, the flavor isn’t quite the same.

That said, golden syrup isn’t hard to find in America, it just tends to be expensive. Even in the wastelands of Phoenix, I could find Lyle’s Golden Syrup in the small British goods section of my local Fry’s (Kroger) chain.
Bready or Not: Crunchy Biscuits
Equipment
- parchment paper
- baking sheet
- tablespoon scoop
- cooling rack
Ingredients
- 1 cup unsalted butter (2 sticks) softened
- 3/4 cup white sugar
- 3 Tablespoons golden syrup
- 1 cup self-rising flour
- 2 2/3 cup rolled oats also called old fashioned oats
- 1 teaspoon baking soda
- 1/4 teaspoon salt
Instructions
- Preheat oven to 350-degrees. Line a baking sheet with parchment paper.
- In a large bowl, cream together butter and sugar until it is soft and light in color. Add golden syrup. Follow up with the flour, oats, baking soda, and salt, mixing until just combined.
- Use a tablespoon scoop to shape dough, rolling each lump briefly with hands to compress and flatten, then place spaced out two-inches apart on baking sheet. They will spread as they bake.
- Bake 12 to 14 minutes, until golden brown and set. Let them idle on the cookie sheet about 5 to 10 minutes, then transfer them to a cooling rack. Store them in an airtight container at room temperature.
OM NOM NOM!
Bready or Not: Golden Syrup Brownies
I’ve made a lot of brownies that I’ve shared here on Bready or Not, but these Golden Syrup Brownies are the fudgiest I’ve ever made.

Seriously, they are good but they are dense and rich. I highly recommend cutting these things small, just as one does with fudge.
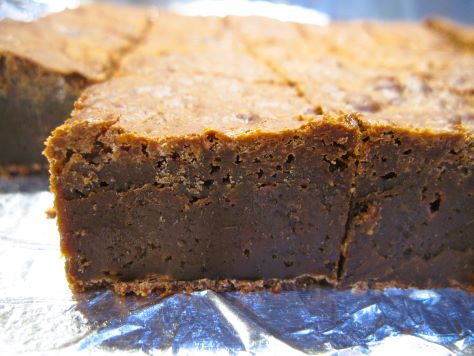
Golden Syrup and coarse sugar are what set these brownies apart. I used Lyle’s Golden Syrup, the original version, imported from the UK. Sometimes you’ll see honey and light corn syrup mentioned as American substitutes; if you want to go that route, split them half and half, but it still won’t be the same as Lyle’s.
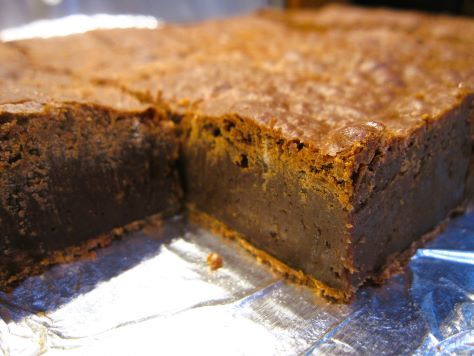
As for the coarse sugar, the original recipe printed in Bake from Scratch called for unrefined light muscovado, but I used a mix of demerara and turbinado. Hence my general recommendation for coarse sugar.
This recipe will keep for weeks in the fridge, have you the fortitude!
Bready or Not: Golden Syrup Brownies
Equipment
- 9×9 pan
- aluminum foil
- nonstick spray
- fine mesh sieve
Ingredients
- 1 1/2 cups plus 2 teaspoons coarse sugar such as turbinado and demerara
- 14 Tablespoons unsalted butter
- 4 Tablespoons plus 2 teaspoons golden syrup
- 1 1/4 cups dark chocolate chopped or in chips
- 6 large eggs room temperature
- 2/3 cups plus 2 Tablespoons all-purpose flour
Instructions
- Preheat oven at 325-degrees. Line a 9-inch square pan with foil and apply nonstick spray.
- In a large saucepan, heat the coarse sugar, butter, and golden syrup over medium heat until the mixture is smooth and bubbly, around 5 to 6 minutes. Remove the pan from heat and add the chocolate. Stir until everything is melted. Let cool for a bit.
- In a medium bowl, whisk the eggs. Strain them through a fine mesh sieve into the batter. Stir everything to incorporate. Add flour, stirring until no white streaks remain. Pour the batter into the prepared pan. Tap it on the counter a few times to knock bubbles free and level the batter.
- Bake until brownies are set with the center still moist, about 45 minutes. It’s okay if they look slightly underdone. Let pan cool to room temperature. Refrigerate at least 6 hours or overnight.
- Use foil to lift contents onto a cutting board. Use a large knife to cut brownies into small squares. If the brownies stick to the knife, wipe it clean after each pass and dip the blade in hot water before each cut. Store brownies in a sealed container in the fridge for up to two weeks, or freeze for longer.
OM NOM NOM!
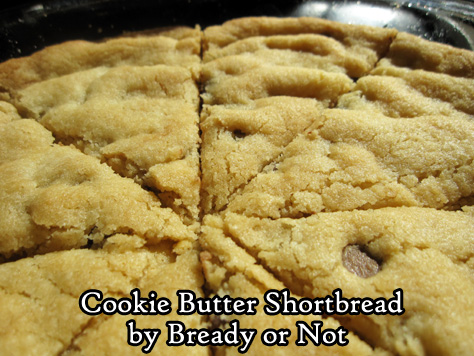
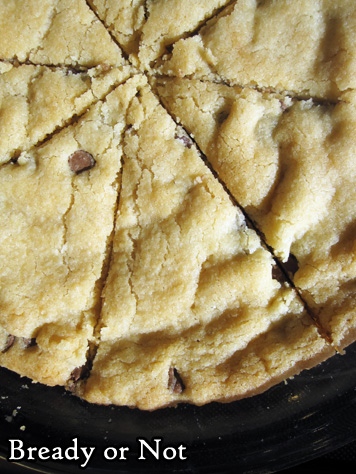
Bready or Not Original: Cookie Butter Shortbread
The Cookie Butter Shortbread is a new riff on my classic Shortbread recipe that I’ve also made with espresso powder and chocolate chips–and also with an infusion of lemon and a glaze. It’s a versatile base recipe.
Now, I bet some of you are asking–what is cookie butter? It’s essentially pureed spice cookies with oil, forming a spreadable consistency just like peanut butter. You can find it in stores by the nut butter; Trader Joe’s carries it under the name Speculoos. What cookie butter does is make cookies taste more… cookie. You’ll know what I mean when you try it.
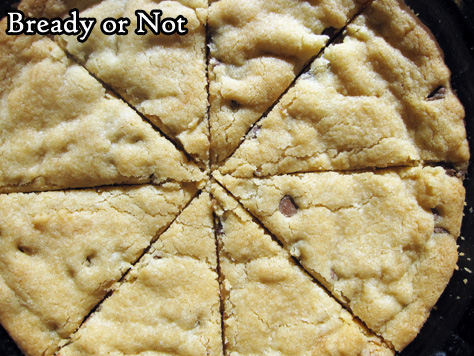
This is not a crisp shortbread like the traditional Walker’s brand (which is delicious in its own right). No, this shortbread is cakey and soft, only crisp at the very edge.
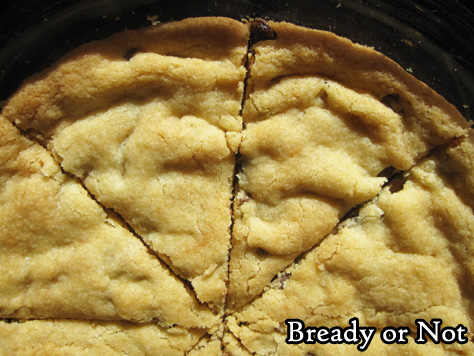
Sometimes the first piece out of the pan can even be fussy and break in half; a metal pie spatula helps, but sometimes it can still happen. That’s no major problem, though, because of every bite of Shortbread is good, even if it’s not perfectly photogenic.
Enjoy this Cookie Butter Shortbread for breakfast or snacks, or in proper fashion at tea time.
Bready or Not Original: Cookie Butter Shortbread
Equipment
- 2 pie plates
Ingredients
- 2 cups all-purpose flour
- 3/4 cup white sugar
- 1/4 teaspoon salt
- 1 cup unsalted butter 2 sticks, softened
- 1 egg yolk
- 1/2 teaspoon vanilla extract
- 1/4 cup creamy cookie butter
- 1/2 cup milk chocolate chips
Instructions
- Preheat oven at 375-degrees. Apply nonstick spray to both pie plates.
- Stir together the flour, sugar, and salt. Add butter, egg yolk, vanilla extract, and cookie butter. Use hands to compress dough together. Add the chocolate chips and mix, bringing dough together again to form a ball. Divide in half, placing one in each pie plate. Flatten dough with palms to create an even surface. Prick surface all over with a fork then use a knife to slash dough into triangular wedges.
- Bake for 18 to 22 minutes, until edges are golden brown and middle is set. Remove from oven and cut again along slash marks. Let shortbread cool completely, then cut again along existing marks.
- Shortbread keeps for several days at room temperature. It can be stored covered in pie plates, or stacked in a sealed container with wax paper between the layers.
OM NOM NOM!
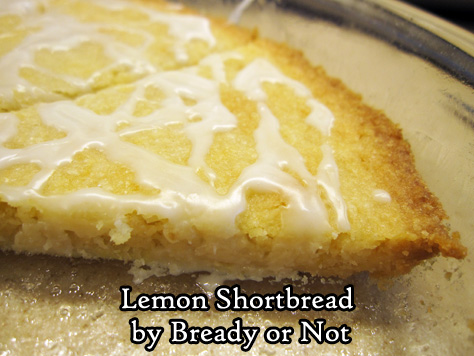
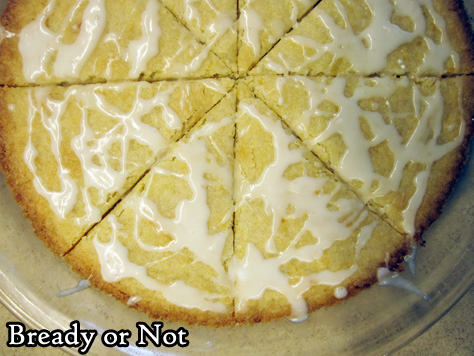
Bready or Not Original: Lemon Shortbread
My Shortbread recipe was the first I really mastered as a teenager beginning to bake. This new version uses that as a base, but modifies it into a delicious Lemon Shortbread.
I love a good Scottish Shortbread. It’s so buttery and scrumptious. The fresh zing of lemon plays very well with that inherent butter flavor and texture.
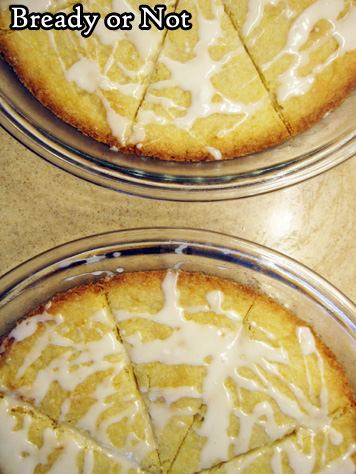
This is not a crisp shortbread like the traditional Walker’s brand (which is delicious in its own right). No, this shortbread is cakey and soft, only crisp at the very edge.
Sometimes the first piece out of the pan can even be fussy and break in half; a metal pie spatula helps, but sometimes it can still happen. That’s no major problem, though, because of every bite of Shortbread is good, even if it’s not perfectly photogenic.
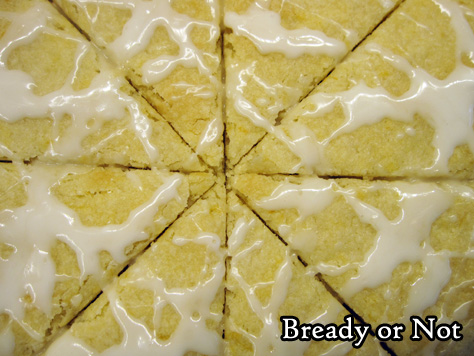
This new version does have a photogenic advantage, though, because the glaze is so very pretty. It should be just thick enough to drizzle, though if it’s a touch watery, that’s not the end of the world.
Enjoy this Lemon Shortbread for breakfast or snacks, or in proper fashion at tea time.
Bready or Not Original: Lemon Shortbread
Equipment
- 2 pie plates
Ingredients
Shortbread
- 1 lemon zested and juiced
- 2 cups all-purpose flour
- 3/4 cup white sugar
- 1/4 teaspoon salt
- 1 cup unsalted butter (2 sticks) softened
- 1 egg yolk
- 1 teaspoon lemon flavor
- 1/2 teaspoon vanilla extract
Lemon Glaze
- 3/4 cup confectioners’ sugar
- 1 Tablespoon lemon juice
Instructions
- Preheat oven at 375-degrees. Apply nonstick spray to both pie plates.
- Stir together the lemon zest, flour, sugar, and salt. Add butter, egg yolk, lemon flavor, and vanilla extract. Use hands to compress dough together to make a ball. Divide in half, placing one in each pie plate. Flatten dough with palms to create an even surface. Prick surface all over with a fork then use a knife to slash dough into triangular wedges.
- Bake for 18 to 22 minutes, until edges are golden brown and middle is set. Remove from oven and cut again along slash marks. Let shortbread cool completely.
- In a medium bowl, stir together confectioners’ sugar and lemon juice to create a glaze with a consistency to drip and keep shape. Drizzle all over shortbread. Let set, then cut again along existing marks.
- Shortbread keeps for several days at room temperature. It can be stored covered in pie plates, or stacked in a sealed container with wax paper between the layers.
OM NOM NOM!
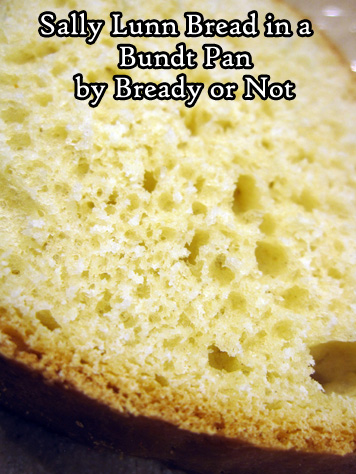
Bready or Not: Sally Lunn Bread in a Bundt Cake Pan
When I had the opportunity to visit the city of Bath in England in 2019, I knew the absolutely necessary stop for lunch was Sally Lunn Eating House, known for centuries for the Sally Lunn bun. I first learned of it from a history spot on the Great British Bake Off.
The bun has some mystery and history to it, but what is certain is that it is rather brioche-like and delicious. Upon coming home, I set about trying several recipes for a homemade version. The results were meh–until this one, which is odd because this bread is also very different.
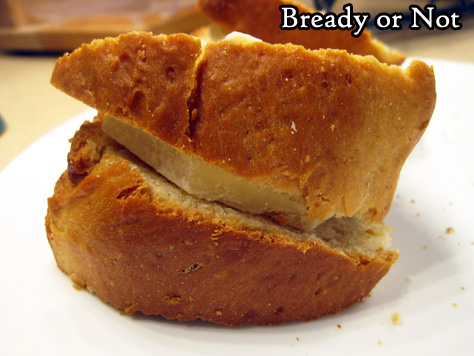
The true Sally Lunn bun is a bun, made in a specialized bun mold. This recipe makes an enriched bread, mixed in a food processor, and risen and baked in a bundt pan. The result is a lush, sweet bread. The flavor and feel is right, even if the shape is radically different.

Though it has a browned crust, the bread itself is still somewhat delicate. It requires thick slices, which isn’t a bad thing at all, because it’s so soft and delicious.
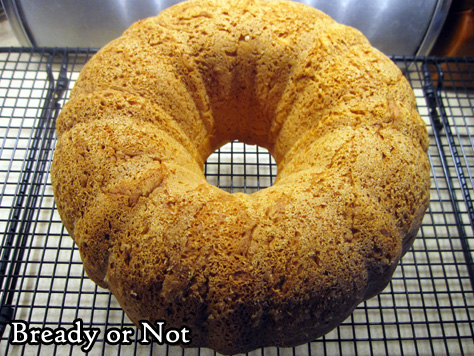
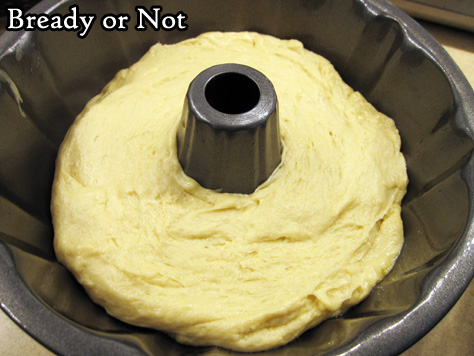
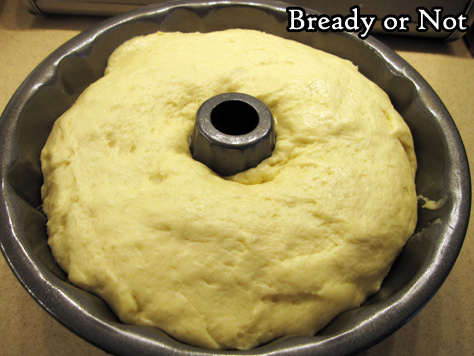
I don’t often share process photos on Bready or Not, but I think for this recipe, they will help. First of all, here’s what the bread looked like with the batter just placed in the bundt pan.
Here it is after the second rise!
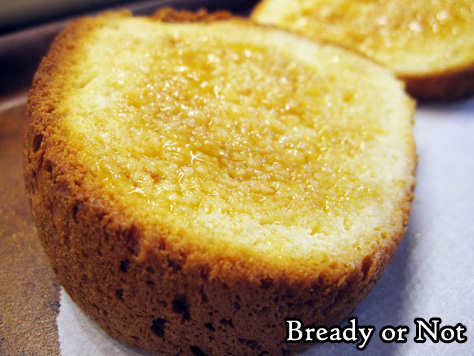
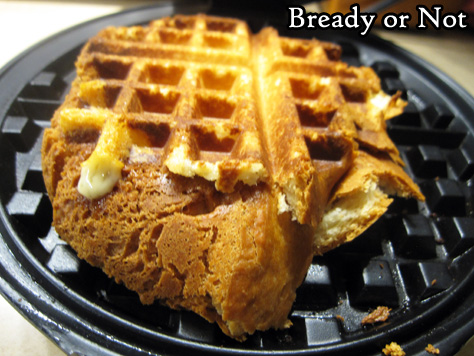
We found that the bread needed to be eaten hot, with toasted being the best. Since the pan made a big loaf–18 thick slices–I had plenty of bread to experiment with. I hit on the idea of using it for grilled cheese sandwiches using the waffle iron. This is THE BEST way to make grilled cheese, by the way.
This shot shows how thick the bread was. I was still able to compress it in the waffle iron just fine, where in a matter of minutes, I created a no-fuss crispy, buttery masterpiece.
Bready or Not: Sally Lunn Bread in a Bundt Cake Pan
Equipment
- large food processor
- large bundt pan
Ingredients
- 1/2 cup milk
- 1/2 cup water
- 3 1/2 to 4 cups all-purpose flour
- 1/3 cup white sugar
- 1 teaspoon salt
- 2 1/4 teaspoon instant yeast
- 1/2 cup unsalted butter 1 stick, room temperature
- 3 large eggs room temperature
Instructions
- Warm the milk and water together, by microwave or stovetop, to about 100-degrees.
- Fit a plastic dough blade inside the food processor. Add 2 cups flour, the sugar, salt, and yeast. Pulse a few times. Add the milk-water, butter, and eggs, and pulse more. Add 1/2 cup more flour. Pulse again. Add the rest of the flour, pulsing until the dough becomes stiff.
- Cover mixer bowl with lid or plastic wrap and let dough rise at room temperature for about an hour. It should double.
- Remove plastic wrap, if using, and affix lid. Pulse a few times to beat down again–but be warned, the dough is so thick, the processor might jump around. Stay right there. The dough only needs a few seconds of pulses.
- Thoroughly grease the bundt pan. Pour in the batter and smooth it out to an even level. Cover pan with plastic wrap or a towel and let the dough rise until it has doubled again, about 50 minutes.
- Preheat oven at 325-degrees.
- Bake for 50 minutes. The loaf should look golden brown on top, and a digital thermometer plunged into the middle of the bread should read at least 190-degrees.
- Let loaf cool in pan about 20 minutes, then invert onto a rack to cool more. The bread is fragile to cut and requires thick slices. This Sally Lunn loaf is best eaten warm, especially toasted. It can also be cut into individual slices and frozen for later enjoyment.
OM NOM NOM!
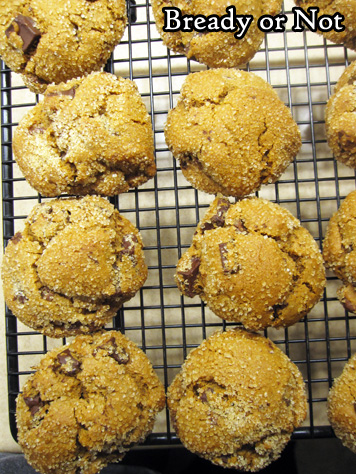
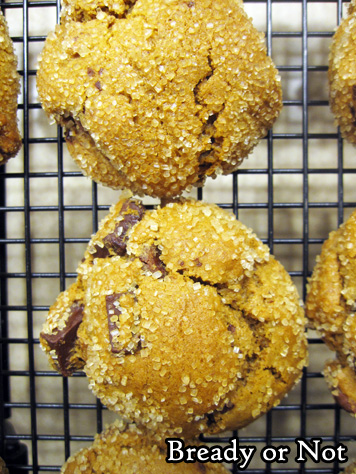
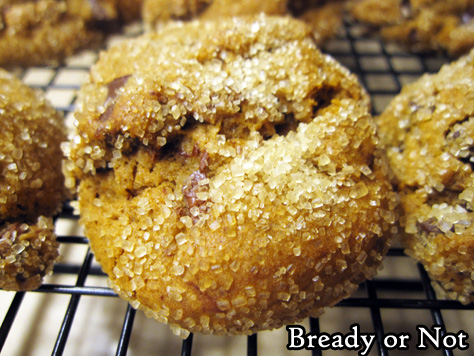
Bready or Not: Gingerbread Chocolate Chip Cookies
Let’s start the year right with these Gingerbread Chocolate Chip Cookies!
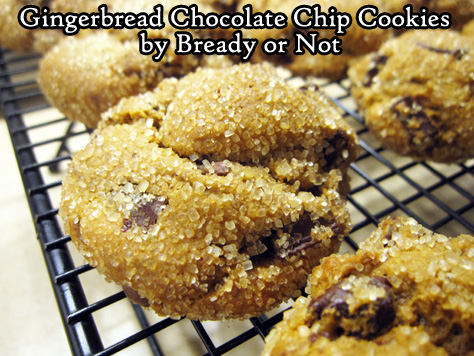
These things are soft and chewy, the coarse sugar providing a sweet, crunchy crust. Plus, you get chocolate mixed throughout, which provides a lovely contrast to the spicy gingerbread.
I’ve noticed that it’s a very British thing to do at least part of a gingerbread recipe on the stovetop. It definitely creates a different, richer flavor that the standard American recipe that mixes everything in a bowl.
You’ll notice this recipe includes a lot of fresh ginger. In the past, I’ve kept ‘fresh’ ginger around by buying a hunk, using a vegetable peeler to take off the outside, then freezing the interior in pieces. You can then grate it straight from the freezer. I think I learned about this technique from a food magazine ages ago.
The original of this recipe is from a food magazine, too–Bake from Scratch Holiday Cookies 2019, this recipe by Edd Kimber. My version is modified a great deal. I do recommend seeking out this issue, though, as it has a LOT of great recipes.
Bready or Not: Gingerbread Chocolate Chip Cookies
Equipment
- large saucepan
- tablespoon scoop
- parchment paper
Ingredients
- 1 cup light brown sugar packed
- 1 cup unsalted butter 2 sticks, softened
- 1/2 cup unsulphured molasses
- 2 large eggs room temperature
- 4 cups all-purpose flour
- 2 Tablespoons fresh ginger
- 2 teaspoons baking soda
- 1 teaspoon baking powder
- 2 teaspoons ground cinnamon
- 1 teaspoon ground ginger
- 1/2 teaspoon kosher salt
- 1/4 teaspoon ground nutmeg
- 10.5 ounces chocolate chips dark, semisweet, or a mix
- 3/4 cup turbinado sugar
Instructions
- In a large saucepan on medium-heat, stir together brown sugar, butter, and molasses until the butter is melted and everything is mixed. Remove from heat to cool for 30 minutes.
- Whisk eggs into the cooled mixture.
- In a big bowl, combined flour, fresh ginger, baking soda, baking powder, cinnamon, ground ginger, salt, and nutmeg. Pour in the sugar from the saucepan, stirring until just combined. Fold in the chocolate.
- Encase dough in plastic wrap and refrigerate for at least 2 hours.
- Pull out dough to soften slightly, about 10 or 15 minutes. Preheat oven at 375-degrees. Line a large baking sheet with parchment paper.
- Measure out the turbinado sugar into a small bowl. Use a tablespoon scoop to dole our dough, rolling each ball in sugar before setting spaced-out on baking sheet.
- Bake for 12 to 14 minutes, until cookies are set. Cool on pan for 5 minutes before transferring them to a cooling rack.
- Store in an airtight container at room temperature. Cookies keep for at least 3 days.
