


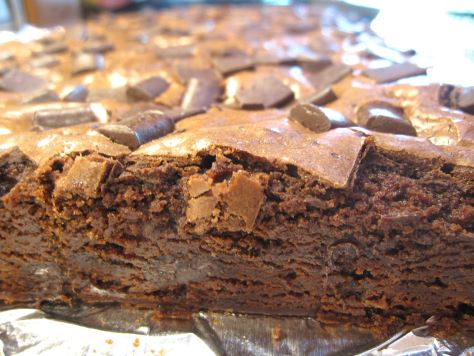
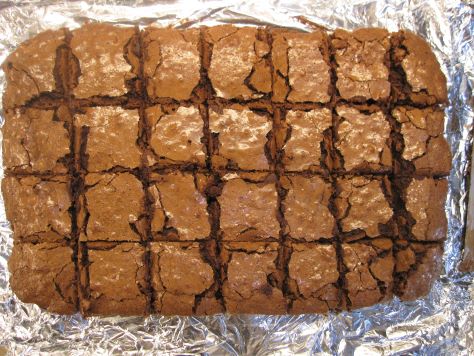
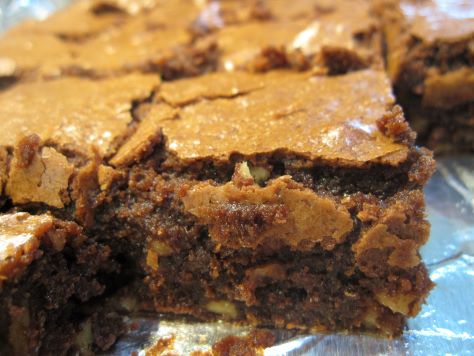
Bready or Not: Fudgy Chocolate Chunk Brownies
These Fudgy Chocolate Chunk Brownies are thick and rich. Plus, they even look amazing thanks to the chocolate chunks on top!

My favorite go-to for chocolate chunks are the German chunks sold at Aldi. They are way cheaper than those sold at other stores, but the quality is high. (I’m a major Aldi fan. They have one of the best cheese selections around, too!)
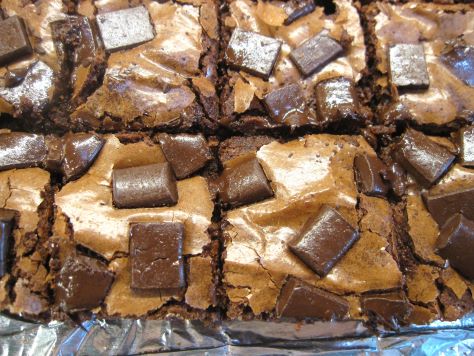
If you want to make these have a neat presentation, slice off the edges. Then eat those edges, because they can’t go to waste.
Modified from Food Network Magazine October 2013.
Bready or Not: Fudgy Chocolate Chunk Brownies
Equipment
- 9×13 dish
- aluminum foil
- uneven spatula
Ingredients
- 1 1/2 sticks unsalted butter
- 1 1/2 cups all-purpose flour
- 1/2 cup cocoa powder sifted
- 1/2 teaspoon salt
- 8 ounces dark chocolate
- 2 cups white sugar
- 6 large eggs room temperature
- 1 1/2 cups semisweet chocolate chunks
Instructions
- In a large microwave-safe bowl or in a pot on the stovetop, melt together the butter and dark chocolate until smooth. Set aside to cool slightly.
- Preheat oven at 325-degrees. Line a 9×13 pan with foil and apply nonstick spray or butter.
- In a small bowl, combine the flour, cocoa powder, and salt.
- Return to the large container with the melted butter and chocolate. Stir in the sugar until no white streaks remain. Beat in the eggs one at a time. Gradually fold in the dry ingredients. Fold in 1 cup of chocolate chunks.
- Pour batter into the prepared dish. Use an uneven spatula to spread it into an even layer. Sprinkle the remaining 1/2 cup chocolate chunks over the top.
- Bake for 40 to 45 minutes, until the middle passes the toothpick test. Set on a rack to cool for at least an hour, speeding process in fridge if desired. Use foil to lift contents onto a cutting board to slice up. Store in a sealed container at room temperature.
OM NOM NOM!
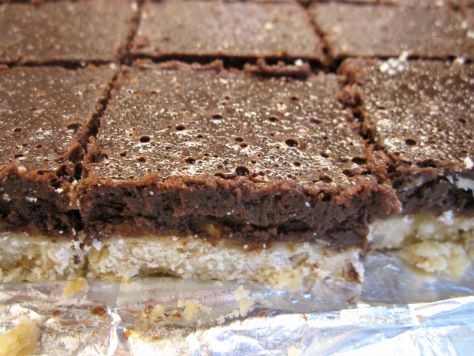
Bready or Not: Peppermint Truffle Bars
These Peppermint Truffle Bars are loaded with peppermint flavor, perfect for the holiday season or year-round!
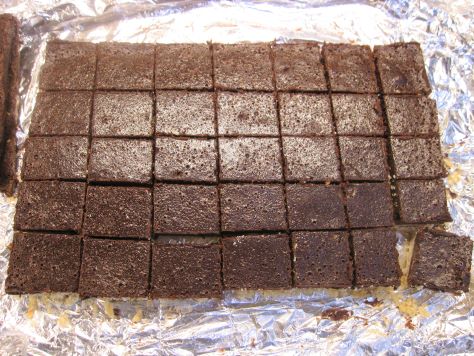
If you like chocolate peppermint (or know someone who does), this is the recipe for you. A shortbread base is topped with a dense layer of soft chocolaty goodness infused with peppermint extract.
As with many chocolate recipes, this one has a deeper flavor if you make it a day ahead. Build that info your baking plans.
To make for neat bars, I cut off the edges. These are not to be wasted, of course–set them aside for select people to enjoy, and present the neatly-edged bars to a more discriminating audience.
Modified from Best Holiday Recipes from Taste of Home 2011.
Bready or Not: Peppermint Truffle Bars
Equipment
- 9×13 pan
- nonstick spray
- wax paper
- heavy glass
Ingredients
Bottom crust
- 3/4 cup unsalted butter cold and cubed (1 1/2 sticks butter)
- 1 1/2 cups all-purpose flour
- 3/4 cup confectioners’ sugar
- 1/4 teaspoon salt
- 1/2 teaspoon vanilla extract
Chocolate layer
- 16 ounces semisweet chocolate chips or chopped chocolate
- 3/4 cup milk or half & half
- 1/2 cup unsalted butter cubed
- 4 large eggs room temperature
- 2/3 cup white sugar
- 1 teaspoon peppermint extract
Instructions
- Line a 13×9 baking pan with foil and apply nonstick spray. Preheat oven at 325-degrees.
- In a large bowl, combine the flour, confectioners’ sugar, and salt. Add vanilla. Dice in the butter. Mix ingredients until the butter resembles fine crumbs. Distribute into prepared pan. Use a piece of waxed paper and a heavy glass to compress the dough into a firm layer.
- Bake for 20 to 25 minutes, until the edges are lightly brown. In the meantime, start mixing the top layer.
- In a large pot, combine the semisweet chocolate, milk, and butter and cook on low heat until the mixture is smooth. Remove from heat and let cool for a bit.
- In a large bowl, beat eggs and white sugar until it is smooth and thick. Add the peppermint extract and the chocolate mixture. Beat until incorporated and smooth. Pour over the bottom crust.
- Bake for 30 to 35 minutes until the middle is set and passes the toothpick test. Cool in pan on a rack, then place in fridge to set for several hours or overnight.
- Use foil to lift contents onto a cutting board. Slice into bars. Store in sealed container or individually wrapped in the fridge.
OM NOM NOM!
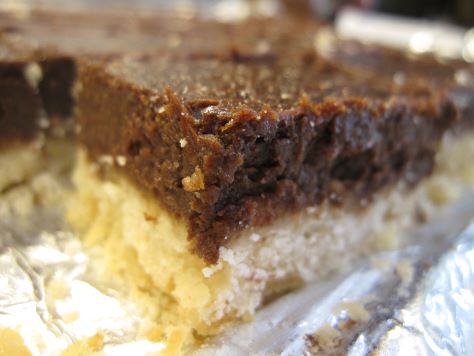
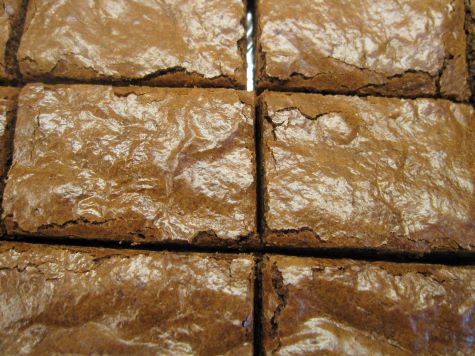
Bready or Not Original: Gingerbread Brownies
These Gingerbread Brownies are the perfect holiday season treat–or make them year-round, because they are just that good.
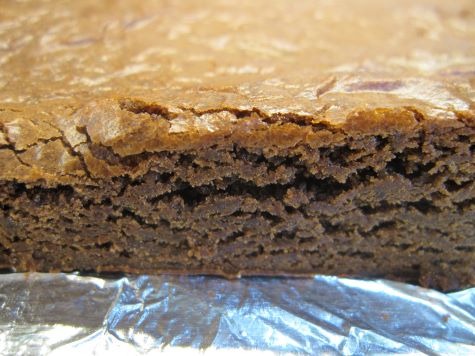
These are soft, moist, and dense in texture. The chocolate flavor hits the tongue first, followed by the pleasant warmth of ginger. The combination is fantastic.
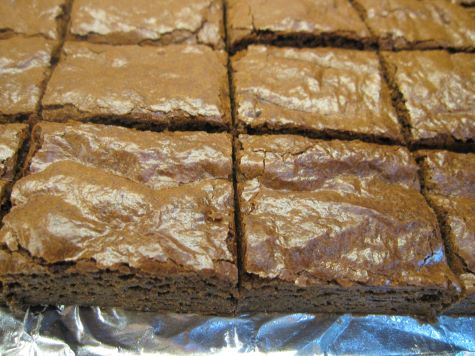
If you want to aim for an especially nice presentation, cut off the very edge of the brownies all the way around, then slice the interior into nice squares or rectangles.
Unfortunately, someone has to eat those leftover edge pieces. Oh, darn.
Bready or Not Original: Gingerbread Brownies
Equipment
- 9×13 pan
- aluminum foil
Ingredients
- 1 1/2 cups all-purpose flour
- 1/4 cup Dutch-processed cocoa powder sifted
- 1/2 teaspoon salt
- 1/2 teaspoon baking powder
- 1/4 teaspoon baking soda
- 4 ounces semisweet chocolate chopped or in chips
- 8 Tablespoons unsalted butter 1 stick
- 1 Tablespoon ground ginger
- 1 cup brown sugar packed
- 2 large eggs room temperature
- 1/3 cup unsulphured molasses
Instructions
- Preheat oven at 325-degrees. Line 9×13 pan with foil and apply nonstick spray or butter to grease bottom and sides.
- In a medium bowl, stir together flour, cocoa, salt, baking powder, and baking soda. Set aside.
- In a microwave-safe bowl in the microwave or on the stovetop in a pot, melt together the chocolate and the butter. Stir in the ginger. Let set to cool for ten minutes, then stir again.
- In a large mixing bowl, beat together brown sugar, eggs, and molasses. Mix in the chocolate. Stir in the dry ingredients until just combined. Pour batter into the prepared pan and even out.
- Bake for 24 to 28 minutes. The middle should pass the toothpick test.
- Let bars cool for several hours, speeding the process in the fridge if desired. Use the foil to lift the contents onto a cutting board for easy slicing. Store in a sealed container.
OM NOM NOM!
Bready or Not: Cocoa Pecan Brownies
These Cocoa Pecan Brownies are perfect for when you have a chocolate emergency and need brownies, STAT.
(If you don’t know what might constitute a chocolate emergency, my gosh, why are you even here?)
In any case, these brownies are great because they mix up quickly in a big pot, and they are a pretty straightforward bake, too. If you don’t like pecans, okay. Omit the nuts entirely, or use walnuts, a mix of nuts, cocoa nibs, whatever. This recipe can flex!

The one necessity: you need to enjoy these things. Really savor them. Maybe even stash some in the freezer for when that next chocolate emergency strikes.
Bready or Not: Cocoa Pecan Brownies
Equipment
- 13×9 pan
Ingredients
- 1 1/2 cups unsalted butter 3 sticks
- 3 cups white sugar
- 2 teaspoons vanilla extract
- 12 Tablespoons cocoa powder sifted
- 6 eggs
- 1 1/2 cups all-purpose flour
- 1 cup chopped pecans
Instructions
- Preheat oven at 350-degrees. Line a 13×9 pan with foil and apply nonstick spray or butter.
- In a large saucepan, heat the butter and sugar together on medium heat, stirring often, just until the butter is melted. Remove from heat. Stir in vanilla and cocoa powder. Add eggs one at a time, mixing in completely before adding the next. Stir in flour. Fold in the pecans.
- Pour batter into prepared pan. Bake for 30 to 35 minutes, until the very middle passes the toothpick test. Cool at room temperature, speeding the process in fridge if desired. Use foil to lift contents onto a cutting board. Slice up. Store in a sealed container.
OM NOM NOM!
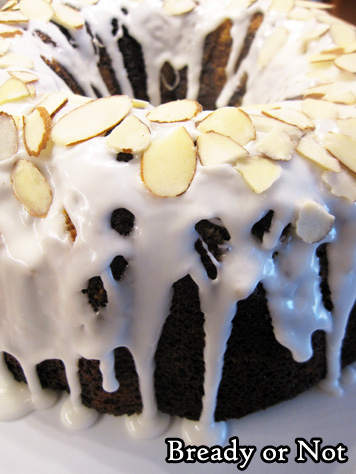
Bready or Not: Chocolate-Frangipane Bundt Cake
This Chocolate-Frangipane Bundt Cake is a show-stopper: a rich chocolate cake with a hidden frangipane layer inside, crowned with drippy icing and almonds.
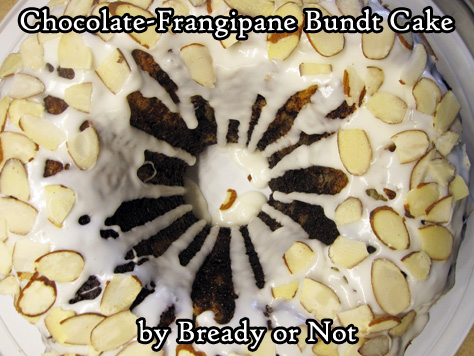
This cake would be perfect for the holiday season–or any time of year you want to go all-out on a delicious cake.
There are a lot of directions and ingredients, but the cake is really quite straightforward to make. I tried to simplify some elements from the original in Bake from Scratch Magazine (who would notice browned butter in a cake that’s already rich in several ways?) and made the ingredient division friendlier, too.
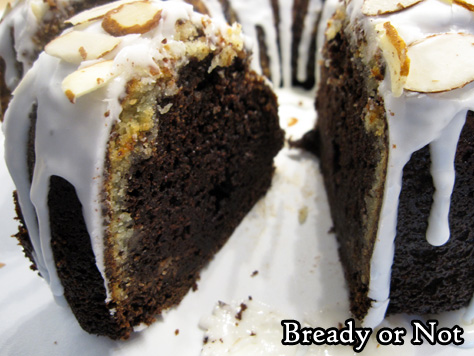
I have a deep, abiding love for frangipane, and this recipe balances the sweet almond paste against a nice, dense chocolate cake. It’s a fine combo.

If you want to save some baking day effort, make the frangipane a day ahead and stash it in the fridge. I do that quite often with recipes like this.
Bready or Not: Chocolate-Frangipane Bundt Cake
Equipment
- 10-cup bundt pan or larger
Ingredients
Frangipane
- 1 cup almond flour sifted
- 1/2 cup white sugar
- 1/2 cup unsalted butter (1 stick) melted and cooled
- 1 large egg room temperature
- 1 Tablespoon all-purpose flour
- 1 teaspoon almond extract
Bundt Cake
- 1/2 cup unsalted butter (1 stick) plus more for pan
- 2 cups whole buttermilk or soured milk*
- 2 large eggs room temperature
- 1 Tablespoon instant espresso powder
- 1 teaspoon almond extract
- 1 teaspoon vanilla extract
- 2 cups white sugar
- 2 cups all-purpose flour
- 3/4 cup Dutch process cocoa powder sifted, plus more to dust pan
- 2 teaspoons baking soda
- 1 teaspoon kosher salt
- 1 teaspoon baking powder
Frosting
- 1 1/2 cups confectioners’ sugar
- 1/2 teaspoon almond extract
- 3 Tablespoon half & half or heavy cream
- sliced almonds
Instructions
- First of all, make the frangipane. In a medium bowl, stir together all ingredients until a smooth paste forms. This can be made a day or hours ahead of the cake assembly; if it is made ahead, press plastic wrap to directly cover the frangipane and refrigerate until it is used.
- Preheat oven at 350-degrees. Generously grease interior surface of a 10-cup bundt pan with butter, then sift extra cocoa powder to coat it as much as possible. Rotate pan to distribute cocoa powder, tapping out excess if necessary.
- Melt butter in microwave or on stovetop and let it cool a few minutes. Pour it into the bowl of a stand mixer with a whisk attachment. Add the buttermilk, eggs, espresso powder, almond extract, and vanilla, beating until smooth.
- In a separate large bowl, combine the sugar, flour, cocoa, baking soda, salt, and baking powder. Switch from the whisk to the paddle attachment. Gradually mix the dry ingredients into the wet until just smooth.
- Pour half the batter into the pan and smooth the top. Dollop the frangipane over the batter and smooth out, if possible. Top with remaining cake batter and smooth it again.
- Bake until the middle passes the toothpick test, about 55 to 60 minutes, rotating pan halfway through. Let pan cool for about 20 minutes and then carefully invert it onto a rack to completely cool. Bits might stick to the pan; if so, pry them out and try to patch the cake. Remember that frosting will help mask any damage.
- Once the cake is room temperature, make the frosting. Beat the confectioners' sugar, almond extract, and half & half together to together to form a thick consistency, then drizzle over the cake. Sprinkle sliced almonds on top.
- Cake will be moister on the first day but keeps fairly well for a few days. Slices can also be individually wrapped and frozen for later.
OM NOM NOM!
Notes
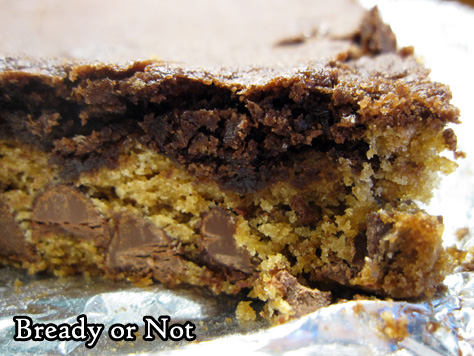
Bready or Not: Brookies
No need to deliberate whether to make chocolate chip cookies or brownies–this recipe for Brookies combines these goodies together in a delicious way.
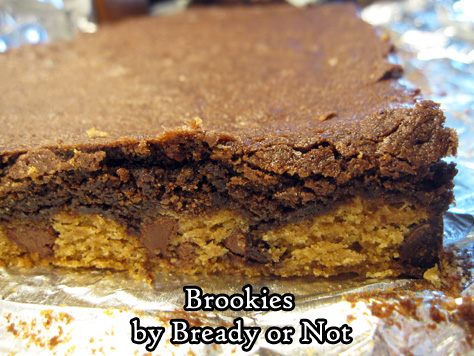
This recipe excels at chocolate distribution. It’s not super-chocolaty, but every bite has some brownie and chocolate chips. If you add in cacao nibs, it’s even better; the nibs enhance the other chocolate flavors and adds a pleasant crunch at the same time.
On that note, this is a great recipe for people who don’t like nuts. There’s lots of flavor here without them. Could you add nuts? Sure. Is it necessary? Nope.
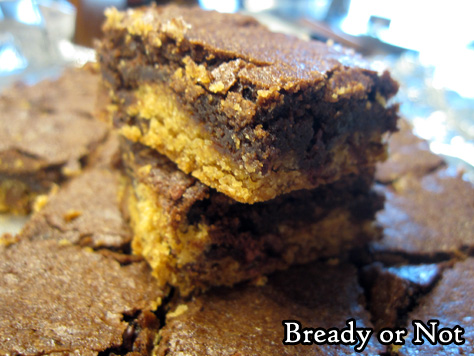
These bars are dense and nicely portable. Wrap them up individually, and they are great for a school lunch, road trip, or picnic. Plus, they freeze well, so you can even save some for later!
Modified from AllRecipes Magazine August/September 2020.
Bready or Not: Brookies
Equipment
- 9×13 pan
Ingredients
Cookie layer
- 1/2 cup unsalted butter (1 stick) room temperature
- 1/2 cup light brown sugar packed
- 1/4 cup white sugar
- 1/2 teaspoon vanilla extract
- 1 large egg room temperature
- 1 1/4 cups all-purpose flour
- 1/2 teaspoon salt
- 1/2 teaspoon baking soda
- 1 cup semisweet chocolate chips
Brownie layer
- 1/2 cup unsalted butter (1 stick) melted
- 1 cup white sugar
- 1 teaspoon vanilla extract
- 2 large eggs
- 1/3 cup cocoa powder sifted
- 1/2 cup all-purpose flour
- 1/4 teaspoon baking powder
- 1/8 teaspoon salt
- 1/4 cup cacao nibs optional
Instructions
Make cookie layer
- Preheat oven at 350-degrees. Line a 9×13 pan with aluminum foil and apply nonstick spray.
- In a large bowl, beat together butter, sugars, and vanilla until light and creamy. Add egg, scraping bottom of bowl, then beat another two minutes.
- In another bowl, combine flour, salt, and baking soda. Gradually mix the dry ingredients into the wet. Fold in chocolate chips. Dough will be very thick and sticky. Drop into pan in clumps and press into a level layer, covering the bottom completely.
Make brownie layer
- Using the same big bowl (leave it unwashed or wash it, baker’s preference), beat together butter, sugar, and vanilla. Follow with the egg. Stir in the cocoa powder, flour, baking powder, and salt. Fold in the cacao nibs, if using.
- Pour over the cookie layer, spreading it into an even layer.
- Bake until the middle passes the toothpick test, 20 to 25 minutes. Cool completely–chilling in fridge, if desired–before slicing into bars.
- Brookies will keep in a sealed container at room temperature for 3 days, and can also be frozen for layer enjoyment.
