


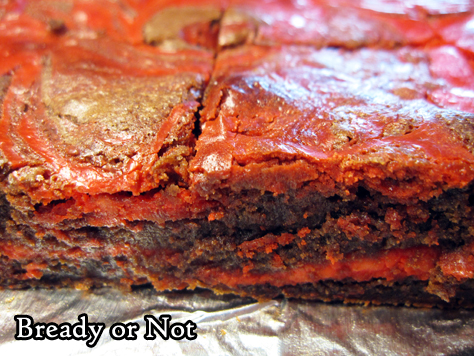
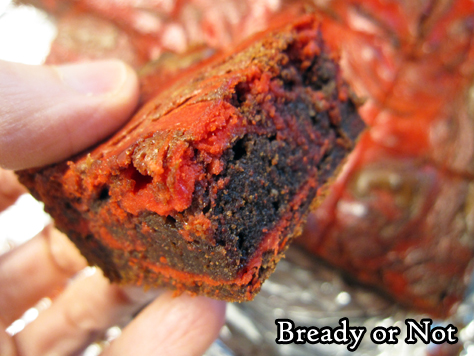
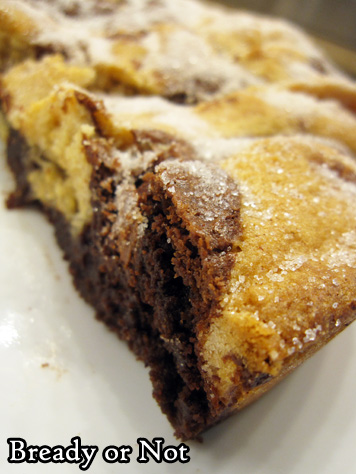
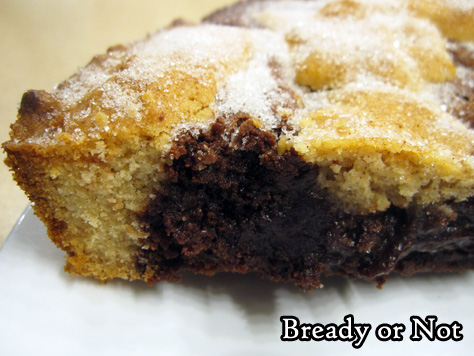
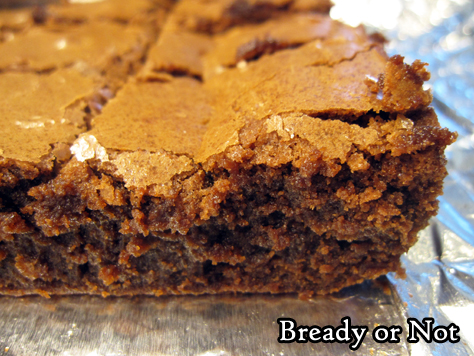
Bready or Not: Peppermint Cheesecake Swirl Brownies
These Peppermint Cheesecake Swirl Brownies will dirty a lot of bowls and tools, but to gorgeous, delicious results.

These are an incredibly holiday-appropriate brownie. I colored the cheesecake layer in red, but really, you could do green, or even mix two small, separate bowls with green and red!
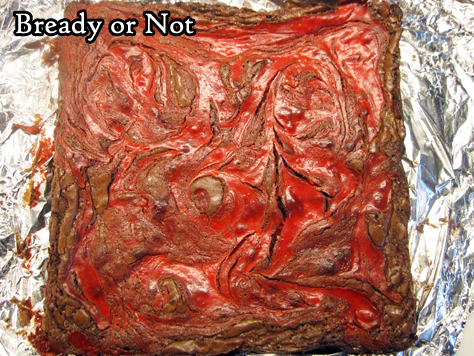
Then there’s the peppermint. It’s not overwhelming in this recipe; to me, it was mild and refreshing against the deep chocolate flavor.
I’m not a fan of cheesecake alone, but I do love that cheesecake flavor and texture when mixed with brownies or other great mix-ins. Be sure to check out some past Bready or Not recipes in the same family!
- Snickerdoodle Cheesecake Bars
- Cheesecake Brownies
- Cream Cheese-Stuffed Lemon Bundt Cake
- Swirled Goat Cheese Brownies
- Lemon Cheesecake Bars
- Earl Grey Cheesecake Bars
- Matcha Cheesecake Cookies
- Matcha Cheesecake Bars
Peppermint Cheesecake Swirl Brownies modified from the original recipe in Bake from Scratch Holiday Cookies 2019.
Bready or Not: Peppermint Cheesecake Swirl Brownies
Ingredients
Cream cheese swirl
- 8 ounces cream cheese (one block) softened
- 1/4 cup white sugar
- 1 large egg room temperature
- 1/2 teaspoon peppermint extract
- red gel food coloring
Brownie layer
- 4 ounces dark chocolate chips or chopped chocolate bar
- 3/4 cup unsalted butter 1 1/2 sticks
- 1 cup white sugar
- 1/2 cup brown sugar light or dark, packed
- 2 teaspoons vanilla extract
- 1 teaspoon kosher salt
- 3 large eggs room temperature
- 1/2 cup all-purpose flour
- 1/4 cup unsweetened cocoa powder sifted
Instructions
- Beat cream cheese until it is smooth and creamy. Add white sugar to fully incorporate. Mix in egg and peppermint extract. Stir in droplets of food color to reach desired tint. Set bowl aside.
- Prepare a 9×9 pan by lining it with foil and applying nonstick spray or butter to grease it. Preheat oven at 350-degrees.
- Using a microwave-safe bowl, in brief bursts heat the butter and dark chocolate, stirring well between each pass, until both are melted and smooth. Set aside to cool for a few minutes.
- In the large bowl of a stand mixer, use the whisk attachment to beat together both sugars, the vanilla, and salt. Add the eggs one at a time, and continue to beat at a high speed for 10 minutes. With the mixer on low, pour in the butter-chocolate. Use a spatula to fold in the flour and cocoa until just combined. Batter will be thick.
- Pour half the brownie batter into the prepared pan; use an offset spatula to even it out. Add about half the cheesecake mix in dollops. Repeat twice more, adding brownie and cheesecake in alternate dolloped layers. Use a butter knife to swirl everything together to create a marbled effect.
- Bake for about 45 minutes, until the middle passes the toothpick test. Cool to room temperature then cut into pieces.
OM NOM NOM!
Bready or Not Original: Thin Mint Cake
Oh hey, it’s time for cake. A Thin Mint Cake that is neither too big or too small, something that keeps well stashed in the fridge, and looks as amazing as it tastes.
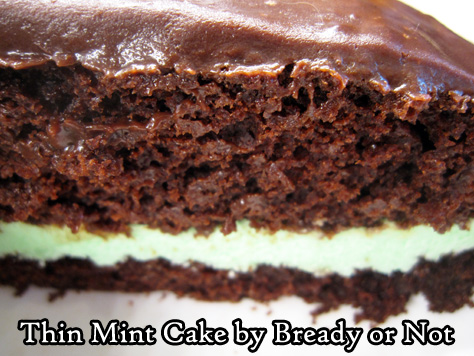
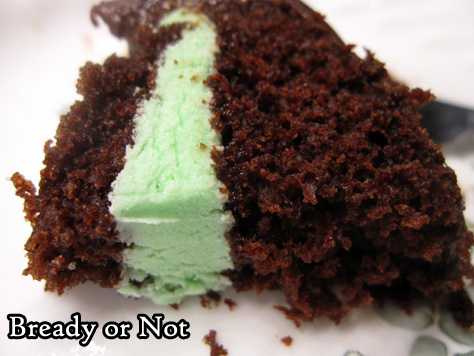
If you love chocolate and mint, this is the cake for you. The cake is loaded with chocolate flavor, and a ganache adds a shiny finishing touch.
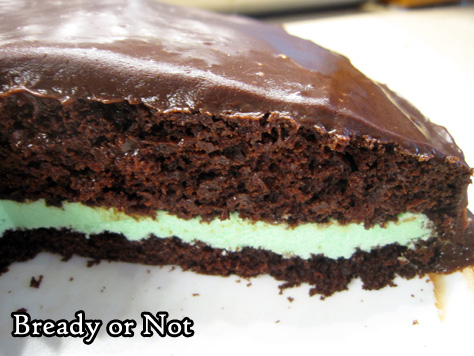
The middle layer of the cake is essentially a peppermint or mint-flavored buttercream. Sweet but not too sweet, it gives good contrast to balance the prevalent chocolate flavor.

I used this cake to try out a technique I’ve only read about and seen on TV before–I used four toothpicks to measure the halfway point on the sides of the cake, then tugged a piece of floss to cut the cake evenly in half! It worked out well.

Of course, you can still use a knife to cut through. The toothpicks will still be a helpful guide.
This is an ideal birthday or special occasion cake for a small group!
Greatly modified from Eating Well Magazine May 2020.
Bready or Not Original: Thin Mint Cake
Equipment
- 9-inch cake pan
- ruler
- toothpicks
- unwaxed floss
- parchment paper
Ingredients
Cake
- 1 cup all-purpose flour
- 1/2 cup white whole-wheat flour
- 3/4 cup white sugar
- 1/4 cup unsweetened cocoa powder sifted
- 1 teaspoon baking soda
- 1/2 teaspoon salt
- 1 cup water
- 1/3 cup canola oil
- 1 Tablespoon apple cider vinegar or other cider vinegar
- 1/2 teaspoon almond extract
- 1/2 teaspoon vanilla extract
Mint Filling
- 1/2 cup unsalted butter (1 stick), room temperature
- 1 1/2 cups confectioners' sugar sifted, more as needed for consistency
- 1/4 teaspoon peppermint extract or mint extract
- 1/4 teaspoon vanilla extract
- 1/4 teaspoon salt
- 1-2 drops green food coloring
- 2 Tablespoons half and half or milk
Glaze
- 1/2 cup half and half
- 1 1/4 cups semisweet chocolate chips
- pinch salt
Instructions
To prepare the cake
- Preheat an oven at 350-degrees. Cut a piece of parchment paper to fit inside a 9-inch cake pan. Apply nonstick spray inside pan, place parchment inside, and spray it again.
- Stir together all-purpose flour, white whole wheat flour, sugar, cocoa, baking soda, and salt.
- In another bowl, whisk together water, oil, vinegar, and both extracts. Gradually mix the wet ingredients into the dry until the batter is smooth. Pour into the prepared pan. Tap and thump it gently on the counter to knock out as many bubbles as possible.
- Bake 25 to 30 minutes, until a toothpick in the middle emerges with few crumbs attached. Let the pan cool on a rack for 10 minutes, then invert cake onto the rack to cool completely.
Make the filling
- Beat the butter until it is creamy and light. Add the confectioners' sugar, 1/2 cup at a time, to fully incorporate; if the mixture is still too soft and loose, add more sugar. Add mint and vanilla extract, followed by the salt. Add a few drops of food coloring to achieve the desired tint. Add the half and half and beat to make the filling fluffy and light.
Slice the cake and fill
- Stick a toothpick into the halfway point at each side of the cake; four toothpick markers work well. Use a knife to barely slice into the cake above each toothpick. Continue to use a long-bladed knife to slice all the way through, or use a long piece of unwaxed floss with the toothpicks as a guide to divide the cake evenly in half.
- Place the base of the cake on a serving plate. Spread the filling over the cake. Place the top of the cake over it, cut side down.
Make the glaze
- Microwave the half & half in a microwave-safe bowl for about a minute, until hot. Stir in the chocolate chips and salt. Stir, stir, stir until the chocolate is smooth and glossy. Let cool about 5 minutes to thicken, then slowly pour and spread glaze over the cake. Let sit at room temperature or in fridge to set, then slice in and enjoy!
- Store cake in fridge. Exposed sides of the cake will dry out more, but it will still be tasty. Keeps for at least 4 days.
OM NOM NOM!
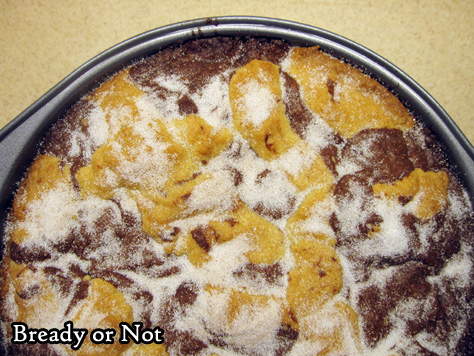
Bready or Not: Snickerdoodle Brookie
Don’t struggle to choose between Snickerdoodles and Brownies. Have them both at the same time in this extraordinary Snickerdoodle Brookie!
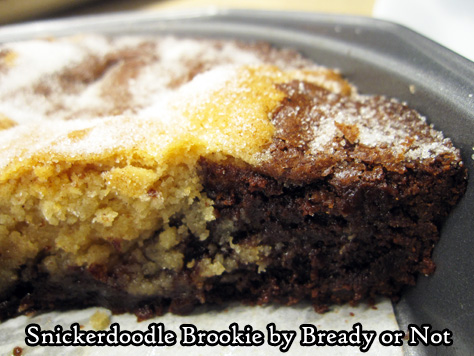
This is essentially like a massive cookie-cake hybrid. It looks impressive, and the flavor is impressive, too. If the layers work out right, you get a bit of everything in every bite.
If you eat the brookie warm, the chocolate flavor is quite strong. I actually liked this best at room temperature. The flavors play together better then.
I mean, it’d be a shame to not get to enjoy the Snickerdoodle side of things. A travesty.
I modified this from the original in my favorite food magazine, Bake from Scratch. I tried to make it easier by using the microwave, prepping the pan with parchment, and clarifying the steps throughout.
I can also testify that this is a great recipe to portion out and freeze. Pieces don’t take long to thaw and the brookie is dense enough to be pretty portable, too, though the dusting of cinnamon and sugar on top can sometimes be messy.
Modified from the March/April 2020 issue of Bake from Scratch Magazine.
Bready or Not: Snickerdoodle Brookie
Equipment
- 9-inch round cake pan
- parchment paper
Ingredients
Brownie batter:
- 6 ounces semisweet chocolate chips or bittersweet (170 grams)
- 1/2 cup unsalted butter 1 cube
- 1 cup white sugar
- 2 large eggs
- 1 teaspoon vanilla extract
- 3/4 cup all-purpose flour
- 1/4 cup Dutch process cocoa powder sifted
- 1/2 teaspoon kosher salt
Snickerdoodle dough:
- 1/3 cup unsalted butter softened
- 1/2 cup white sugar
- 1 large egg
- 1/2 teaspoon vanilla extract
- 1 cup all-purpose flour
- 1/2 teaspoon cream of tartar
- 1/2 teaspoon kosher salt
- 1/2 teaspoon ground cinnamon
- 1/4 teaspoon baking powder
Topping:
- 1 tablespoon white sugar
- 1/8 teaspoon ground cinnamon
Instructions
- Preheat oven to 350-degrees. Cut a piece of parchment to fit inside a 9-inch round cake pan. Apply nonstick spray in pan, place parchment, then spray parchment as well. Set aside.
Make brownie batter
- Melt together the chocolate and butter either in a double boiler on the stove or in the microwave in a microwave-safe bowl. Stir until everything is mixed and smooth. Stir in sugar. Set aside to cool for a few minutes before mixing in the eggs and vanilla.
- In a medium bowl, stir together flour, cocoa, and salt. Fold the dry ingredients into chocolate mixture just until combined. Set aside.
Make snickerdoodle dough
- Beat together the butter and sugar until they are fluffy; in a stand mixer, this will be at about 3 to 4 minutes. Scrape the sides of the bowl a few times. Add the egg and vanilla.
- In a separate bowl, stir together flour, cream of tartar, salt, cinnamon, and baking powder. Gradually mix the dry ingredients into butter mixture. Dough will be quite thick.
Assemble the cake
- Spoon large dollops (about 3 tablespoons each) of brownie batter into bottom of the prepared pan, leaving space between each lump. Crumble dollops of snickerdoodle dough in between brownie batter. Top with any more scoops of brownie batter and snickerdoodle dough. Gently use fingers to even out top.
- Bake until the middle passes the toothpick test, 33 to 40 minutes.
Make topping
- Stir together cinnamon and sugar. As soon as the cake is removed from the oven, sprinkle the mixture across the top.
- Let cool at least 15 minutes before cutting in. Cake can be served warm or at room temperature. It can also be frozen in slices and thawed for later enjoyment.
OM NOM NOM!
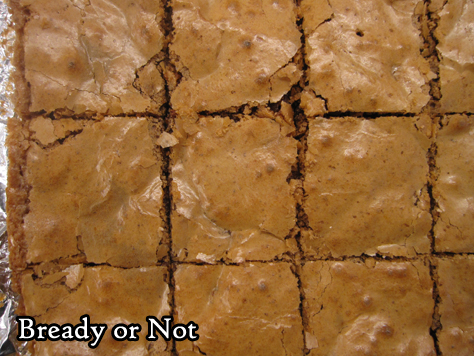
Bready or Not Original: Small Batch Cakey Brownies
Sometimes you just need a few brownies. That’s the perfect time for this Small Batch Cakey Brownies recipe.
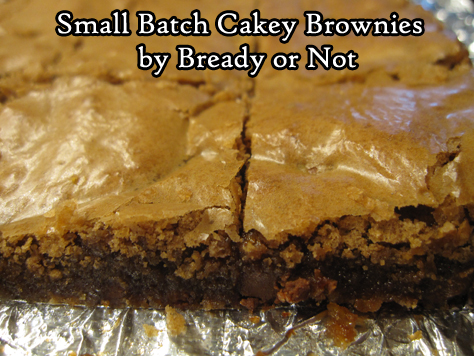
These are not monstrously thick brownies. They are thin with a crackled top, with a nice, cakey moist crumb.
I created this recipe by combining about four other recipes, trying to find a middle ground recipe that my son would like. This is the one that turned out to be the winner.
Even better, I found out these brownies kept well for an entire week in a sealed container at room temperature–and who knows, maybe they could last a lot longer? In any case, there’s no urgent need to gorge on them lest they go bad.
These brownies are all about goodness.
Bready or Not Original: Small Batch Cakey Brownies
Ingredients
- 2 ounces semi-sweet chocolate
- 6 Tablespoons unsalted butter
- 1 cup white sugar
- 2 large eggs
- 1/2 teaspoon vanilla extract
- 1/2 teaspoon fine sea salt
- 1/4 cup all-purpose flour
- 1/4 cup cake flour
- 1/2 cup milk chocolate chips
Instructions
- Preheat the oven to 350-degrees. Line a 9x9 or 8×8-inch pan with foil, letting foil overhang each side. Apply nonstick cooking spray.
- In a microwave-safe bowl, microwave the chocolate and butter on high in 30 second increments, stirring between each burst, until everything is melted. Let cool slightly.
- Using a stand mixer or hand mixer, in a large bowl beat together the sugar and eggs for 3 to 5 minutes, until they are pale, light, and fluffy. Pour in the cooled chocolate and butter mixture, followed by the vanilla.
- Combine the salt and both flours in a bowl. Stir in the chocolate chips. Fold flour mix into the wet ingredients. Pour into the prepared pan and even out.
- Bake for 20 minutes, or until a toothpick inserted in the center comes out with moist crumbs attached. Cool completely. Use foil onto a cutting board to slice into bars.
- Brownies will keep for upwards of a week in a sealed container at room temperature.
OM NOM NOM!
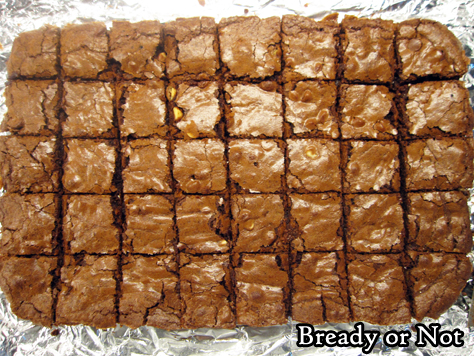
Bready or Not: Triple-Chocolate Brownies
These Triple-Chocolate Brownies are loaded with three kinds of chocolate, cocoa, and a unique blend of flours: all-purpose along with chickpea flour.
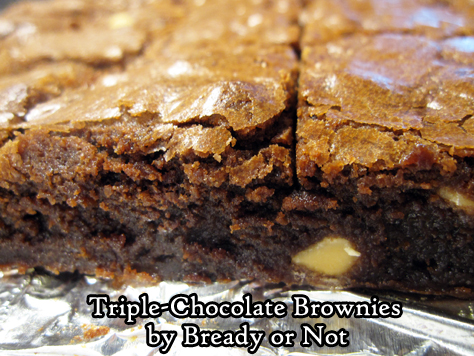
What does the chickpea flour do for the recipe? Well, it handles moisture differently. That makes these dense, moist, in a texturally more complex way than the usual all-wheat-flour brownies.
The flavor is also more complex. Soon after baking, these brownies taste almost like they have breakfast cereal mixed in. You can tell something is different.

Like a lot of chocolate baked goods, though, these taste better after a day. In these brownies, that means the complicated flavors deepen. They taste more chocolaty, more delicious.
If you don’t want to fuss with a big bag of chickpea flour, check out your local grocery or natural goods stores that have flours in bins. In the Phoenix area, that includes Sprouts and WinCo.
Once you make these brownies, though, you may want to make them again soon, so maybe a larger amount of chickpea flour isn’t a bad thing.
Modified from February 2020 Bake from Scratch/Bob’s Red Mill lesson.
Bready or Not: Triple-Chocolate Brownies
Equipment
- 9×13 baking pan
Ingredients
- 1 1/2 cups semisweet chocolate divided
- 1 1/4 cups milk chocolate chips divided
- 1 cup unsalted butter 2 sticks, cubed
- 1 cup white sugar
- 1 cup brown sugar packed
- 1 1/4 cups all-purpose flour
- 1/2 cup chickpea flour
- 1/4 cup Dutch process cocoa powder sifted
- 2 teaspoons kosher salt
- 1 teaspoon espresso powder
- 4 large eggs room temperature, lightly beaten
- 2 teaspoons vanilla extract
- 1/2 cup white chocolate chips
Instructions
- Preheat oven at 325-degrees. Line a 13×9 pan with foil and apply nonstick spray or butter.
- Using a double boiler on the stove top or a microwave-safe bowl in the microwave, melt together 1 cup of dark chocolate/semi-sweet chocolate chips, 3/4 cup milk chocolate chips, and butter. Heat until it can be stirred smooth. Remove from heat and stir in all of the sugar. Set aside.
- In a medium bowl, mix together both flours, cocoa powder, salt, and espresso powder. Set aside.
- Return to the chocolate bowl. Mix in the eggs and vanilla. Gradually fold in the dry ingredients, and follow up with the rest of the three kinds of chocolate chips. Spread the batter evenly in the prepared pan.
- Bake until the center passes the toothpick test, about 35 to 40 minutes. Cool completely at room temperature or speed the process in the fridge. Use the foil to lift the contents onto a cutting board. Slice into bars.
- Store in an airtight container in the fridge up to a week. Like many chocolate baked goods, these brownies will actually taste better after the first day as the flavor intensifies.
OM NOM NOM!
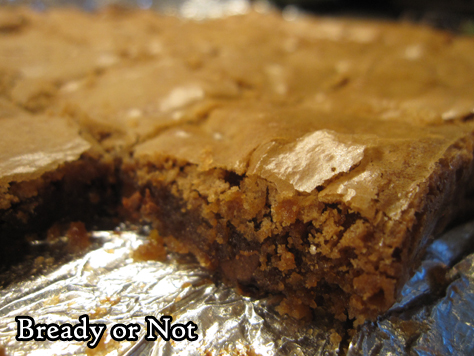
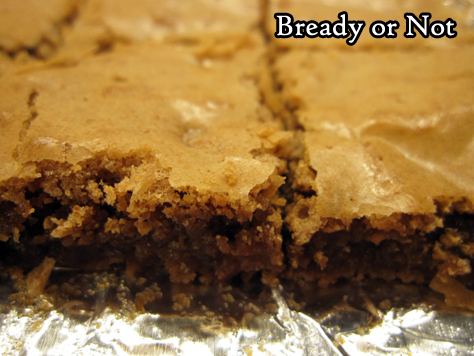
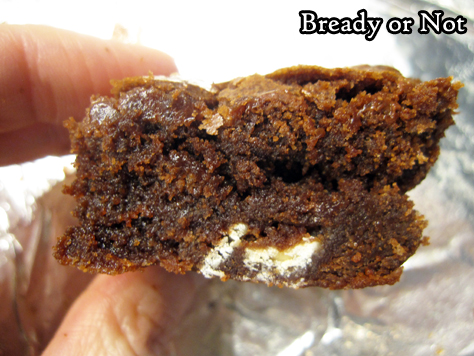
Bready or Not Original: Classic Brownies
Each year around Valentine’s Day, I like to share a chocolatey recipe. For this year, we’re going for Classic Brownies.
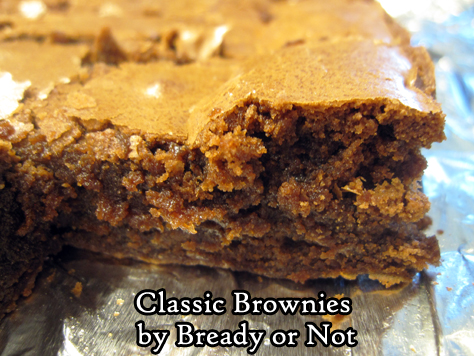
This straightforward recipe makes a 13×9 pan of luscious, moist brownies. They have a rich middle and a crackly top.
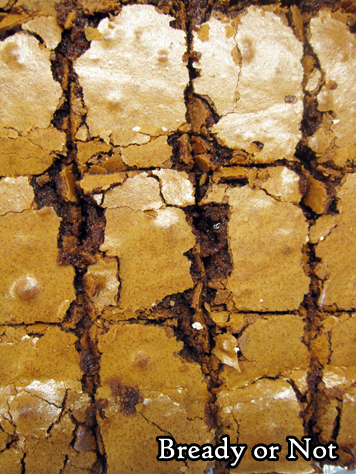
Yes, they might crumble a little, but they are by no means dry. Not unless they are overbaked.
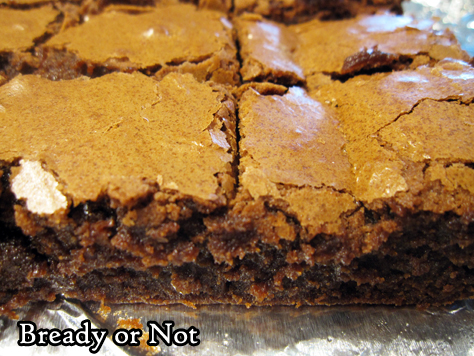
These brownies are great on their own but would be out-of-this-world paired with some ice cream or fruit, or both of those at once.
Store these at room temperature for a few days at most, or freeze them for several months.
Bready or Not Original: Classic Brownies
Equipment
- 13×9 pan
Ingredients
- 8 ounces semisweet chocolate chips
- 1 cup unsalted butter 2 sticks
- 2 cups all-purpose flour
- 1/4 cup unsweetened Dutch-process cocoa powder sifted
- 2 1/2 cups white sugar
- 1 Tablespoon espresso powder or instant coffee granules
- 2 teaspoons ground cinnamon
- 6 eggs room temperature
- 2 teaspoons vanilla extract
Instructions
- Preheat oven at 325-degrees. Line a 13×9 pan with foil and apply nonstick spray or butter.
- In a medium microwave-safe bowl, microwave the chocolate and butter in very short bursts, stirring well between each pass, until it is melted and smooth. Set aside to cool.
- In a small bowl, combine the flour and cocoa.
- In a large bowl, combine the sugar, espresso powder, and cinnamon. Pour in the chocolate mixture. Beat until just combined. Add eggs, one at a time, followed by the vanilla. Gradually stir in the flour-cocoa mix. Spread the batter in the prepared pan.
- Bake for 35 to 42 minutes, until the edges start to pull away from the sides of the pan and the very middle passes the toothpick test. Set on rack to completely cool.
- Use the foil to lift the brownies onto a cutting board. Cut into bars. Store in a sealed container at room temperature. Brownies can also be layered in wax paper and frozen for later enjoyment.
