


Bready or Not Original: Goat Cheese Biscuits
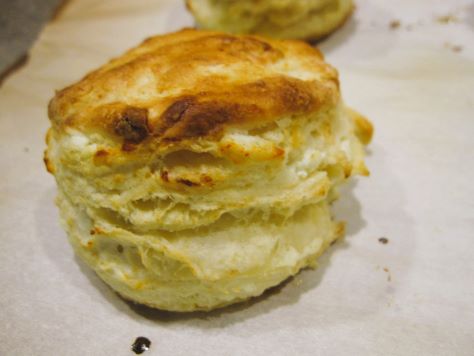
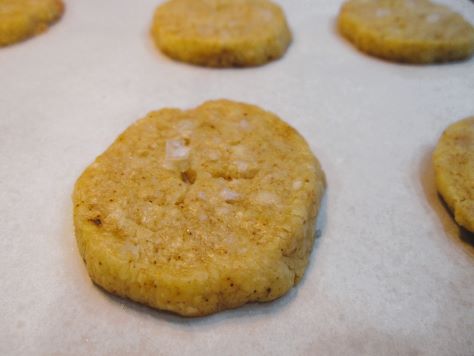
Today we are not only bready, to fit with the blog title of Bready or Not, but we are also cheesy. These Goat Cheese Biscuits are the perfect side for a supper meal.

If you’re on the lookout for a good supper meal, too, stay tuned–in two weeks, I’m sharing a pot roast recipe that will set you up nicely for this fall and winter!
For this recipe, I love using the 4-ounce logs that are often available at Aldi. They are cheap and basic, not high end as far as chevre goes, but they are absolutely perfect in a recipe like this. Plain logs are ideal, but you can also use one with herbs.

I like thick biscuits. I get 6 out of this recipe, but if you form them to be thinner, you could get 8 or more. The texture is cakey, the flavor rich because of the butter and goat cheese throughout.
Bready or Not Original: Goat Cheese Biscuits
Equipment
- 2-inch round cutter
- pastry brush
Ingredients
- 4- ounces plain goat cheese or used an herbed variety
- 2 cups all-purpose flour plus more for surface
- 1 Tablespoon baking powder
- 1 teaspoon salt
- 1/4 cup unsalted butter
- 3/4 cup buttermilk or soured milk, see note
- extra milk or half & half
Instructions
- Preheat oven to 475-degrees. Line a baking sheet with parchment paper.
- Set the goat cheese in the freezer for just a few minutes as the dough is being prepared.
- In a large bowl, stir together the flour, baking powder, and salt. Cut in the butter and mash it until it is pea-sized. Pour in the buttermilk or soured milk.
- The chilled goat cheese will be easier to dice into small pieces without being a sticky mess. Fold those chunks into the dough.
- Sprinkle flour onto a clean work surface. Knead the dough to make sure it is cohesive, but don’t overwork. Pat into a thick round. Use a 2-inch cutter to cut out shapes. Set them on cookie sheet, then reform leftovers to cut out more biscuits.
- Once all of the scrap dough is used, pour a dab of milk or half & half into a saucer. Use a pastry brush to brush a thin layer of milk onto the top of each biscuit; this will create a nice golden crust.
- Bake for 10 to 12 minutes, until nicely golden. Serve immediately. Leftovers can be reheated in the microwave or wrapped in foil and set in the oven to briefly bake.
OM NOM NOM!
Notes
Bready or Not Original: Easy Flatbread Crackers
These Easy Flatbread Crackers are delicious, much better than anything you find in stores, and they are quick to make, too.

Anyone who knows me can figure out how I used these crackers: as a base for cheese. I need crackers to go with all kinds of cheese, so I don’t go heavy on savory flavors. The light seasonings here make for versatility. That versatility also makes these useful for dips, soups, or just eating straight.

A quick note on the cheese, too: whatever kind of Parmigiano-Reggiano or similar hard cheese you use inside these crackers, don’t get the pre-shredded kind if you can help it. Those shreds are coated with preservative, anti-stick stuff. That said, if you need to get shredded cheese for accessibility reasons, I understand–but be aware it can throw off recipes sometimes.

Bready or Not Original: Easy Flatbread Crackers
Equipment
- baking sheet
- parchment paper
- Rolling Pin
- pizza cutter or knife
Ingredients
- 1 1/2 cups bread flour plus flour for surface
- 1 1/2 teaspoons kosher salt
- 1 teaspoon white sugar
- 1/2 cup Parmigiano-Reggiano or a quality domestic version, freshly grated
- 1 teaspoon celery flakes
- 1/2 teaspoon dried thyme
- 1/2 cup cold water
- 3 Tablespoons extra virgin olive oil
- flaked sea salt to top
Instructions
- Preheat oven at 400 degrees. Line a baking sheet with parchment paper.
- In a medium bowl, toss together the flour, salt, sugar, and cheese. Add the herbs along with the olive oil and water, stirring until it just comes together as a dough. Add a touch more water if it’s too dry or flour if it is too wet.
- Transfer to a lightly floured surface and knead the dough briefly to smooth it out. It shouldn’t be sticky. Divide the dough in half.
- Roll out a portion on the floured surface. Use a pastry brush to lightly coat the top with water. Sprinkle with flaked sea salt. Use a pizza cutter or other blade to portion the dough into rectangles or other shapes a few inches in diameter. Transfer pieces to prepared parchment. Repeat process with remaining dough.
- Bake for 18 to 21 minutes, until lightly browned. Let harden and cool for at least an hour. Store in a sealed container for up to 3 days, or immediately freeze portions for later enjoyment.
OM NOM NOM!
Bready or Not: Gooey Butter Bars [Cake Mix Variation]
A few months ago, I shared a time-consuming yeast-based recipe for making St. Louis Butter Cake. I continue to explore different takes on this Missouri classic, and this time around, the Gooey Butter Bars use convenient cake mix! (If you’re more interested in cookies than cake, I can also point you towards a Bready or Not guest post from Dan Koboldt back in 2018 where he shared Gooey Butter Cake Cookies that also use cake mix.)
![Bready or Not: Gooey Butter Bars [Cake Mix Variation]](https://www.bethcato.com/blog/wp-content/uploads/2024/01/Gooey-Cake-with-cake-mix2_sm.jpg)
To maximize the cheapness and convenience of this recipe, I used entirely Aldi ingredients. Their cake mix is as good as the name brands.
![Bready or Not: Gooey Butter Bars [Cake Mix Variation]](https://www.bethcato.com/blog/wp-content/uploads/2024/01/Gooey-Cake-with-cake-mix5_sm.jpg)
When it comes down to taste, I far prefer the yeast version. It is sweet and delicate with nuance–but it also takes a long time to make. This version is easy, but the sweetness could come across as cloyingly strong. So, keep that in mind in regards to your audience’s tastes.
![Bready or Not: Gooey Butter Bars [Cake Mix Variation]](https://www.bethcato.com/blog/wp-content/uploads/2024/01/Gooey-Cake-with-cake-mix4_sm.jpg)
Modified from Centennial Kitchen Fall Baking 2021 Magazine.
Bready or Not: Gooey Butter Bars [Cake Mix Variation]
Equipment
- 15x10x1 pan
- aluminum foil
- nonstick spray
Ingredients
Cake base
- 15.25- ounce yellow cake mix or white cake mix
- 1/2 cup unsalted butter softened
- 1 large egg
Top layer
- 8 ounces cream cheese softened
- 2 large eggs
- 4 cups confectioners’ sugar
Instructions
- Preheat oven at 350-degrees. Line a 15x10x1 inch pan (also called a jelly roll pan) with foil; apply nonstick spray.
- In a large bowl, stir together cake mix, butter, and egg, until they are crumbly. Pat the entire dough into the bottom of the prepared pan. It will be very thin and fiddly to work with.
- In the same bowl, beat together the cream cheese and eggs until they are fairly smooth; a few clumps are okay. Gradually mix in the confectioners’ sugar to make a cohesive mix. Spread on top of the crust.
- Bake for 25 to 30 minutes, until the middle is set and golden brown. Cool at room temperature, and chill in fridge to completely set.
- A reminder that this is called ‘Gooey Butter Cake.’ Cut pieces finger-sized. Some in the middle may be particularly gooey. If not serving immediately, move pieces to a lidded container and use waxed paper between the stacked layers. They will stay firmer and less-gooey if they are kept chilled.
OM NOM NOM!
Bready or Not: Southern Cream Cheese Pound Cake
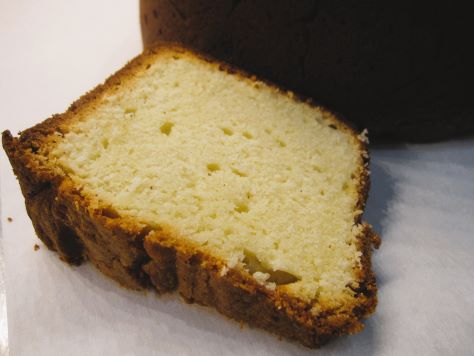
This Southern Cream Cheese Pound Cake is simple but oh so good. Rich flavors of butter, vanilla, and cream cheese infuse the whole thing.
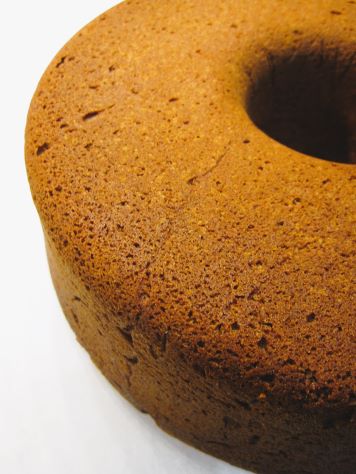
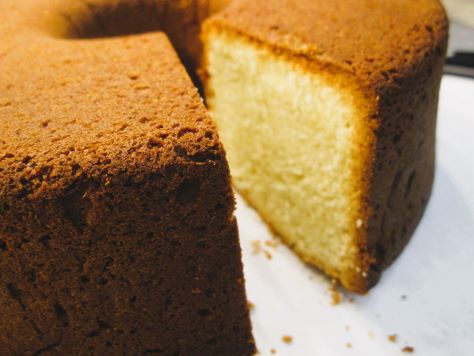
The middle features a velvety crumb while the crust is browned and crisp, creating a wonderful contrast. This has All the Textures.
In full disclosure, this is a recipe that will test your mixer. My poor Kitchen Aid strained to handle this thick, massive quantity of batter. It kept tripping the circuit at the end!
The annoyance was worthwhile, though. This cake is extraordinary. So basic in appearance, and then you take a bite and your mind is blown. Make this one for the holidays this year, and you’ll feed a crowd and awe them while you’re at it.
Modified a lot from Bake from Scratch: Cake 2019.
Bready or Not: Southern Cream Cheese Pound Cake
Equipment
- nonstick spray with flour
- large straight-sided tube pan or angel food cake pan
- stand mixer
Ingredients
- 1 1/2 cups unsalted butter (3 sticks) room temperature
- 8 ounces cream cheese (1 box) room temperature
- 3 cups white sugar
- 1 Tablespoon vanilla extract
- 1 1/2 teaspoons kosher salt
- 6 large eggs room temperature
- 3 cups cake flour
Instructions
- Preheat oven at 325-degrees. Generously coat the interior of the pan with nonstick spray with flour.
- In a stand mixer with a paddle attachment, beat together the butter, cream cheese, sugar, vanilla, and salt until they are fluffy and pale, about 8 minutes, scraping the bowl several times during the process. Add the eggs one at a time, making sure the recent addition is fully mixed in before adding the next. Scrape the bottom of the bowl again. Mix on medium-high for about 3 minutes, until everything is light and airy.
- Gradually add the flour. If the paddle attachment can't handle the load (and/or it is too messy), remove the paddle and use a spatula to incorporate the flour.
- Scoop the batter into the prepared pan. Level out the top. Bake for about 1 hour and 30 minutes to 1 hour and 40 minutes. When it is done, the top will be golden brown and the middle will pass the toothpick test. Let it cool in pan for about 20 minutes, then invert it onto a rack to cool completely.
- Slice into pieces. It is delicious by itself or can accompany fruit and/or ice cream. Store covered or in individually wrapped pieces at room temperature.
OM NOM NOM!
Notes
Bready or Not Original: Swirled Cookie Butter Brownie Bars
These Swirled Cookie Butter Brownie Bars are thick and luscious with just the right balance of chocolate and cookie dough flavors.

If you’re one of those people who had just to discover the joys of cookie butter–you’re in for a treat! Think cookies blended with oil to create a spreadable mass just like peanut butter. There is nothing healthy about it, but it tastes like cookie dough. You can find it at Trader Joe’s as Speculoos and at other stores as Biscoff or as a generic.
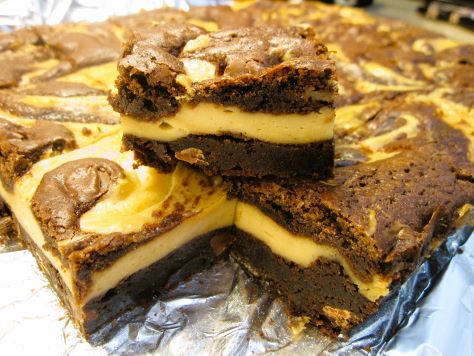
Cookie butter can pretty much replace peanut butter in any recipe, or even on something as simple as a sandwich. Here, it’s great swirled in with brownie batter. Chocolate and cookie dough, ever the perfect combination.
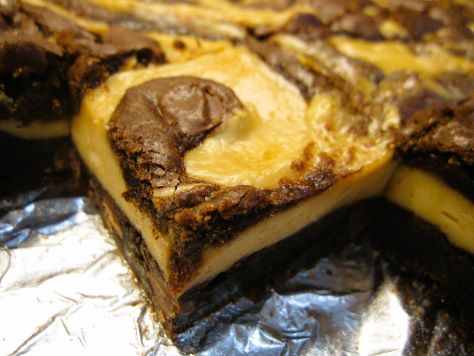
Since the swirl-in includes cream cheese, be sure to refrigerate these after they’ve baked and cooled. They are divine straight from the fridge!
Bready or Not Original: Swirled Cookie Butter Brownie Bars
Equipment
- 13×9 pan
- aluminum foil
- nonstick spray
- uneven spatula
- cutting board
Ingredients
Brownie base
- 3 large eggs room temperature
- 1 cup unsalted butter (2 sticks) melted
- 2 teaspoons vanilla extract
- 2 cups white sugar
- 1 1/4 cups all-purpose flour
- 3/4 cup baking cocoa sifted
- 1/2 teaspoon baking powder
- 1/4 teaspoon salt
- 1 cup milk chocolate chips
Cookie butter swirl-in
- 2 boxes cream cheese (8 ounces each) softened
- 1/2 cup creamy cookie butter
- 1/4 cup white sugar
- 1 large egg room temperature
- 2 Tablespoons milk
Instructions
- Preheat oven at 350-degrees. Line a 13×9 pan with foil and apply nonstick spray.
- In a big bowl, beat together eggs, butter, and vanilla. In another bowl, combine the brownie dry ingredients and gradually add them to the egg mix. Fold in the chocolate chips. Set aside 1 cup of the brownie batter for the topping. Scoop the rest into the prepared pan and use an uneven spatula to even it out.
- In another bowl, beat together the cream cheese blocks, cookie butter, and sugar. Once that is blended, add the egg and milk. Use an uneven spatula to spread the mixture in a thin layer across the top of the brownie batter in the pan. Dollop the reserved brownie batter on top. Use the tip of the uneven spatula or a butter knife to create swirls.
- Bake pan for 35 to 40 minutes, until the very middle passes the toothpick test. Cool on a wire rack for an hour, then place in fridge to completely chill. Use the foil to lift the contents onto a cutting board. Slice up and store in a sealed container in the fridge. Keeps for at least 3 days.
OM NOM NOM!
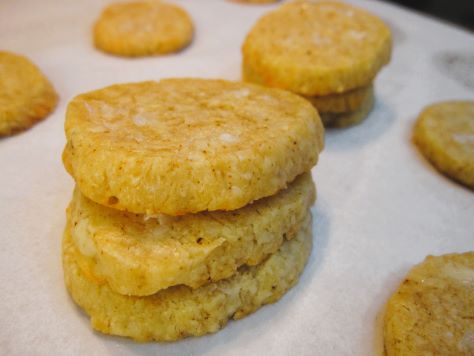
Bready or Not Original: Paprika Cheddar Crackers
These Paprika Cheddar Crackers are a perfect snack or appetizer, and they even keep well for travel!
Use a good aged cheese here–or one labeled extra sharp. The cheese should be the main thing here, with the paprika and salt serving to heighten that flavor. Of course, you can mix in some other spices as well–or even use chipotle pepper for a zing.
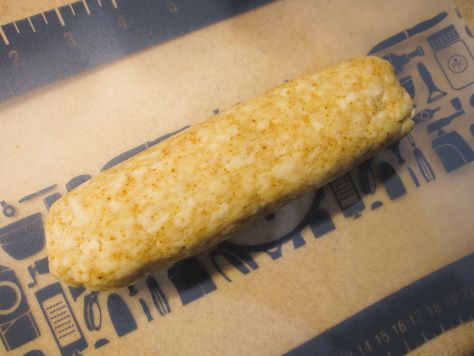
I split up this batch and baked them months apart. One of the nice things about these tubes of dough is that they don’t take up much room in the freezer–or in the fridge when it’s time to thaw them.
I got 16 crackers out of each batch (so 32 total), and mind you, these are pretty thick, hearty crackers. These aren’t the kind you grab a handful of, maybe just a few at a time. They would be great at a fancier function, served with wine or champagne, but are good with pretty much any drink. Cheese is versatile like that.
Bready or Not Original: Paprika Cheddar Crackers
Equipment
- food scale
- plastic wrap
- parchment paper
- baking sheet
- knife
Ingredients
- 1/2 cup unsalted butter (1 stick) room temperature
- 8 ounces aged cheddar shredded
- 1 cup plus 2 Tablespoons all-purpose flour
- 1/2 teaspoon paprika
- 1 1/2 Tablespoons water
- 1 teaspoon kosher salt
- flaked sea salt
Instructions
- Mix together the butter, cheddar, flour, paprika, and salt. Add the water. Continue to mix together until it forms a cohesive dough; add a touch more flour if it’s too wet, or a dribble of water if it’s dry.
- Use a food scale to weigh the dough and divide it in half. Roll out the plastic wrap to about 10 inches. Place half the dough on the plastic and shape into a thick tube, then wrap it in plastic to compress it and make it into an even log about an inch in diameter. Completely seal in plastic wrap. Repeat with other half of dough.
- The dough can be kept in the fridge for up to 4 days, or frozen for several months.
- When ready to bake, preheat the oven at 350-degrees. Place parchment paper on baking sheet. Place a chilled (thawed) dough tube on a cutting board and slice about 1/4-inch thick. Place with minimal spacing on the parchment. Add a pinch of flaked sea salt onto each cracker and gently press it into the surface.
- Bake for 17 to 20 minutes, until edges are just starting to turn golden. Let set to cool on cookie sheet. Store in a sealed container. They are best eaten within 3 days.
