


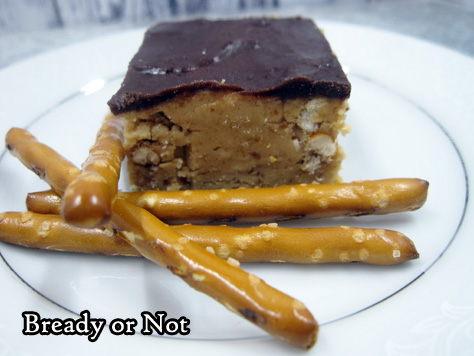
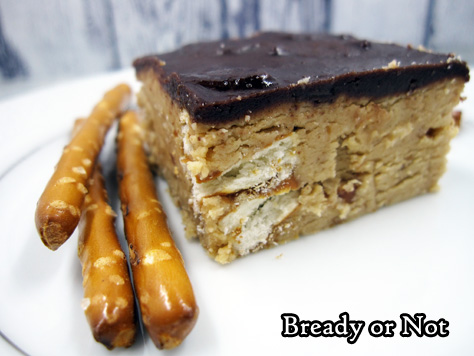
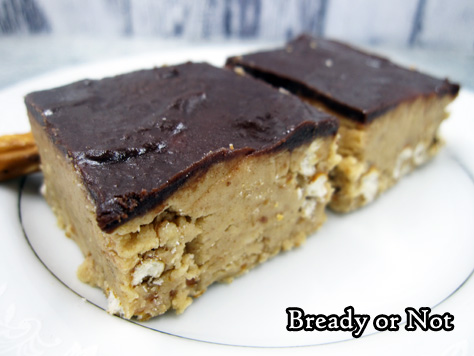
Bready or Not: No-Bake Peanut Butter Pretzel Fudge
These easy-to-make No-Bake Peanut Butter Pretzel Fudge pieces are basically like homemade candy bar bites.
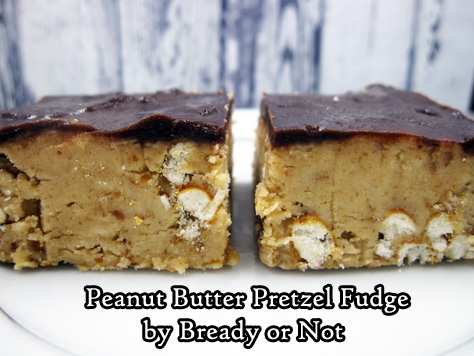
They are a fantastic combination of savory, salty, sweet, and crunchy. They have it all going on.
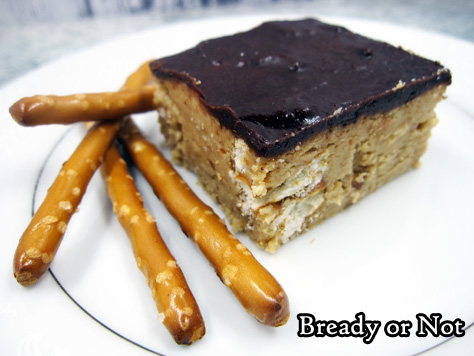
Plus, you don’t even have to turn on the oven–just a food processor, microwave, and maybe a stand mixer. The fridge does all the lengthy work.
These went over so well at my husband’s work that a guy immediately logged onto my website via his phone to try to find the recipe. Uh, sorry, dude. There is quite a lead time between the initial baking/making and the online post.
However, by his enthusiasm, maybe he’ll find this post is worth the long wait.
Modified from America’s Test Kitchen, Christmas Cookies 2013.
Bready or Not: No-Bake Peanut Butter Pretzel Fudge
Ingredients
Fudge:
- 5 ounces thin pretzel sticks 2 cups, divided, broken into pieces
- 12 Tablespoons unsalted butter melted
- 1 1/2 cups creamy peanut butter
- 1 teaspoon vanilla extract
- 1/4 teaspoon salt
- 3 cups confectioners' sugar
Chocolate Ganache:
- 3 Tablespoons unsalted butter
- 3 1/2 ounces bittersweet chocolate chips or semi-sweet chocolate chips
- 1 Tablespoon light corn syrup
Instructions
- Line an 8x8 or 9x9-inch pan with aluminum foil and apply nonstick spray.
- In a food processor, process 1 cup of broken pretzels until finely ground. Stir together the pretzel crumbs and melted butter in a large mixing bowl and let sit to cool a few minutes.
- Add peanut butter, vanilla extract, and salt to the butter mixture, and mix until the peanut butter is smooth. Slowly mix in the confectioners' sugar until it all comes together. Add the additional 1 cup of pretzel sticks and stir to combine.
- Transfer the mix to the prepared pan and spread into an even layer. Cover surface directly with plastic wrap or waxed paper and smooth out more, then stash in fridge for 30 minutes.
- Microwave the three ganache ingredients at 50% power, stirring often, until melted and smooth. This will total about 1 minute or so. Let cool slightly.
- Remove plastic cover from atop the fudge and use an uneven spatula to spread ganache on top.
- Chill pan for about 4 hours. Use the foil sling to lift contents from pan and onto a cutting board to parcel into bars.
- Keeps well in fridge for days in a sealed container.
- OM NOM NOM!
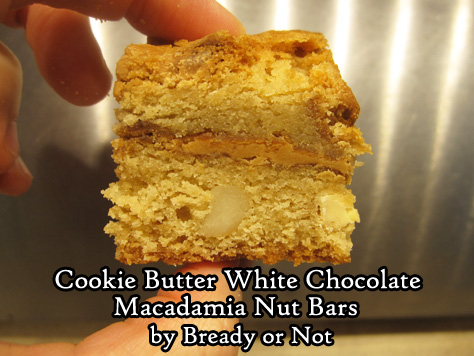
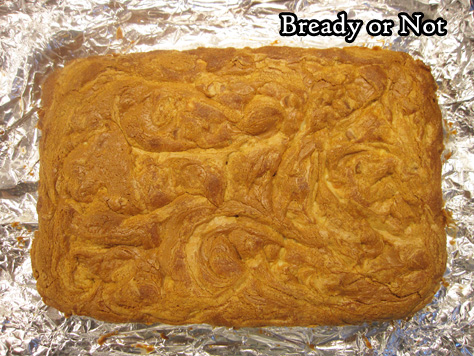
Bready or Not Original: Cookie Butter White Chocolate Macadamia Nut Bars
Cookie butter makes everything better. This is a maxim of life. It is proven true yet again with these Cookie Butter White Chocolate Macadamia Nut Bars.
Cookie butter is found by the peanut butter in most grocery stores in the US these days. The most popular brands are Biscoff and Speculoos, but Walmart, Kroger, and Sprouts even have their own jars now!
What does cookie butter taste like? Well… rich, buttery cookie dough rendered into peanut butter-like form. That’s the only way to describe it.
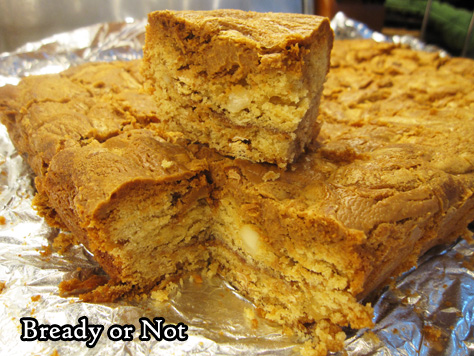
In this recipe, the cookie butter flavor amps up the inherent baked-good yumminess of these bars. Add white chocolate and macadamias along with that? Oh yeah.
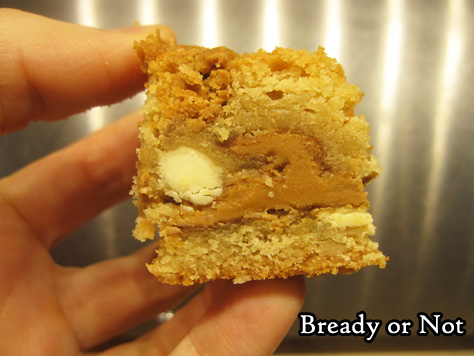
You end up with a ribbon of cookie butter through the middle and swirls across the top. These effectively acts like a thin frosting, as these otherwise aren’t heavy duty on sweetness.
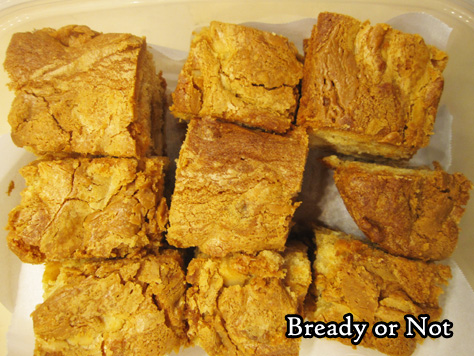
The bars rise a lot as they bake and end up quite cakey. They hold together well, so you can cut them small, if you want.

I want to mention macadamia nuts again. They are lovely in this recipe, adding a sporadic crunch and buttery flavor that goes oh-so-well with everything else.
Bready or Not Original: Cookie Butter White Chocolate Macadamia Nut Bars
Ingredients
- 1 1/2 cups unsalted butter 3 sticks, softened
- 1/2 cup white sugar
- 2 cups brown sugar packed
- 4 large eggs room temperature
- 1 Tb vanilla extract
- 4 cups all-purpose flour
- 1 teaspoon salt
- 2 teaspoons baking powder
- 1 cup white chocolate chips
- 1 cup macadamia nuts chopped
- 2/3 cup + 1/2 cup creamy cookie butter spread divided
Instructions
- Preheat oven to 350-degrees. Line a 9x13 pan with aluminum foil and apply nonstick spray.
- In a large bowl, cream butter until light and fluffy. Add in both sugars, followed by the eggs one by one, then the vanilla.
- In a separate bowl, sift together the flour, salt, and baking powder. Gradually mix into the wet ingredients until just incorporated.
- Spread half of the dough in the bottom of the pan. Mixture will be thick. Use an uneven spatula to spread 2/3 cup cookie butter in an even layer over the dough.
- Top with remaining dough and spread to edges. Dollop the 1/2 cup of cookie butter here and there over the top, then use a butter knife to swirl it into the dough.
- Bake for 40 to 45 minutes, until the top is golden brown and the middle passes the toothpick test. Dough will rise a great deal.
- Cool completely in pan. Use the foil to lift up bars for easy cutting. Store sliced pieces in a sealed container at room temperature for as long as a week.
- OM OM NOM!
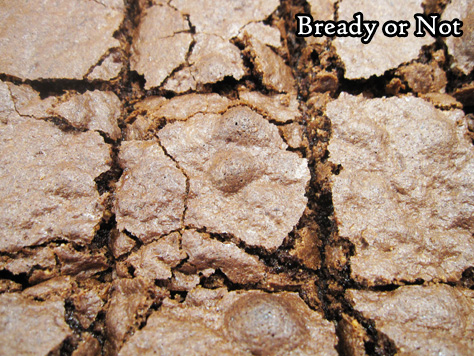
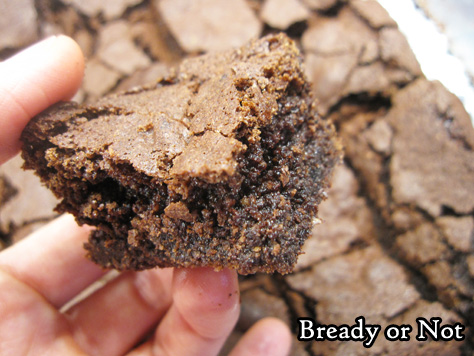
Bready or Not: Gluten-Free Almond Flour Brownies
I often get requests for more gluten-free sweets. Here you go. These brownies are so good, people won’t even know they lack gluten.
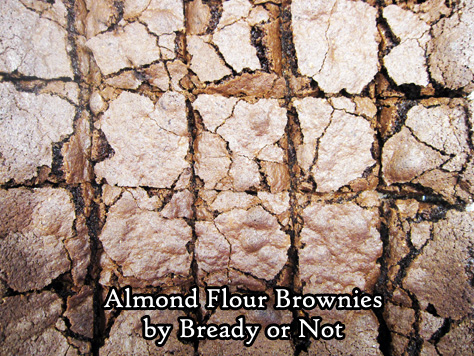
They also happen to be grain-free. Just don’t give them to people who have almond allergies!
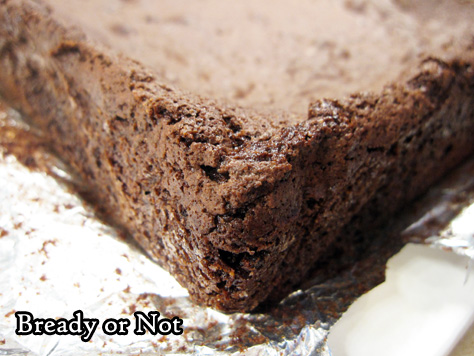
These brownies are fast to assemble. The end result tastes like standard brownies. I didn’t find them super moist, but they were nice and chewy.
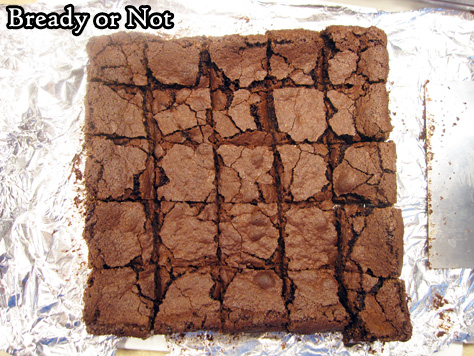
They kept pretty well in a sealed container for several days, too. The cut edges dried out a bit, but they were still delicious.
Here’s a tip for you: almond flour, because of its high fat content, can spoil. Keep it in the freezer! It won’t freeze solid but it will get clumpy. Hence my note in the ingredients list to sift the almond flour.
Modified from King Arthur Flour.
Bready or Not: Gluten-Free Almond Flour Brownies
Ingredients
- 5 Tablespoons unsalted butter
- 1 3/4 cups white sugar
- 1/2 teaspoon salt
- 1 teaspoon vanilla extract
- 3/4 cup cocoa powder sifted
- 3 large eggs room temperature
- 1 1/2 cups almond flour sifted
- 1 teaspoon baking powder
Instructions
- Preheat oven at 350-degrees. Line an 8x8 or 9x9 pan with foil and apply butter or nonstick spray.
- In the microwave, melt the butter in a medium-sized bowl. Stir in the sugar, salt, vanilla, cocoa, and eggs. Add in the almond flour and baking powder. Pour batter into the ready pan.
- Bake for 33 to 38 minutes, until the top is set and the middle just passes the toothpick test. Let cool, then cut into blocks. Store at room temperature in a sealed container or freeze for later enjoyment.
- OM NOM NOM!
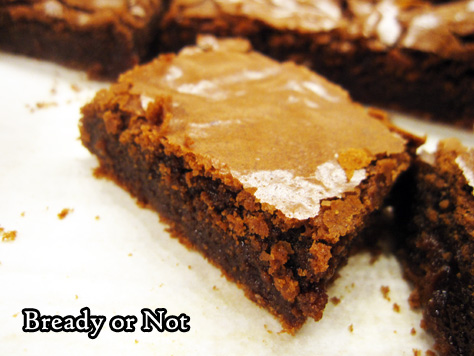
Bready or Not: Chewy Brownies
These are some seriously amazing brownies.

Chewy, fudgy, chocolaty, the type that makes you moan the second that flavor hits your tongue. Yeah.
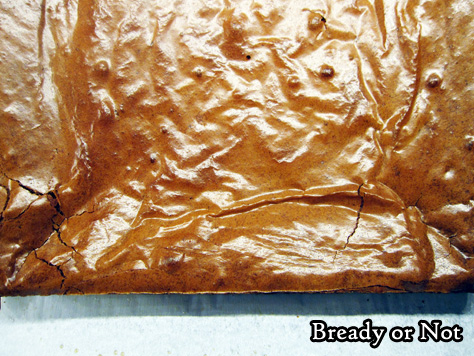
I had to do a brownie recipe for Valentine’s Day. This recipe comes together super-fast, so maybe you have time to whip it up today instead of buying some overpriced not-so-good version at the store.
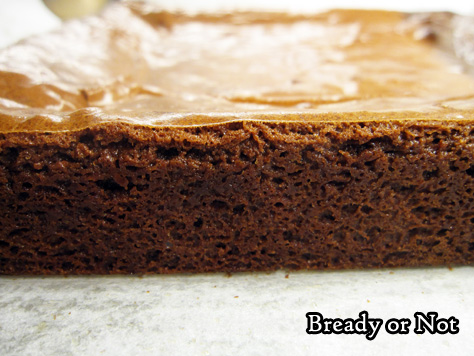
Because these brownies?
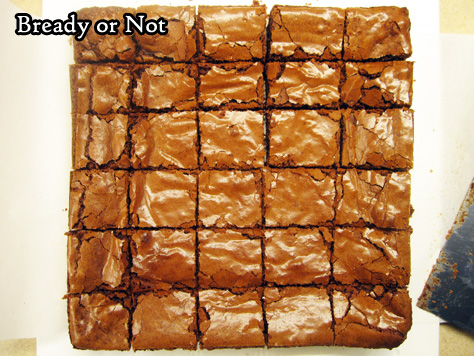
LOOK AT THEM.
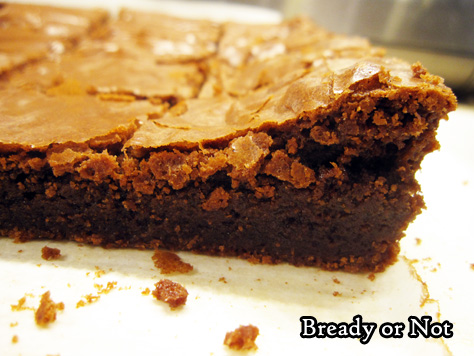
LOOOOK.
I don’t think I need to say anything else.
Modified from Chewy Brownies in Martha Stewart Living, November 2016.
Bready or Not: Chewy Brownies
Ingredients
- 3/4 cup plus 2 Tablespoons all-purpose flour
- 1/4 teaspoon baking powder
- 1/2 teaspoon kosher salt
- 3/4 teaspoon espresso powder optional
- 7 Tablespoons unsalted butter room temperature
- 7 ounces unsweetened chocolate chips or semisweet
- 3 Tablespoons coconut oil
- 1 cup white sugar
- 1 cup brown sugar packed
- 3 large eggs room temperature
Instructions
- Preheat oven at 350-degrees. Line an 8x8 or 9x9 baking pan with parchment paper and apply nonstick spray.
- In a medium bowl, combine the flour, baking powder, salt, and espresso powder (if using). Set aside.
- Place the butter, chocolate, and oil in a large microwave-safe bowl. Heat in short bursts, stirring well between each, until the chocolate is melted. Add both sugars and stir together. Whisk in the eggs until the batter is glossy and smooth.
- Pour in the dry ingredients and mix until just combined. Pour batter into the prepared pan and smooth out the top.
- Bake until the brownies pass the toothpick test in the middle, about 35 to 40 minutes. Let cool in pan for about 30 minutes, then lift the block out by the parchment to completely cool on a rack. Slice into bars. Keep stored in an airtight container.
- OM NOM NOM!
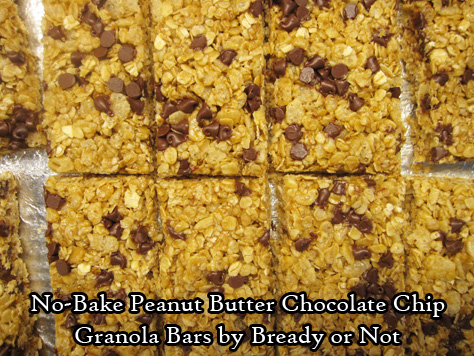
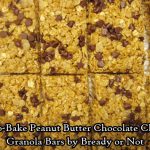
Bready or Not: No-Bake Peanut Butter Chocolate Chip Granola Bars
Homemade granola bars! These things are delicious and great for breakfast or snacks, for kids or adults.
Making these requires some brief time at the stove. This is a great recipe to get kids or grandkids involved, as they can help measure the dry ingredients and help to stir.
Do note that these bars won’t be quite as firm as the store-bought stuff, so keep that in mind if you’re transporting them around.
However, they taste a lot better than the store stuff. They taste FRESH. And peanut butter-chocolatey. Plus, they can be even more chocolatey if you use Nutella instead of peanut butter.
Speaking of chocolate, for Valentine’s Day next Wednesday, gird yourself (i.e. bust out the stretchy pants) in preparation of a Chewy Brownie recipe!

Bready or Not: No-Bake Peanut Butter Chocolate Chip Granola Bars
Ingredients
- 2 cups quick oats
- 1 cup puffed rice cereal like Rice Krispies
- 1/4 cup peanut butter creamy or crunchy
- 1 teaspoon vanilla extract
- 2 Tablespoons coconut oil
- 1/4 cup honey
- 1/4 cup light brown sugar packed
- 2 Tablespoons mini chocolate chips
Instructions
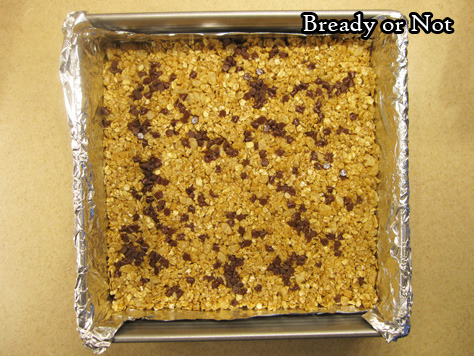
- Line an 8x8 or 9x9 baking pan with aluminum foil and apply nonstick spray.
- In a big bowl, stir together the oats and cereal. Set that aside. Measure out the peanut butter and vanilla extract and set near stove.
- Place the coconut oil, honey, and brown sugar in a small saucepan. Cook on medium heat, stirring often, as sugar dissolves, and continue to heat until it just starts boiling. Remove pot from burner. Quickly add the peanut butter and vanilla, and stir until everything is incorporated.
- Pour the hot mix into the bowl with the oats and cereal. Stir until everything is coated, then pour into the prepared pan. Use a spatula to press down evenly. Sprinkle mini chocolate chips over the top. To compress the granola even more, line waxed paper over the pan, then use the bottom of a glass or other flat, heavy implement to press down.
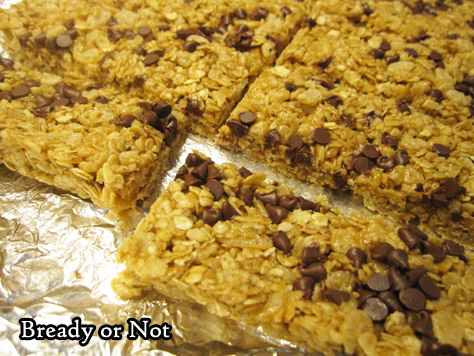
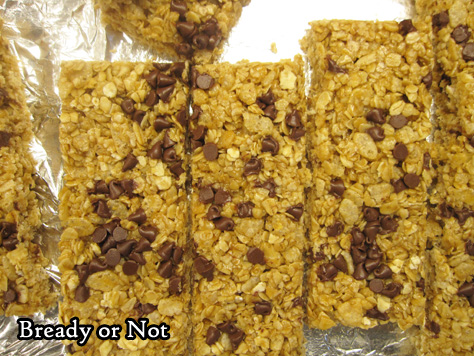
- Allow pan to set for several hours. Slice into bars. Pack up individually with plastic wrap or keep in a sealed container with plastic wrap or waxed paper between layers. At room temperature, keeps well for up to a week; bars can also be frozen.
- OM NOM NOM!
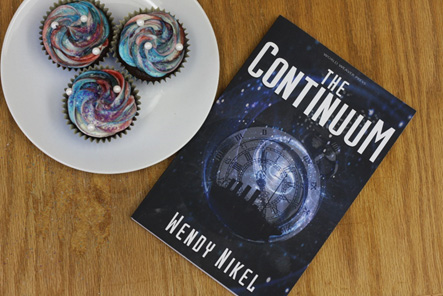
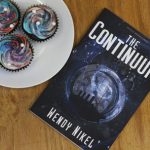
Bready or Not Guest Recipe from Author Wendy Nikel: Continuum Coffee Cupcakes
Today I welcome Wendy Nikel! Her novella The Continuum came out on Tuesday from World Weaver Press. Find out all about all the cool time-traveling twists in her new book, and grab a recipe for some cupcakes that are out of this world!
Elise Morley is an expert on the past who’s about to get a crash course in the future.
For years, Elise has been donning corsets, sneaking into castles, and lying through her teeth to enforce the Place in Time Travel Agency’s ten essential rules of time travel. Someone has to ensure that travel to the past isn’t abused, and most days she welcomes the challenge of tracking down and retrieving clients who have run into trouble on their historical vacations.
But when a dangerous secret organization kidnaps her and coerces her into jumping to the future on a high-stakes assignment, she’s got more to worry about than just the time-space continuum. For the first time ever, she’s the one out-of-date, out of place, and quickly running out of time.
January 23 marks the release day for my first book: a time travel novella entitled THE CONTINUUM. And what better way to celebrate a new book than with cupcakes?
My main character, Elise, is a professional time traveler and — like me — a big fan of coffee, so I knew I wanted something rich and delicious. Plus, I’d been seeing galaxy-swirl treats here and there online and wanted to give this colorful, space-themed frosting a shot. What I ended up with was a death-by-chocolate cupcake, filled with mocha pudding and swirling buttercream frosting.
THE CUPCAKES:
THE FILLING:

THE FROSTING:

Bready or Not Guest: The Continuum Coffee Cupcakes by Wendy Nikel
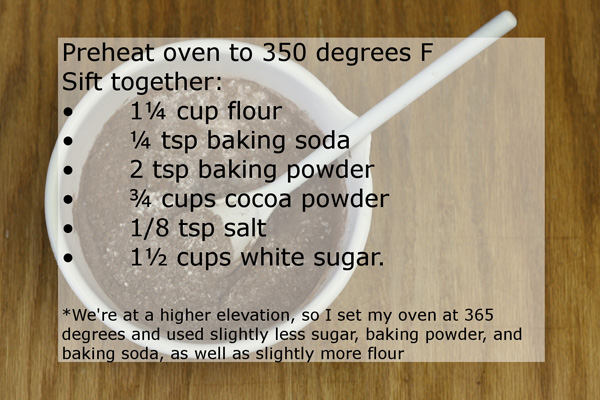
Ingredients
Cupcakes
- 1 1/4 cup all-purpose flour
- 1/4 teaspoon baking soda
- 2 teaspoon baking powder
- 3/4 cup cocoa powder
- 1/8 teaspoon salt
- 1 1/2 cup white sugar
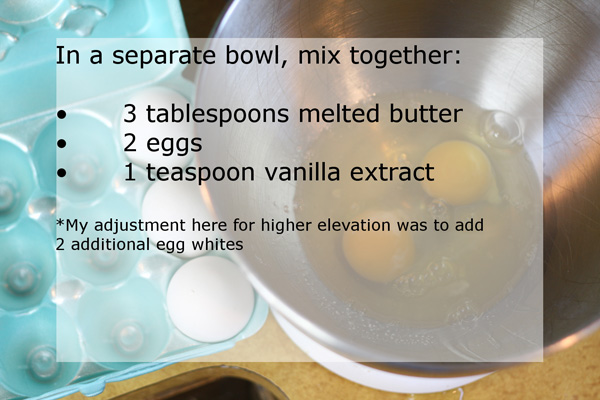
- 3 Tablespoons melted butter
- 2 eggs
- 1 teaspoon vanilla extract
- 1 cup milk
- 1 cup chocolate chips
Filling
- Chocolate instant pudding
- 2 cups milk
- 1 teaspoon coffee extract
Frosting
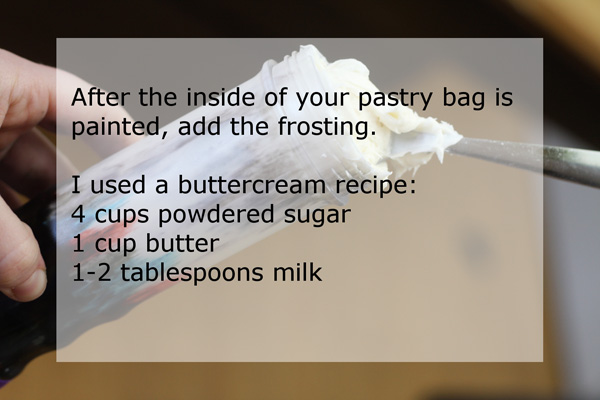
- 4 cup powdered sugar
- 1 cup butter
- 1-2 Tablespoons milk
- Gel food coloring
- Sprinkles
Instructions
- Preheat oven to 350 degrees F.
- Sift together flour, baking soda, baking powder, cocoa, salt, and sugar.
- In separate bowl, mix melted butter, eggs, and vanilla.
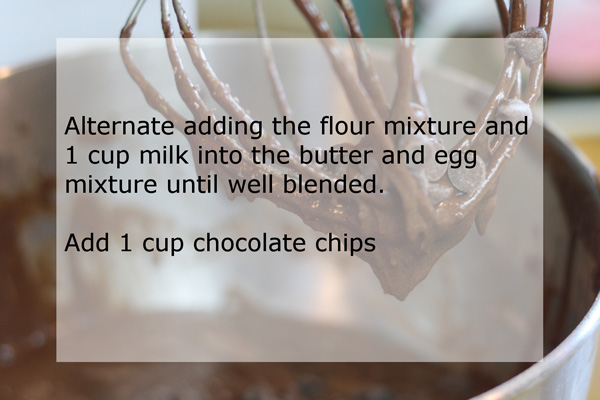
- Alternate adding the flour mixture and 1 cup milk into the butter & egg mixture until well blended. Add chocolate chips.
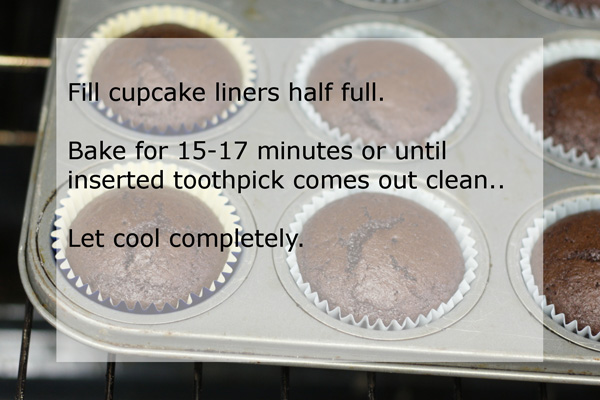
- Fill cupcake liners half full and bake for 15-17 minutes. Let cool.
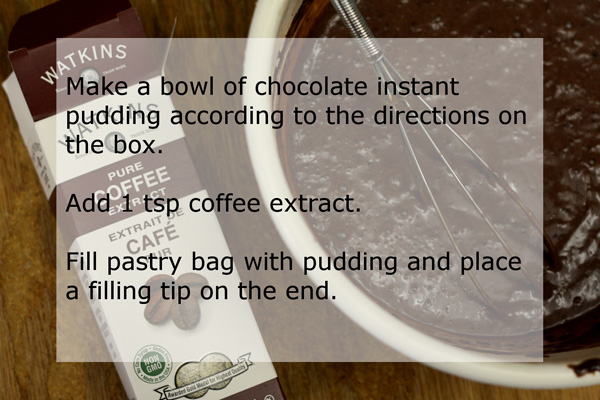
- Make instant pudding according to directions. Add 1 tsp coffee extract.
- Fill pastry bag with pudding and place a filling tip on the end. Stick the filling tip into the center of each cupcake at a 90 degree angle and squeeze in the filling until you can see the top crust bulge.
- Drop a bit of each color of food coloring into a bowl. Use a new paintbrush to "paint" the insides of the pastry bag or decorator with the food coloring.
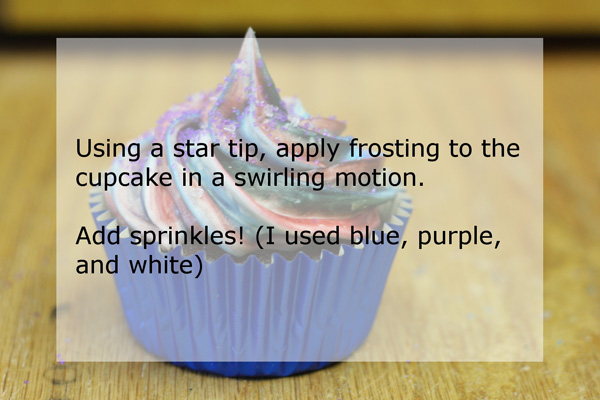
- After the inside is painted, add the frosting. Using a star tip, apply frosting in a swirling motion. Add sprinkles, and enjoy!
THE CONTINUUM out NOW
paperback via World Weaver Press $8.99 (regular $9.99)
eBook via iTunes
eBook via Barnes & Noble
eBook via Amazon
eBook via Kobo
Wendy Nikel is a speculative fiction author whose short stories have appeared in Fantastic Stories of the Imagination, Daily Science Fiction, AE Sci-Fi, Nature: Futures, and various anthologies and e-zines. She is a member of SFWA and Codex Writers Group and is a managing editor at Flash Fiction Online.
Read More