


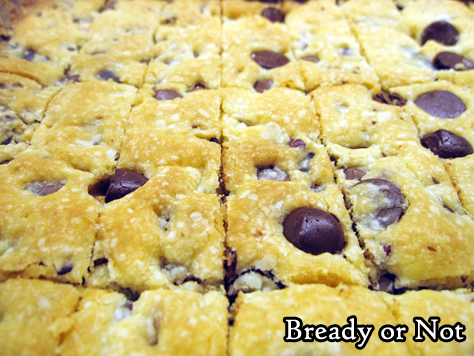
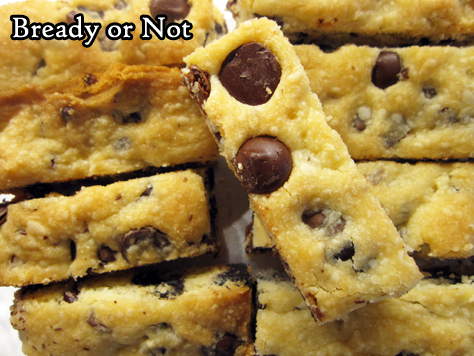
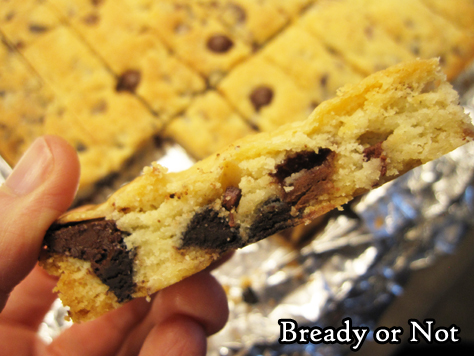
Bready or Not Original: Chewy Cookie Butter Chocolate Chip Cookies
These Chewy Cookie Butter Chocolate Chip Cookies are embodied with extra cookie dough flavor thanks to the miracle of cookie butter.
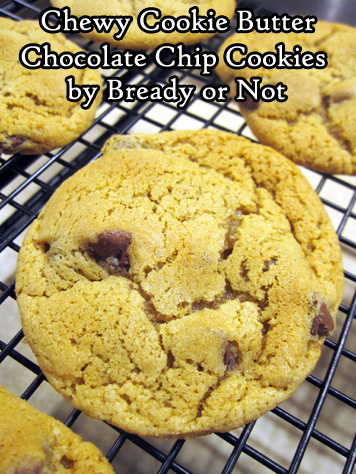
It always seems someone is always discovering cookie butter for the first time, so I shall repeat: this stuff is basically ground-down cookies blended with oil, giving it the same consistency as peanut butter, but without the health benefits. And oh yeah, it’s delicious.
Ccookie butter can be found under the Biscoff brand at many grocery stores (and sometimes in a store generic brand) and at Trader Joe’s as Speculoos. You can use it just as you would peanut butter for sandwiches or for baked goods.

It’s fantastic stuff paired with chocolate, as in this recipe. It makes cookies taste more… cookie. Once you try it, you’ll know what I mean.
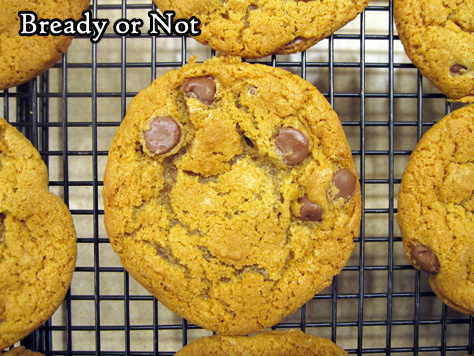
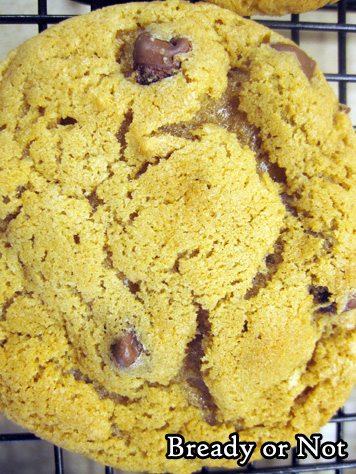
This recipe makes a nice, big batch of crispy, chewy cookies. Use any kind of chocolate chips that you want–or use a mix! It’ll all be good.
Bready or Not Original: Chewy Cookie Butter Chocolate Chip Cookies
Equipment
- tablespoon scoop
Ingredients
- 2 1/2 cups all-purpose flour
- 1 teaspoon baking soda
- 1/2 teaspoon salt
- 1/2 cup unsalted butter (1 cube), room temperature
- 1/2 cup creamy cookie butter
- 1 cup brown sugar packed
- 1/2 cup white sugar
- 2 eggs room temperature
- 2 Tablespoons light corn syrup
- 2 Tablespoons water
- 3 teaspoons vanilla extract
- 1 bag milk chocolate chips or semisweet chips, about 1 3/4 cups
Instructions
- Preheat oven at 375-degrees.
- In a medium bowl, sift together flour, baking soda, and salt. Set aside.
- In a big mixing bowl, beat butter and cookie butter until completely blended. Add the two sugars. Beat in the eggs, one at a time, followed by the corn syrup, water, and vanilla. Gradually mix in the dry ingredients. Fold in the chocolate chips.
- Use a tablespoon scoop to dole out dough onto a cookie sheet, giving each one room to spread while baking. Bake for 10 to 11 minutes, until golden, then let them sit on the sheet another 5 to 10 minutes to set. Transfer to rack to completely cool.
- Store in a sealed container at room temperature. They will keep well for up to 3 days.
*OM NOM NOM!*
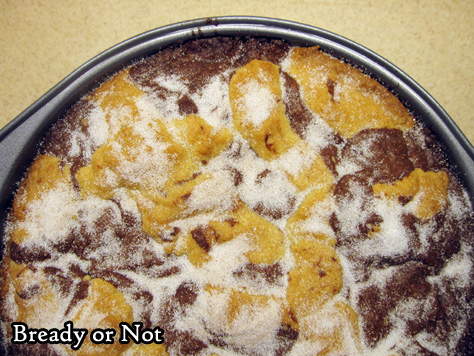
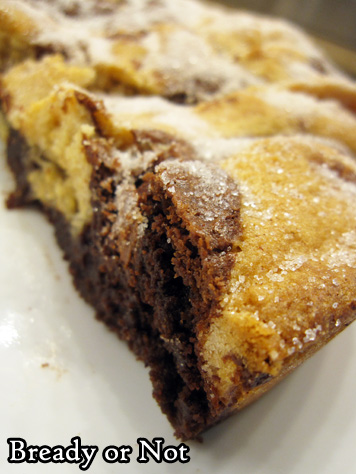
Bready or Not: Snickerdoodle Brookie
Don’t struggle to choose between Snickerdoodles and Brownies. Have them both at the same time in this extraordinary Snickerdoodle Brookie!
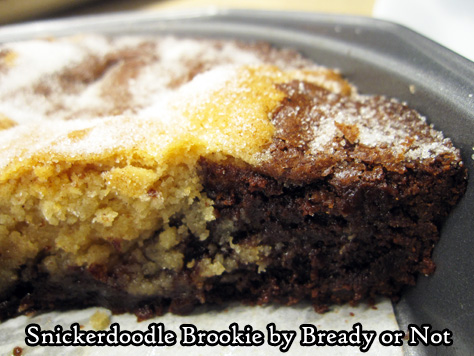
This is essentially like a massive cookie-cake hybrid. It looks impressive, and the flavor is impressive, too. If the layers work out right, you get a bit of everything in every bite.
If you eat the brookie warm, the chocolate flavor is quite strong. I actually liked this best at room temperature. The flavors play together better then.
I mean, it’d be a shame to not get to enjoy the Snickerdoodle side of things. A travesty.
I modified this from the original in my favorite food magazine, Bake from Scratch. I tried to make it easier by using the microwave, prepping the pan with parchment, and clarifying the steps throughout.
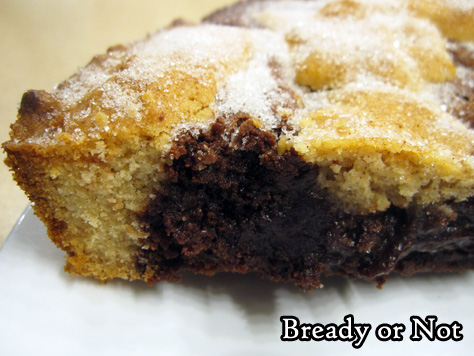
I can also testify that this is a great recipe to portion out and freeze. Pieces don’t take long to thaw and the brookie is dense enough to be pretty portable, too, though the dusting of cinnamon and sugar on top can sometimes be messy.
Modified from the March/April 2020 issue of Bake from Scratch Magazine.
Bready or Not: Snickerdoodle Brookie
Equipment
- 9-inch round cake pan
- parchment paper
Ingredients
Brownie batter:
- 6 ounces semisweet chocolate chips or bittersweet (170 grams)
- 1/2 cup unsalted butter 1 cube
- 1 cup white sugar
- 2 large eggs
- 1 teaspoon vanilla extract
- 3/4 cup all-purpose flour
- 1/4 cup Dutch process cocoa powder sifted
- 1/2 teaspoon kosher salt
Snickerdoodle dough:
- 1/3 cup unsalted butter softened
- 1/2 cup white sugar
- 1 large egg
- 1/2 teaspoon vanilla extract
- 1 cup all-purpose flour
- 1/2 teaspoon cream of tartar
- 1/2 teaspoon kosher salt
- 1/2 teaspoon ground cinnamon
- 1/4 teaspoon baking powder
Topping:
- 1 tablespoon white sugar
- 1/8 teaspoon ground cinnamon
Instructions
- Preheat oven to 350-degrees. Cut a piece of parchment to fit inside a 9-inch round cake pan. Apply nonstick spray in pan, place parchment, then spray parchment as well. Set aside.
Make brownie batter
- Melt together the chocolate and butter either in a double boiler on the stove or in the microwave in a microwave-safe bowl. Stir until everything is mixed and smooth. Stir in sugar. Set aside to cool for a few minutes before mixing in the eggs and vanilla.
- In a medium bowl, stir together flour, cocoa, and salt. Fold the dry ingredients into chocolate mixture just until combined. Set aside.
Make snickerdoodle dough
- Beat together the butter and sugar until they are fluffy; in a stand mixer, this will be at about 3 to 4 minutes. Scrape the sides of the bowl a few times. Add the egg and vanilla.
- In a separate bowl, stir together flour, cream of tartar, salt, cinnamon, and baking powder. Gradually mix the dry ingredients into butter mixture. Dough will be quite thick.
Assemble the cake
- Spoon large dollops (about 3 tablespoons each) of brownie batter into bottom of the prepared pan, leaving space between each lump. Crumble dollops of snickerdoodle dough in between brownie batter. Top with any more scoops of brownie batter and snickerdoodle dough. Gently use fingers to even out top.
- Bake until the middle passes the toothpick test, 33 to 40 minutes.
Make topping
- Stir together cinnamon and sugar. As soon as the cake is removed from the oven, sprinkle the mixture across the top.
- Let cool at least 15 minutes before cutting in. Cake can be served warm or at room temperature. It can also be frozen in slices and thawed for later enjoyment.
OM NOM NOM!
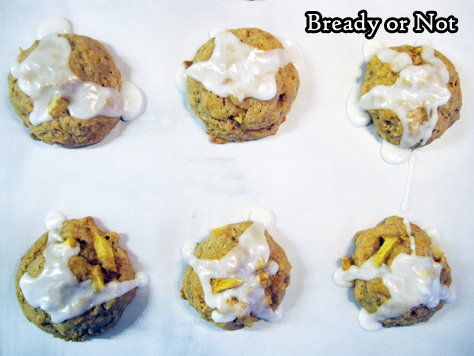
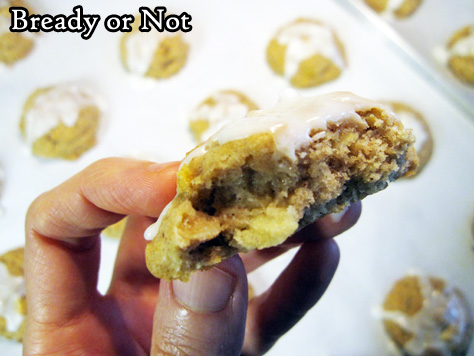
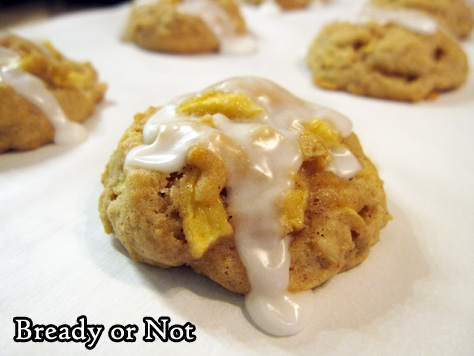
Bready or Not Original: Apple-Oat Cookies
These Apple-Oat Cookies are like a cross between apple oatmeal and apple pie, in a convenient portable form.
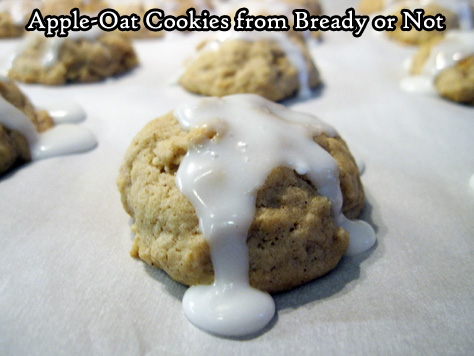
Really, these cookies feel homey. They take like comfort, with the apples and oats a little dense but not too heavy. The glaze on top adds a touch of sweetness that is just right.
As I have a husband who loves apple oatmeal AND apple pie, he enjoyed these cookies greatly. They are a perfect breakfast cookie!

I found that they kept for at least three days at room temperature. Even better–as these were all for my husband to enjoy–I found they froze and thawed without a problem. I actually froze most of the batch straight away. Portion control is a good thing, especially with over thirty cookies offering temptation!
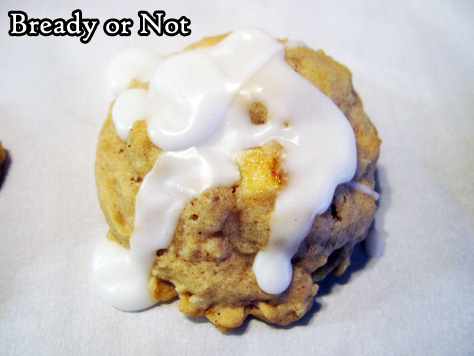
I used a Gala apple, but I say any sweet baking apple would work well.
Bready or Not Original: Apple-Oat Cookies
Equipment
- tablespoon cookie scoop
- parchment paper
- waxed paper
Ingredients
Cookies
- 2 1/4 cups all-purpose flour
- 1 cup old-fashioned oats also called rolled oats
- 1 teaspoon ground cinnamon
- 3/4 teaspoon baking powder
- 1/2 teaspoon baking soda
- 1/2 teaspoon salt
- 1/4 teaspoon ground allspice
- 3/4 cup unsalted butter 1 1/2 sticks, room temperature
- 1/2 cup brown sugar packed
- 1/2 cup white sugar
- 2 large eggs room temperature
- 2 teaspoons vanilla extract
- 1 large baking apple peeled and finely chopped; Gala and Fuji are ideal
Glaze
- 1 cup confectioners' sugar plus more if needed
- 2 Tablespoons milk or half & half, plus more if needed
Instructions
- Preheat oven at 350-degrees. Line a large baking pan with parchment paper.
- In a medium bowl, whisk together flour, oats, cinnamon, baking powder, baking soda, salt, and allspice.
- In a big mixing bowl, combine the soft butter, brown sugar, and white sugar. Follow up with the eggs and vanilla. Slowly mix in the dry ingredients. Fold in the apple pieces.
- Use a tablespoon scoop or spoon to dole out dough spaced an inch apart on the cookie sheet. Bake until set, about 10 to 12 minutes. Let set on rack for 10 minutes, then move to a cooling rack. Continue with the next batch.
- Once all of the cookies are cool, make the glaze. Stir together the confectioners’ sugar and milk to form a thick but oozy consistency. Spoon over the cookies.
- Store in a sealed container at room temperature, with waxed paper between the stacked layers. They will keep for at least three days. Cookies will freeze and thaw without issue.
OM NOM NOM!
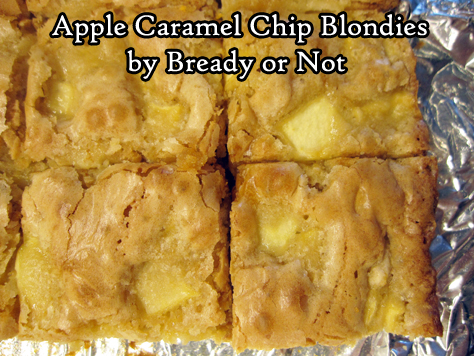
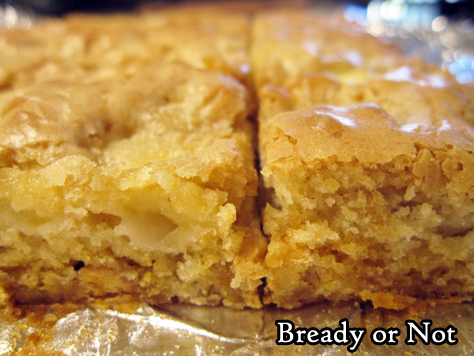
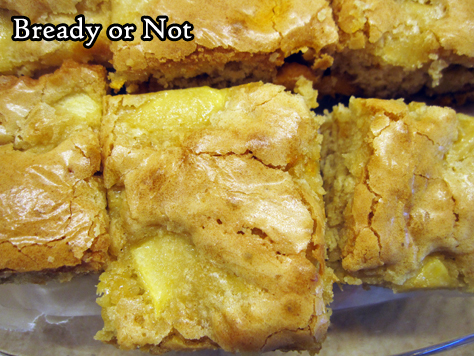
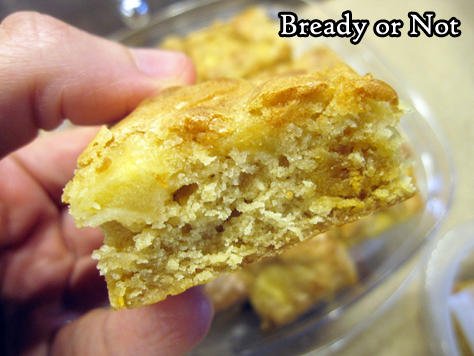
Bready or Not Original: Apple Caramel Chip Blondies
These Apple Caramel Chip Blondies are soft, sweet, and dangerously snackable, perfect for a quick bite to get you through the day.
I have other apple bar recipes like my tried-and-true Apple Cake that are thicker and more meal-like.
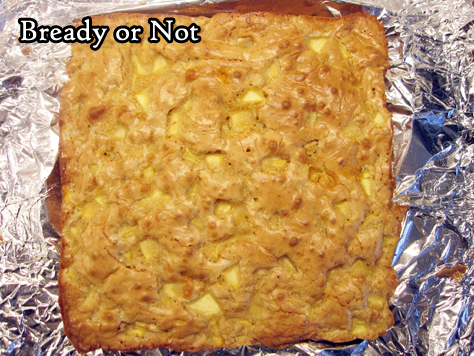
These bars are thin and light. They aren’t even heavy with apples, but the apple flavor is definitely there.
This is the kind of thing to use for a light breakfast, snack, or dessert, and they’d be great to wrap up and pack to go.
I used caramel chips for this recipe, but butterscotch or white chocolate would be great, too–or even seasonal sweet chips like pumpkin spice!
Bready or Not Original: Apple Caramel Chip Blondies
Equipment
- 9x9 pan
- medium saucepan
Ingredients
- 1 cup all-purpose flour
- 1/2 teaspoon kosher salt
- 1/4 teaspoon baking powder
- 6 Tablespoons unsalted butter
- 3/4 cup light brown sugar packed
- 1 teaspoon pure vanilla extract
- 2 large eggs room temperature
- 1 apple such as Ambrosia or Honeycrisp, peeled and chopped into raisin-sized pieces
- 1/3 cup caramel chips or substitute butterscotch chips or white chocolate chips
Instructions
- Preheat oven at 350-degrees. Line a 9x9 pan with foil and apply nonstick spray or butter.
- In a small bowl, whisk together flour, salt, and baking powder. Set aside.
- In a medium saucepan, melt the butter, and continue to monitor a few more minutes, stirring often, to brown the butter. It should have a fresh, nutty smell. Remove from heat. Stir in the brown sugar and vanilla until the sugar is less grainy. Let the pan cool for a few minutes. Beat in the eggs until smooth. Stir in the dry ingredients next, followed by the apple pieces. Fold in the chips last.
- Pour the batter into the pan and smooth out the top. Bake for about 25 minutes, until the middle passes the toothpick test.
- Cool to room temperature. Use the foil to lift the contents onto a cutting board to slice up. Store the bars in a sealed container, with waxed paper or parchment between stacked layers.
OM NOM NOM!
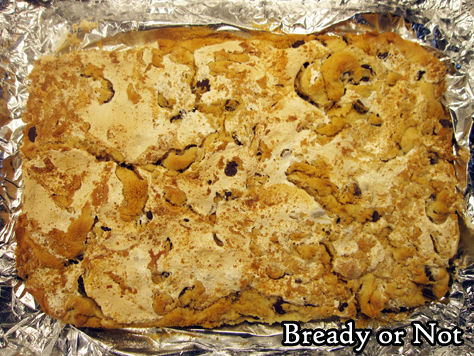
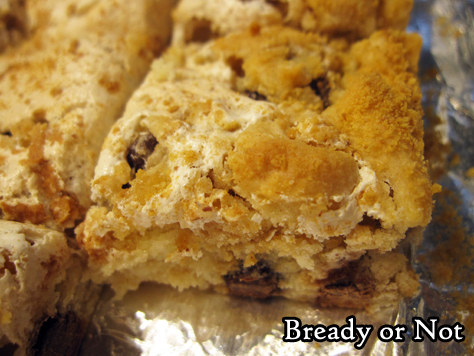
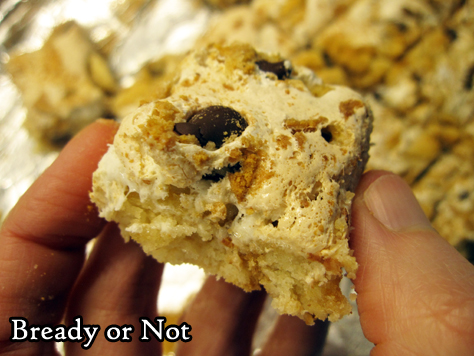
Bready or Not Original: S’mores Cake Mix Bars
Cake mix is fantastic ingredient to keep in the pantry for a quick-fix dessert. It’s easy to doctor into something extraordinary, such as with these S’mores Cake Mix Bars.
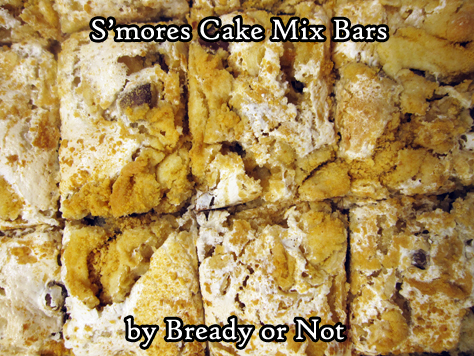
This is a treat that doesn’t taste like cake mix at the end. It’s just sweet and wonderful, courtesy of the lovely combination of ingredients.
I used ready-made graham crackers crumbs here, but really, you could probably use various kind of vanilla cookies, smashed, to mix in. Vanilla wafers or even Golden Oreos would be good substitutes.
I love bar recipes like this where ingredients are swirled together at the end. There is something visually delightful about that marbled look.
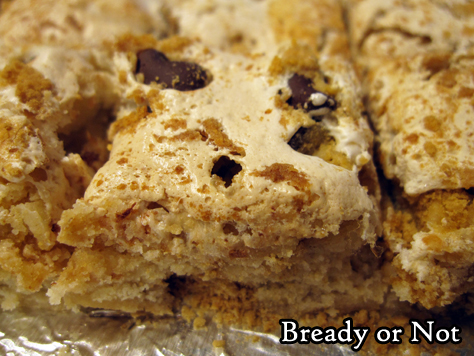
Be sure that when these bars are sliced, they are stores with waxed paper between the layers. Marshmallow makes things a bit sticky! And delicious.
Bready or Not Original: S’mores Cake Mix Bars
Equipment
- 9×13 pan
- waxed paper
Ingredients
- 1 box white cake mix or yellow cake mix or French Vanilla
- 1/2 cup unsalted butter 1 stick, melted
- 1 teaspoon vanilla extract
- 2 eggs room temperature
- 1 cup semisweet chocolate chips
- 7 ounce marshmallow fluff jar
- 1/2 cup graham cracker crumbs
Instructions
- Preheat oven at 350-degrees. Line a 9×13 casserole pan with foil and apply nonstick spray or butter.
- In a large bowl, mix together the cake mix, butter, vanilla extract, and eggs until no dry crumbs remain. Fold in the chocolate chips.
- Pour batter into the prepared pan and even out surface. Add the graham cracker crumbs in little piles scattered across the top. Use a butter knife to partially swirl the crumbs into the dough. Add dollops of marshmallow fluff across the top. Again, swirl the marshmallow into the dough, coating it with graham crackers in the process. Don’t combine everything too much–there should still be visible swirls and varied textures.
- Bake at 350-degrees for 20 to 25 minutes, until edges are golden and contents look set.
- Completely cool at room temperature or speed process in the fridge. Use foil to lift the contents onto a cutting board. Slice into bars. Store in a sealed container with waxed paper between the stacked layers.
OM NOM NOM!
Bready or Not Original: Chocolate Chip Shortbread with Cocoa Nibs
A classic shortbread gets deeper coffee flavors in this new take featuring cocoa nibs.
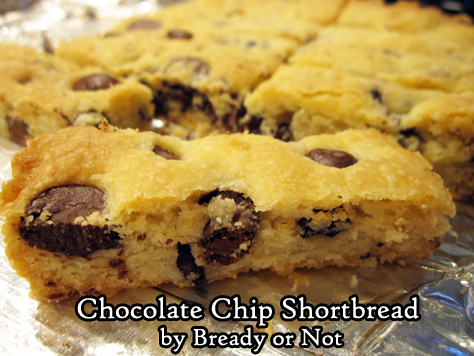
Cocoa nibs are strong stuff. You don’t need a lot to add some oomph. Here, two tablespoons is enough to do the trick.
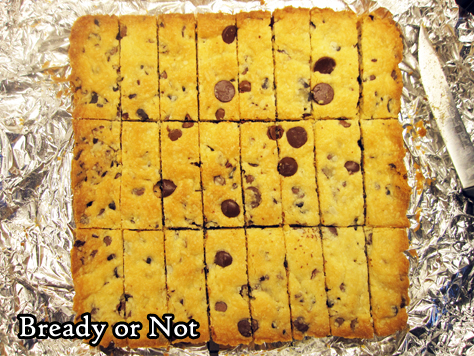
Use whatever chocolate chips you have around for this recipe. Going dark will be a closer match for the nibs. Therefore, I prefer semisweet or milk chocolate, or a combination thereof.
The resulting shortbread is firm enough to hold up when it is cut into finger-sized pieces, but it is wonderfully soft and chewy to eat.
Eat this for a snack or dessert, or do the proper UK thing and serve it with some hot tea!
Bready or Not Original: Chocolate Chip Shortbread with Cocoa Nibs
Equipment
- 9×9 pan
Ingredients
- 1 cup unsalted butter 2 sticks, room temperature
- 1 teaspoon vanilla extract
- 1/4 teaspoon salt
- 3/4 cup confectioners’ sugar
- 2 cups all-purpose flour
- 3/4 cup chocolate chips
- 2 Tablespoons cocoa nibs
Instructions
- Preheat oven at 350-degrees. Line a 9×9 pan with foil and apply nonstick spray.
- In a big bowl, beat butter, vanilla, and salt until it is smooth and creamy. Slowly beat in the confectioners’ sugar followed by the flour. Fold in the chocolate chips and cocoa nibs.
- Dump dough into the prepared pan. Lightly flour hands and pat dough flat and smooth. Score through the dough with a floured knife to make rectangular wedges, then prick surface all over with a floured fork.
- Bake for 30 to 33 minutes, until shortbread is set and the edges are browned. Let set in pan for 20 minutes, then use the foil to lift contents onto a rack to completely cool. Move them to a cutting board and slice into pieces along original score marks.
- Store in a sealed container at room temperature.
