


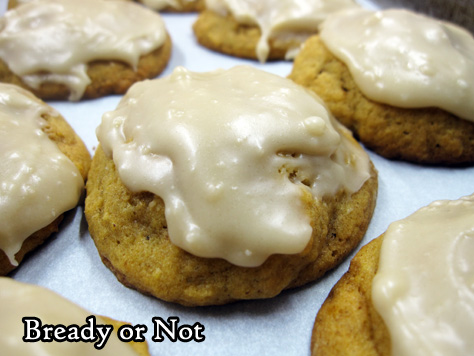
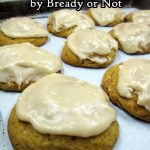
Bready or Not: Buttery Pumpkin Cookies
It’s October! That means Bready or Not resumes its traditional month of pumpkin recipes, starting with these Buttery Pumpkin Cookies.

These cookies are a dream come true for pumpkin lovers. They are soft and tender, like handheld cake, really.
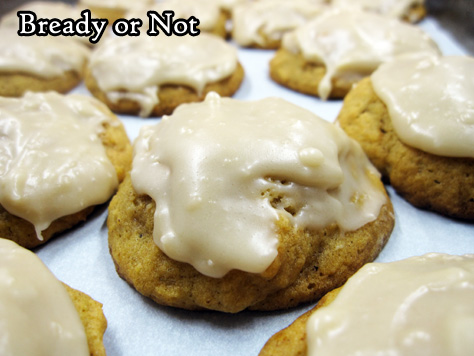
But of course, the cookies are better with a little extra sweetness. These babies need ICING–a brown sugar icing that comes together quickly on the stovetop.
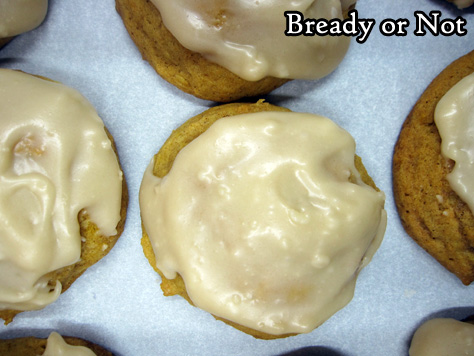
This is a recipe to make to share: the end result is about 70 tablespoon-sized cookies!
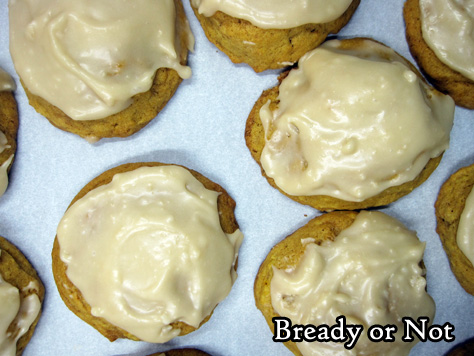
Modified from Fall Baking 2016 from Better Homes & Gardens.
There are more pumpkin recipes to look forward to this month! Here’s the full schedule:
Buttery Pumpkin Cookies (today)
Chocolate Swirl Pumpkin Bars
Pumpkin Raisin Cookies
Pumpkin Chocolate Cake
Pumpkin-Ginger Coffee Cake
Bready or Not: Buttery Pumpkin Cookies
Ingredients
Cookies
- 1 cup unsalted butter 2 sticks, room temperature
- 2 cups white sugar
- 2 teaspoons baking powder
- 2 teaspoons baking soda
- 3 teaspoons pumpkin pie spice
- 1 teaspoon salt
- 2 eggs
- 2 teaspoons vanilla extract
- 15 oz can pumpkin puree
- 4 cups all-purpose flour
Brown sugar icing
- 1/2 cup unsalted butter
- 1/2 cup brown sugar packed
- 1/4 cup milk or half & half
- 1 teaspoon vanilla extract
- 3 cups confectioners' sugar
Instructions
- Preheat oven at 350-degrees. Line a large cookie sheet with parchment paper.
- In a large bowl, beat the butter until creamy. Mix in the white sugar, baking powder, baking soda, pumpkin pie spice, and salt. Beat until fluffy, scraping bowl as needed. Add the eggs and vanilla, followed by the pumpkin. Mix in the flour until just combined.
- Use a tablespoon scoop to dole out dough onto the cookie sheet, spacing out to allow for expansion. Bake for 12 to 15 minutes, until tops are set and edges golden. Cool on wire rack.
- Once cookies are completely cool, make the icing. In a small saucepan, cook the butter and brown sugar, stirring constantly until sugar is dissolved. Stir in the milk and vanilla. Mix in the confectioners' sugar until smooth, adding more if necessary to reach a spreadable consistency. Use the back of a spoon to spread the icing onto the cookies. If the icing in the pot begins to harden, stir in a few drops of hot water to make it pliable again.
- Store cookies in a sealed container, with waxed paper or parchment between the layers.
- OM NOM NOM!
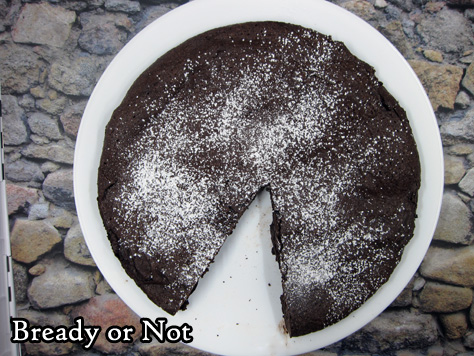
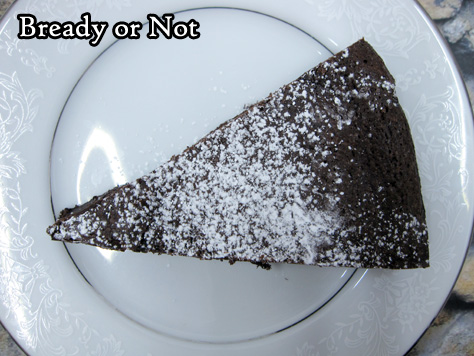
Bready or Not: Fudgy Chocolate Gluten-Free Cake
This incredible Fudgy Chocolate Cake is like a great big grown-up brownie.
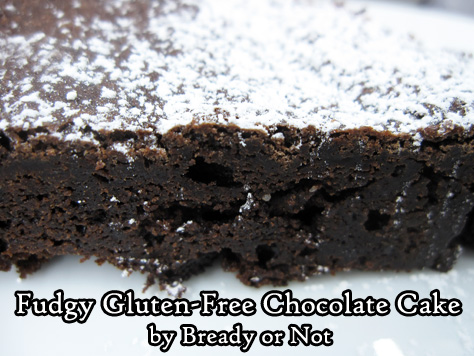
While this can’t be said to be healthy, it IS gluten free, so makes for a wonderful treat for people with that dietary restriction.
It also keeps very well. I sliced it up and kept pieces stored in the fridge for over a week. They never dried out or lost flavor.
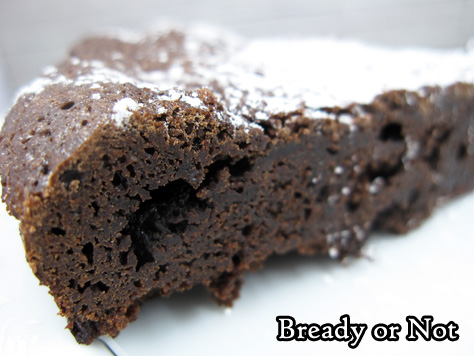
Even better, this cake can be frozen to last longer. Freeze slices on waxed paper and keep stored in a plastic container or freezer bag. Defrost in fridge when you want to indulge!

This cake is delicious by itself, but you could easily dress it up with fresh strawberries, cherries, or raspberries, and/or a scoop of vanilla ice cream–all of which are gluten-free as well, of course.
Modified from Allrecipes Magazine February/March 2015.
Bready or Not: Fudgy Chocolate Gluten-Free Cake
Ingredients
- 1/2 cup cocoa powder sifted, plus more to dust pan
- 4 ounces semisweet chocolate chips
- 1/2 cup unsalted butter
- 3/4 cup white sugar
- 3 eggs beaten
- 1 teaspoon vanilla extract
- confectioners' sugar for top, optional
Instructions
- Preheat oven at 300-degrees. Cut parchment to fit in the bottom of an 8-inch cake pan. Grease pan. Set parchment inside. Grease again. Dust paper and sides of pan with cocoa.
- In a large microwave-safe bowl, heat chocolate and butter in short bursts, stirring well between each pass, until smooth. Stir in cocoa powder followed by sugar, eggs, and vanilla. Pour into prepared pan.
- Bake about 40 minutes, until cake begins to pull away from the sides of the pan; a toothpick inserted in the center should come out just slightly wet. Cool in pan for 20 minutes, then invert onto a rack. Remove the parchment, then invert again onto a plate to cool for at least an hour before cutting. Sprinkle with confectioners' sugar, if desired.
- Keep cake covered by plastic wrap in fridge; keeps well as long as a week. Cake can be sliced and frozen for later enjoyment.
- OM NOM NOM!
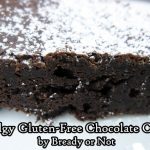
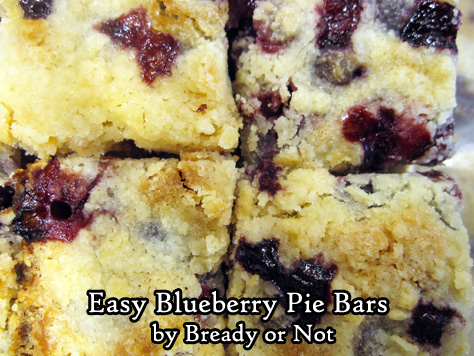
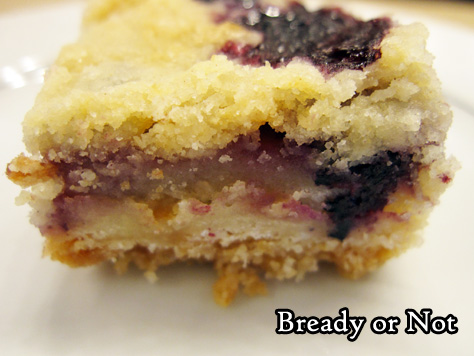
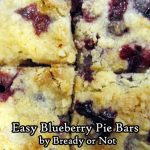
Bready or Not Original: Easy Blueberry Pie Bars
These Easy Blueberry Pie Bars taste like blueberry cobbler in a tidier, more compact form. They are DELICIOUS.
Yeah, yeah, I share a lot of good recipes on here, but these are seriously amazing.
The recipe is pretty straightforward, too. Make the shortbread crust. Press it down. Bake. Mix up the middle ingredients, folding in the blueberries last. Sprinkle reserved crust on top. Bake. Enjoy.
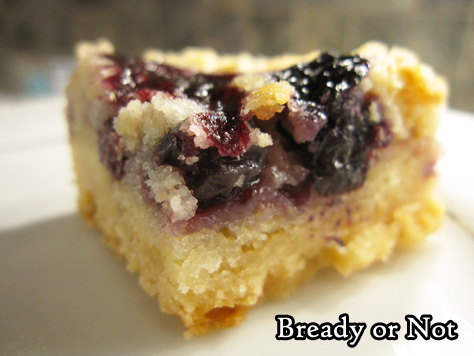
I like that this recipe only requires a pint of blueberries, too. During the summer, I can often find a little 12 ounce clamshell container on sale for under a buck!
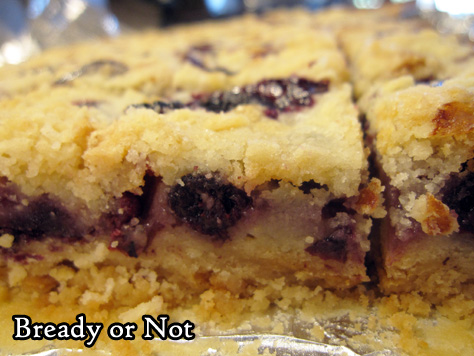
These bars keep well for as long as three days, maybe longer, in a sealed container in the fridge. They make for a great dessert, but they’d be great for breakfast, too.
Bready or Not Original: Easy Blueberry Pie Bars
Ingredients
Crust
- 2 cups all-purpose flour
- 3/4 cup white sugar
- 1/8 teaspoon salt
- 1 cup unsalted butter 2 sticks
Filling
- 2 eggs room temperature
- 1 cup white sugar
- 1/3 cup all-purpose flour
- 1/8 teaspoon salt
- 1/2 cup sour cream or plain or vanilla Greek yogurt
- 1 teaspoon vanilla extract
- 1 pint fresh blueberries 12 ounces
Instructions
- Preheat oven at 350-degrees.Line a 9x13 pan with foil and apply nonstick spray.
- Place flour, sugar, and salt in a large bowl. Add the butter, and use a knife and fork to chop it into crumbles. Measure out 1 cup of this crumb mixture; set aside.
- Place the rest of the crust mix into the baking dish. Distribute evenly, then compress into a thin layer; a piece of wax paper and a heavy glass work well for this.
- Bake for 15 minutes. In the meantime, make the filling.
- Beat eggs, then add in the sugar, flour, salt, sour cream/yogurt, and vanilla. Gently fold in the blueberries.
- Pour the filling over the prebaked crust. Spread out evenly. Sprinkle the reserved crust mixture over the top.
- Bake 55 to 60 minutes, until top is golden brown and passes the toothpick test.
- Cool at room temperature, then chill in fridge to set more firmly. Use foil to lift onto a cutting board to slice into bars. Store in sealed container in fridge with waxed paper or parchment paper between layers. Keeps for at least 3 days.
- OM NOM NOM!
It’s fruitcake-making time!
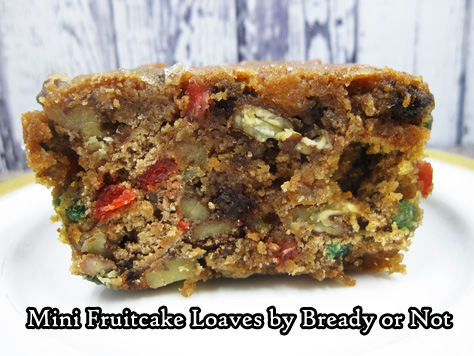
Yes, the subject line is serious, because YES, fruitcake can be delicious–especially if you make it yourself and control the whole process! Follow my Mini Fruitcake Loaves recipe and you’ll see what I mean. Bake these babies now and you’ll have plenty of time to ripen them (that means brushing them down with a simple sugar mix once a week to soak in flavor) in time for holiday festivities.
Read MoreBready or Not: Chocolate Peanut Butter Bars [cake mix]
These Chocolate Peanut Butter Bars are so good that people won’t even guess that it uses cake mix.
![Bready or Not: Chocolate Peanut Butter Bars [cake mix]](https://www.bethcato.com/blog/wp-content/uploads/2019/05/Double-Choc-PB-Bars6_sm.jpg)
I, personally, don’t see any shame in using cake mix. It’s a convenient base ingredient to doctor up.
![Bready or Not: Chocolate Peanut Butter Bars [cake mix]](https://www.bethcato.com/blog/wp-content/uploads/2019/05/Double-Choc-PB-Bars10_sm.jpg)
Chocolate and peanut butter is such a classic pairing. You can use any number of chocolate cake mixes for this (it was tested with a 15.25 ounce box), but I recommend devil’s food cake. It has a nice depth to it.
![Bready or Not: Chocolate Peanut Butter Bars [cake mix]](https://www.bethcato.com/blog/wp-content/uploads/2019/05/Double-Choc-PB-Bars8_sm.jpg)
If you’re in America, you might find a premade bag of peanut butter and chocolate chips at stores like Walmart. If you can’t find that, just use separate bags of those kinds of chips and measure out a cup of each.
![Bready or Not: Chocolate Peanut Butter Bars [cake mix]](https://www.bethcato.com/blog/wp-content/uploads/2019/05/Double-Choc-PB-Bars14_sm.jpg)
At my husband’s work, some of his co-workers considered this among their all-time favorite recipes. That is high praise indeed.
![Bready or Not: Chocolate Peanut Butter Bars [cake mix]](https://www.bethcato.com/blog/wp-content/uploads/2019/05/Double-Choc-PB-Bars4_sm.jpg)
![Bready or Not: Chocolate Peanut Butter Bars [cake mix]](https://www.bethcato.com/blog/wp-content/uploads/2019/05/Double-Choc-PB-Bars6_sm-150x150.jpg)
Bready or Not: Chocolate Peanut Butter Bars [cake mix]
Ingredients
- 1 box chocolate cake mix 15.25 oz
- 3/4 cup unsalted butter melted
- 1/2 cup milk
- 1 cup creamy peanut butter
- 1 bag peanut butter and chocolate chips or 1 cup of each kind of chips
- 1/2 cup chopped peanuts
Instructions
- Preheat oven at 350-degrees. Line a 9x13 pan with foil and apply nonstick spray.
- In a big bowl, combine the cake mix, melted butter, and milk. Spread half of batter on bottom of the pan. Bake for 15 minutes.
- Place peanut butter in a microwave safe bowl and warm to be spreadable. Pour over the baked bottom crust and spread to edges. Sprinkle the peanut butter and chocolate chips on top, followed by dollops of the reserved cake batter. Finish with the chopped peanuts.
- Bake for another 20 minutes, until the visible portions of the peanut butter layer look set. Cool completely, refrigerating if desired.
- Use foil to lift onto cutting board to slice into bars. Store in a sealed container at room temperature.
- OM NOM NOM!
Bready or Not: Coconut Cream Cheese Pound Cake
This stunning Coconut Cream Cheese Pound Cake is gorgeous and delicious, and will win over even people like me that are not big coconut fans.
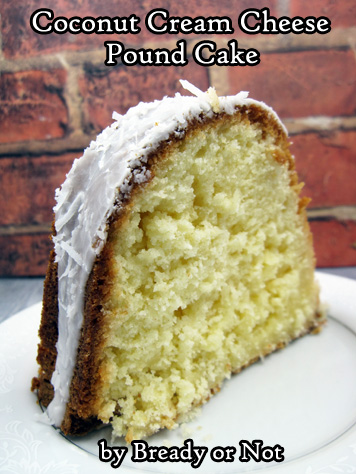
This cake works for me because the cream cheese creates a rich, tender crumb, and the coconut adds a lovely chewiness to it all.

The cake ends up being chewy, but not too chewy; sweet, but not cloyingly. Really, that makes this great as a breakfast, brunch, or dessert cake.
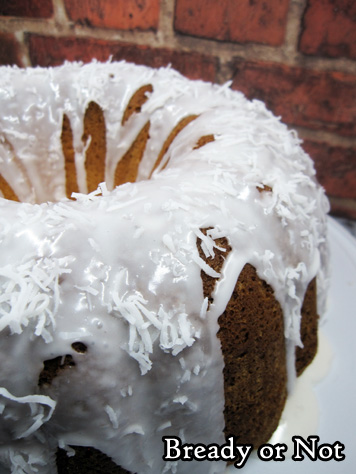
I highly recommend reserving some coconut to sprinkle on top, too. It adds a certain oomph.
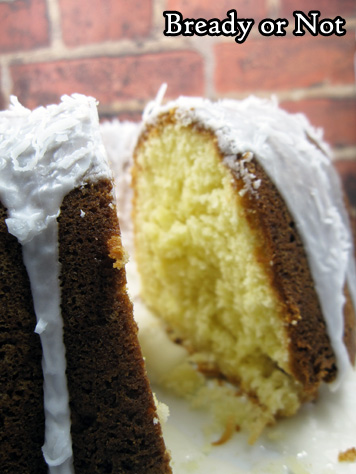
Serve this as cake alone, or like with any pound cake, it would be lovely alongside fresh fruit.

Modified from Cookies and Cups.
Bready or Not: Coconut Cream Cheese Pound Cake
Ingredients
Cake
- 1 cup unsalted butter 2 sticks, room temperature
- 8 ounces cream cheese 1 box, room temperature
- 3 cups white sugar
- 6 large eggs room temperature
- 2 teaspoons vanilla extract
- 1 teaspoon kosher salt
- 1 teaspoon baking powder
- 3 cups all-purpose flour
- 2 cups shredded coconut
Glaze
- 2 cups confectioners' sugar
- 2-3 Tablespoons milk
- extra shredded coconut
Instructions
- Preheat oven at 325-degrees. Coat a 10-cup bundt pan with nonstick spray or butter.
- In a large bowl, beat butter and cream cheese together until smooth. Add sugar and mix until light and fluffy.
- Add eggs one at a time, followed by the vanilla extract, salt, and baking powder. Gradually mix in the flour until just combined, then fold in the coconut.
- Pour batter into pan and distribute evenly. Bake for 75 to 80 minutes, until it passes the toothpick test.
- Cool pan for 20 minutes, then invert the cake onto a wire rack to completely cool. Move to a plate or cake platter.
- To make the glaze, stir together the confectioners' sugar and milk to form a smooth yet thick consistency. Pour or spoon glaze over the top, then sprinkle with additional coconut.
