


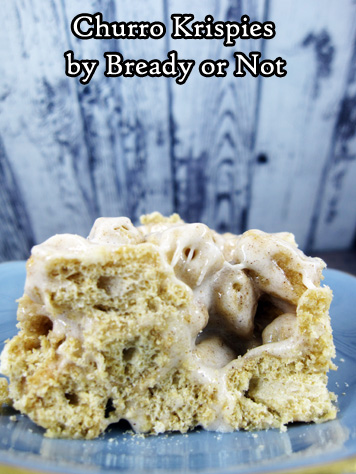
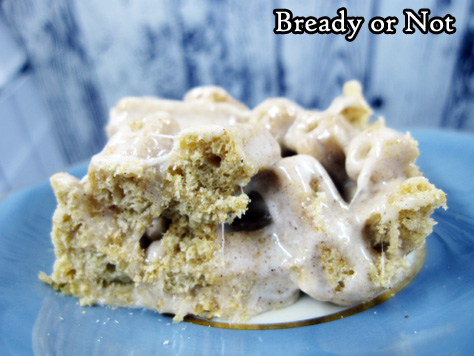
Bready or Not Original: Churro Krispies
Use the new Churros Cereal to make a fast no-bake treat in the mode of Rice Krispies!
As the Once-and-Future High Priestess of Churromancy in the Holy Taco Church, I cannot observe a product like Churros Cereal and simply walk by. No, I must experiment with it in the kitchen.
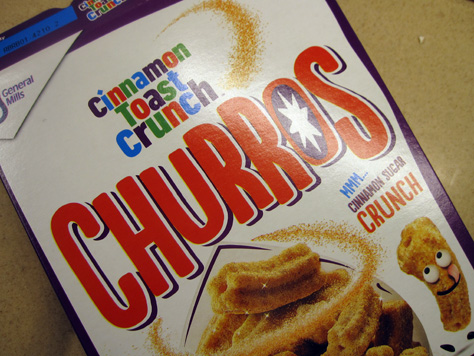
I resolved to adapt this cereal in the mode of Rice Krispies. The first thing I discovered: the box contains more cereal than needed for this process. Measure out 1.5 cups of the cereal to use in some other way, like for cereal (I know, a shock) or eat it straight, because the large pieces actually work well for that.
The bulk of the box’s contents, though, get coated in a mix of butter and marshmallows to create an ooey, gooey, delicious treat.
Yeah, there’s absolutely nothing healthy about this, but it sure tastes good.
Bready or Not Original: Churro Krispies
Ingredients
- 6 cups Churros Cereal
- 4 Tablespoons unsalted butter
- 10 ounces jumbo or mini marshmallows 1 bag
Instructions
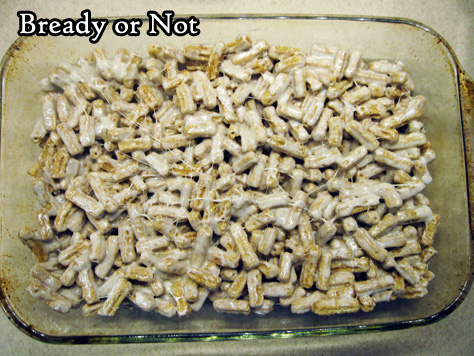
- Prepare a 13x9 pan with nonstick spray. There are about 7 1/2 cups of Churros Cereal in the box, so measure out 1 1/2 cups to set aside for some other use.
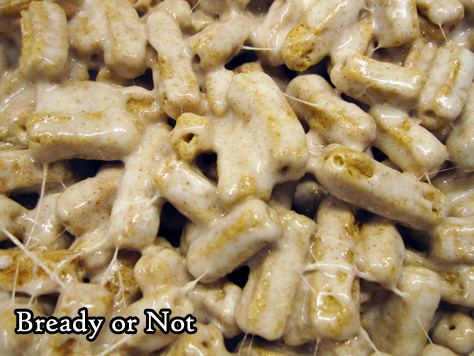
- In very large microwave-safe bowl, watch closely as the butter and marshmallows are heated on HIGH for 1 minute. Stir well. Heat for another 30 seconds and stir again; heat more if necessary. But once it stirs to be smooth, proceed immediately to the next step.
- Add the 6 cups of Churros cereal to the bowl and completely coat.
- Promptly pour the sticky mess into the prepared pan and use waxed paper or a greased spatula to press it down. Cool completely before cutting. Serve out of dish or pack into a sealed container with waxed paper between stacked layers. Best eaten the same day.
- OM NOM NOM!
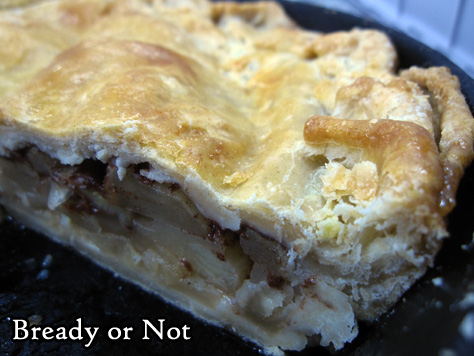
Bready or Not Original: Iron-Skillet Apple Pie with Ginger Liqueur
A trusty cast iron skillet bakes up a beautiful apple pie in this delicious recipe.
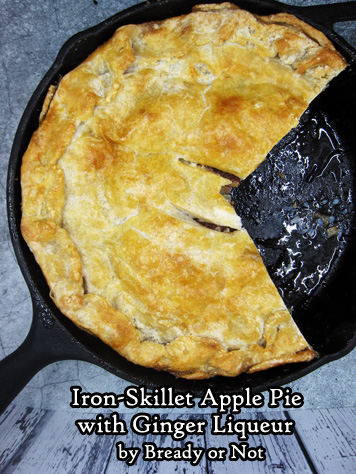
This pie is also special because it includes a drizzle of ginger liqueur. I posted a recipe a few weeks ago on how to make a cheap, sublime version at home in under a week.
The ginger liqueur does add some lovely nuance to this pie, too–the complexity and freshness come across in a different way than, say, using some lemon juice on the sliced apples as I sometimes do to prevent them from browning.
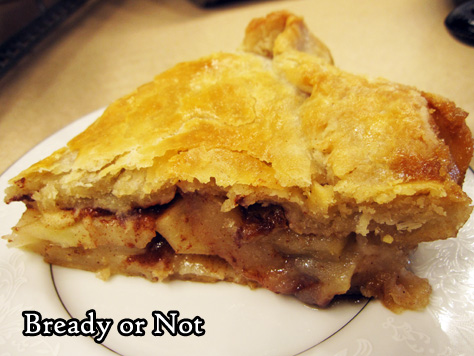
The whole process of this recipe is pretty neat, too. The biggest dose of sweetness is actually at the bottom of the pie, as butter and brown sugar are baked into the bottom crust!

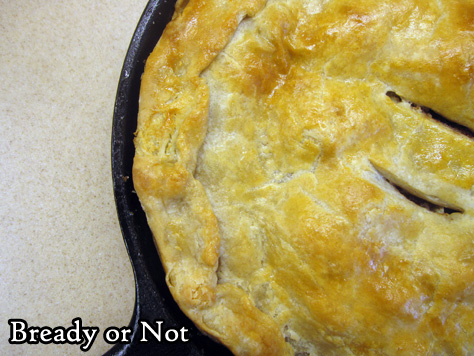
I had to make this recipe three times to finally figure out the right balance of ingredients and how best to bake it. The second try was the most disastrous, as I ended up with the dreaded soggy bottom.

Do be sure to follow the advice to use a rimmed cookie sheet in the oven. It’ll catch the overflow from the skillet and save you from suffering a soggy bottom.
Click here for my Homemade Ginger Liqueur Recipe
Bready or Not Original: Iron-Skillet Apple Pie with Ginger Liqueur
Ingredients
Skillet base:
- 1/4 cup unsalted butter half cube
- 1/2 cup brown sugar packed
Pie:
- 2 prepared rounds of piecrust dough bought or made
- 1/4 cup white sugar
- 2 teaspoons cinnamon
- 2 teaspoons flour
- 5 Granny Smith and/or Honeycrisp apples peeled, cored, and sliced
- 1/4 cup ginger liqueur
For top:
- 1 egg slightly beaten with 1 teaspoon water, for egg wash
Instructions
- Preheat oven at 350-degrees with a large rimmed cookie sheet in the oven. [THIS IS IMPORTANT. The skillet will likely overflow as it bakes and the hot cookie sheet will also reduce the likelihood of a soggy pie bottom.] Add butter to skillet and place in oven until butter is melted. Remove skillet; stir in brown sugar, then return to oven until sugar starts bubbling, about 10 to 15 more minutes.
- In the meantime, in a small bowl combine the white sugar, cinnamon, and flour. Set aside.
- Roll out one of the pie crusts, if not already done. Carefully lay crust inside hot skillet so that bottom and sides are covered. Pour apple slices inside. Drizzle liqueur over the apples, followed by the dry ingredients.
- Roll out second pie crust. Lay atop the mounded pie. Wary of the hot pan, tuck the crusts together as much as possible. Cut several slits in the top of the pie.
- Brush egg wash over the top crust. Set pie on top of hot cookie sheet in oven.
- Bake until pie is golden brown and apples are tender when jabbed with a fork, about 45 to 50 minutes.
- Let cool at least 30 minutes before cutting. Store covered with foil, at room temperature or in fridge.
- OM NOM NOM!
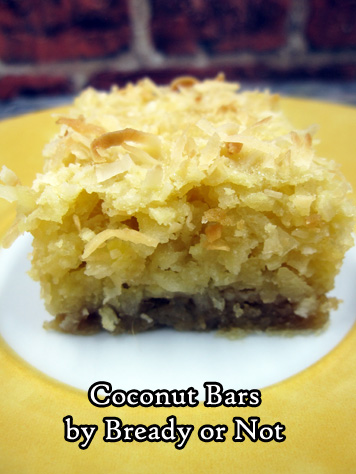
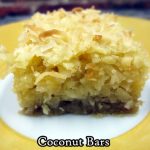
Bready or Not: Coconut Bars
These Coconut Bars are easy to make and absolutely delicious!
I say that, and I don’t typically like coconut. As a kid, I hated all candy bars with coconut. To me, the texture was the problem. It was chewy and dry in a horrible way.
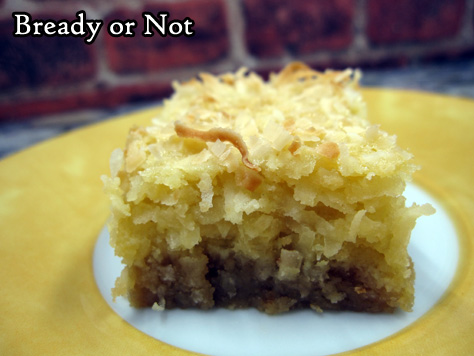
In contrast, these bars are chewy in a fantastic way. The shortbread base pairs well with the coconut top.
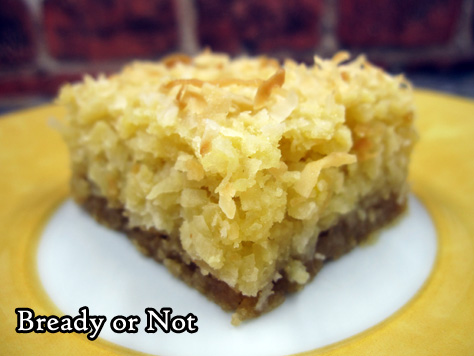
They even look pretty, don’t they? That’s because the recipe holds back a quarter of the coconut to go on top. That way it ends up crisping up in a lovely way.

I modified this recipe from Taste of Home Magazine, December 2015, where the original notes describe it as an American take on the Filipino coconut cake called bibingka. I don’t think I’ve ever tried that–if I have, it was like 20 years ago–so I can’t vouch as to how close it is.
But what I can say is that this is a fantastic recipe by its own merits. This is the kind of recipe that would be bright and pleasant at the holidays, and also perfect for a summer cook-out.
Bready or Not: Coconut Bars
Ingredients
Crust:
- 2 cups all-purpose flour
- 1 cup brown sugar packed
- 1/2 teaspoon salt
- 1 cup unsalted butter melted
Filling:
- 3 large eggs
- 14 oz sweetened condensed milk can
- 1/2 cup all-purpose flour
- 1/4 cup brown sugar packed
- 1/4 cup unsalted butter melted
- 3 teaspoons vanilla extract
- 1/2 teaspoon salt
- 4 cups flaked coconut divided
Instructions
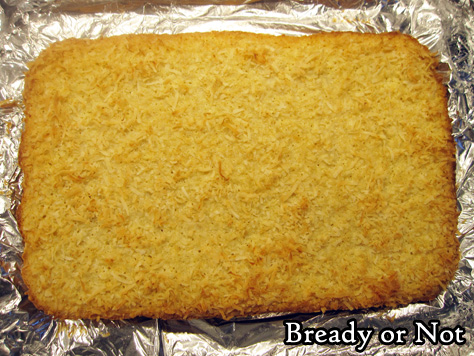
- Preheat oven at 350-degrees. Line a 13x9 pan with foil and apply nonstick spray.
- In a big bowl, mix together the flour, brown sugar, and salt, followed by the melted butter. Sprinkle into the prepared pan and compress it to form an uneven layer. Bake for 12 to 15 minutes, until light brown. Cool on a wire rack for at least 10 minutes.
- Reduce oven temperature to 325-degrees.
- In a big bowl, whisk together the eggs, sweetened condensed milk, flour, brown sugar, butter, vanilla extract, and salt. Stir in 3 cups of coconut. Pour atop the crust. Sprinkle the remaining 1 cup coconut over the top.
- Bake for 25 to 30 minutes, until the coconut is turning golden brown.
- Cool completely at room temperature. Lift onto cutting board using foil; slice contents into bars.
- OM NOM NOM!
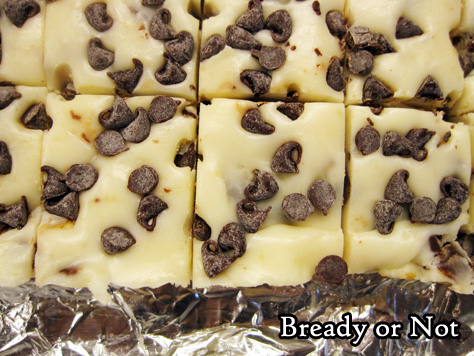
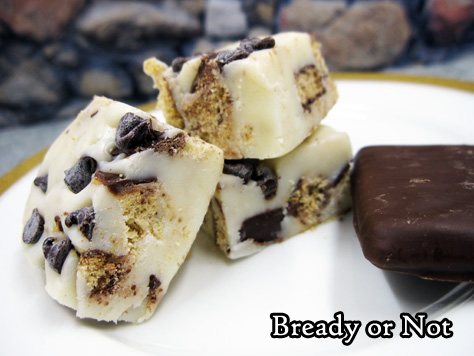
Bready or Not Original: Cookies and Milk Quick Fudge
Old-fashioned stovetop fudge is great. It’s also fussy, sometimes refusing to set or turning out gritty, and makes the cook babysit a hot pot to stir and stir. I’m all about quick fudges, especially during the Arizona summer. This Cookies and Milk Quick Fudge is especially nice because it has endless variations!
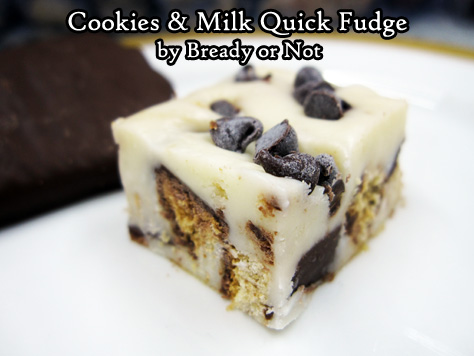
Choose a crisp, crunchy cookie from the store. Maybe on a good sale. In my case, I used Keebler’s Deluxe Grahams. A lot of Keebler’s cookies would work here–just don’t use the soft-baked ones.
Prep the cookies by chopping up a cup and a half. Freeze those bits; it won’t take long. From there, it takes just a few minutes to mix up the fudge.
The hardest part is waiting for the fudge to set for the next few hours.
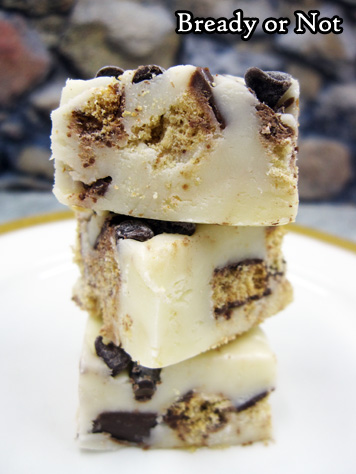
This recipe makes a lot of fudge, but it’s easy to portion out. Slice it small, and keep it sealed and stored in the fridge!
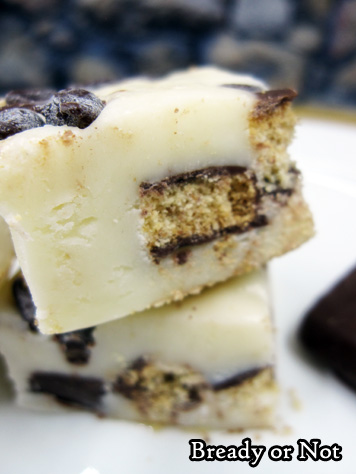
Make this recipe time and again with different cookies. It could even be customized for the holidays or sporting events with the addition of differently colored sprinkles on top. Have fun with it!
Bready or Not Original: Cookies and Milk Quick Fudge
Ingredients
- 1 1/2 cups chopped store-bought cookies frozen
- 3 cups white chocolate chips
- 14 ounce sweetened condensed milk can
- 3 Tablespoons mini chocolate chips
Instructions
- Line an 8x8 or 9x9 pan with foil and apply nonstick spray. Set aside.
- In a large microwave-safe bowl, heat the white chocolate and sweetened condensed milk in 30 second increments, stirring well after each bout, until it is melted and smoothed. Watch it closely!
- Quickly stir in the frozen cookies and pour into the prepared pan. Sprinkle chocolate chips on top and tap them into place. Refrigerate at least 2 hours. Use foil to lift fudge onto a cutting board to slice into small squares. Store in a sealed container in the fridge.
- OM NOM NOM!
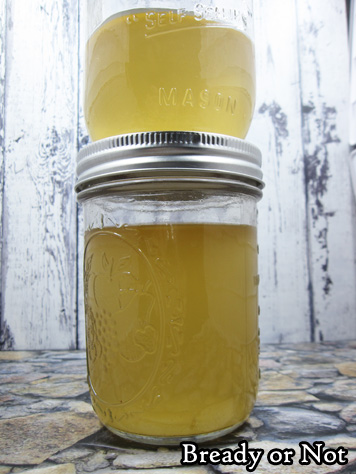
Bready or Not Original: Homemade Ginger Liqueur
Make ginger liqueur at home in a matter of days, and save a lot of money over buying the store stuff!

I’m frugal. I wanted to try an apple pie recipe that called for ginger liqueur, so I priced it. Um, no way was I paying for a $40 bottle when I needed just a smidge.
Therefore, I utilized the powers of the internet to find a way to make my own ginger liqueur. I ended up combining a couple recipes, and to great result. I used Kirkland brand vodka, from Costco, which made this even more of a bargain.
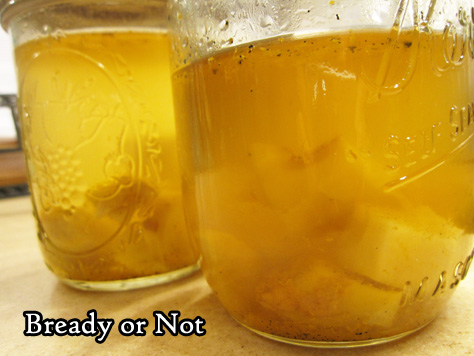
The result of the infusion is sublime. Citrus hits the palate first, followed by the ginger, leaving the mouth tasting fruity, zesty, and refreshed.
Use this ginger liqueur in baking (that apple pie recipe will be up in a few weeks!), drink it straight, or mix it into cocktails. It’ll be delicious no matter how you drink it, and–thanks to the vodka–it will keep indefinitely.

Bready or Not Original: Homemade Ginger Liqueur
Ingredients
- 4 ounces ginger root peeled and diced
- 1/2 cup caster sugar
- 1 vanilla bean halved
- 16 fluid ounces vodka
- orange zested
Instructions
- Combine all ingredients in a large jar or bottle with a good lid. Shake to mix. Let steep for 2 days, shaking the jar a few times a day.
- Strain out the solids using a coffee filter or cheesecloth. Rebottle it and let it sit a day or two more to mellow before using it.
- Store sealed. Drink straight, use in mixed drinks, or in recipes. Should keep indefinitely.
- OM NOM NOM!
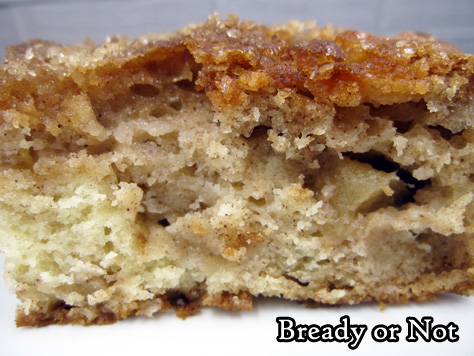
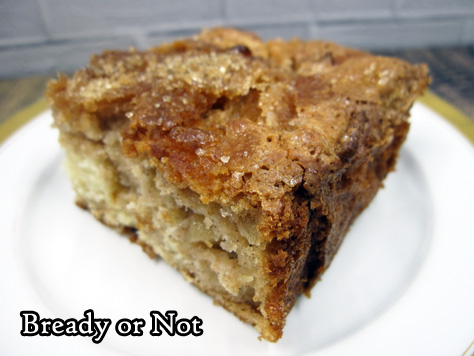
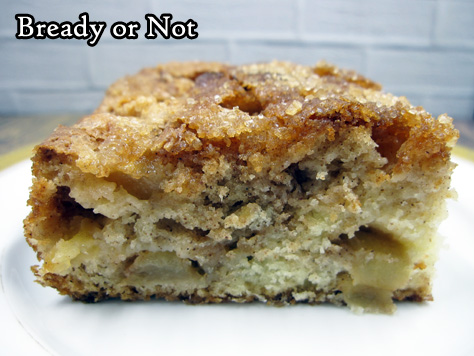
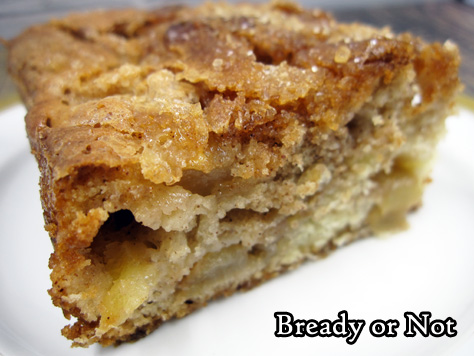
Bready or Not Original: Easy Apple Cinnamon Cake
Easy Apple Cake! This delicious cake is great to bake up, slice, and store in the fridge or freezer to enjoy for weeks to come.
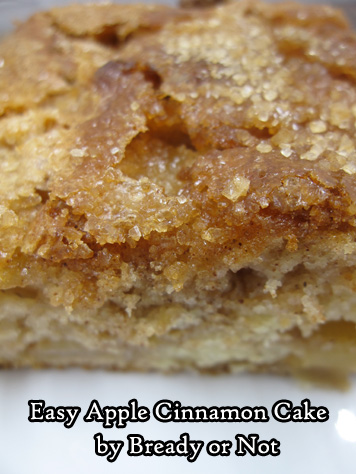
If this recipe looks familiar, it’s because this is a rewrite of a recipe I posted back in 2016. The original version asked the baker to arrange the apple pieces in the middle and again on top.
After making this cake many, many times, I realized that was an unnecessarily fussy step. Ain’t nobody got time for that!
I started folding all of the apple chunks into the batter, and this saved a lot of time. The apples were perfectly distributed and the taste was the exact same.
This cake remains a very favorite for both my husband and my dad. They’ll eat it for breakfast, snack, or dessert.
When I travel back home to California, I always make this cake for my dad. Since my mom doesn’t stock baking ingredients, I measure up my own (one sandwich baggy with brown sugar and cinnamon; another with flour, baking soda, and salt; one more with white sugar) and whip him up a cake in no time!
Bready or Not Original: Easy Apple Cinnamon Cake
Ingredients
- 3 medium apples peeled, cored, & chopped into small chunks
- 1 teaspoon cinnamon heaping
- 1/4 cup brown sugar packed
- 1 1/4 cup all-purpose flour
- 1 teaspoon baking powder
- 1/8 teaspoon salt
- 1 cup white sugar
- 1/3 cup vegetable oil
- 1/3 cup sour cream or Greek yogurt
- 1 teaspoon vanilla extract
- 2 eggs room temperature
- turbinado or maple sugar for topping optional
Instructions
- Preheat oven to 350-degrees. Line a 9×9 square pan with foil and apply butter or nonstick spray.
- In a medium bowl, toss peeled and chopped apples with cinnamon and brown sugar.
- In a separate bowl, combine the flour, baking powder, and salt.
- In a larger mixing bowl, whisk together the white sugar, vegetable oil, sour cream/yogurt, and vanilla extract until it's smooth. Add the eggs.
- Add the dry ingredients into the wet ingredients until everything is just mixed. Fold in the apple chunks.
- Pour batter into the prepared pan. Sprinkle turbinado or maple sugar over top, if desired.
- Bake 1 hour, until it passes the toothpick test in middle. Cool completely, chilling in fridge if desired. Use foil to list contents onto a cutting board. Cut into pieces.
- These are great individually plastic wrapped and stored at room temperature or in the fridge; bars can be frozen and keep well for months. Eat from the fridge, or at room temperature, or warm in the microwave or oven. However you eat it, it'll be delicious!
- OM NOM NOM!
