


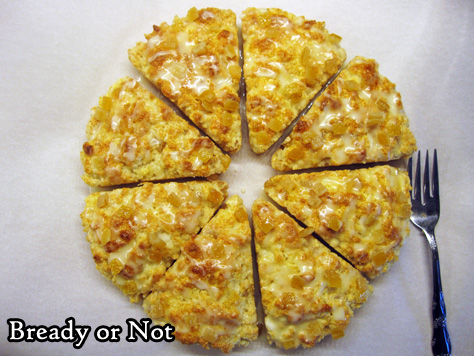
Bready or Not Original: Citrus Scones
These citrus scones offer a bright way to start the day in portable and delicious form!

I managed to score a container of candied citrus peel–the stuff usually used in fruitcakes–on an after-Christmas clearance. “Oh, what to do with us?” I wondered.
Finally, it hit me: scones! An original scone recipe that my husband could enjoy before work.

Of course, I had to add a glaze. Orange juice and confectioners’ sugar made that easy.

Plus, I found that the scones freeze like a charm, even while glazed! They thaw quickly at room temperature, too.
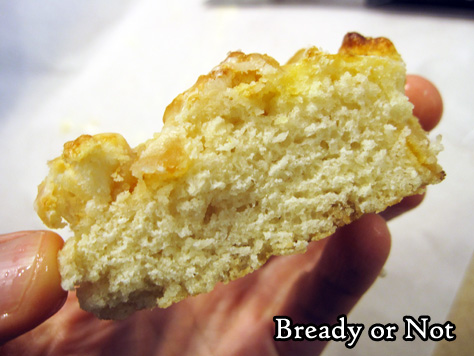
Unlike other scone recipes I’ve made, this one produces soft, fluffy results. Not dry or crumbly at all. I credit the sour cream for that. It sure works wonders in cakes and bars, too.

Bready or Not Original: Citrus Scones
Ingredients
Scones:
- 1 3/4 cups all-purpose flour
- 1/4 cup white sugar
- 4 teaspoons baking powder
- 1/8 teaspoon salt
- 5 Tablespoons unsalted butter
- 1/2 cup plus 1 Tablespoon milk or half & half
- 1/4 cup sour cream
- 1/3 cup candied orange peel
- 1 egg lightly beaten
Glaze:
- 1/2 cup confectioners' sugar
- 3 teaspoons orange juice [or water]
- sprinkle of additional orange peel optional
Instructions
- Preheat oven at 400-degrees.
- In a large bowl, whisk together flour, sugar, baking powder, and salt. Cut in the butter until it resembles coarse crumbs.
- In a different bowl, stir together 1/2 cup milk and sour cream. Stir into dry ingredients until it just holds together, adding more milk if needed. Fold in the candied citrus peel.
- If using a scone pan, pack the dough into the triangular holes. If shaping by hand, transfer the cohesive dough to a large piece of parchment paper on a large cookie sheet. Shape into a large, even circle. Slice into eight wedges and separate them slightly.
- Whisk egg and remaining tablespoon of milk and brush them atop each scone.
- Bake until scones are golden brown, 15 to 17 minutes. Leave on pan to cool for 20 minutes.
- To glaze, mix together confectioners' sugar and orange juice to create a thick, dribbly consistency. Spoon atop scones. Immediately sprinkle on more candied orange peel and gently press into tops of scones.
- Scones are best eaten within the day, but they can be frozen even while glazed. Freeze on waxed paper then transfer to a freezer bag or plastic container. They thaw quickly at room temperature.
- OM NOM NOM!
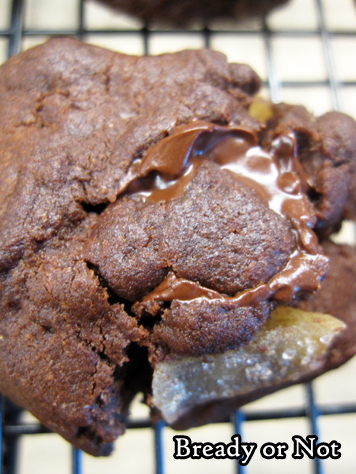
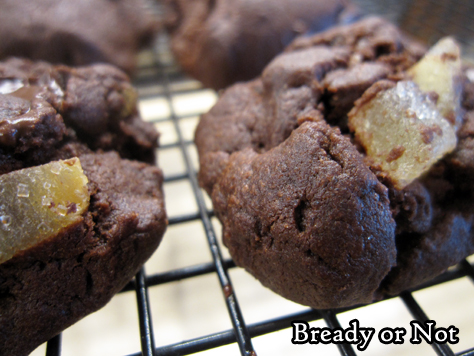
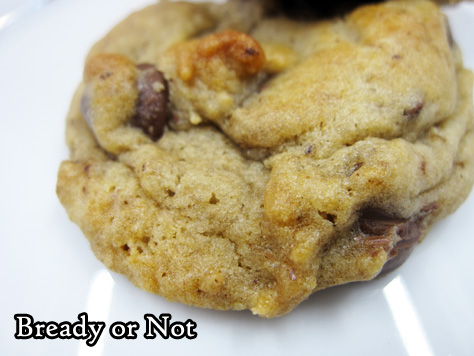
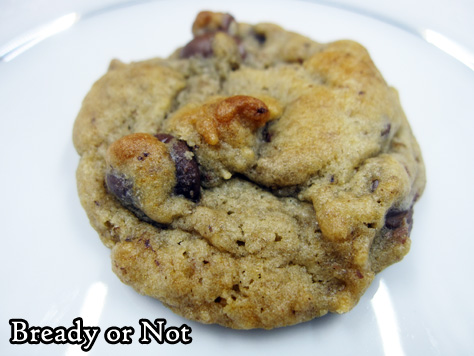
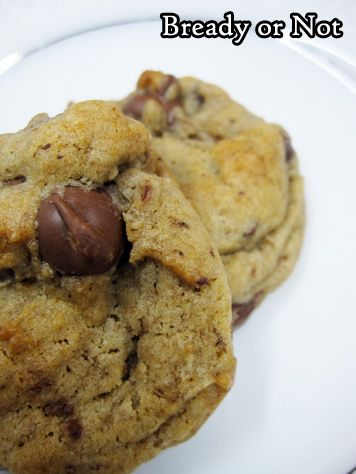
Bready or Not: Double Chocolate-Candied Ginger Cookies
Let’s go hardcore chocolaty with these Double Chocolate-Candied Ginger Cookies.

Candied ginger with bittersweet chocolate, you say? Why, yes! The combination is extraordinary. These are grown-up cookies, with heady chocolate and ginger mingling in a great way.
I was surprised at how much the cookies dough hardened during its chill time. I still recommend chilling the dough, though, because aging the flour mix does age the dough and deepen flavors.

Just soften the dough at room temperature for a bit, if needed. My cookies didn’t spread much, either. They ended up as fat. luscious little chocolate bombs!
These are cookies to bludgeon off the lingering foulness of a bad day. Indulge!
Modified from Saveur Magazine.

Bready or Not: Double Chocolate-Candied Ginger Cookies
Ingredients
- 1 1/2 cups all-purpose flour
- 1/2 cup plus 1 Tb unsweetened cocoa powder sifted
- 1 teaspoon baking powder
- 1/2 teaspoon baking soda
- 5 Tablespoons unsalted butter softened
- 1/3 cup coconut oil
- 1/3 cup white sugar
- 1/4 cup light brown sugar packed
- 3/4 teaspoon kosher salt
- 1 large egg
- 1/2 cup bittersweet chocolate heaping, coarsely chopped or in chips
- 1/2 cup candied ginger chopped
Instructions
- In a medium bowl, combine the flour, cocoa powder, baking powder, and baking soda. Set aside.
- In a big bowl, beat together the butter, coconut oil, both sugars, and salt, until pale and fluffy. Add the egg, scraping the bowl as needed. Stir in the flour mixture. Fold in the bittersweet chocolate and candied ginger.
- Wrap cookie dough in plastic wrap and chill for a few hours.
- Preheat oven at 375-degrees. Pull out cookie dough; if it fairly hard, let sit out a few minutes to soften some. Use a spoon to shape and form small dough balls. Space out on a parchment-lined baking sheet.
- Bake 9 to 11 minutes. Let sit on cookie sheet for 10 minutes, then transfer to a rack to finish cooling. Store in a sealed container at room temperature.
- OM NOM NOM!
Bready or Not: Moose Farts
Tomorrow might be America’s Independence Day, but let’s go rebellious and Canadian with a tasty no-bake treat called Moose Farts.
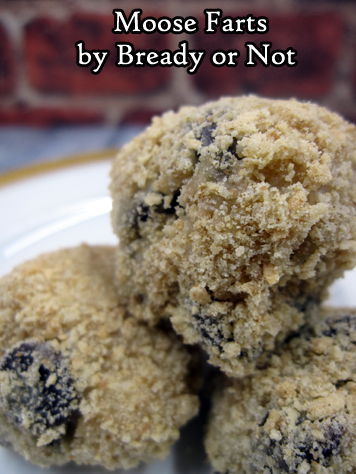
That’s right, MOOSE FARTS. With a name like that, you know it has to be good.
These are apparently a Newfoundland treat. They bear some similarities to “magic cookie bars,” but these are in a distinct ball shape.
I think they’re perfect for a hot Arizona summer. No need to turn on the oven or use tons of fussy ingredients! Moose Farts are something kids and adults can enjoy. The moose… not so much.
Modified from Rock Recipes.
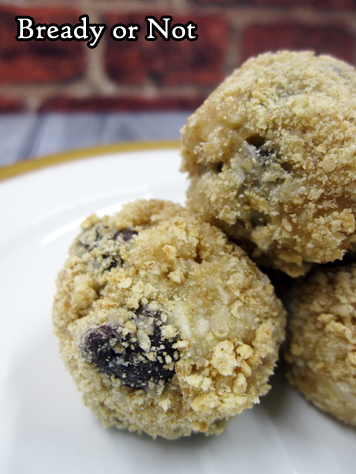
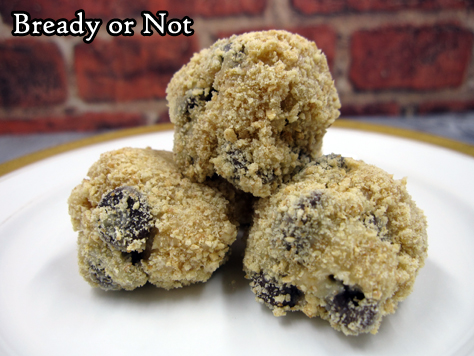
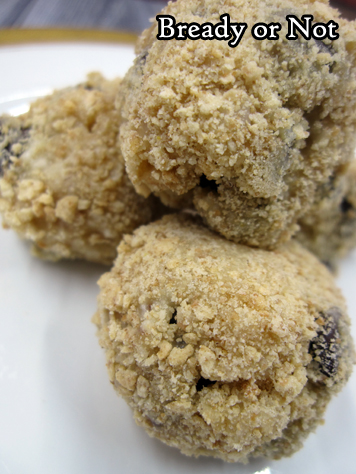
Bready or Not: Moose Farts
Ingredients
- 1/4 cup unsalted butter melted
- 14 oz sweetened condensed milk can
- 1 teaspoon vanilla extract
- 1 1/2 cups dried coconut shreds or flakes
- 1 1/2 cups graham cracker crumbs
- 1 1/2 cups chocolate chips milk or semi-sweet
- extra graham cracker crumbs to roll balls
Instructions
- In a large microwave-safe bowl, melt the butter. Stir in the sweetened condensed milk and vanilla extract, then follow up with the coconut flakes, graham cracker crumbs, and chocolate chips. Once they are combined, stash the bowl in the fridge to chill for at least 30 minutes.
- Use a teaspoon or teaspoon scoop to form a small ball. Roll in extra graham cracker crumbs. Place in a container. Repeat with more balls, with waxed paper placed between the layers. Recipe makes about 51 ball using a scoop.
- Store balls in sealed container in the fridge.
- OM NOM NOM!
Read More
Bready or Not Original: Chewy Honey Chocolate Chip Cookies
Bready or Not is back with an original recipe for Chewy Honey Chocolate Chip Cookies!

This recipe arose from my need to create a good, basic chocolate chip cookie that could last for weeks to be shipped cross-country. I looked to my staple Chewy Honey cookies for inspiration, and started tweaking.
On my first try, the cookies were good but a tad bland. Therefore, I upped the vanilla extract and also added espresso powder. Espresso powder is a secret weapon for anyone who bakes with chocolate, as it deepens the inherent flavor without making it taste like coffee.
This second version worked in every way. Not only did it taste delicious, but it was perfect to pack and ship, too.
Mind you, I wouldn’t do that right now because I live near Phoenix. In June, this isn’t a chocolate-friendly place outside of air conditioning!

Try my other original Chewy Honey cookie recipes! If you’ve met me at a con, I’ve likely offered you the Maple or Snickerdoodle Cookies.
Chewy Honey Maple Cookies
Chewy Honey Snickerdoodles
Chewy Honey Lemon Cookies

Bready or Not Original: Chewy Honey Chocolate Chip Cookies
Ingredients
- 3/4 cup unsalted butter softened
- 1/2 cup light brown sugar packed
- 1/2 cup white sugar
- 2 Tb honey
- 1 large egg room temperature
- 1 Tablespoon vanilla extract
- 1 cup bread flour
- 1 cup all-purpose flour
- 2 teaspoons cornstarch
- 1 teaspoon baking soda
- 1 teaspoon espresso powder
- 1/2 teaspoon salt
- 1 cup chocolate chips add a variety!
Instructions
- In a large bowl, beat the butter until smooth. Add the sugar and honey and beat until creamy and fluffy, about 3 minutes. Scrape down the sides of the bowl and then mix in the egg and vanilla extract.
- In a separate bowl, combine the dry ingredients: bread flour, all-purpose flour, cornstarch, baking soda, espresso powder, and salt. Sift together.
- Slowly stir together the wet ingredients and flour mix until just combined. Sprinkle in the chocolate chips. Wrap the dough in plastic wrap and stash in the fridge for several hours or days; dough can also be frozen at this stage.
- When ready to bake, preheat the oven at 350-degrees. Use greased stoneware, parchment paper, or silpat mats. The cookie dough, even straight from the fridge, has a soft Play-Doh-like consistency, and will spread when it bakes; keep this in mind when spacing cookie dough.
- Teaspoon-sized cookies need to bake 9 to 12 minutes; Tablespoon-sized take 11 to 13 minutes. Let set on cookie sheets for 10 to 15 minutes before moving to a rack to cool completely.
- Stored cookies will keep in a sealed container, between waxed paper or parchment layers, for weeks. They are excellent for travel or shipping.
- OM NOM NOM!
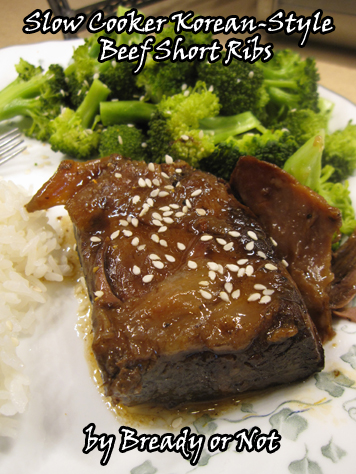
Bready or Not Classic: Slow Cooker Korean-Style Short Ribs
If all has gone according to plan, I’ve fled to a far-distant isle to enjoy Wensleydale cheese and scones. I didn’t want to schedule new recipes while I travel as I won’t be able to promote them to the fullest. Therefore, I’m revisiting a classic recipe this week. Enjoy!
I’m presenting to you the recipe for one of the best dishes I’ve ever made in a crock pot: Korean-Style Short Ribs.
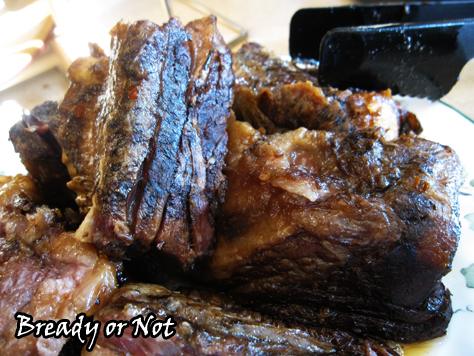
I have made this many times over now. I’ve even tried it using cheaper cuts like chuck roast and rump roast. Those worked out okay (though the meat really dries out before its soak in the juice at the end), but they are nowhere as delicious as the short rib version.
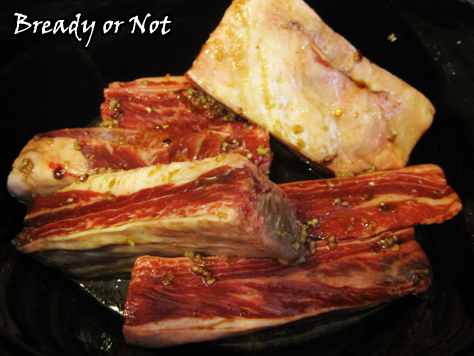
It turns out amazing whether you use boneless or bone-in ribs–a mix is a great way to go, too! Don’t trim the fat. You want all that flavor. The end result is a sauce that tastes like you added red wine, but you didn’t. It’s like MAGIC.
Seriously, these ribs taste like something from a great Asian restaurant. Pair it with some broccoli and a good spoonful of the sauce, and YUM.

Whenever I see beef short ribs go on sale, I do a little dance of joy because it means I get to make this recipe again.
Bready or Not Classic: Slow Cooker Korean-Style Beef Short Ribs
Ingredients
- 1/2 cup low-sodium soy sauce
- 1/3 cup light brown sugar packed
- 2 Tb sesame oil
- 2 Tb rice vinegar
- 1/2 teaspoon powdered ginger
- 4 cloves garlic minced
- 1/2 tsp red pepper flakes
- 5 lbs beef short ribs bone-in adds more flavor, but boneless works
- 1-2 Tb cornstarch
- sesame seeds optional
Instructions
- In a small bowl, mix together soy sauce, brown sugar, oil, vinegar, ginger, garlic and red pepper. Place the ribs in a 5 or 6-quart slow cooker; pour the sauce over them. Cover and cook on HIGH for 4 hours or on LOW for 9 hours. Depending on how the ribs are stacked in the cooker, you may want to quickly stir them at some point halfway through.
- Use a slotted spoon to remove the ribs from the cooker. Place a tablespoon of corn starch in a small bowl and add some juice from the cooker. Whisk them together to create a slurry without lumps, and add back into the crock pot. Stir. If the juice doesn't start to thicken, repeat the process with some more corn starch.
- Either keep the ribs intact, or pull meat into chunks and discard the bones and fat. Place meat in cooker again on WARM setting for 10 minutes or so to soak in flavors. Serve. Great with rice, broccoli, and perhaps a sprinkling of sesame seeds!
- OM NOM NOM!
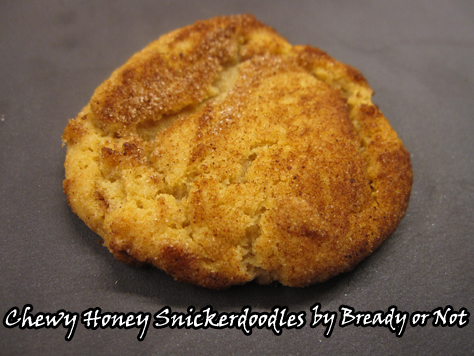
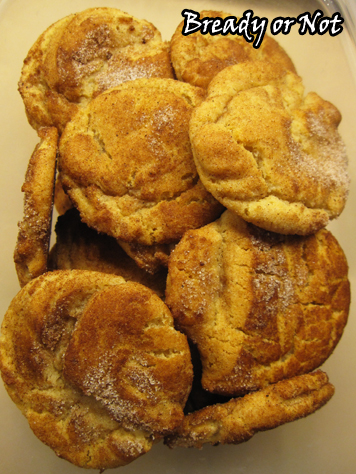
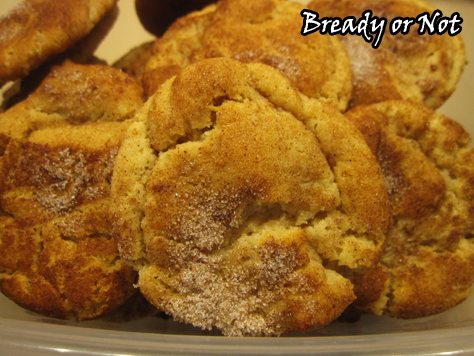
Bready or Not Classic: Chewy Honey Snickerdoodles
If all has gone according to plan, I’ve fled to a far-distant continent to enjoy Wensleydale cheese and scones. I didn’t want to schedule new recipes while I travel as I won’t be able to promote them to the fullest. Therefore, I’m revisiting a classic recipe this week and next. Enjoy!
If you’ve eaten my cookies at a convention or book event in recent years, you may have very well eaten these cookies: Chewy Honey Snickerdoodles.
As WorldCon in Kansas City neared, I asked on Facebook if people had cookie requests. Several people asked for Snickerdoodles. Problem: My traditional Snickerdoodle recipe only stays optimal for a few days.
Therefore, I needed to create a new Snickerdoodle recipe, one that would travel well and hold up to summer heat. I looked at my other go-to convention cookie recipe for Chewy Honey Maple Cookies. I Snickerdoodlified it.
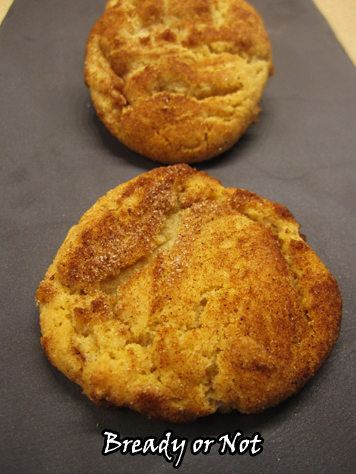
The end result: a new kind of Snickerdoodle with a sweet kiss of honey, and the durability to travel without falling apart AND the miraculous knack for staying fresh ‘n tasty for weeks. As long as three weeks, I’ve been told.
I’ve had numerous people tell me that these are the best Snickerdoodles they have ever had. Try the recipe yourself, and see if you agree!

Bready or Not Classic: Chewy Honey Snickerdoodles
Ingredients
For dough:
- 3/4 cup unsalted butter softened
- 1/2 cup light brown sugar packed
- 1/2 cup white sugar
- 2 Tablespoons honey
- 1 large egg room temperature
- 2 teaspoons vanilla extract
- 1 cup bread flour
- 1 cup all-purpose flour
- 1 1/2 teaspoons cream of tartar
- 2 teaspoons cornstarch
- 1 teaspoon baking soda
- 1/2 teaspoon salt
For rolling:
- 3 Tablespoons sugar
- 3 teaspoons ground cinnamon
Instructions
- In a large bowl, beat the butter until smooth. Add the sugar and honey and beat until creamy and fluffy, about 3 minutes. Scrape down the sides of the bowl and then mix in the egg and vanilla extract.
- In a separate bowl, combine the dry ingredients: bread flour, all-purpose flour, cream of tartar, cornstarch, baking soda, and salt. Sift together.
- Slowly stir together the wet and dry ingredients until just combined. Wrap the dough in plastic wrap and stash in the fridge for several hours or days; dough can also be frozen.
- When ready to bake, preheat the oven to 350-degrees. Use greased stoneware, parchment paper, or silpat mats. Prepare sugar and cinnamon mix, and roll dough balls to coat. The cookie dough, even straight from the fridge, has a soft Play-Doh-like consistency, so it will spread when it bakes; keep this in mind when spacing the cookie dough balls.
- Teaspoon-sized cookies bake in 9 to 12 minutes; Tablespoon-sized take 11 to 13 minutes. Let set on cookie sheets for 10 to 15 minutes before moving to a rack to cool completely.
- Cookies will keep in a sealed container, between waxed paper or parchment layers, for as long as three weeks. They are excellent for travel or shipping.
- OM NOM NOM!
