


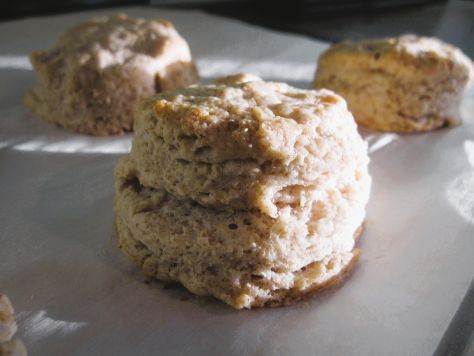
Bready or Not: Buttery Sourdough Biscuits
Sourdough bread is often an all-day or multi-day affair, but that’s not true of these Buttery Sourdough Biscuits. They’ll be done in well under an hour, and provide the perfect supper side for 2 to 3 people!
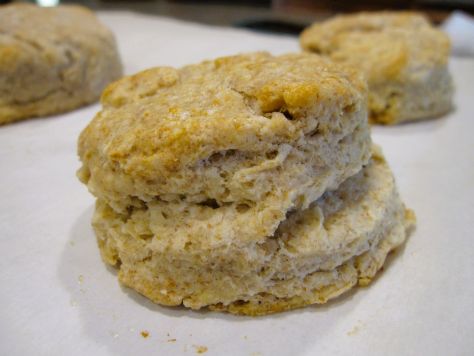
I modified this recipe from King Arthur Flour. I found that the biscuits were naturally very pale; the addition of milk on top helped.
These biscuits are so inherently buttery, you almost don’t need to add more butter. Almost.
My next book is out October 1st, and it’s something new and different! It’s fantasy with a literary edge, depicting a new kind of found family–one that includes two unique sentient characters: an anxious murder house and an ancient sourdough starter named Mother. I maintained my own “Mother” for book research (and still do), and therefore have tried a lot of new sourdough recipes over the past while.
Click the book cover below to preorder A House Between Sea and Sky via my affiliate link.

Bready or Not: Buttery Sourdough Biscuits
Equipment
- parchment paper
- biscuit cutter or empty jar
- pastry brush
Ingredients
- 1 cup all-purpose flour plus extra
- 2 teaspoons baking powder
- 3/4 teaspoon salt
- 1/2 cup unsalted butter (1 stick) cold
- 1 cup sourdough discard (227g)
- milk to brush on top
Instructions
- Move the central oven rack up a level, closer to the top heating element. Preheat oven at 425 degrees. Line a baking sheet with parchment paper.
- In a mixing bowl, combine flour, baking powder, and salt. Use a fork or fingers to work the butter into the mixture until it becomes crumbly. Add the starter, mixing until cohesive.
- Flour a section of counter or more parchment paper. Shape the dough into an evenly thick round about 6 inches across. Use a small biscuit cutter or the top of an empty jar to cut four rounds that just touch each other. Set those rounds on baking sheet, spaced out a few inches. Reshape dough scraps to cut out more biscuits, if need be, patting the last bit of dough into a mini biscuit.
- Pour a smidgen of milk into a saucer. Brush onto the tops of the biscuits.
- Bake biscuits for 20 to 25 minutes. They won’t brown much, but the milk on top would help them gain a golden tint.
- Remove from oven. Serve warm.
OM NOM NOM!
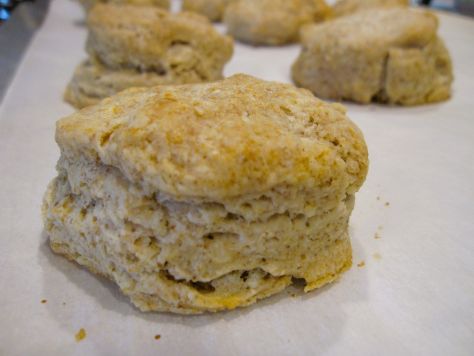
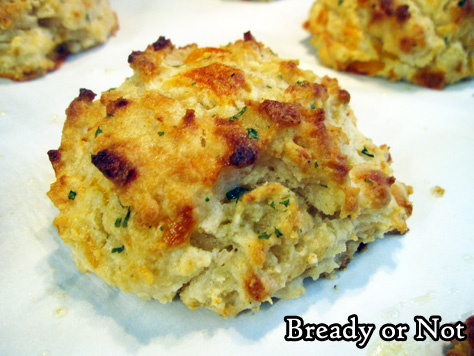
Bready or Not Original: Goat Cheese Biscuits
Today we are not only bready, to fit with the blog title of Bready or Not, but we are also cheesy. These Goat Cheese Biscuits are the perfect side for a supper meal.

If you’re on the lookout for a good supper meal, too, stay tuned–in two weeks, I’m sharing a pot roast recipe that will set you up nicely for this fall and winter!
For this recipe, I love using the 4-ounce logs that are often available at Aldi. They are cheap and basic, not high end as far as chevre goes, but they are absolutely perfect in a recipe like this. Plain logs are ideal, but you can also use one with herbs.

I like thick biscuits. I get 6 out of this recipe, but if you form them to be thinner, you could get 8 or more. The texture is cakey, the flavor rich because of the butter and goat cheese throughout.
Bready or Not Original: Goat Cheese Biscuits
Equipment
- 2-inch round cutter
- pastry brush
Ingredients
- 4- ounces plain goat cheese or used an herbed variety
- 2 cups all-purpose flour plus more for surface
- 1 Tablespoon baking powder
- 1 teaspoon salt
- 1/4 cup unsalted butter
- 3/4 cup buttermilk or soured milk, see note
- extra milk or half & half
Instructions
- Preheat oven to 475-degrees. Line a baking sheet with parchment paper.
- Set the goat cheese in the freezer for just a few minutes as the dough is being prepared.
- In a large bowl, stir together the flour, baking powder, and salt. Cut in the butter and mash it until it is pea-sized. Pour in the buttermilk or soured milk.
- The chilled goat cheese will be easier to dice into small pieces without being a sticky mess. Fold those chunks into the dough.
- Sprinkle flour onto a clean work surface. Knead the dough to make sure it is cohesive, but don’t overwork. Pat into a thick round. Use a 2-inch cutter to cut out shapes. Set them on cookie sheet, then reform leftovers to cut out more biscuits.
- Once all of the scrap dough is used, pour a dab of milk or half & half into a saucer. Use a pastry brush to brush a thin layer of milk onto the top of each biscuit; this will create a nice golden crust.
- Bake for 10 to 12 minutes, until nicely golden. Serve immediately. Leftovers can be reheated in the microwave or wrapped in foil and set in the oven to briefly bake.
OM NOM NOM!
Notes
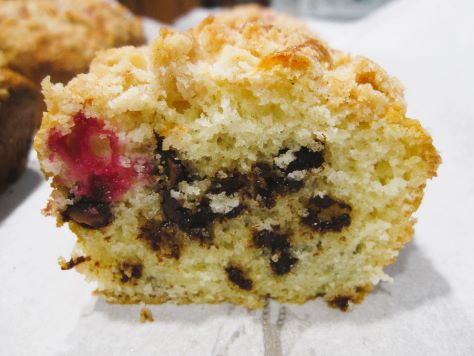
Bready or Not: Raspberry-Chocolate Chip Mini Loaves
These Raspberry-Chocolate Chip Mini Loaves are an easy make-ahead breakfast, brunch, or dessert. Use fresh or frozen raspberries–I used frozen!
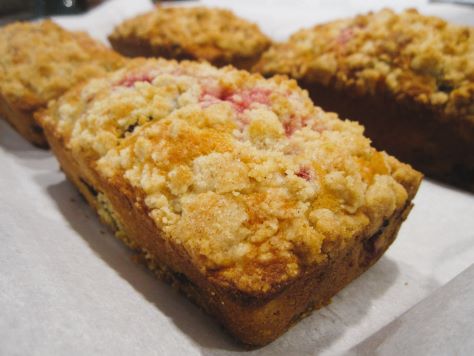
I have a Pampered Chef Stoneware loaf pan that I swore I’d use more often because I bothered to haul the big thing from Arizona. It has spaces for four small loaves. This recipe can be made with that kind of pan, or use 8 1/2 by 4 1/2-inch disposable pans. The individual pans, with a tasty baked treat inside, are great for gift-giving!
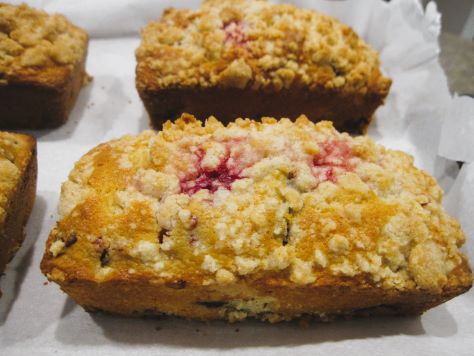
Use any kinds of chocolate chips with this recipe, or a mix. Flavor-wise, I’d prefer white chocolate here, but brown chips or chunks certainly look better for pictures.
Modified from a muffin recipe at King Arthur Flour.
Bready or Not: Raspberry-Chocolate Chip Mini Loaves
Equipment
- Mini loaf pan with four spaces or 4-count 8 1/2 by 4 1/2 disposable pans
- nonstick spray
Ingredients
Topping
- 1/2 cup all-purpose flour
- 1/4 cup white sugar
- 1/4 teaspoon cinnamon
- pinch salt
- 3 Tablespoons unsalted butter melted
- 1/4 teaspoon pure vanilla extract
Batter
- 8 Tablespoons unsalted butter melted
- 3/4 cup milk or half & half
- 2 large eggs
- 1 3/4 cups all-purpose flour
- 1 cup chocolate chips any kind
- 1 cup raspberries fresh or frozen
- 3/4 cup white sugar
- 1 Tablespoon baking powder
- 1/2 teaspoon salt
Instructions
- Preheat the oven to 375 degrees. Lightly grease the loaf pans.
Make the topping
- Mix the topping ingredients together until the mixture is very moist and crumbly. Set aside. If the kitchen is warm, place the bowl in the fridge.
Make the loaves
- In a large bowl, whisk together the melted butter, milk or half & half, and eggs.
- Measure the flour into a large bowl. Into separate bowls, place the chocolate chips and the raspberries. Add a generous scoop of flour to the chocolate chips and toss them to coat. Repeat with the raspberries. This coating will help them to resist sinking in the batter.
- To the remaining flour, add the sugar, baking powder, and salt. Gradually mix the wet ingredients into the dry. Fold in the chocolate chips, followed by the raspberries.
- Divide the batter evenly among the loaf pans. Sprinkle the topping over each loaf to cover, pressing it in slightly to help it adhere.
- Bake for 25 to 35 minutes; separated pans may cook faster. When done, they should be browned across the top and pass the toothpick test in the middle. Cool for 30 minutes. If using a large pan with four mini loaves inside it, run a sharp knife around the edges of each divot and then carefully tip the loaves onto a pan or counter. Set them on a rack to completely cool.
- Store loaves in a sealed container at room temperature or freeze soon after making. Eat at room temperature or warmed in the microwave.
OM NOM NOM!
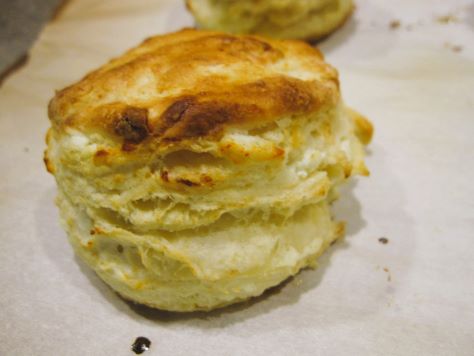
Bready or Not: Cheddar Bay Biscuits
Let’s state a truth up front: a visit to Red Lobster isn’t about the seafood. It’s about those Cheddar Bay Biscuits they bring out as an appetizer.
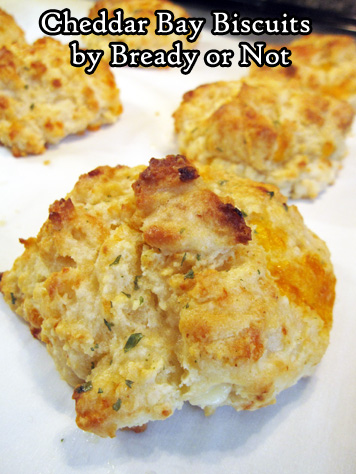
I’ve used this recipe for about 10 years now. I posted it on my LiveJournal in the earlier iteration of Bready or Not, but now it’s time to share again with new photos and an easy-to-print format.
These biscuits are incredible. Cheesy, crisp, tender. Buttery. I mean, you baste them in butter and seasonings for the final step. You know they will be good.

Plus, these keep well in the fridge for days! In a pinch, you can heat them in the microwave, but they are far better warmed in an oven or toaster oven. That way the outside stays crisp and the interior texture stays just right.
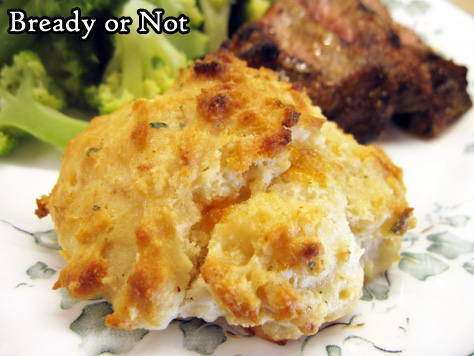
I bet if you give these a try, they’ll be a reliable side dish bread in your recipe repertoire, too!
Bready or Not: Cheddar Bay Biscuits
Equipment
- parchment paper
- pastry brush
Ingredients
Biscuits
- 2 cups all-purpose flour
- 2 teaspoons baking powder
- 1/2 teaspoon baking soda
- 1 teaspoon white sugar
- 1/2 teaspoon garlic powder
- 1/4 teaspoon cayenne pepper
- 6 ounces sharp cheddar cheese shredded
- 1 cup buttermilk or soured milk*
- 1/2 cup unsalted butter 1 stick, melted and cooled
Topping
- 3 Tablespoons unsalted butter melted
- 1/2 teaspoon garlic powder
- 1/4 teaspoon dried parsley
Instructions
- Preheat oven at 475-degrees. Line a big baking sheet with parchment.
- In a big bowl, combine the flour, baking powder, baking soda, sugar, salt, garlic powder, and cayenne. Fold in the cheddar cheese.
- Fold the buttermilk into the dry ingredients, followed by the melted butter, scraping the bottom of the bowl well to make sure everything is mixed in. Grease a 1/3 cup and use that to scoop up portions of dough to place spaced out on the baking sheet.
- As the biscuits bake for 11 to 13 minutes, until golden brown, prepare the topping. Melt the butter and stir in the garlic powder and parsley. As soon as the biscuits are out of the oven, brush on the topping to cover the nooks and crannies of every biscuit on the pan.
- Eat right away. Leftovers will keep in a sealed container in the fridge for days. They can be microwaved, but are best warmed in an oven or toaster oven.
OM NOM NOM!
Notes
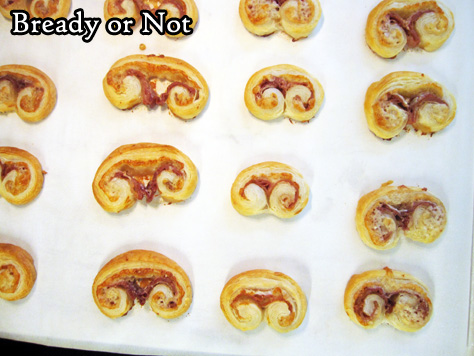
Bready or Not Original: Prosciutto-Parmesan Palmiers
The holiday season is nigh, and these Prosciutto-Parmesan Palmiers are the perfect appetizer for a couple or an entire gang!
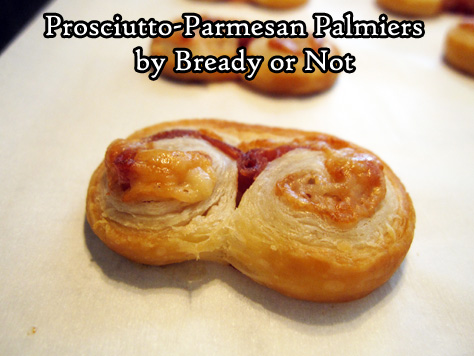
These really have three ingredients, plus some flour for dusting a counter. They take minutes to assemble. Stash them in the freezer for hours or days. They bake up fast. They make bellies happy.
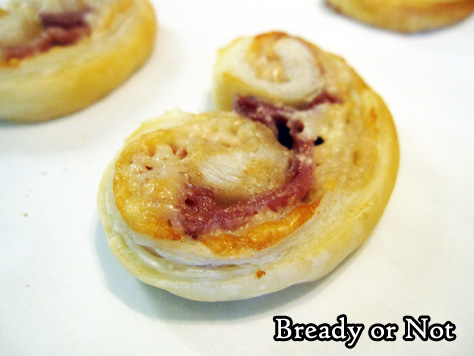
Plus, I daresay, they are downright pretty. I love the layers in puff pastry! Here, those crisp buttery layers are fantastic along with shredded cheese and thin slices of prosciutto.
Honestly, these are dangerous. It’s hard to eat just one.
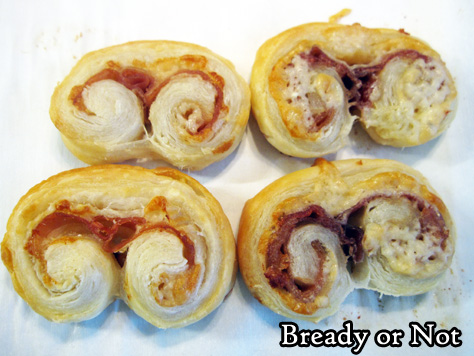
However, if you can exercise restraint, the leftovers are delicious. They can be eaten cold (the prosciutto is the prominent flavor then), but are better with a brief warm-up in the oven.
Make these your go-to game day, holiday event, or date night treat!
Bready or Not Original: Prosciutto-Parmesan Palmiers
Equipment
- parchment paper
- knife
Ingredients
- flour to dust surface
- 1 sheet puff pastry (half a box) thawed in fridge
- 1/2 cup shredded Parmesan packed
- 2 to 3 ounces sliced prosciutto
Instructions
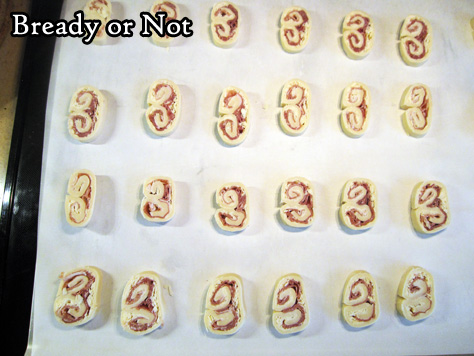
- Hours or days before baking day: Sprinkle flour on a flat, clean surface. Roll out the puff pastry to make a 12-inch square. Cut in half. Sprinkle cheese over both halves. Place prosciutto slices to completely cover cheese; if there is extra meat, layer on the additional pieces. Roll the short sides of each piece of pastry together to meet in the middle–from the end, it will look rather like a number 3. Repeat this with the other half.
- Encase both logs in plastic wrap and freeze until firm, at least an hour, but as long as several days.
- Preheat oven at 400-degrees. Prepare a large baking sheet with parchment paper.
- Pull out frozen logs to thaw for just a few minutes. While it is still mostly frozen, slice into 1/4-inch pieces and place spaced out on parchment. (Note that the end pieces may be sparse on filling and not presentable for company, but still worth baking up for private enjoyment.)
- Bake for 12 to 15 minutes until palmiers are golden brown and puffed. They are best eaten fresh, but leftovers can be refrigerated. They are okay cold, but better toasted briefly again in the oven.
OM NOM NOM!
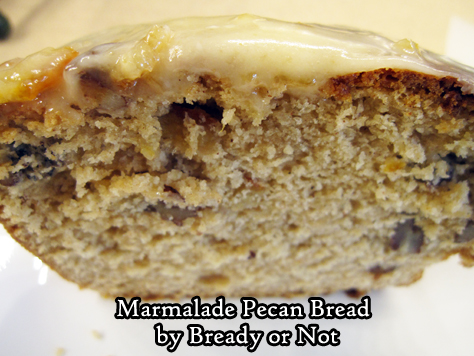
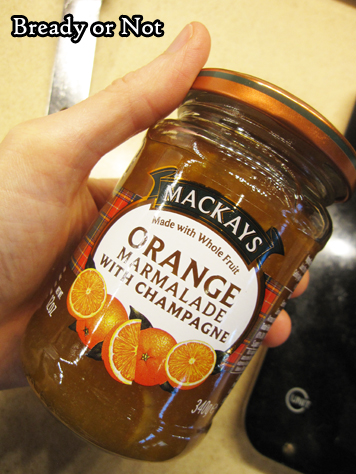
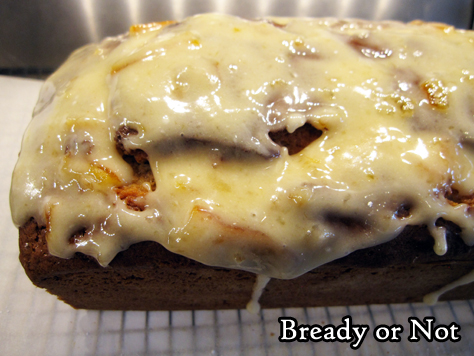
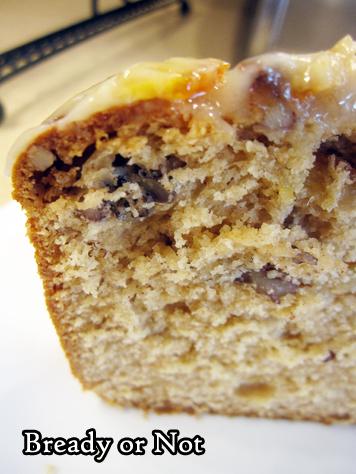
Bready or Not Original: Marmalade Pecan Bread
Orange marmalade is delicious stuff atop an English muffin or toast, and it’s also amazing incorporated into this Marmalade Pecan Bread.
If your jar is large enough, you can use some marmalade in the glaze, too–but worry not if your jar is smaller. Just use orange juice instead!
This bread has a tender, delicious crumb. You get some orange in every bite, and the pecans pieces add a great crunch for contrast.
This is ideal for a breakfast or brunch, but really, it would be a nice bedtime snack, too. Something cozy, delicious, and a touch sweet.
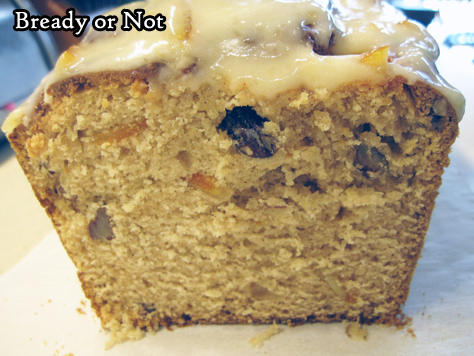
I cut the bread into slices and found it froze and thawed well, too. A tiny bit of glaze stuck to the plastic wrap, but it wasn’t that bad at all.
Modified from Taste of Home Church Potluck 2015.
Bready or Not Original: Marmalade Pecan Bread
Equipment
- 9x5 loaf pan
- parchment paper
Ingredients
- 12 ounce orange marmalade jar or a 10oz jar with a modified glaze
- 1/2 cup unsalted butter 1 stick, softened
- 1/2 cup brown sugar packed
- 2 eggs room temperature
- 2 2/3 cups all-purpose flour
- 3 teaspoons baking powder
- 2 teaspoons ground cinnamon
- 1 teaspoon salt
- 1/3 cup orange juice plus more, if needed for glaze
- 1/2 cup pecans chopped
- 1/2 cup confectioners' sugar
Instructions
- Preheat oven at 350-degrees. Cut a piece of parchment to fit long-ways in the loaf pan, extending up either side. Grease the pan, place the paper inside, then grease again. Set aside.
- If using a 12 ounce jar of marmalade, measure out two ounces to set aside.
- In a large bowl, beat together butter and brown sugar until blended. Add eggs, one at a time. Gradually mix in the 10 ounces of marmalade.
- In a separate bowl, mix together flour, baking powder, cinnamon, and salt.
- Slowly beat the dry ingredients into the wet, until just combined. Fold in the pecans.
- Pour batter into the loaf pan. Bake for 45 minutes; check on bread, and cover with foil if it is becoming too browned on top. Continue baking for another 15 to 20 minutes (that is 60 to 65 minutes total), until the very middle passes the toothpick test. Let rest in pan for about 10 minutes, then use the parchment sling to pull the bread out to set on a cooling rack.
- After the bread cools completely, mix together the remaining marmalade and the confectioners' sugar to form a thick glaze; alternatively, if a smaller jar was used, add orange juice by teaspoons into the sugar until a thick glaze is formed.
- Let set for 20 minutes before slicing in. Store at room temperature in a sealed beg or plastic wrap. Bread can also be sliced and frozen for later enjoyment.
