


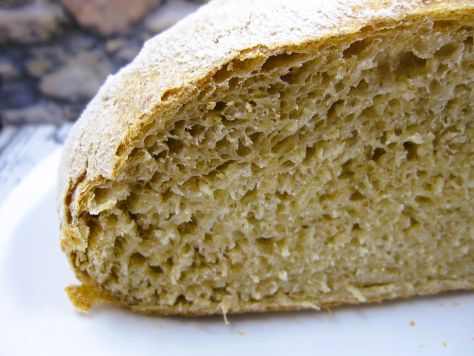
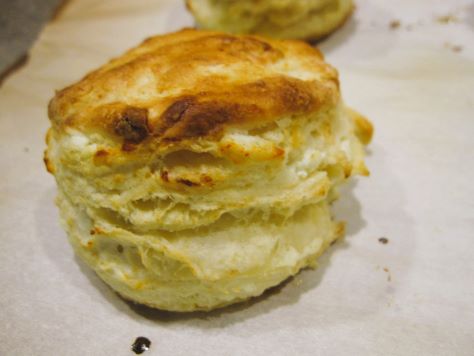
Bready or Not: Sourdough Cornbread
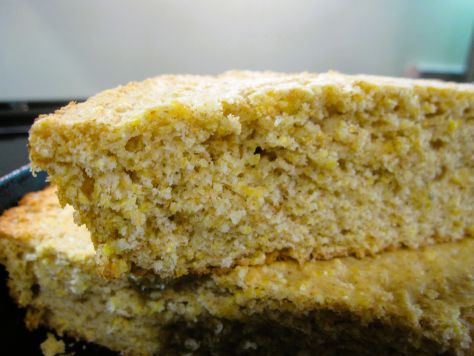
I’m continuing the sourdough theme, which ties into my forthcoming book, with an American stand-by that’s made even more delicious with a slight tang of sourdough: Sourdough Cornbread. A whole cup of discard is incorporated into the batter. The flavor it adds is subtle yet delicious.
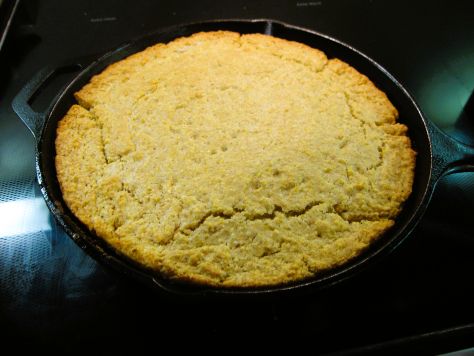
This recipe, modified from King Arthur Flour, calls for a cast iron skillet. That is essential in creating a nice, crisp crust. That said, I’ve also adapted other cornbread recipes to use a muffin pan, so that could be done here as well with a similar baking time. Just expect a softer cornbread, and use the toothpick test to make sure they are done.
My next book is out October 1st, and it’s something new and different! It’s fantasy with a literary edge, depicting a new kind of found family–one that includes two unique sentient characters: an anxious murder house and an ancient sourdough starter named Mother. I maintained my own “Mother” for book research (and still do), and therefore have tried a lot of new sourdough recipes over the past while.
Click the book cover below to preorder A House Between Sea and Sky via my affiliate link.

Bready or Not: Sourdough Cornbread
Equipment
- 10-inch cast iron skillet
Ingredients
- 1/2 cup unsalted butter 1 stick
- 1 1/4 cups all-purpose flour
- 1 cup yellow cornmeal
- 1/3 cup white sugar
- 2 teaspoons baking powder
- 1 teaspoon table salt
- 1/2 teaspoon baking soda
- 1 cup sourdough starter discard (227g to 241g)
- 1/3 cup milk or half & half
- 2 large eggs room temperature
Instructions
- Put the butter in the skillet and place it in a cold oven. Start heating at 425 degrees.
- In a large bowl, combine the flour, cornmeal, sugar, baking powder, salt, and baking soda. In another bowl, whisk together the sourdough discard, milk, and eggs until combined.
- Meanwhile, the butter is browning in the oven. When it is fully melted with a nice golden brown hue, remove the skillet and let cool for only a few minutes. Carefully pour most of the butter into the wet mixture, leaving roughly a tablespoon in the skillet.
- Mix the wet ingredients again to fully incorporate the butter. Add the dry ingredients, mixing to form the batter.
- Carefully swirl the remaining butter in the skillet to coat the bottom and sides. Pour in the batter and spread it into an even layer.
- Bake the sourdough cornbread for 15 to 20 minutes. It should look set and golden at the edges, with the middle passing the toothpick test.
- Remove from oven and allow cool briefly before serving warm or at room temperature. Cornbread is best enjoyed the day it’s made. However, leftovers can be wrapped and stored at room temperature for a day, or freeze for longer storage.
OM NOM NOM!
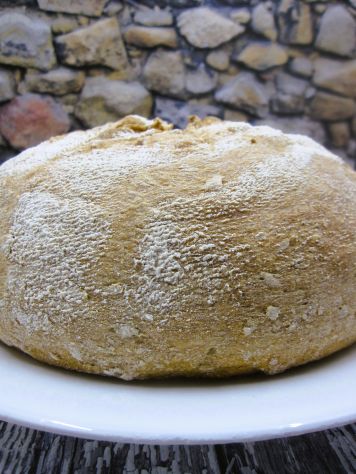
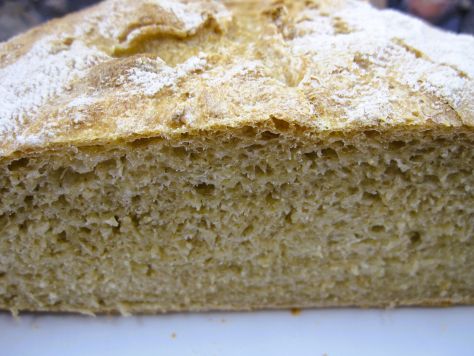
Bready or Not: Sourdough Beer Bread
Not gonna lie: this Sourdough Beer Bread takes time, working in spurts over a day. It dirties many things. However, it also makes a big loaf of bread, so the effort can likely provide a delicious side for a few meals.
When I say this is an all day recipe, I point to my own experience. I started making this at 7:15AM, and it was done about 3PM.
A few other data points. I advise using a kitchen scale to measure the ingredients here. It’s very hard to reliably use a cup to measure sticky, goopy sourdough starter. The original recipe at King Arthur Flour had the instant yeast listed as optional, but for me, it wasn’t optional. I appreciate the extra oomph in the rise.
Find the original recipe here. I rewrote it quite a bit for clarification.
Also, a reminder that my book featuring a sentient sourdough starter character is out in about TWO MONTHS! Find out more about A House Between Sea and Sky on its page.
Bready or Not: Sourdough Beer Bread
Equipment
- kitchen scale
- parchment paper
- baking stone or cast iron skillet
Ingredients
Soaker
- 1 1/4 cups old-fashioned rolled oats (112g)
- 1/2 cup boiling water (113g)
Dough
- 1 cup ripe sourdough starter (227g)
- 1 cup plus 2 tablespoons beer (255g beer) such as an amber ale or dark ale, room temperature
- 3 1/2 cups bread flour (420g)
- 1 teaspoon instant yeast
- 1 Tablespoon honey (21g) add more flavor using a variety such as basswood honey
- 2 teaspoons table salt (12g)
Instructions
- To make the soaker: Place oats in a heatproof bowl and pour the boiling water over them. Stir. Allow to cool while you start to prepare the dough.
- Using a kitchen scale and weighing everything is highly recommended.
- Combine the sourdough starter, beer, flour, and yeast in a large bowl. Mix well, by hand or with a mixer, the dough forms a cohesive mass.
- Cover and let it rest (autolyse) for about 30 minutes.
- Add the soaked oats, honey, and salt to the dough, fully incorporating. By hand or with a mixer, knead dough until it’s smooth, though it will still be tacky.
- Cover dough and let it rise for 1 hour.
- Turn the dough out onto a floured surface. Fold it over itself and stretch gently several times. Return the dough to the bowl and cover.
- Let dough rise for another hour.
- Repeat the stretching and folding process one more time. Return dough to the bowl to rise for a third, final hour.
- At the end of the rise, turn the dough out onto a lightly floured surface. Cover with greased plastic wrap and let it rest for 20 minutes.
- Place a clean cotton towel to cover the interior of a large bowl (or use a brotform). Add a heavy dusting of flour.
- Shape the dough into a tighter round by tucking dough underneath to tighten the top. Place it seam-side up in the bowl.
- Cover and let proof for 2 1/2 to 3 hours in a warm place; if your house is cool, it may need 4 hours. An oven with a proofing mode can also be used. When the dough is ready, it will look puffy and will jiggle when gently shaken.
- When the rise time is nearing end, begin preheating oven at 450 degrees with a baking stone or cast iron pan inside (obviously, if the proof mode was being used, remove the bread to continue rising in a warm spot elsewhere). To use steam during the baking process, to create a crunchy crust, place another empty pan (such as a cast iron skillet or a cake pan) beneath the baking vessel.
- Gently tip the risen loaf onto a piece of parchment. Slash the loaf several times with a sharp knife or lame–this creates vents for steam inside so the bread doesn’t grossly split–then use the parchment as a sling to CAREFULLY place the loaf on the very hot stoneware or cast iron.
- While wearing thick oven mitts, pour 1 cup water into the empty pan on the lower rack, with the bread in the pan on the level above. Close oven and keep it closed as the bread bakes.
- Bake bread for 15 minutes at 450, then reduce temperature to 400 F. Bake for another 25 to 30 minutes, until the loaf is deeply browned and sounds hollow when tapped. Remove loaf from the oven and carefully transition to a cooling rack. Cool at least 30 minutes before slicing.
- Store leftover bread in a paper bag or loosely covered by plastic wrap for up to a few days. To preserve it longer, freeze and place in a freezer bags. Slicing the bread before freezing makes it easy to pull out portions to quickly defrost for later meals.
OM NOM NOM!
Bready or Not EXTRA CHEESY: Legendary Macaroni and Cheese
Welcome to the fourth installment of our special month of Bready or Not. My cheese-centric cozy mystery Cheddar Luck Next Time came out earlier this month, so we’re celebrating with another cheesy recipe from the Bready or Not archives.

This week’s feature is Legendary Macaroni and Cheese. This one gained incredible popularity during the shut-down in 2020.
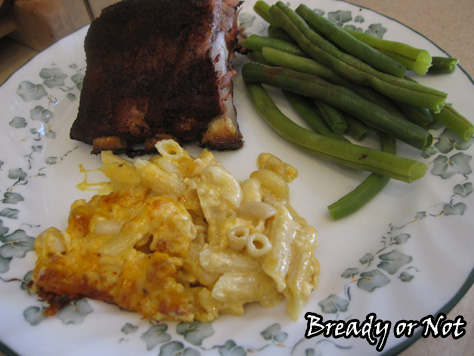
There are a gazillion macaroni and cheese recipes out there. This one is special because it can be prepared ahead of time, making it incredibly convenient to heat up for a meal during a busy week or during a holiday event.
This is a heavily modified version of musician John Legend’s macaroni recipe, which he originally shared on the Martha Stewart Show a long time ago.

Please grab a copy of Cheddar Luck Next Time, which features an autistic (like me!) lead character with a passion for cheese (like me!).
Amazon: paperback | ebook (affiliate links)
Barnes & Noble: paperback & ebook
Bookshop: paperback
Bready or Not: Legendary Macaroni and Cheese
Ingredients
- 2 Tablespoons unsalted butter plus more for baking dish
- 1 1/2 cups elbow macaroni
- 1 can evaporated milk
- 1 large egg
- 3/4 teaspoon seasoning salt
- 1/2 teaspoon garlic powder
- 1/2 teaspoon salt
- 1/4 teaspoon pepper
- 12 ounces sharp cheddar cheese or a mix of cheddars, shredded
- sprinkle paprika
- bread crumbs
Instructions
- If you plan to bake this right away, preheat oven to 375-degrees. Butter or spray a 9×9 baking dish.
- Bring a large pot of water to a boil and add salt and macaroni. Cook until al dente. Drain the water and return the macaroni to the pot. Add butter and stir until it has melted.
- In a medium bowl, whisk together evaporated milk and egg. Add seasoned salt, garlic powder, salt, and pepper.
- Place about 1/3 of the macaroni in an even layer in the bottom of prepared baking dish. This should be just enough to cover the bottom. Cover with 1/3 of the cheese. Repeat twice more with remaining macaroni and cheese.
- Pour the milk and seasonings mixture evenly over the contents of the baking dish. At this point, you can stash the dish in the fridge overnight or during the day until it’s meal time.
- When you’re ready to bake, make sure the oven is preheated. Sprinkle the top of the macaroni with paprika and bread crumbs.
- Bake until top layer is lightly browned, 25 to 30 minutes; note that if the dish is cold, bake time will likely need to be extended to closer to 40 minutes. Let stand 10 minutes before serving.
- OM NOM NOM!
Bready or Not EXTRA CHEESY: Cheese and Chives Yorkshire Puddings (Small Batch)
Welcome to the third installment of our special month of Bready or Not. My cheese-centric cozy mystery Cheddar Luck Next Time just came out last week, so we’re celebrating with another cheesy recipe from the Bready or Not archives.
This week’s feature is Cheese and Chives Yorkshire Puddings.

Yorkshire puddings are what many Americans also know of as pop-overs–light, airy, crisp sponges perfect to eat with a roast and gravy!
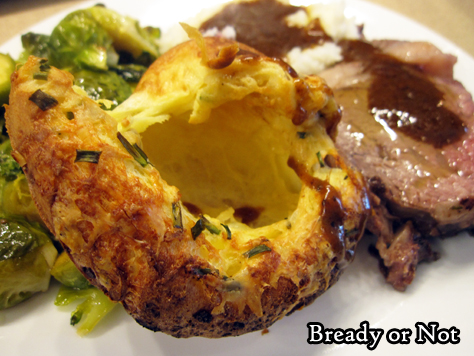
This recipe is for a small batch of puds. Since they are so airy (if they rise right), the six puddings of this recipe are perfect for two or three people. These will not reheat well, so eat’em up fresh!
Use a good quality cheddar here to really take these puddings to the next level. I used Kerrygold Dubliner.
Please grab a copy of Cheddar Luck Next Time, which features an autistic (like me!) lead character with a passion for cheese (like me!).
Amazon: paperback | ebook (affiliate links)
Barnes & Noble: paperback & ebook
Bookshop: paperback
Bready or Not: Cheese and Chives Yorkshire Puddings (Small Batch)
Equipment
- metal muffin pan
- blender
Ingredients
- 3/4 cup milk or half & half
- 2 large eggs room temperature
- 3 Tablespoons unsalted butter melted, divided
- 3/4 cup all-purpose flour
- 1/2 teaspoon kosher salt
- 1/4 cup quality cheddar cheese (25 grams), freshly grated
- 1 1/2 Tablespoons fresh chives chopped, plus more for garnish
Instructions
- Preheat oven at 425-degrees.
- In the container of a blender, place milk, eggs, 1 tablespoon melted butter, flour, and salt; process just until smooth. Let rest for 10 minutes.
- In a small bowl, toss together grated cheese and chives.
- Place a 12-cup muffin pan in oven for 5 minutes to preheat.
- Remove muffin pan from oven, and quickly spoon the remaining 2 tablespoons melted butter into the 6 muffin cups that are being used. Return pan to oven for 2 minutes.
- Remove pan from oven. Working fast, spoon or pour batter into buttered muffin cups, dividing as evenly as possible. Top each with a spoonful of cheese mixture.
- Bake until puffed and golden brown, 15 to 18 minutes. Garnish with more chives, if desired. Serve immediately. Yorkshires are best fresh as they deflate after baking.
OM NOM NOM!
Bready or Not: Easy Cranberry Sauce
It’s the first week of October, but we’re anticipating the holiday season with this Easy Cranberry Sauce recipe.
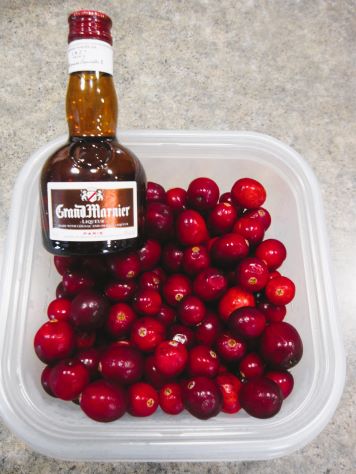
Last Thanksgiving was my first in almost 20 years when I didn’t get to go home to California. My mom is all about using the canned jellied cranberry sauce. I’ve hinted for years now that I could try making a fresh sauce, but tradition is tradition.
I was sad I couldn’t be with my folks at Thanksgiving, but hey, at least I could try a homemade sauce at long last. Being that I’m in Minnesota now, that also meant using local cranberries.

I used a 12-ounce bag of fresh cranberries, but frozen is fine, too. Since there were only two of us partaking in the feast, we had a lot of leftover sauce, but that was fine–I used most of the remainder in a Cranberry Swirled Blondies recipe that I’ll share next week!
Bready or Not: Easy Cranberry Sauce
Ingredients
- 12 ounces cranberries fresh or frozen
- 3/4 cup white sugar
- 1 Tablespoon Grand Marnier
- zest of one orange
- pinch kosher salt
- 1 cup water
Instructions
- Place all of the ingredients in a medium saucepan on medium heat. Stir frequently as the contents warm through so that nothing sticks and burns. After 10-15 minutes, the cranberries will start to burst and the mixture will turn jammy. Cook another couple minutes as more berries break down. Remove from heat and cool before serving.
- Sauce can be made up to 5 days ahead. Store it in an airtight container in the fridge. Serve with meats such as turkey and ham, or with ice cream or within a baked dessert.
OM NOM NOM!
Bready or Not Original: Goat Cheese Biscuits
Today we are not only bready, to fit with the blog title of Bready or Not, but we are also cheesy. These Goat Cheese Biscuits are the perfect side for a supper meal.

If you’re on the lookout for a good supper meal, too, stay tuned–in two weeks, I’m sharing a pot roast recipe that will set you up nicely for this fall and winter!
For this recipe, I love using the 4-ounce logs that are often available at Aldi. They are cheap and basic, not high end as far as chevre goes, but they are absolutely perfect in a recipe like this. Plain logs are ideal, but you can also use one with herbs.

I like thick biscuits. I get 6 out of this recipe, but if you form them to be thinner, you could get 8 or more. The texture is cakey, the flavor rich because of the butter and goat cheese throughout.
Bready or Not Original: Goat Cheese Biscuits
Equipment
- 2-inch round cutter
- pastry brush
Ingredients
- 4- ounces plain goat cheese or used an herbed variety
- 2 cups all-purpose flour plus more for surface
- 1 Tablespoon baking powder
- 1 teaspoon salt
- 1/4 cup unsalted butter
- 3/4 cup buttermilk or soured milk, see note
- extra milk or half & half
Instructions
- Preheat oven to 475-degrees. Line a baking sheet with parchment paper.
- Set the goat cheese in the freezer for just a few minutes as the dough is being prepared.
- In a large bowl, stir together the flour, baking powder, and salt. Cut in the butter and mash it until it is pea-sized. Pour in the buttermilk or soured milk.
- The chilled goat cheese will be easier to dice into small pieces without being a sticky mess. Fold those chunks into the dough.
- Sprinkle flour onto a clean work surface. Knead the dough to make sure it is cohesive, but don’t overwork. Pat into a thick round. Use a 2-inch cutter to cut out shapes. Set them on cookie sheet, then reform leftovers to cut out more biscuits.
- Once all of the scrap dough is used, pour a dab of milk or half & half into a saucer. Use a pastry brush to brush a thin layer of milk onto the top of each biscuit; this will create a nice golden crust.
- Bake for 10 to 12 minutes, until nicely golden. Serve immediately. Leftovers can be reheated in the microwave or wrapped in foil and set in the oven to briefly bake.
