


Bready or Not: Cheddar Beer Bread Rolls
These Cheddar Beer Bread Rolls taste as good as they look. Seriously.

When the pandemic sent everything topsy-turvy in spring 2020, my husband ended up working from home more often. That meant I needed to feed him more often.
So, like so many people, I started baking more bread. These rolls were among the first of my experiments, and they were a major hit.
The original recipe from New York Times Cooking made a huge batch of rolls. I needed enough rolls to feed one guy, with a extras frozen for later.
I rewrote the recipe to delicious results. I used a Guilt Lifter beer to make these, which lent a refreshing hoppy flavor. A heavier and darker beer will create heavier and darker flavor. Try different beers to suit your tastes and match your meal.
Bready or Not: Cheddar Beer Bread Rolls
Equipment
- 2 8-or 9-inch cake pans
- 2.5-inch round cutter
- plastic wrap
- basting brush
Ingredients
- 2 Tablespoons unsalted butter divided
- 3 cups all-purpose flour or bread flour
- 1/2 Tablespoons instant yeast
- 1 teaspoon coarse kosher salt
- 2 Tablespoons honey
- 1 cup beer room temperature
- 1 cup shredded cheese 120 grams
Instructions
- Divide the two tablespoons of butter in half, separating them to soften at room temperature.
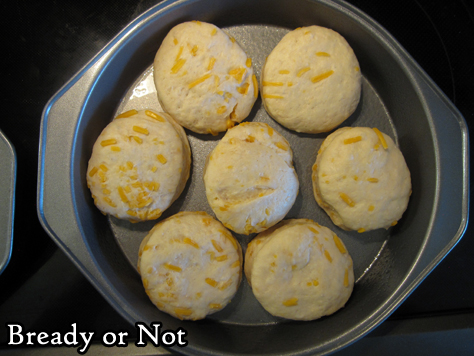
- In a stand mixer with a bread hook attachment, stir together the flour, yeast, and salt. Follow up with 1 tablespoon of softened butter, honey, and beer. Mix on low speed for 4 minutes, scraping the bowl as needed. Increase the speed to medium for another 2 minutes, pulling the dough from the hook a few times. Add about half the cheese, reserving the rest to go on top later. Mix the cheese until it's distributed through the dough.
- Lightly grease a large bowl. Transfer the dough there and cover with plastic wrap or a towel to let it rise until it's about doubled in size, about an hour.
- Grease the two cake pans. Prepare a lightly floured surface and tip the dough onto it. Pat the dough out into a thick, even layer. Use the cutter to slice out rolls. Place them not quite touching in the pans. Reform scraps as much as possible to shape into more rolls. The rolls likely won't quite fill both pans.
- Cover pans with plastic wrap and set in a warm place to rise again for 35 to 45 minutes. They may not increase a lot in size, but they should look puffy.
- Preheat oven at 400-degrees.
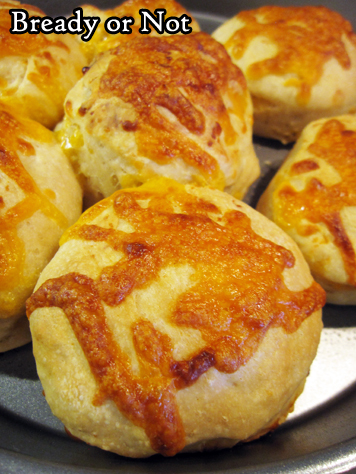
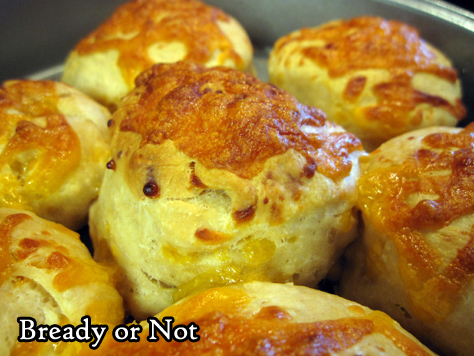
- Pull out remaining pat of butter and cheese. Brush the soft butter over the rolls, and follow up with a sprinkling of cheese. Try to keep the cheese from touching the edge of the pan, where it could burn.
- Place both pans in the oven and bake until the rolls are browned and cheese is melted, 15 to 20 minutes. A digital thermometer in a center roll should read 190-degrees at minimum.
- Let cool for at least 10 minutes before (carefully) pulling apart and serving.
- Rolls can keep in a sealed bag at room temperature for up to 2 days. They can also be frozen and thawed for later enjoyment. They taste best hot. For best results, wrap them in foil and bake at 400 for about 10 minutes to warm them through.
OM NOM NOM!
Bready or Not: 5 Minute Artisan Pizza Dough and Cast Iron Pan Pizzas
Today’s Bready or Not is a 2-for-1 deal: a recipe for fast and easy pizza dough, followed by the process I use for divvying up that dough to make small but thick cast iron pan pizzas.

The basic dough recipe is modified from the great book Artisan Bread in 5 Minutes a Day. [Affiliate link] Yes, this dough really comes together in 5 minutes. It also keeps for up to 2 weeks AND can be frozen.
The method for making mini pizzas in a skillet is one I practiced a few times several years ago, then made a LOT during 2020 as my husband was working from home more often. I perfected it to the point where I had to write it down–and share here.
The pan pizza recipe is pretty much an outline to show the timing on the shaping, rise, and crust-cooking, but the ingredients are all up to you!
Bready or Not: 5 Minute Artisan Pizza Dough
Ingredients
- 1 1/3 cups warm water
- 2 Tablespoons olive oil
- 1/2 Tablespoon white sugar
- 3 1/4 cups all-purpose flour
- 3/4 Tablespoon kosher salt
- 2 teaspoons pizza seasoning or Italian seasoning, optional
- 2 1/4 teaspoons active yeast or one packet store-bought active yeast
Instructions
- Place the water, olive oil, and sugar in a big mixing bowl, stand mixer, or food processor. Add the flour, salt, and seasoning, if using. Start mixing together, then sprinkle in the yeast. Mix until just combined.
- Keep in same bowl, if desired, or transfer to another bowl that is greased. Loosely cover top with plastic wrap or towel and let dough rise at room temperature until it flattens out on top, about two hours.
- Dough can be used now but is much easier to handle when cold. Refrigerate in a non-airtight container and use within two weeks. Dough can also be frozen in freezer bags, for up to a month, and defrosted later in the fridge.
OM NOM NOM!
Bready or Not Original: Cast Iron Pan Pizzas
Equipment
- 10-inch cast iron skillet
Ingredients
- handful pizza dough
- olive oil
- desired toppings and seasonings
Instructions
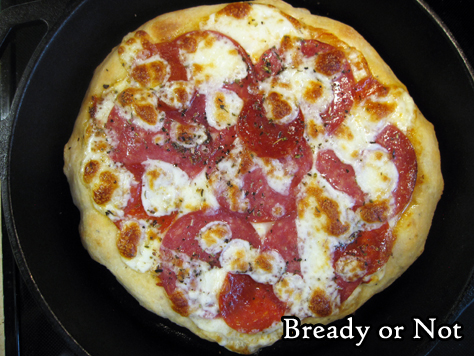
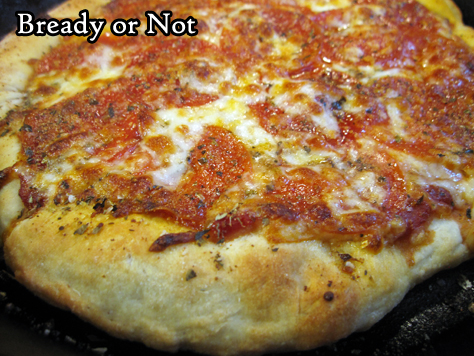
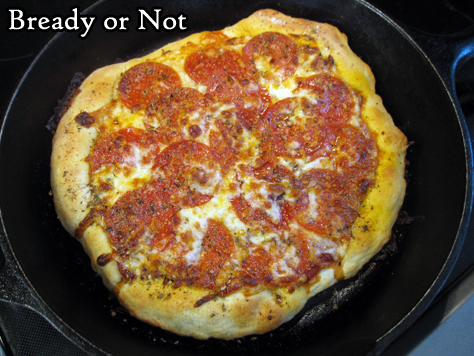
- Preheat oven at 450-degrees. Add about a tablespoon of olive oil to a cast iron skillet and place the pan in the oven to heat up.
- Grab a good handful of pizza dough, or as much as desired to bake today. Oil a small space of counter or table as well as hands, and gently stretch and press out the dough to a rough circle. If it tears, patch with other pieces of dough as best possible. Let dough rest for about 20 minutes.
- By this time, the oven should have preheated. Use a potholder to pull out the skillet. Carefully swirl the hot oil in the pan to coat the bottom and set pan down on a safe surface. Carefully, again, place the dough in the pan.
- Bake crust for 6 to 10 minutes, until it is set. Pull out of oven and add desired toppings.
- Put pizza in oven for another 6 to 10 minutes, until crust is golden and toppings are cooked to desired level. Let pizza cool for about 10 minutes, then slide onto a plate or other surface to slice and eat.
- OM NOM NOM!
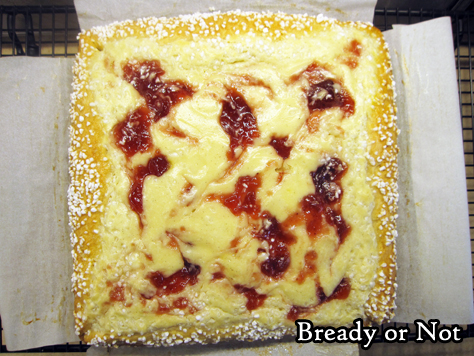
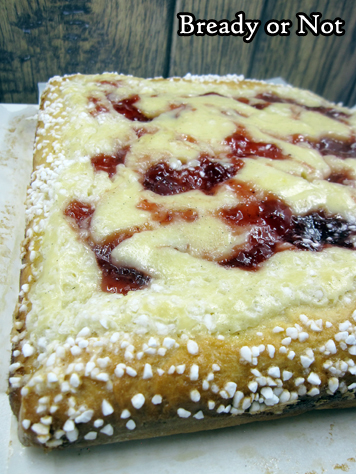
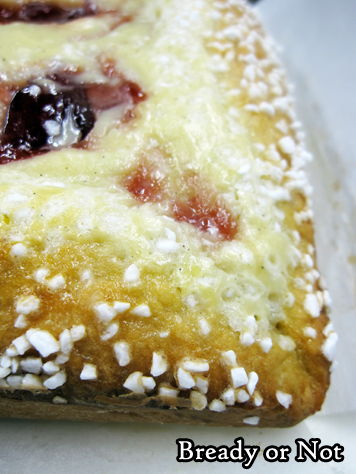
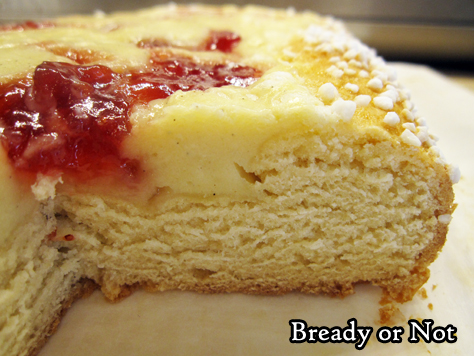
Bready or Not: Jam and Cream Brioche Tart
This Jam and Cream Brioche Tart is probably among the most extraordinary things I’ve ever baked, and that is saying something.
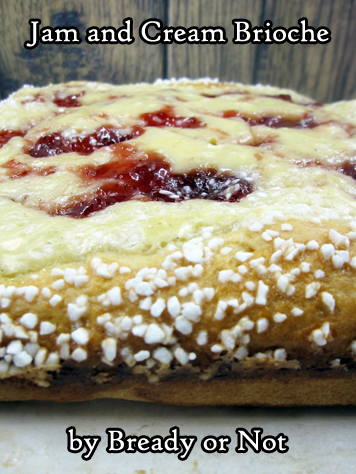
First of all, the end result is gorgeous. Golden, thick crust freckled by pearl sugar. Marbled cream cheese and contrasting jam, with flecks of vanilla bean throughout.
The tart is as delicious as it looks, too. The enriched dough is sweet and soft, providing a luscious base for the different kind of sweet-and-soft offered by the filling.
This is a showstopper of a dessert or breakfast.
The only unusual ingredient involved is the Swedish pearl sugar. I bought it on Amazon. I consider it a worthwhile investment, as there are a number of other pastry recipes I want to try that also use it. Plus, heck, you could even throw them on waffles or fruit or whatever.
Another not-quite-so-obscure ingredients I suggest you use is vanilla bean paste. This is VERY useful if you’re making fancy desserts because you get the flecks of vanilla beans without the high cost of using actual vanilla beans.
In a cream cheese filling or frosting, those flecks really stand out, and they add a lot to the WOW factor. Which this tart already has, many times over.
Recipe modified from Bake from Scratch, Sep/Oct 2019.
Bready or Not: Jam and Cream Brioche Tart
Equipment
- 9x9-inch pan
- parchment paper
Ingredients
For Brioche
- 1/3 cup plus 1 tablespoon whole milk or half & half
- 2 3/4 cups all-purpose flour
- 3 Tablespoons white sugar
- 2 1/4 teaspoons instant yeast
- 1 1/2 teaspoons kosher salt
- 3 large eggs room temperature and divided
- 1 teaspoon vanilla extract
- 6 tablespoons unsalted butter softened
For Cream Cheese Filling
- 2 tablespoons unsalted butter softened
- 1/3 cup white sugar
- 1 teaspoon vanilla bean paste or substitute vanilla extract
- 1/4 teaspoon kosher salt
- 8 ounces cream cheese softened
- 1 large egg room temperature
- 3 Tablespoons all-purpose flour
To Finish
- 2 Tablespoons fruit preserves use good quality stuff with nice chunks
- 1 Tablespoon water
- 1 1/2 Tablespoons Swedish pearl sugar
Instructions
- Using the microwave and a safe dish, heat the milk to between 120 and 130 degrees. Set aside.
- In the bowl of a stand mixer with a paddle attachment, beat the flour, white sugar, yeast, and salt at very low speed until combined, about 30 seconds.
- Slowly add the warm milk to incorporate. Add 2 of the eggs along with the vanilla, and beat for about 1 minute. Switch to the dough hook attachment. Beat at low speed until smooth and elastic, about 8 minutes.
- Add butter, about 1 tablespoon at a time, letting each piece incorporate before adding the next, about 8 minutes total. (If it refuses to incorporate, switch back to the paddle for this stage.) Beat until a smooth and elastic dough forms, about 6 minutes.
- Lightly flour a stretch of counter or tabletop and dump the dough there. Knead it for a minute or so and form it into a smooth round.
- Apply cooking spray inside a large bowl. Place the dough inside and give it a spray, too, to prevent sticking. Cover with a towel or plastic wrap in a warm spot to rise until doubled, 30 to 45 minutes.
- Cut parchment paper to line pan going up all four sides. Apply nonstick spray to pan, then lay both strips inside the pan and spray the top-most sides.
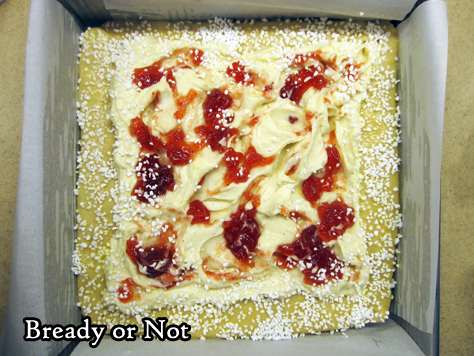
- On a lightly floured surface, roll the dough into an 11-inch square. Score a 9-inch square in center of dough (using the pan as a reference, if needed). Fold outside 2 inches over score mark, creating a crust around edges.
- Place dough in the prepared pan, making sure it is even and fills corners of pan. Cover and let rise until puffed, 20 to 30 minutes.
- Meanwhile, prepare the cream cheese filling. Beat together the butter, sugar, vanilla bean paste (or extract), and salt until well combined. Gradually add cream cheese, beating until smooth. Add egg to incorporate, followed by the flour.
- Preheat oven to 325-degrees. Using your fingertips to dimple the center of dough back down, leaving outside crust as is. Pour the cream cheese mix into the center of dough. Make small indentations in the cream cheese then add dollops of the preserves. Use a knife to swirl the fruit in a bit more.
- In a small bowl, whisk together the 1 tablespoon water and remaining egg. Brush the crust with the egg wash, then finish by sprinkling the pearl sugar all over the edge.
- Bake until the crust is golden brown with the filling set around outside edges, about 35 to 40 minutes. (If desired, check the temp: an instant-read thermometer inserted in center of filling should register 175°F.)
- Let cool in pan for 10 minutes then use the parchment sling to lift up the tart onto a serving plate or rack. Eat fresh, or let cool.
- Tart keeps for days well-wrapped in fridge. Eat slices cold, or make pieces even more delicious with a short zap in the microwave.
OM NOM NOM!
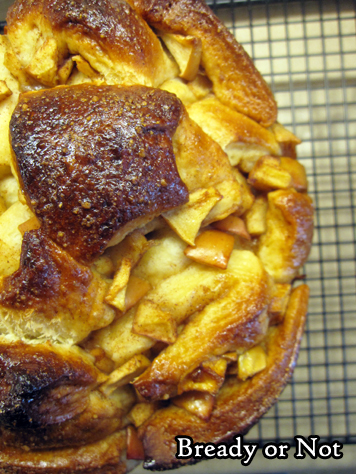
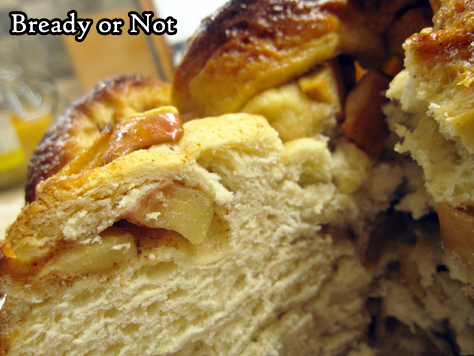
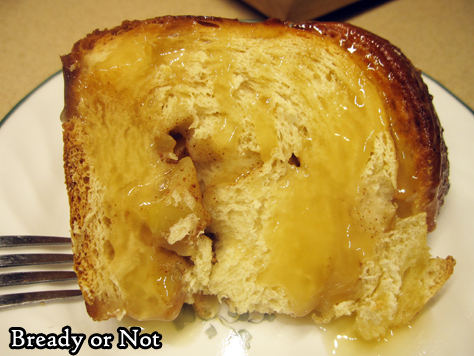
Bready or Not: Harvest Apple Challah
Welcome autumn with this big beautiful Harvest Apple Challah, packed with fruit and spice.
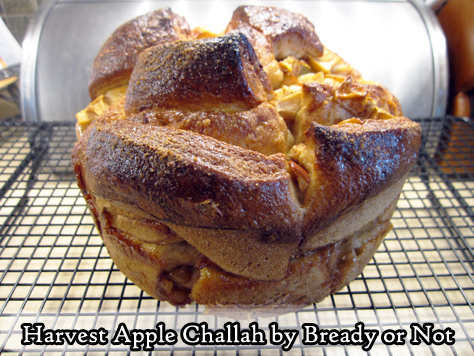
This recipe might look intimidating, but let me assure you, it’s not. The cutting stage is supposed to be messy.
Take comfort that this is not a loaf that is supposed to look tidy. The end goal is rustic–and delicious.
Challah is an enriched dough. Eggs and honey add extra richness plus soft texture.
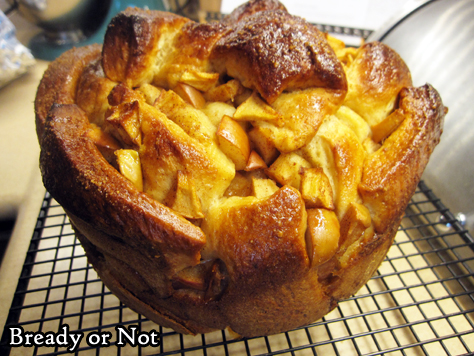
The final result is best served warm with an additional dollop or drizzle of honey. Use the good stuff here! I found that using the toaster oven for 5 to 7 minutes was about perfect for thick slices of bread.
I also found that this bread was great to freeze in slices. Pull out frozen pieces to thaw overnight, and breakfast is quick, convenient, and delicious the next morning!
Modified from a recipe at King Arthur Flour.
Bready or Not: Harvest Apple Challah
Equipment
- deep 9-inch round cake pan or casserole dish
- bench knife
- kitchen thermometer
Ingredients
Dough
- 1/2 cup lukewarm water
- 6 Tablespoons vegetable oil
- 1/4 cup honey
- 2 large eggs room temperature
- 4 cups all-purpose flour
- 1 1/2 teaspoons salt
- 1 Tablespoon instant yeast or active yeast
Filling
- 2 medium apples
- 1/2 teaspoon cinnamon
- 1/4 cup white sugar
Topping
- 1 large egg
- coarse sugar optional
- honey for serving optional
Instructions
Make the dough
- Mix together the dough ingredients by hand or using a mixer with dough hook, until well-incorporated and not stiff. Place dough in a greased bowl to let rise about 2 hours, or until puffy; if poked with a finger, the dent in the dough should remain and not bounce back.
- Prepare a deep round cake pan or casserole dish (at least 4 inches) by greasing thoroughly.
- Also lightly grease a large stretch of counter top or table. Gently deflate dough and transfer to the surface, and flatten dough to an 8x10-inch rectangle.
Prepare the filling
- Core the apples but leave on the peels. Chop apples into chunks about 1/2 to 3/4-inch in size. Should equal about 3 cups total. Toss pieces in cinnamon and sugar.
Assemble the bread
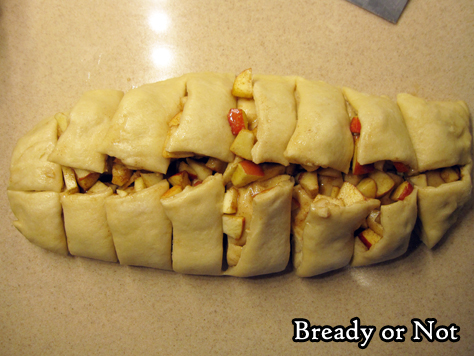
- Spread half the apples in the center of the dough. Fold one short edge over the apples to cover them, and press down the edge to seal them inside.
- Place the remaining apples on top of the existing apple-dough mound. Cover these apples with the other flap of dough, patting again to seal. It's okay if it is bulging and messy!
- Use a bench knife or paring knife to cut the dough down the middle, long-ways. Then cut again along the long side, edge to edge, to create a series of broad, messy stacks of dough with apples overflowing onto the surface.
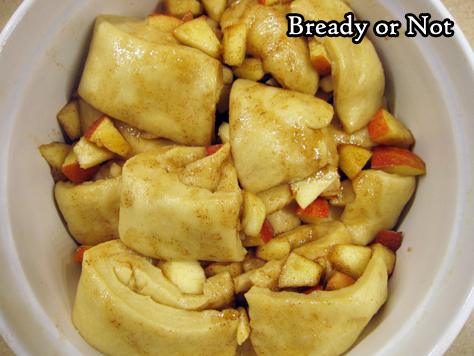
- Start transferring pieces of dough and scattered apples into the prepared pan, forming a bottom layer, then keep stacking more dough and fruit on top until everything is in the pan.
- Cover loosely with plastic wrap, and let rise for another hour, until it is puffed again.
- Preheat oven at 325-degrees, with a rack in the lower third of the oven.
- Uncover the dough. Brush the top with an egg beaten with a tablespoon of water. If desired, sprinkle coarse sugar all over the top.
- Bake for 55 to 65 minutes, until the top is deep brown. As the dough is so thick, if a kitchen thermometer is available, use it to test the middle; bread should be at least 190-degrees.
- Set pan of bread on a rack to cool for 10 minutes. Carefully remove bread from pan.
- Serve challah warm, ideally with extra honey drizzled on top. Store covered at room temperature up to 4 days. Bread can also be sliced and frozen.
OM NOM NOM!
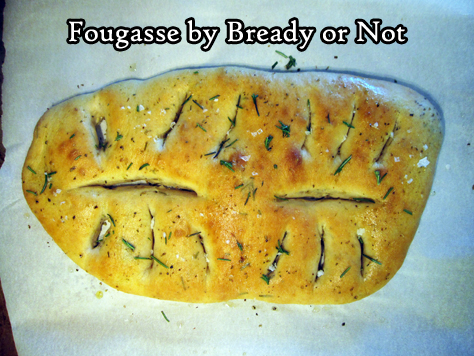
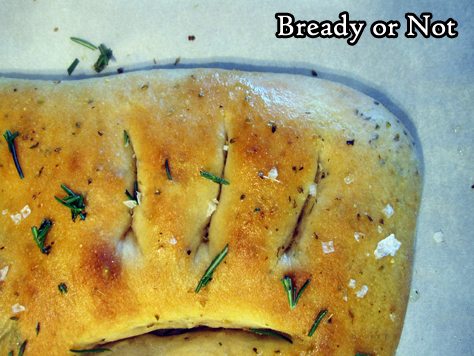
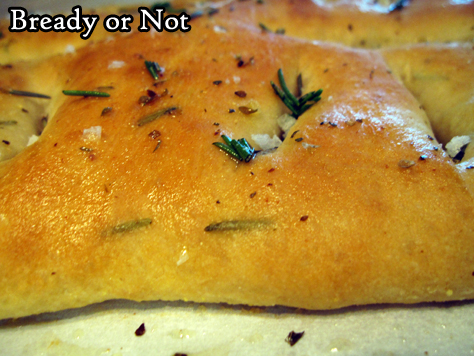
Bready or Not: Fougasse
Bready or Not goes full-on bready with this week’s feature: Fougasse, a French style of bread fragrant with herbs and formed into two leaf-shaped loaves.
I first encountered this bread on the Great British Bake Off, where it was presented as a technical challenge with minimal instructions. (I highly recommend watching season 4 episode 6 prior to baking, if you can, as it provides great tips and visuals of the bread).
I found this bread dough surprisingly easy to work with. I opted to make it in my Kitchen Aid, which is in line with the original recipe, but it could certainly be mixed in a bread machine or by hand.
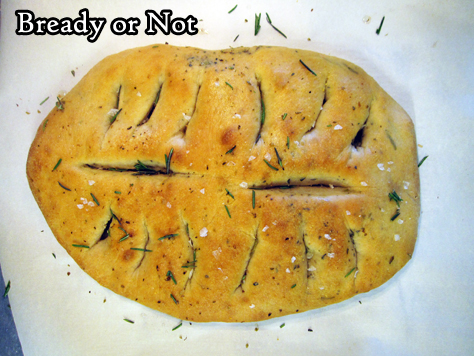
The end result reminded me of focaccia with the herby, salty flavor, but I found the leaf shape of the fougasse to be incredibly fun. It really makes for a great presentation.
To use Bake Off terminology, this bread is a technical challenge that also works as a showstopper.
Modified from Paul Hollywood’s recipe as published on the BBC’s site.
Bready or Not: Fougasse
Equipment
- 2 large baking sheets
- parchment paper
- pizza cutter
- pastry brush
Ingredients
- 2 Tablespoons olive oil plus more for greasing and drizzling
- 500 grams bread flour plus more for dusting (1 lb, 2 ounces)
- 10 grams fine sea salt (1/4 teaspoon)
- 7 grams instant yeast (2 1/4 teaspoon)
- 350 ml warm water (12 ounces)
- 4 teaspoons chopped rosemary plus more to finish
- 2 teaspoons dried Italian seasoning
- fine cornmeal for dusting, or substitute semolina flour
- 1/2 teaspoon dried oregano
- sea salt flakes to finish
Instructions
- Grease a large container with some olive oil. Line two large baking sheets with parchment paper.
- In a mixer with a dough hook (or with a dough whisk and arm muscle), combine the bread flour and sea salt. Add yeast, followed by the measured olive oil and most of the warm water. Mix on low speed. As the dough comes together, slowly add the rest of the water. Continue to mix on medium speed for about 7 or 8 minutes. Add the herbs and make sure they are evenly distributed. Dough should be quite elastic and easy to work with.
- Dump the dough into the oiled container. Cover with plastic wrap and let rise until at least doubled, about an hour. Dough should be bouncy and shiny.
- Dust a work surface with extra flour and cornmeal (or semolina). Tip the dough onto the surface. It should be loose and flowing. Divide dough in half.
- Place each piece of dough on the prepared parchment. Spread into a flat oval, then use a pizza cutter to slice twice down the middle (to make a stem) with six cuts on the side of each leaf (see photograph for example). Gently stretch out the dough to emphasize the holes.
- Cover both loaves with plastic wrap and allow to set for 20 minutes as the oven preheats to 430-degrees.
- Brush or spray additional olive oil atop each leaf, then sprinkle on the dried oregano.
- Bake for about 7 minutes, then switch positions of bread on the oven racks. Continue baking another 8 minutes or so (15 to 20 minutes total) until each fougasse is golden and sounds hollow when tapped on the bottom. Remove from oven. Immediately brush more olive oil on top, followed by a sprinkling of sea salt.
- Bread is delicious fresh or at room temperature. Loaves can be well-wrapped and frozen for later enjoyment.
OM NOM NOM!
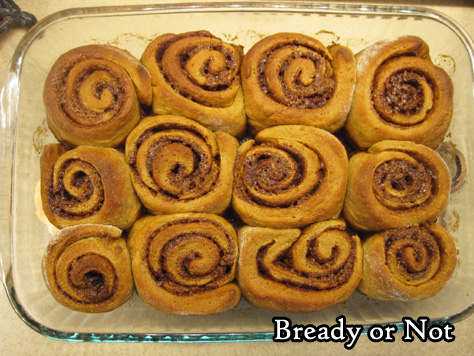
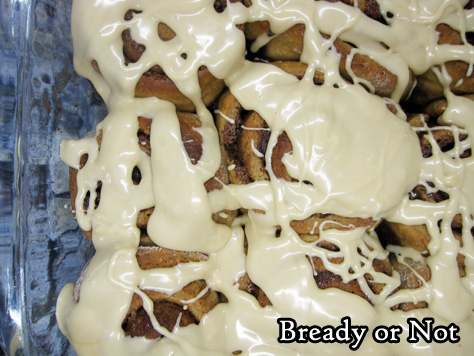
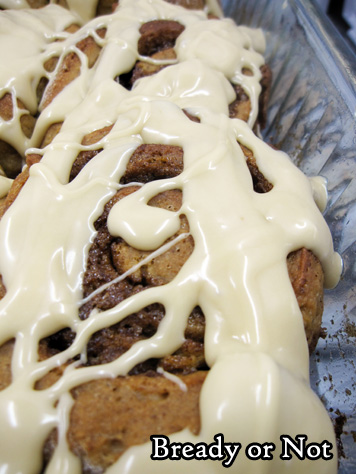
Bready or Not Original: Glazed Gingerbread Rolls
Imagine cinnamon rolls that taste like gingerbread, and you have these incredible Gingerbread Rolls.
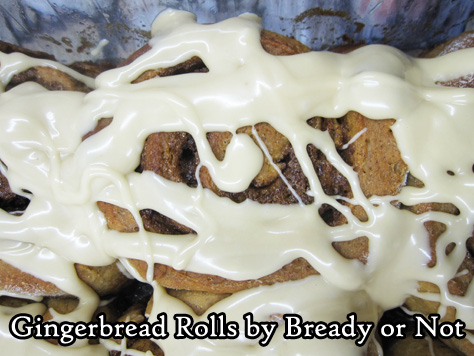
These things are a TREAT. Make them for a special holiday breakfast or brunch, or make them just because.
I had to make this twice to get it right. I followed another recipe closely at first and did a cream cheese frosting, which was delicious, but required the rolls be refrigerated, which made them end up pretty stiff before being eaten the next day.
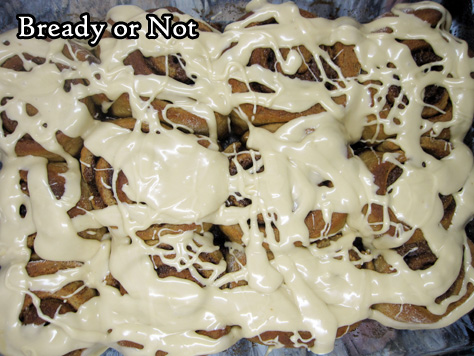
So, take two. This time, I made up my own glaze, and that worked beautifully. The rolls could stay at room temperature, and stay nice and pliable.
One of my husband’s co-workers described these rolls as “not as soft as Cinnabon, but better flavor.” By golly, I’ll take that, especially since the rolls had been made the day before.
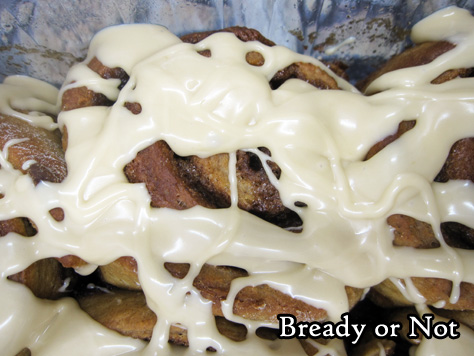
These rolls are as delicious as they look… and they look pretty good, don’t they?

Bready or Not Original: Glazed Gingerbread Rolls
Ingredients
Dough:
- 1/4 cup white sugar
- 1 teaspoon ground cinnamon
- 3/4 teaspoon ground ginger
- 1/2 teaspoon kosher salt
- 3 1/2 cups all-purpose flour divided
- 1 Tablespoon dry active yeast
- 1 cup whole milk or substitute 3/4 cup half & half and 1/4 cup water
- 2 Tablespoons unsalted butter room temperature
- 1 large egg
- 2 Tablespoons molasses
Filling:
- 1/2 cup brown sugar packed
- 6 Tablespoons unsalted butter room temperature
- 1 Tablespoon ground cinnamon
- 1 1/2 teaspoons ground ginger
- 1/4 teaspoon ground cloves
- all-purpose flour to dust work surface
Glaze:
- 2 1/2 cups confectioners' sugar
- 1 teaspoon molasses
- 1 teaspoon vanilla extract
- 1 Tablespoon milk or half & half, use more as needed
Instructions
Make the dough:
- In a large bowl (such as a Kitchen Aid bowl), combine sugar, ground cinnamon, ginger, salt, and 1 3/4 cups of flour. Stir in yeast.
- In a small saucepan, warm milk and butter. Cook until butter is melted and the milk/butter is between 105 and 110-degrees.
- Pour the milk mixture into the flour mixture. Stir. Add the egg and molasses, and stir well.
- Use a dough hook on a stand mixer or arm power to beat the dough. Gradually add the remaining 1 3/4 cups flour, kneading until the dough is smooth and pliable. Using a dough hook, this will be 4 to 5 minutes.
- Transfer dough to a lightly buttered or greased bowl and cover with plastic wrap or a towel. Let rise until doubled in size, about 1 hour.
Make the filling and assemble rolls:
- After the dough has risen, butter or grease a 9x13 OR 8x8 OR 9x9 casserole dish.
- In a small bowl, combine the filling ingredients: brown sugar, butter, cinnamon, ginger, and cloves.
- Prepare a clean stretch of counter or table with a dusting of flour. Roll out the dough to about a 12x16 rectangle. Spread the filling all over, but not quite to the edges. Starting with the long side, roll into a log.
- If using a 9x13 pan, cut the rolls into 12 equal rounds; if using a smaller pan, cut into 9. A piece of unwaxed dental floss makes this easy; wrap around dough log, then pull two ends of floss opposite directions to slice through.
- Once the pan is full of rolls, cover with plastic wrap or a towel and let rise again until doubled, about an hour.
- Preheat oven at 375-degrees. Once it comes to temperature, place rolls inside. Bake for about 12 minutes then cover with foil to reduce browning, then bake about 8 to 12 minutes. Let cool a bit.
Glazing:
- Combine the glaze ingredients to each a thick yet loose texture. Add more milk or confectioners' sugar, as needed, to reach a good consistency. Spoon and spread over the rolls.
- Eat immediately, or cover with foil and keep at room temperature. Enjoy right from the pan or warmed slightly in the microwave. Best within a day or two.
OM NOM NOM!
Follow me


