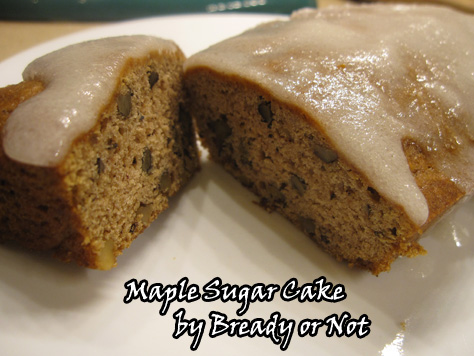
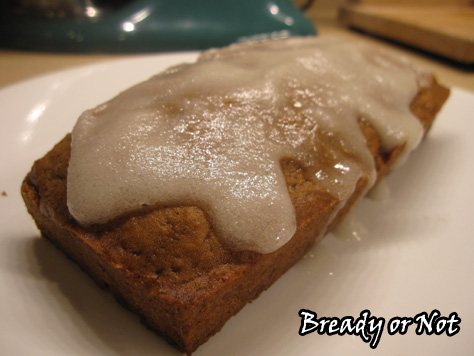
Bready or Not: Maple Sugar Cake: A Clockwork Dagger recipe
Maple is one of my favorite flavors. It’s also a flavor that is often mentioned in my Clockwork Dagger books, especially in connection with the northern kingdom of Frengia.
My new Clockwork Dagger novella “Wings of Sorrow and Bone” follows an important minor character from Clockwork Crown: Rivka. Her mother was Frengian and a baker, and teenaged Rivka is also a baker when you meet her in the book.
“Wings of Sorrow and Bone” begins soon after the events in Clockwork Crown. Rivka now lives in Tamarania City with her grandmother. Instead of running a bakery, she is pursuing her dream of becoming a master mechanist… but maple-flavored goods are still a major subject of nostalgia. They make her think of her old home, and her mama.
I looked around online for recipes that I thought would suit the more rustic world of my books. I found a maple sugar cake recipe
at The Kitchy Kitchen and decided to make some adaptions. I wanted something that would work for gift-sized loaf cakes.
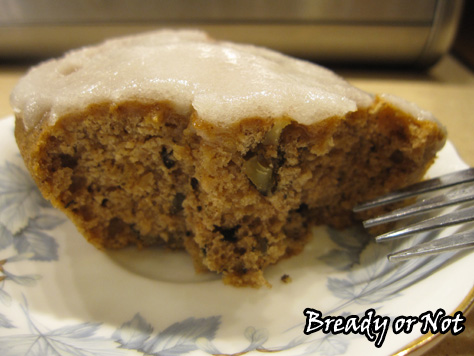
Maple sugar is the one extravagant ingredient, but it can now be bought for a decent price on Amazon.com–heck, you can even subscribe and get it cheaper! A little maple sugar goes a long way, too. It’s potent stuff.
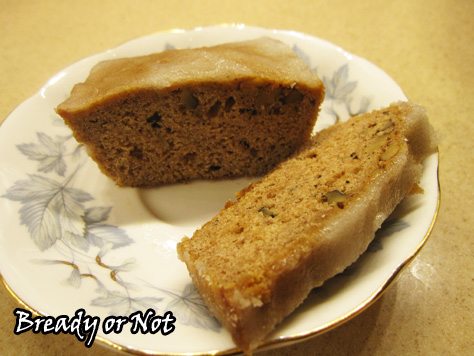
The resulting cake is perfect for breakfast or a snack. You can sweeten it up to your preference. Make glaze with the recipe below, or eat it plain. Plus, it freezes and keeps for months! I used it as a handy breakfast loaf to thaw out for company.
This maple loaf cake has a role in the novella, too. Maybe you can go all meta and eat some cake as you read about the cake!
Bready or Not: Maple Sugar Cake: A Clockwork Dagger recipe
Ingredients
For the loaf cake:
- 1/4 cup unsalted butter half stick, softened
- 1 1/2 cups maple sugar
- 2 eggs beaten
- 1/2 teaspoon salt
- 1 teaspoon baking soda
- 1 teaspoon cinnamon heaping
- 1/2 teaspoon nutmeg
- 2 1/2 cups all-purpose flour sifted
- 1 1/2 cups unsweetened applesauce
- 1 cup pecans or walnuts, chopped
Glaze for ONE small loaf:
- 1 cup confectioners' sugar or powdered xylitol, sifted
- 1 1/2 Tablespoons milk or almond milk or other substitute, more as needed
- 1/2 teaspoon maple flavor or vanilla extract
Instructions
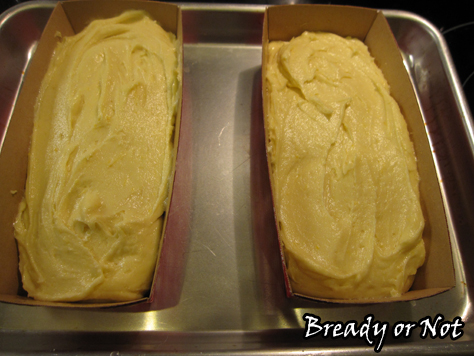
- Preheat oven to 350-degrees. Prepare mini loaf pans (tin, stoneware, paper) by applying nonstick spray.
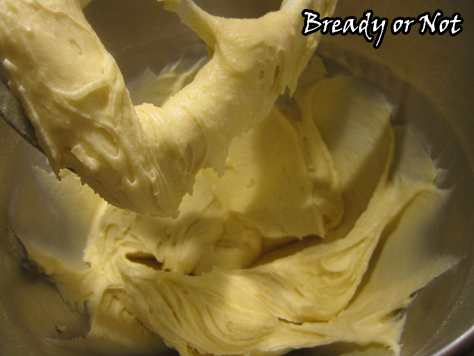
- In a large bowl, cream the butter and gradually add the maple sugar. Beat until creamy; with a mixer, this takes about a minute. Add the beaten eggs and combine.
- In a separate bowl, sift together the salt, baking soda, spices, and flour. Alternately add applesauce and dry ingredients to butter mixture. Once they are blended, fold the nuts into the batter. Distribute the batter among the pans; they should be about half full.
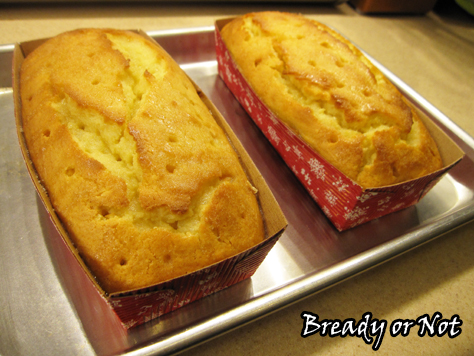
- Bake for 25 to 30 minute, until a tester comes out clean. Let cakes cool completely. If they are in a tin or stoneware pan, remove them from the dish.
- At this point, you can freeze the loaves wrapped in wax paper and plastic wrap or in a gallon bag.
- If you want to eat them now, store at room temperature or in fridge. Serve with glaze (see recipe above) or topped with powdered sugar or even a small amount of maple syrup... or plain! Eat cold or warmed in microwave.
- A loaf keeps for days if wrapped in the fridge. In the freezer, keeps for upward of six months.
- OM NOM NOM!

Read More
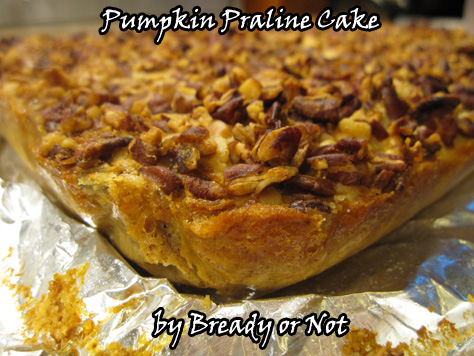
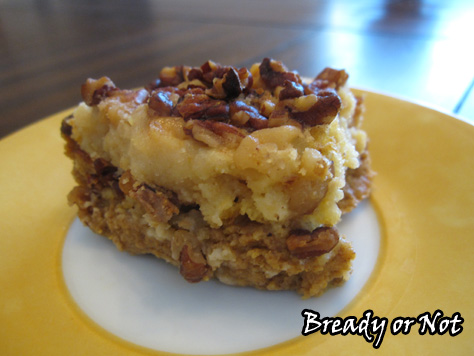
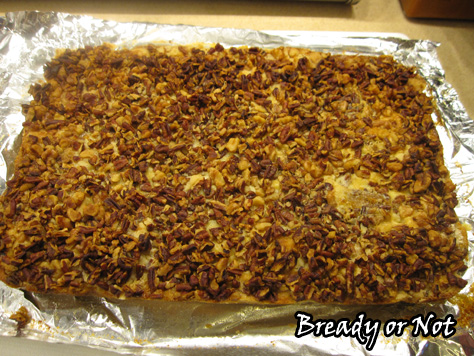
Bready or Not: Pumpkin Praline Cake
If you love quick and easy dump cakes, let me introduce you to one that is full of pumpkin goodness.
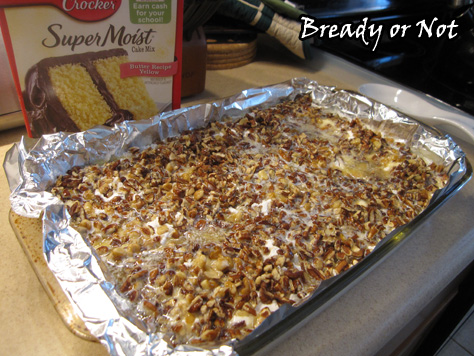
Last year I went through a stack of old issues of Betty Crocker magazine. I sliced out recipes that looked promising. This was one of them.
I was amazed at how easy this recipe was. It literally came together in the time it took for the oven to preheat. The flavors and texture are amazing: you have a cakey base topped with spicy pumpkin custard, with a nutty-crunchy layer atop.
Plus, you can cover it with plastic wrap and keep it in the fridge for days! It tastes even better after a day or two. The spices meld with everything.
My husband took this cake to work. He returned with an empty dish. The guys raved about it.

If you like pumpkin, if you like cake, this is the way to start your fall off right.
Bready or Not: Pumpkin Praline Cake
Ingredients
- 15 oz pumpkin puree
- 12 oz evaporated milk
- 3 eggs room temperature
- 1 cup white sugar
- 4 teaspoons pumpkin pie spice heaping
- 1 box yellow cake mix
- 1 1/2 cups pecans or walnuts, chopped
- 3/4 cup unsalted butter or margarine, melted
Instructions
- Preheat oven to 350-degrees. Prepare a 13x9-inch pan by lining with foil or parchment and then greasing it well with Pam or butter.
- In a large bowl, beat together the pumpkin puree, evaporated milk, eggs, sugar, and pumpkin pie spice. It should be smooth. Pour it into the pan.
- Sprinkle the dry cake mix over the pumpkin goop. Sprinkle the nuts all over the top. Pour the melted butter evenly over everything.
- Bake for 50 to 60 minutes, until a knife in the center comes out clean. Let cool to room temperature, then cover and refrigerate. Cut and serve from the pan; warm slices in the microwave, if desired, or eat cold.
- OM NOM NOM!
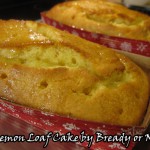
Bready or Not: Lemon Loaf Cake
Let’s finish up CAKE MONTH with something that’s bright, fresh, and perfect for summer!
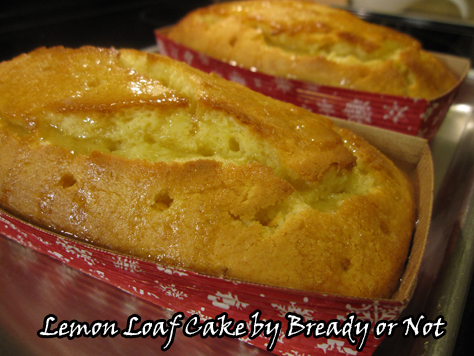
I modified this King Arthur Flour lemon cake and made it in two gift-size pans, as one was indeed given as a gift to dear family friends who came for a visit. My husband pretty well inhaled the loaf that we kept.
Like last week’s chocolate cream cheese cake, this is the kind of cake that isn’t heavy duty on sweet. It’s really perfect for breakfast, brunch, or dessert. Eat it by itself or pair a slice with fruit, ice cream, or whatever else sounds good.
I made this using sour cream, though the original recipe suggested yogurt or buttermilk. I bet this would be amazing with lemon yogurt. MORE LEMONY GOODNESS!
Modified from King Arthur Flour’s Lemon Bread.
Bready or Not: Lemon Loaf Cake
Ingredients
Cake
- 6 tablespoons unsalted butter
- 1 cup white sugar
- 2 large eggs room temperature
- 2 lemons zested and juiced
- 1/4 cup lemon juice
- 3/4 cup sour cream or yogurt or buttermilk
- 1/2 teaspoon lemon extract
- 2 cups all-purpose flour
- 1 teaspoon baking powder
- 1/2 teaspoon salt
Glaze
- 1/4 cup lemon juice
- 1/2 cup white sugar
Instructions
- For the cake: Preheat the oven at 350-degrees. Cream together the butter and sugar till thoroughly combined, followed by the eggs.
- In a small bowl, mix the sour cream, yogurt or buttermilk with the lemon juice, lemon extract, and zest, and set aside.
- In a third bowl, prepare the flour, baking powder, and salt.
- Slowly add the second and third bowls into the butter mixture until everything is together.
- Prepare your pan(s) by applying nonstick spray. Spoon the batter inside. If using a standard bread pan, bake for about 50 minutes; if using two 7x2 paper pans, bake for 30-35 minutes. If using in smaller bread pans, adjust time accordingly. Use the toothpick test to check for doneness.
- Remove the cake from the oven, and deeply poke it all over with a chop stick or fork.
- For the glaze: Right before the cake is done, whisk together the glaze ingredients and stir until the sugar is dissolved. While the cake is hot, slowly drizzle the glaze over it, stopping often to let it to soak in.
- If you're using regular bread pan(s), let the cake cool in the pan another 15 minutes and then remove the loaf to let it cool completely.
- Let cake cool completely before slicing. Wrap it with plastic wrap and store in the fridge or at room temperature. Will keep for at least 3 days.
- OM NOM NOM!

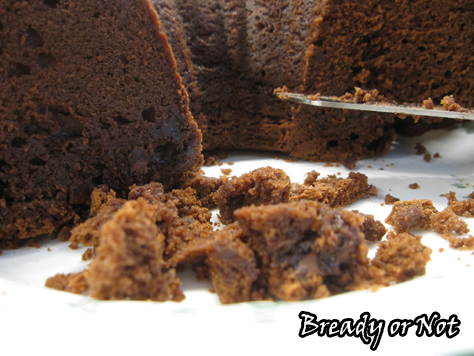
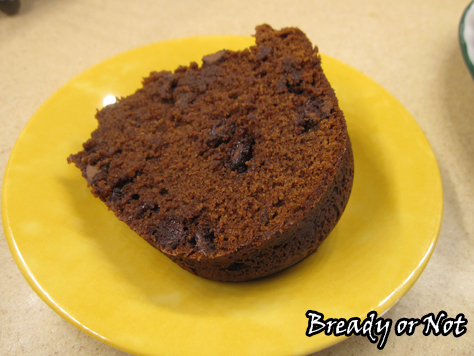
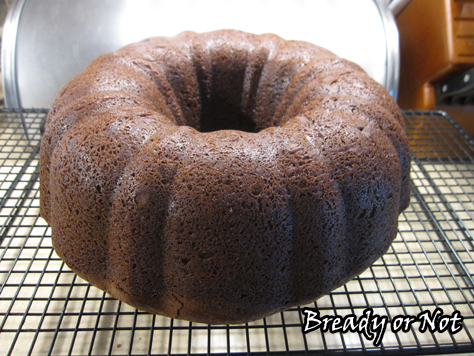
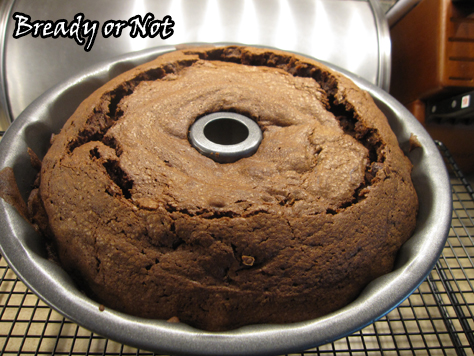
Bready or Not: Chocolate Cream Cheese Pound Cake
CAKE MONTH continues as I celebrate the release of The Clockwork Crown!
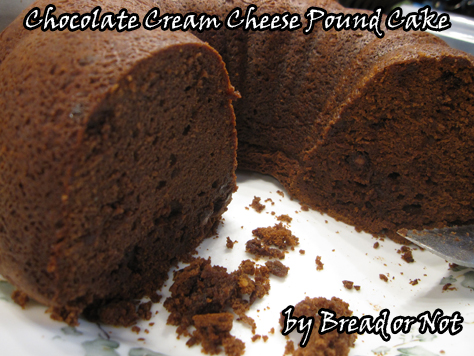
Today’s offering is Chocolate Cream Cheese Pound Cake. It’s everything you would expect a typical loaf pound cake to be: soft, tender, and delicious.
It manages to be rich and chocolatey without being tooth-achingly sweet (like, ahem, the Tunnel of Fudge cake recently posted).
This is the kind of cake that would be lovely for breakfast or brunch with fruit, or dessertified with a few scoops of ice cream and a drizzle of caramel.
When I baked this, I followed the original directions too closely and overbaked the cake slightly. The top (which is the bottom once it’s flipped over) became kinda crunchy, though still delicious. Therefore, I recommend that you start checking this at the hour point. If it starts developing deep cracks and is firm to the touch, it’s likely done.
The cake keeps fantastically for many days if it’s wrapped and kept in the fridge. I imagine it would also work well sliced and frozen, too.
Modified from Bake or Break.
Bready or Not: Chocolate Cream Cheese Pound Cake
Ingredients
- 1 cup unsalted butter 2 sticks, softened
- 8 ounces cream cheese 1 box, softened
- 3 cups white sugar
- 6 large eggs room temperature
- 1 teaspoon vanilla extract
- 2 1/4 cups cake flour
- 1 teaspoon baking powder
- 3/4 cup unsweetened cocoa powder sifted
- 1 cup chocolate chips
Instructions
- Preheat oven to 325-degrees. Grease or spray a 10-inch Bundt pan.
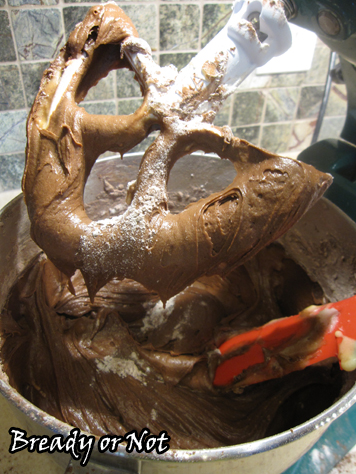
- Beat butter, cream cheese, and sugar until creamy. Add eggs, one at a time, beating well after each, followed by vanilla extract.
- In a separate bowl, combine the flour, baking powder, and cocoa. Slowly incorporate the dry ingredients with the butter mixture and beat well for about 2 minutes.
- Pour batter into prepared Bundt pan. Bake for 1 hour and test with a toothpick; the top will start to crack and will quickly get crispy when it's done.
- Cake keeps upward of a week if kept wrapped in the fridge.
- OM NOM NOM!
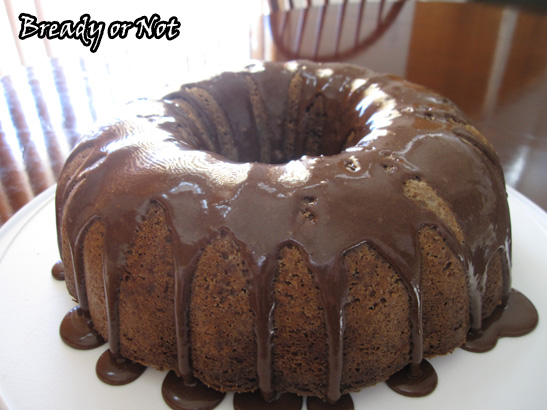
Bready or Not: Tunnel of Fudge Cake (redux)
The Clockwork Crown is out! YAAAAAY! Now here’s the cake to celebrate. THE cake. The infamous Tunnel of Fudge Cake.
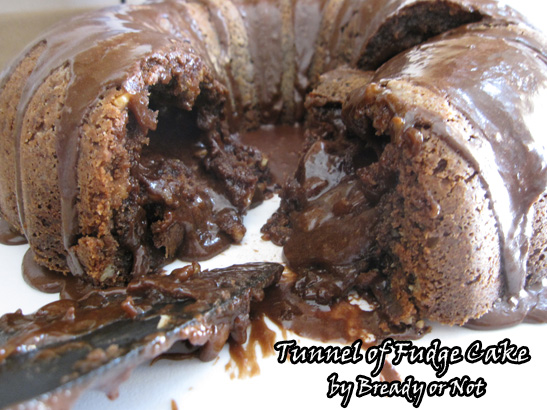
I originally posted this back in May 2012. I figured that for this splendiferous occasion, it deserved a repost. This is one of the most amazing cakes I have ever encountered. I mean, LOOK AT IT.
You just gained five pounds by looking at that picture. I’m sorry.
To quote my original post:
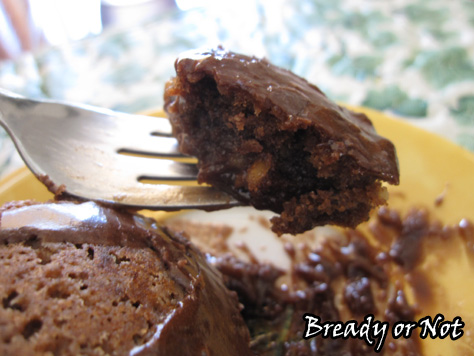
As you can see, it’s a bundt cake. It cooks up and creates its own middle layer of fudge inside. When the cake is fresh, it oozes out in an amazing way. After it has been in the fridge, honestly, it tastes even better. The middle solidifies so it’s like there are two layers of fudgy frosting, one on the inside and one on the outside. You also have this whole mingling of textures thing going on: cakey chocolate, fudgy chocolate, chocolate glaze, walnuts, chocolate, chocolate, chhhhhhocolate.
If you don’t like nuts or have allergies–sorry, this cake really does need them. I think they provide some scaffolding for the massive quantities of chocolate.
I can add some experience from making this a few times, too. The leftovers are easy to handle. Line a small pan with wax paper. Slice the cake however you want and place the pieces on the pan. Freeze them. Bag them. When you want to serve a slice, remove from freezer and zap it in the microwave until it’s as thawed or hot as you want.
Recipe is adapted from Relish Magazine, and originally in Bundt Cake Bliss by Susanna Short.
Bready or Not: Tunnel of Fudge Cake
Ingredients
Cake:
- 2 1/4 cups all-purpose flour
- 3/4 cup cocoa powder sifted
- 1 3/4 cups white sugar
- 1 3/4 cups unsalted butter room temperature
- 6 eggs room temperature
- 2 cups confectioners' sugar sifted
- 2 cups walnuts or pecans, chopped
Glaze:
- 3/4 cup confectioners' sugar sifted
- 1/4 cup cocoa powder sifted
- 2 - 3 tablespoons milk or half and half
Instructions
- Preheat oven to 350-degrees. Grease a 12-cup Bundt pan. One option is to melt 1tablespoon butter, mix 1 tablespoon of cocoa powder into it, then brush the sides of the bundt pan. Or use nonstick spray or butter and sprinkle flour or cocoa powder into the pan.
- In a small mixing bowl, combine flour and cocoa powder and set aside.
- In a large bowl, cream sugar and butter until light and fluffy. Add the eggs, one at a time, beating well after each addition. Gradually add confectioners' sugar and mix thoroughly. Stir in flour mixture by hand until well blended. Gently stir in nuts. Batter will be thick and rather mud-like. Spoon all of the batter into the prepared bundt pan.
- Bake 45 to 50 minutes or until the top is set and the edges begin to pull away from sides of pan. Do NOT use the toothpick test. You don't want the center to solidify with this cake.
- Cool cake upright in the pan on a wire rack for 1 1/2 hours to allow fudge to set. Invert onto a plate to cool thoroughly. Make sure the cake is completely cool before you add the glaze.
- To prepare glaze, combine sifted confectioners' sugar and cocoa. Add 2 tablespoons milk. Mix thoroughly, and add more milk if needed to create a smooth but pourable glaze. Spoon glaze over top of cake, allowing some to run down sides.
- This can be eaten fresh but is even better after being in the fridge overnight. The chocolate flavor deepens. It can also be frozen in slices and thawed/warmed in microwave.
- OM NOM NOM and take an insulin injection.
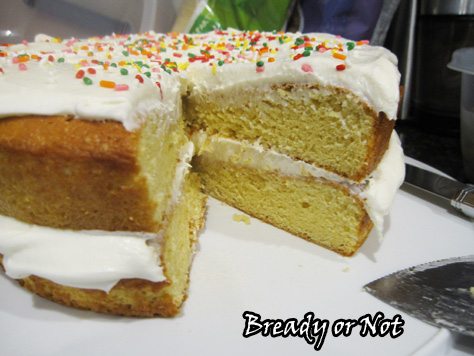
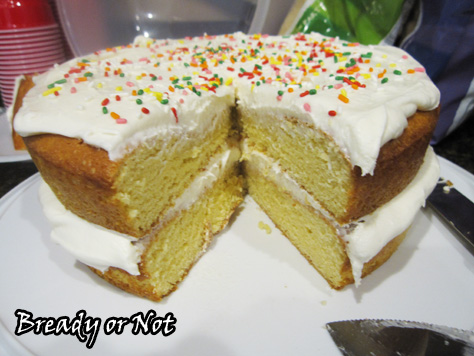
Bready or Not: Twinkie Cake
The Clockwork Crown is out next week, and that means this is CAKE MONTH on Bready or Not! We start that off with a glorious layer cake that tastes like a fresh version of a Twinkie.
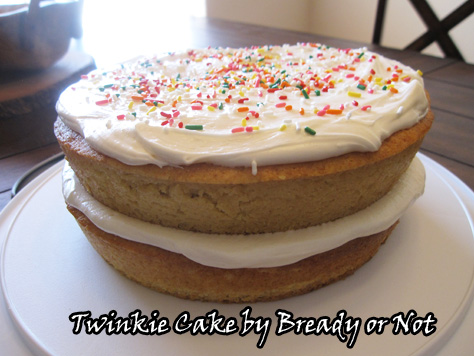
Seriously, that’s what this is. A totally fresh, melt-in-your-mouth version of a Twinkie.
I wanted to make this from scratch because I believe in making my life extra difficult. I found this awesome yellow cake recipe at Mel’s Kitchen. I used the dry ingredients to form my base of the Twinkie Cake.
The good news is that you can make this using a store-bought mix–heck, you could even do it gluten-free!
The marshmallow frosting here is amazing. It’s not overly sweet but it does pack a sugar wallop. Eat a few slices of this and you might have trouble sleeping tonight.
Varied reactions to this cake: “It’s… a Twinkie. That you made?” “Wow.” “You are trying to murder me with diabetes.” “Good grief.” “Don’t tell my doctor I’m eating this.”

One funny note, too. This was at room temperature for a few hours at a party. When it was down to about a quarter of the cake, the top layer kept sliding off. The frosting layers didn’t budge and the yellow cake didn’t even crumble. I kept going over to slide it back into place again because I’m OCD like that.
Finally, I told my husband we had to finish the cake because it didn’t look right.
The things I do.
Yellow cake mix modified from Mel’s Kitchen and Twinkie Cake modified from Confessions of a Cookbook Queen.
Bready or Not: Twinkie Cake
Ingredients
Homemade dry cake mix:
(Or disregard this section and use a boxed yellow cake mix)
- 2 cups white sugar
- 1 1/2 cups all-purpose flour
- 1 1/2 cups cake flour
- 1/2 cup nonfat dry milk powder
- 1 Tablespoon baking powder
- 1 teaspoon salt
Add to cake mix:
- 5.1 oz box instant vanilla pudding large box
- 2 teaspoons vanilla extract
- 1 cup water
- 1/2 cup salted butter 1 stick, melted and cooled slightly
- 4 large eggs lightly beaten
Filling/Frosting:
- 1/2 cup salted butter 1 stick, room temperature
- 1/4 cup heavy cream
- 1 teaspoon vanilla extract
- 7 oz marshmallow creme
- 3 1/2 cups confectioners' sugar sifted
- rainbow sprinkles if desired
Instructions
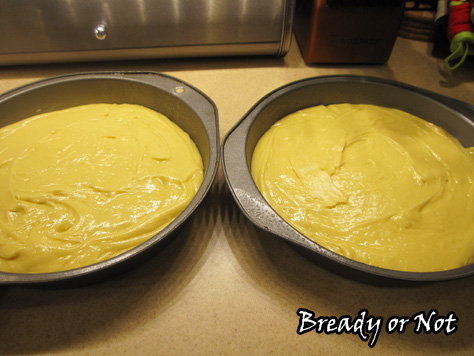
- Preheat oven to 350-degrees. Butter or add nonstick spray to 8 or 9 inch round cake pans, then cut out parchment rounds to place inside each pan, then butter or spray again.
- Combine the dry ingredients of the cake mix (this can be done a day or two ahead of time) or open up a box of yellow cake mix.
- In a large bowl, combine the eggs and butter. Slowly add the cake mix (homemade or store bought), pudding mix, vanilla extract, and water. Beat on medium for a minute or so, until it's smooth and thick.
- Spread batter in the prepared pans. Bake for 20 to 25 minutes, until top is spongy to the touch and/or it passes the toothpick test.
- Cool cakes in pans for a few minutes, then gently run a plastic knife around the edge. Turn cakes out onto wire racks, remove the parchment, and let them completely cool.
For frosting/filling:
- In a mixer, beat together the butter and vanilla extract. Add the jarred marshmallow crème and beat until smooth. Slowly add the powdered sugar and then pour in the heavy cream. Put the mixer on high and beat for a minute or two, until the frosting is light, smooth, and fluffy.
- To assemble the cake, dab some frosting on the cake plate and set the bottom cake layer on top. The frosting dabs will act like glue. Note that this cake doesn't have frosting on the sides. Place about half the marshmallow frosting on the cake layer and even it out. Place the second cake layer on top. Dollop on the rest of the frosting and swirl it to be all pretty. Add sprinkles on top. Store in fridge.
- OM NOM NOM!